Configure a Customer-Managed VPC on AWS
The Zilliz Cloud Bring-Your-Own-Cloud (BYOC) solution enables you to set up a project within your own Virtual Private Cloud (VPC). With a Zilliz Cloud project running in a customer-managed VPC, you gain greater control over your network configurations, allowing you to meet specific cloud security and governance standards required by your organization.
This page enumerates the minimum requirements for you to host a Zilliz Cloud BYOC project in a customer-managed VPC that meets these requirements.
Zilliz BYOC is currently available in General Availability. For access and implementation details, please contact Zilliz Cloud sales.
VPC requirements
Your VPC must meet the requirements enumerated in this section to host a Zilliz Cloud project. If you prefer to use an existing VPC for your BYOC project, ensure that your VPC meets these requirements.
Requirements
VPC regions
The following table lists the AWS cloud regions the Zilliz Cloud BYOC solution supports. If you cannot find your cloud regions on the Zilliz Cloud console, please contact us at support@zilliz.com.
AWS Region | Location |
|---|---|
us-west-2 | Oregon |
eu-central-1 | Frankfurt |
VPC IP address ranges
Zilliz Cloud recommends using the /16 netmask in IPv4 CIDR settings for the VPC, allowing a public subnet and three private subnets to be created from the CIDR block.
Zilliz Cloud currently supports only IPv4 CIDR blocks.
Subnets
A Zilliz Cloud project requires one public subnet and three private subnets, with each private subnet in a different availability zone.
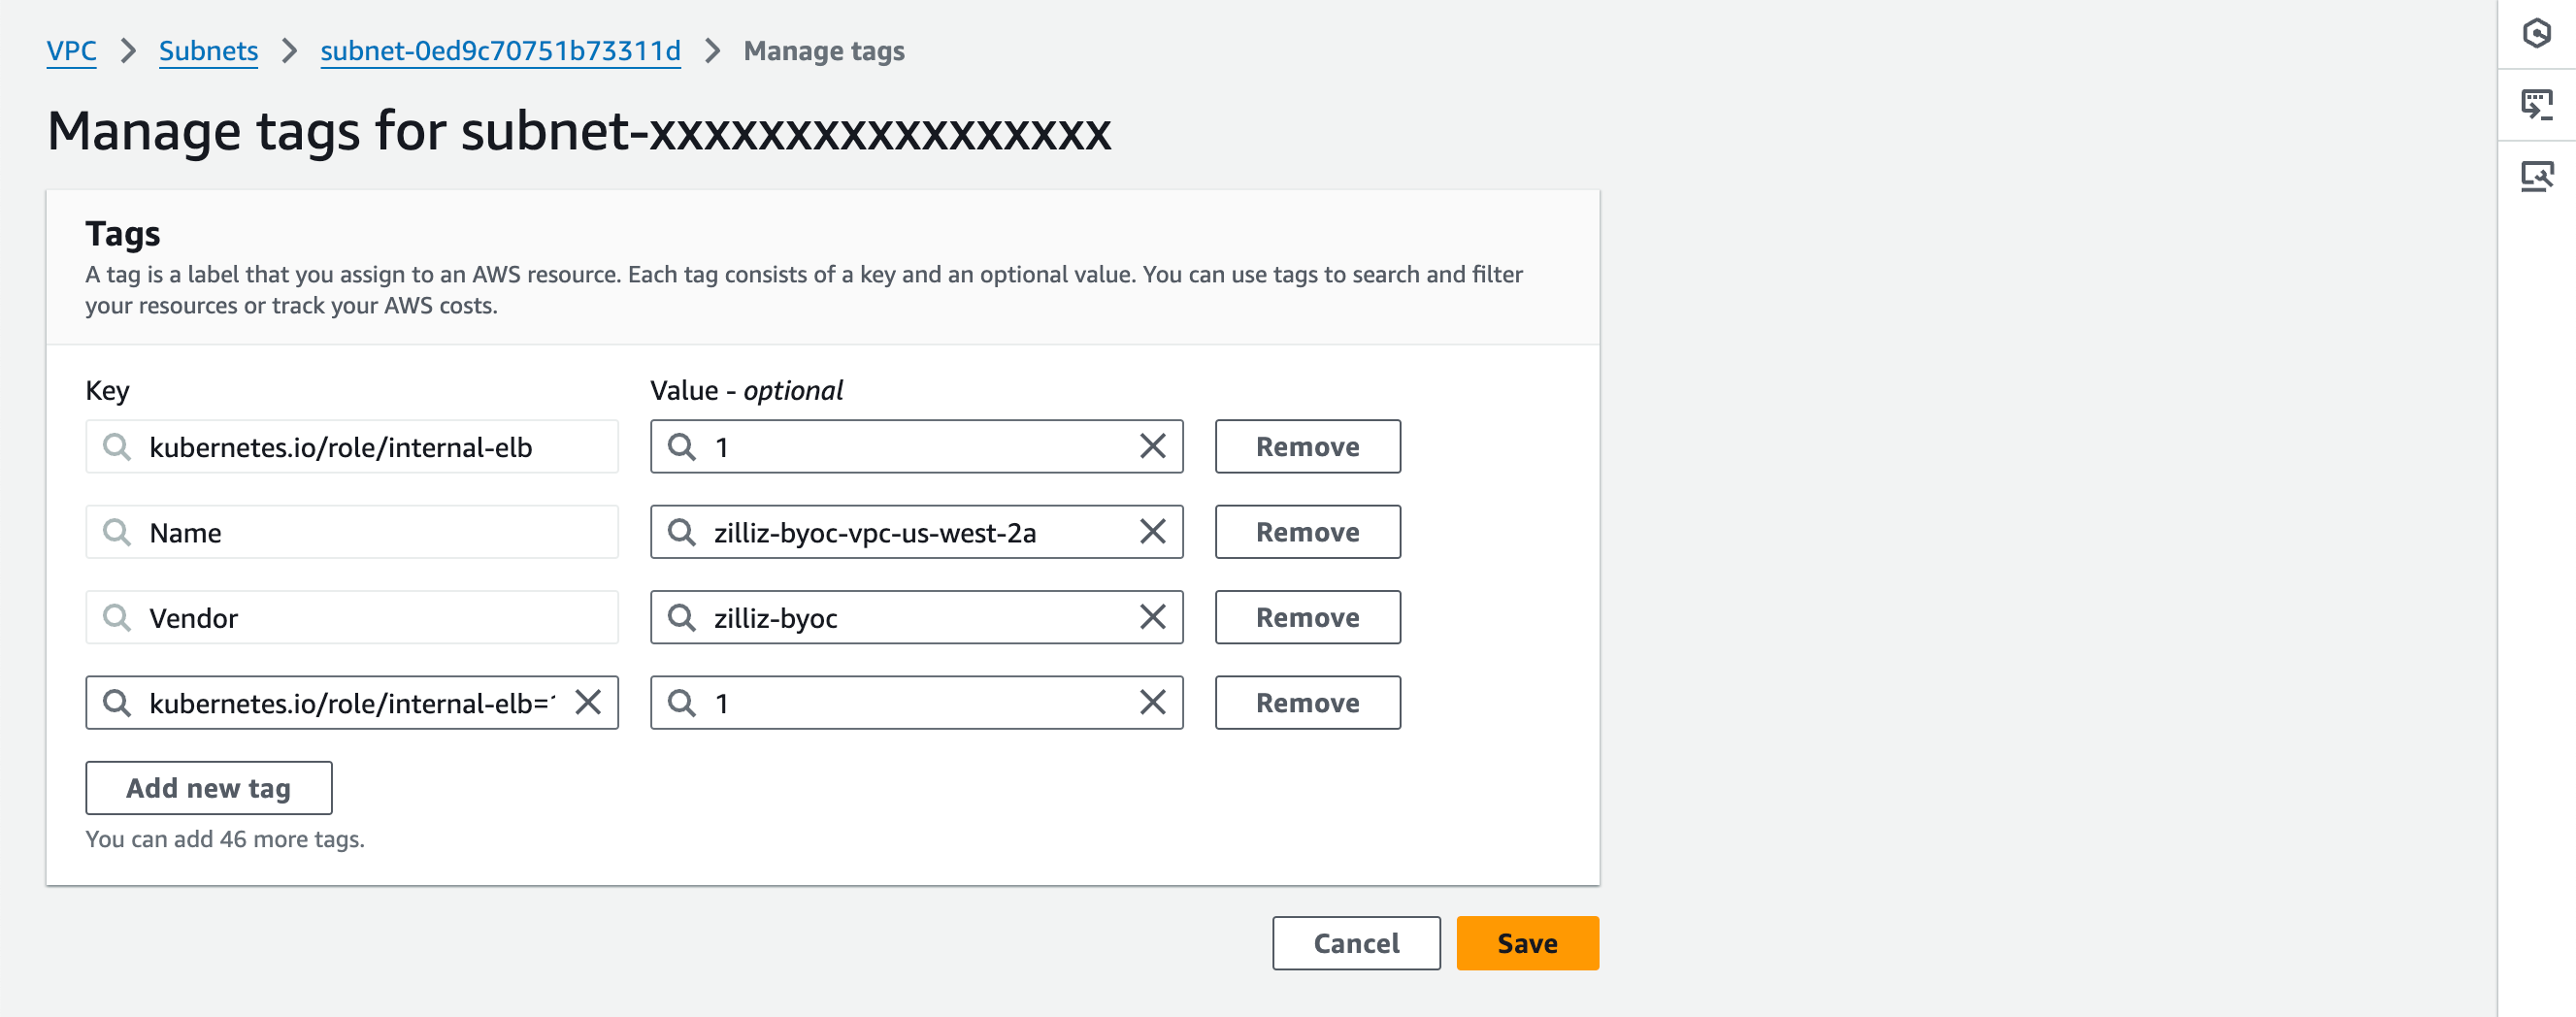
The public subnet hosts the NAT gateway and has a netmask of /24. Each private subnet has a netmask of /18 and must be tagged with kubernetes.io/role/internal-elb=1 to allow the use of Application Load Balancer (ALB) Ingress routing within the EKS cluster.
For details on how ALB routes application and HTTP traffic for the pods in the EKS cluster, refer to this article.
DNS support
The VPC should have DNS hostnames and DNS resolution enabled.
NAT gateway
Zilliz Cloud will set up a single NAT gateway in the public subnet to enable resources in private subnets to reach the Internet. External services, however, cannot initiate a connection with the resources in private subnets.
Security group
The ingress rule should open port 443. For details on creating the security group, refer to Step 2: Create a security group.
VPC endpoint
The VPC endpoint is optional and will be used when you need to configure private endpoints for your BYOC clusters. For details on creating the security group, refer to Step 3: (Optional) Create a VPC endpoint.
Procedure
You can create the VPC and related resources using the AWS console. As an alternative, you can use the Terraform script Zilliz Cloud provides to bootstrap the infrastructure for your Zilliz Cloud project on AWS. For details, refer to Terraform Provider.
Step 1: Create VPC and resources
On the AWS console, you can create the VPC and related resources enumerated in VPC requirements.
Go to the VPC dashboard on AWS.
Check the cloud region in the region drop-down in the upper-right corner. Change it to the one as that of your Zilliz Cloud project.
Click the Create VPC button.
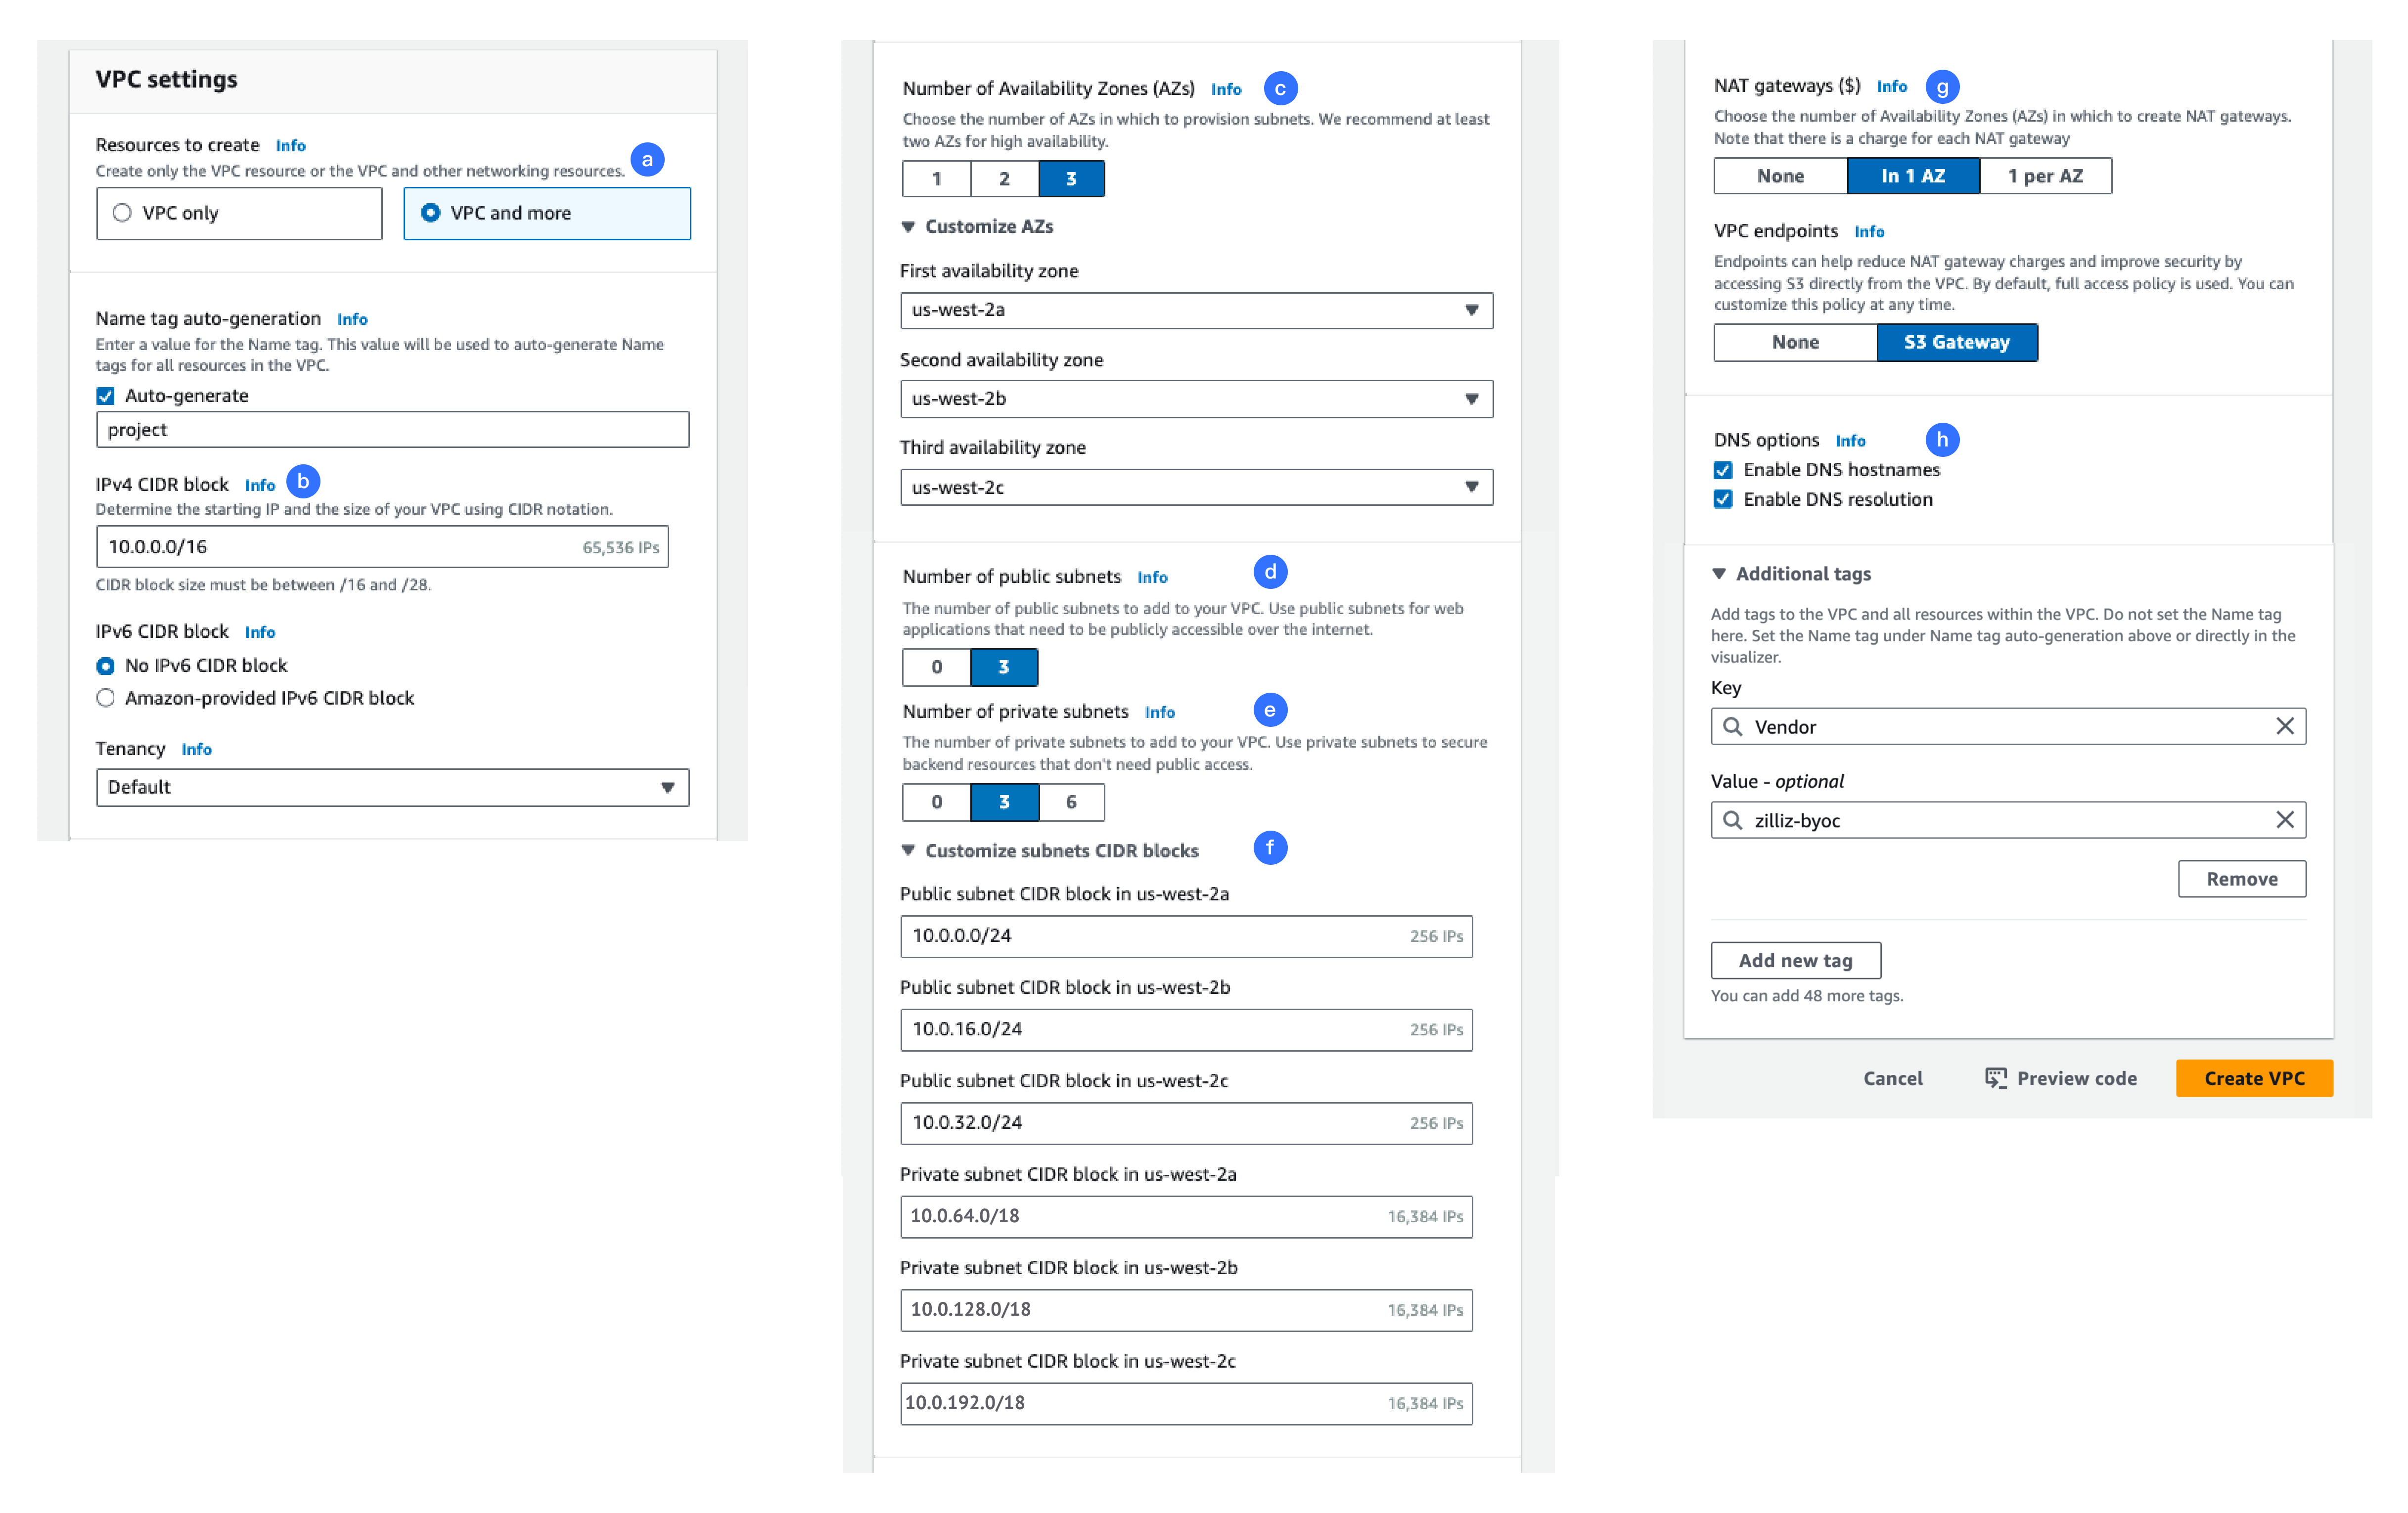
In VPC settings, set as depicted in the following snapshot.
-
Click VPC and more. In Name tag auto-generation, enter a name for your project.
-
In IPv4 CIDR block, ensure that the netmask is /16.
-
In Number of Availability Zones (AZ), click 3. You can expand Customize AZs to check the availability zones available.
-
In Number of public subnets, click 3. These subnets are required to enable NAT gateways in this editor.
-
In Number of private subnets, click 3. These subnets are required for your Zilliz Cloud BYOC project.
-
Expand Customize subnets CIDR blocks, ensure that the network mask of each public subnet is /24, such as 10.0.0.0/24, 10.0.16.0/24, and 10.0.32.0/24, and that of each private subnet is /18, such as 10.0.64.0/18, 10.0.128。0/18, and 10.0.192.0/18.
-
In NAT gateways, click In 1 AZ.
-
In DNS options, ensure that both options are selected.
-
In Additional tags, click Add new tag. Set Key to
Vendorand Value tozilliz-byoc.
Click Create VPC.
Once the VPC has been created, scroll down the details, click View VPC.
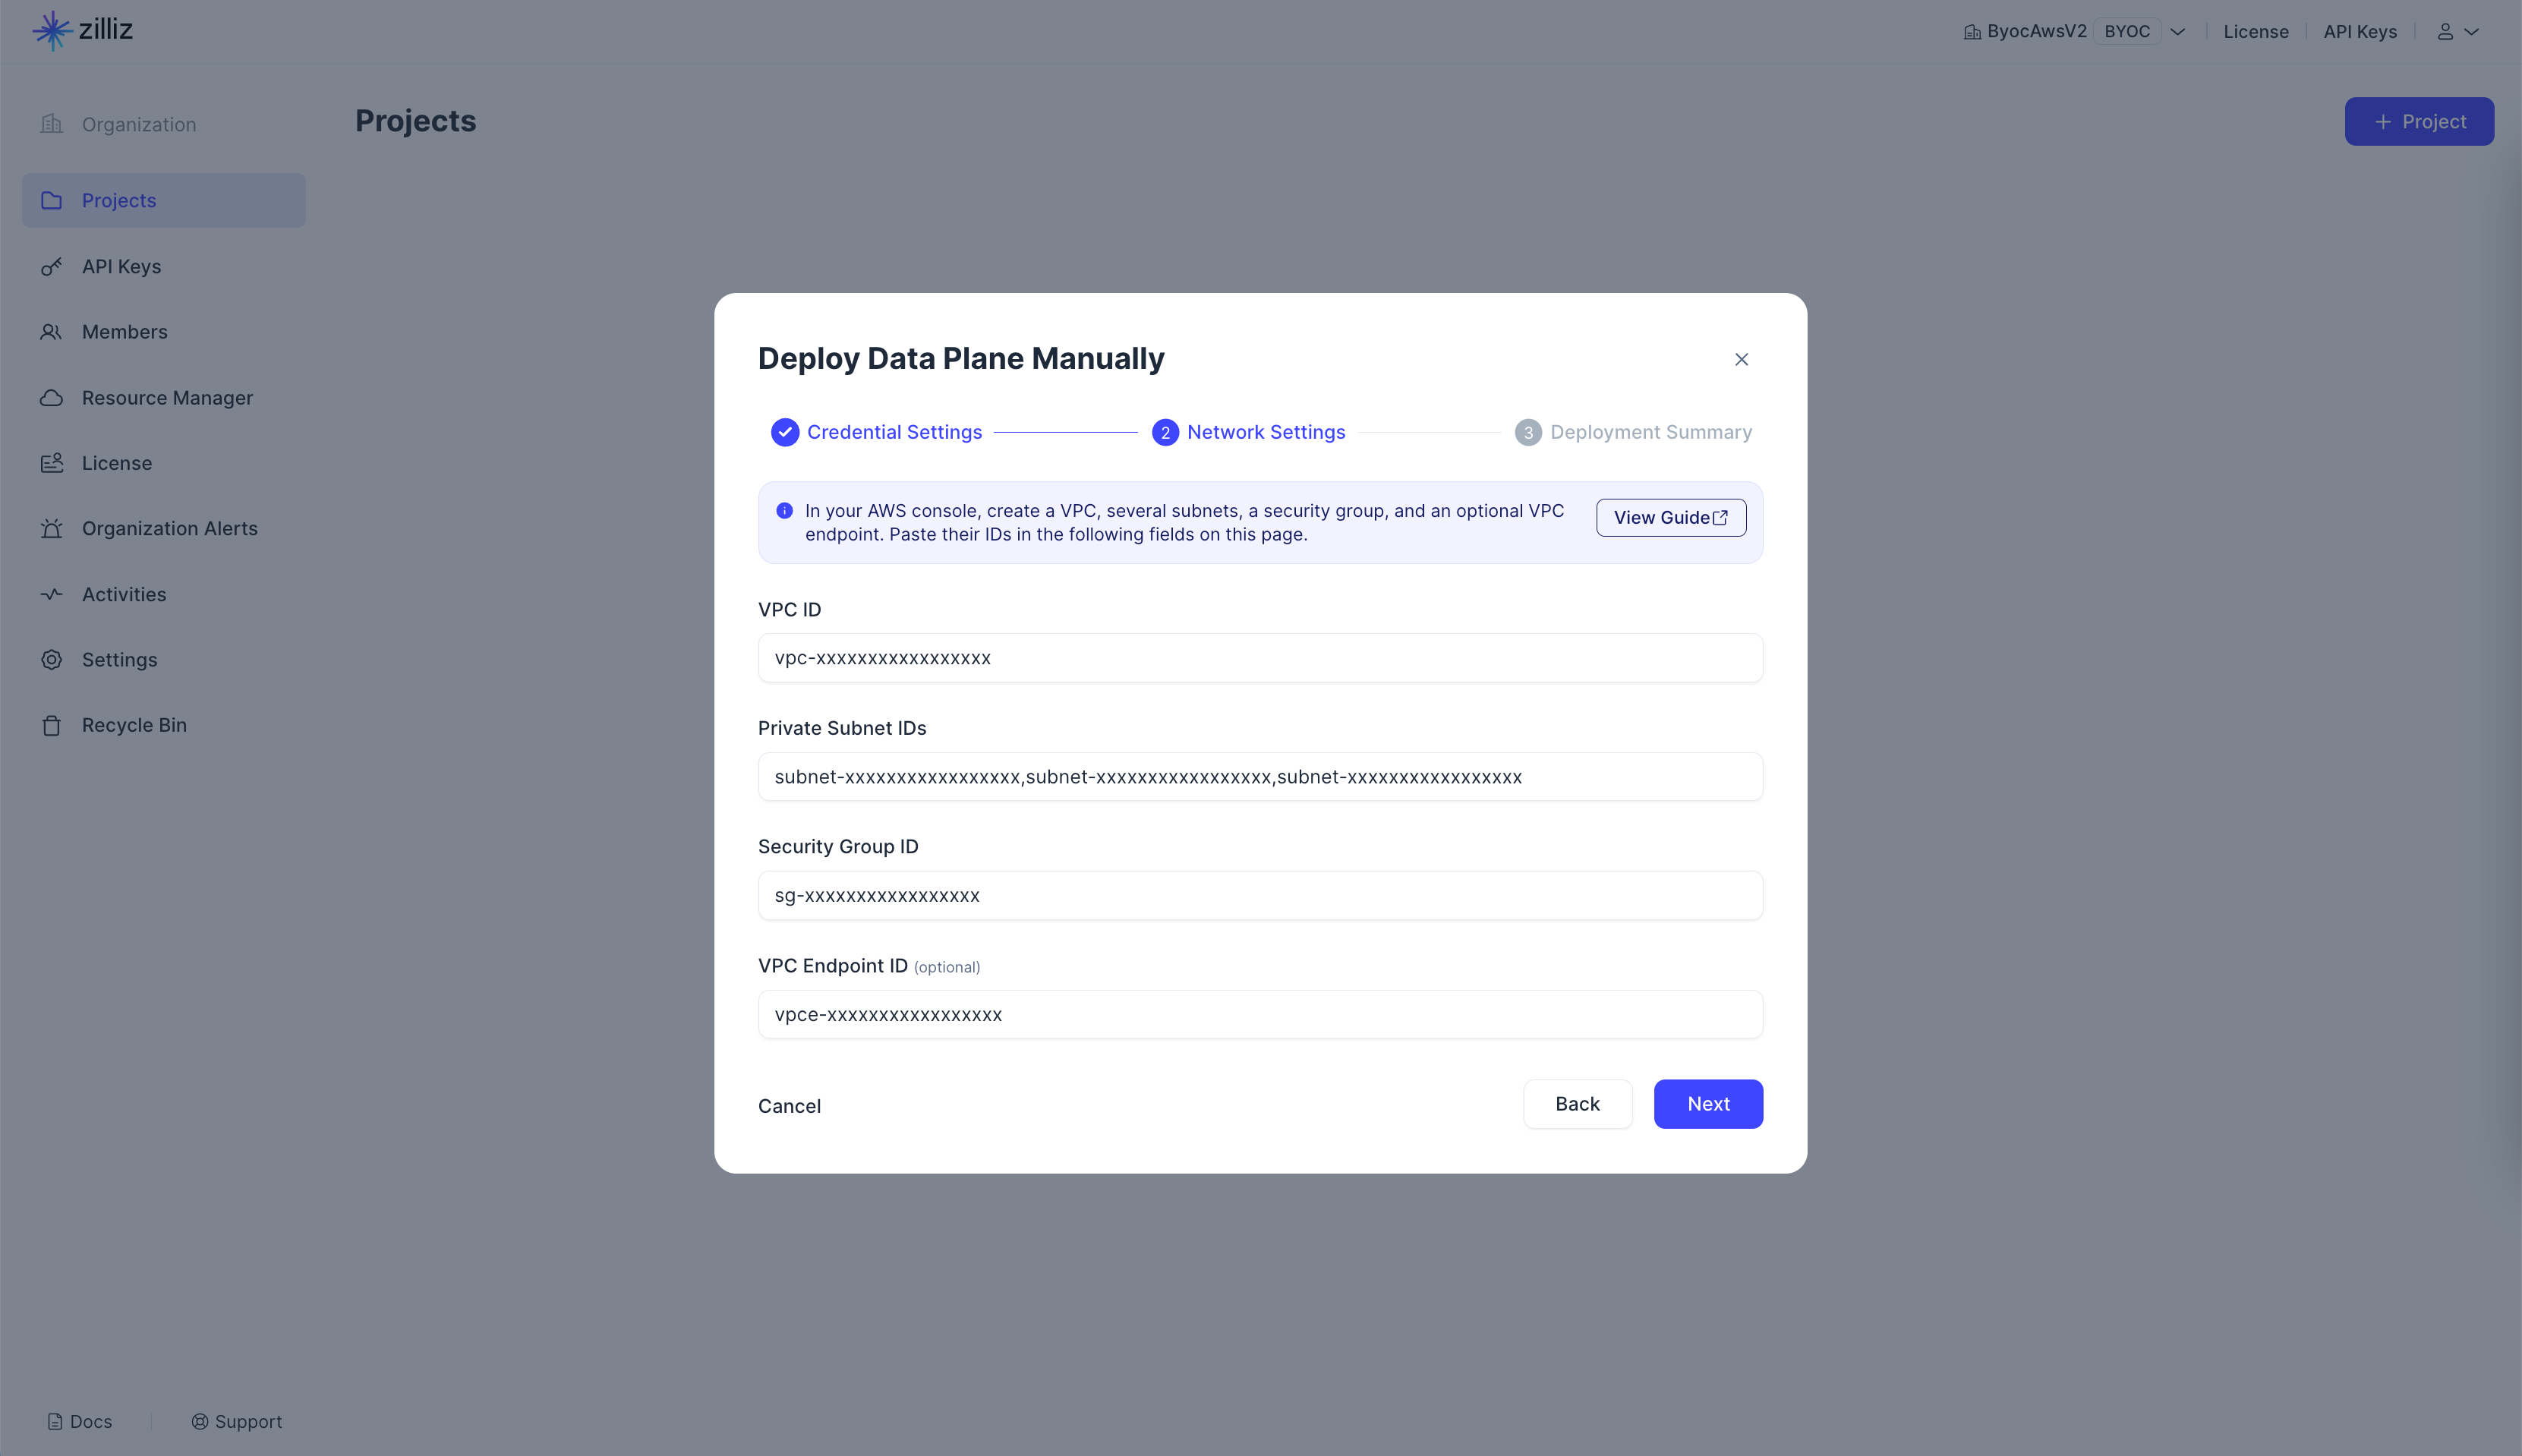
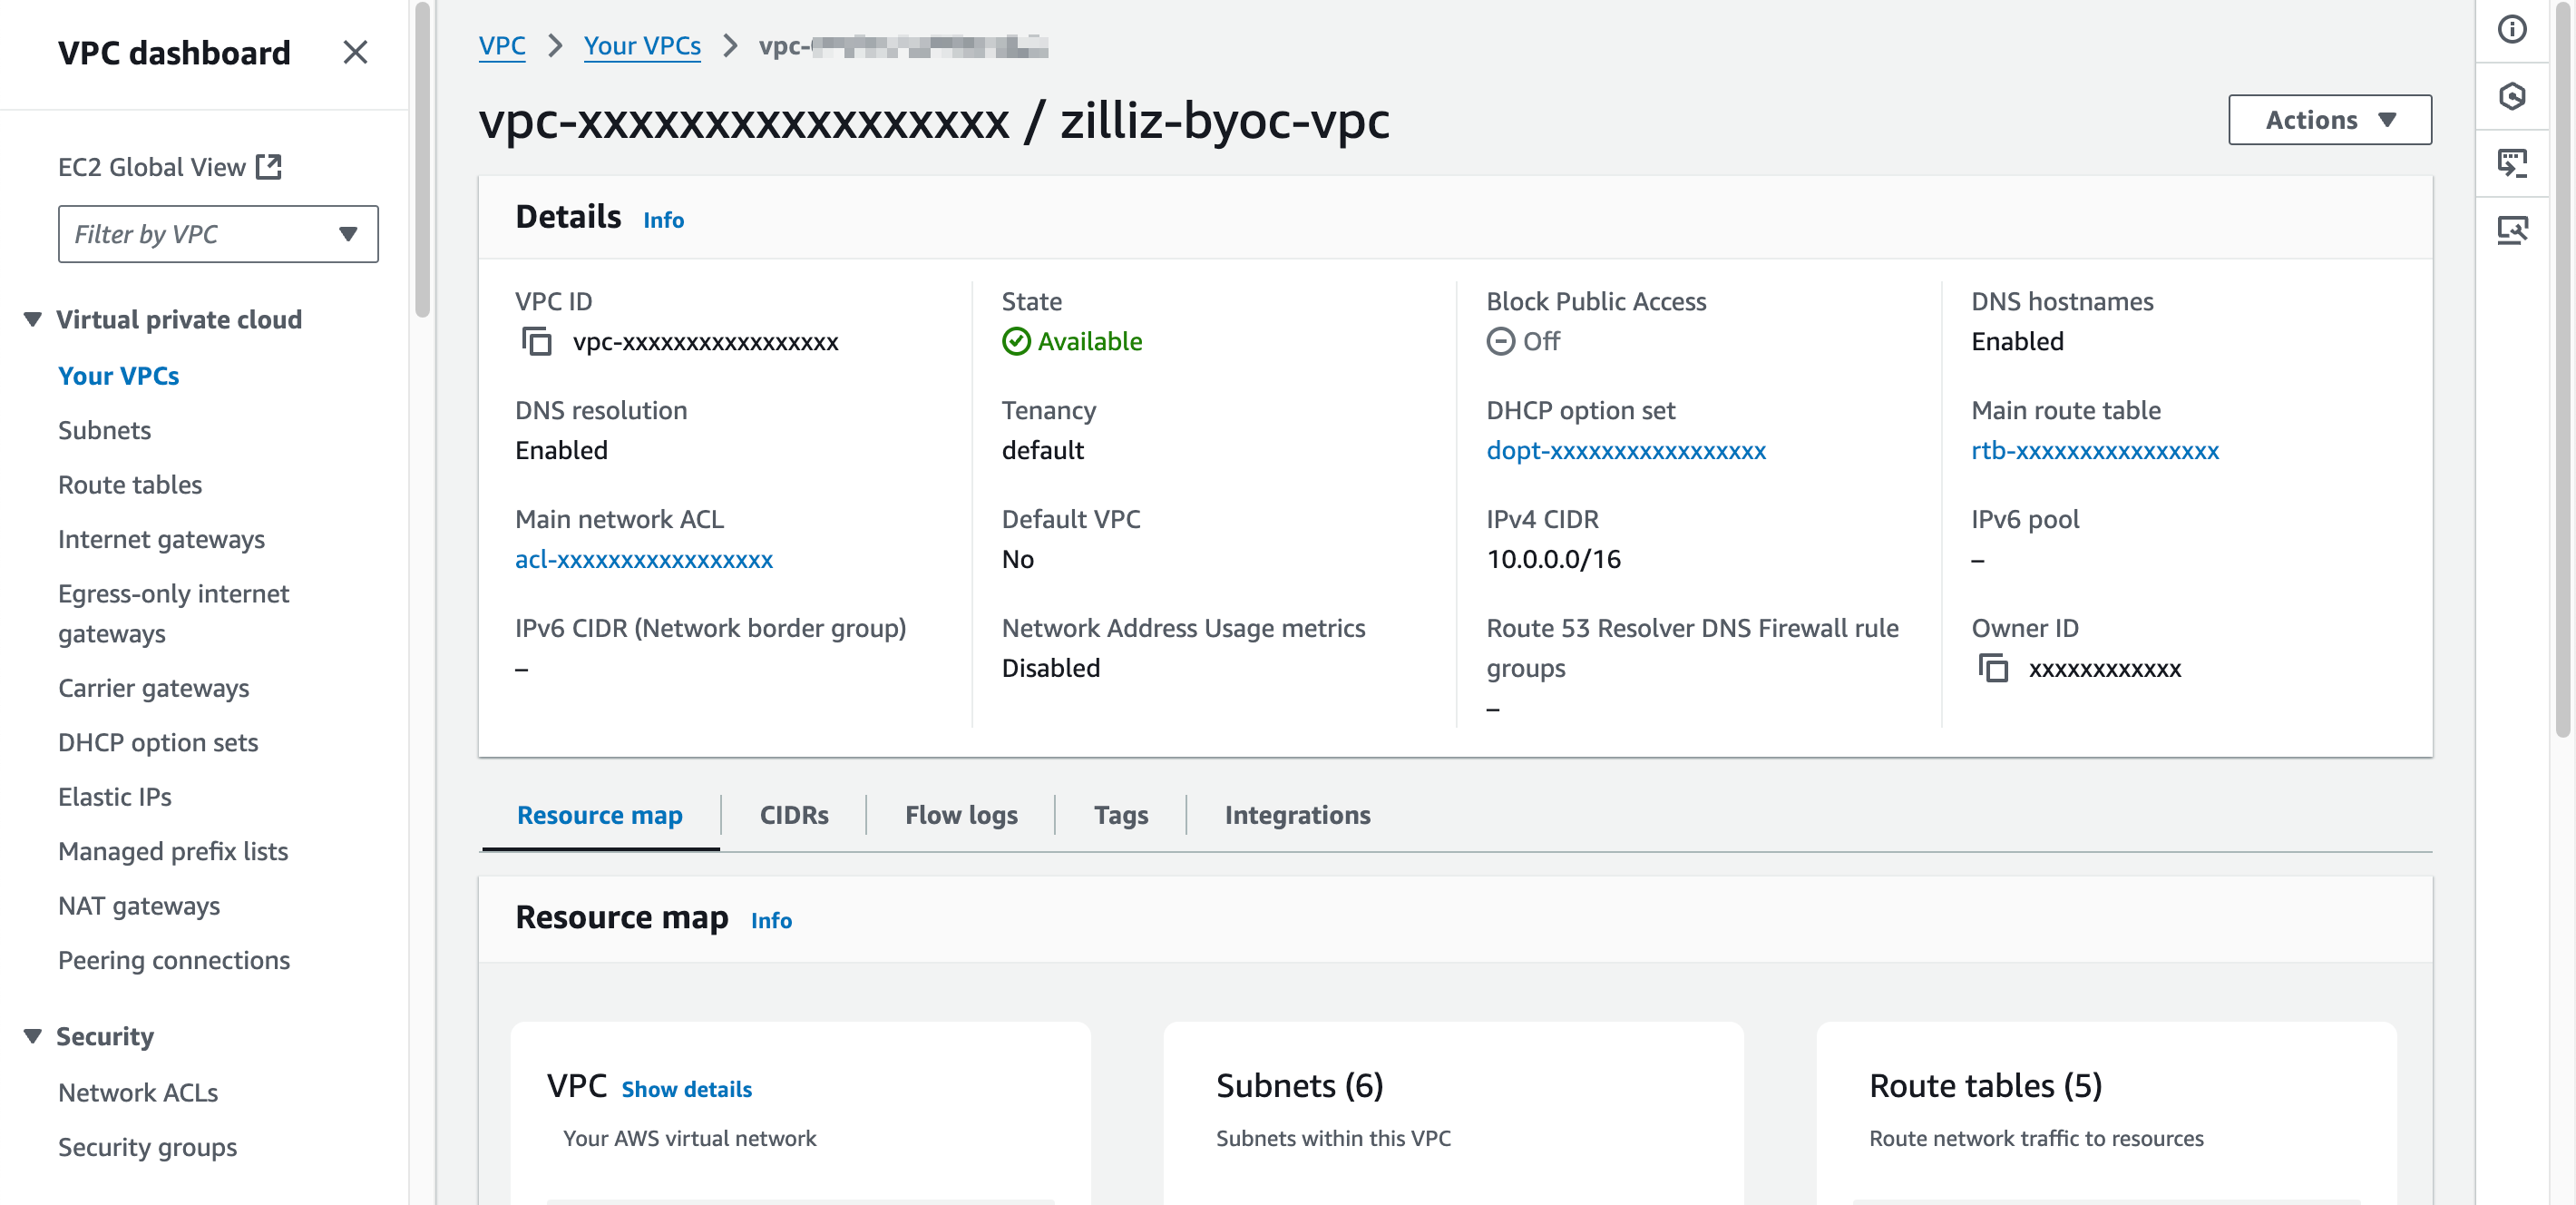
In the Details section, copy the VPC ID, and paste it back to Zilliz Cloud.
In the Resource map section, click the external link icon at the end of each private subnet to view its details.
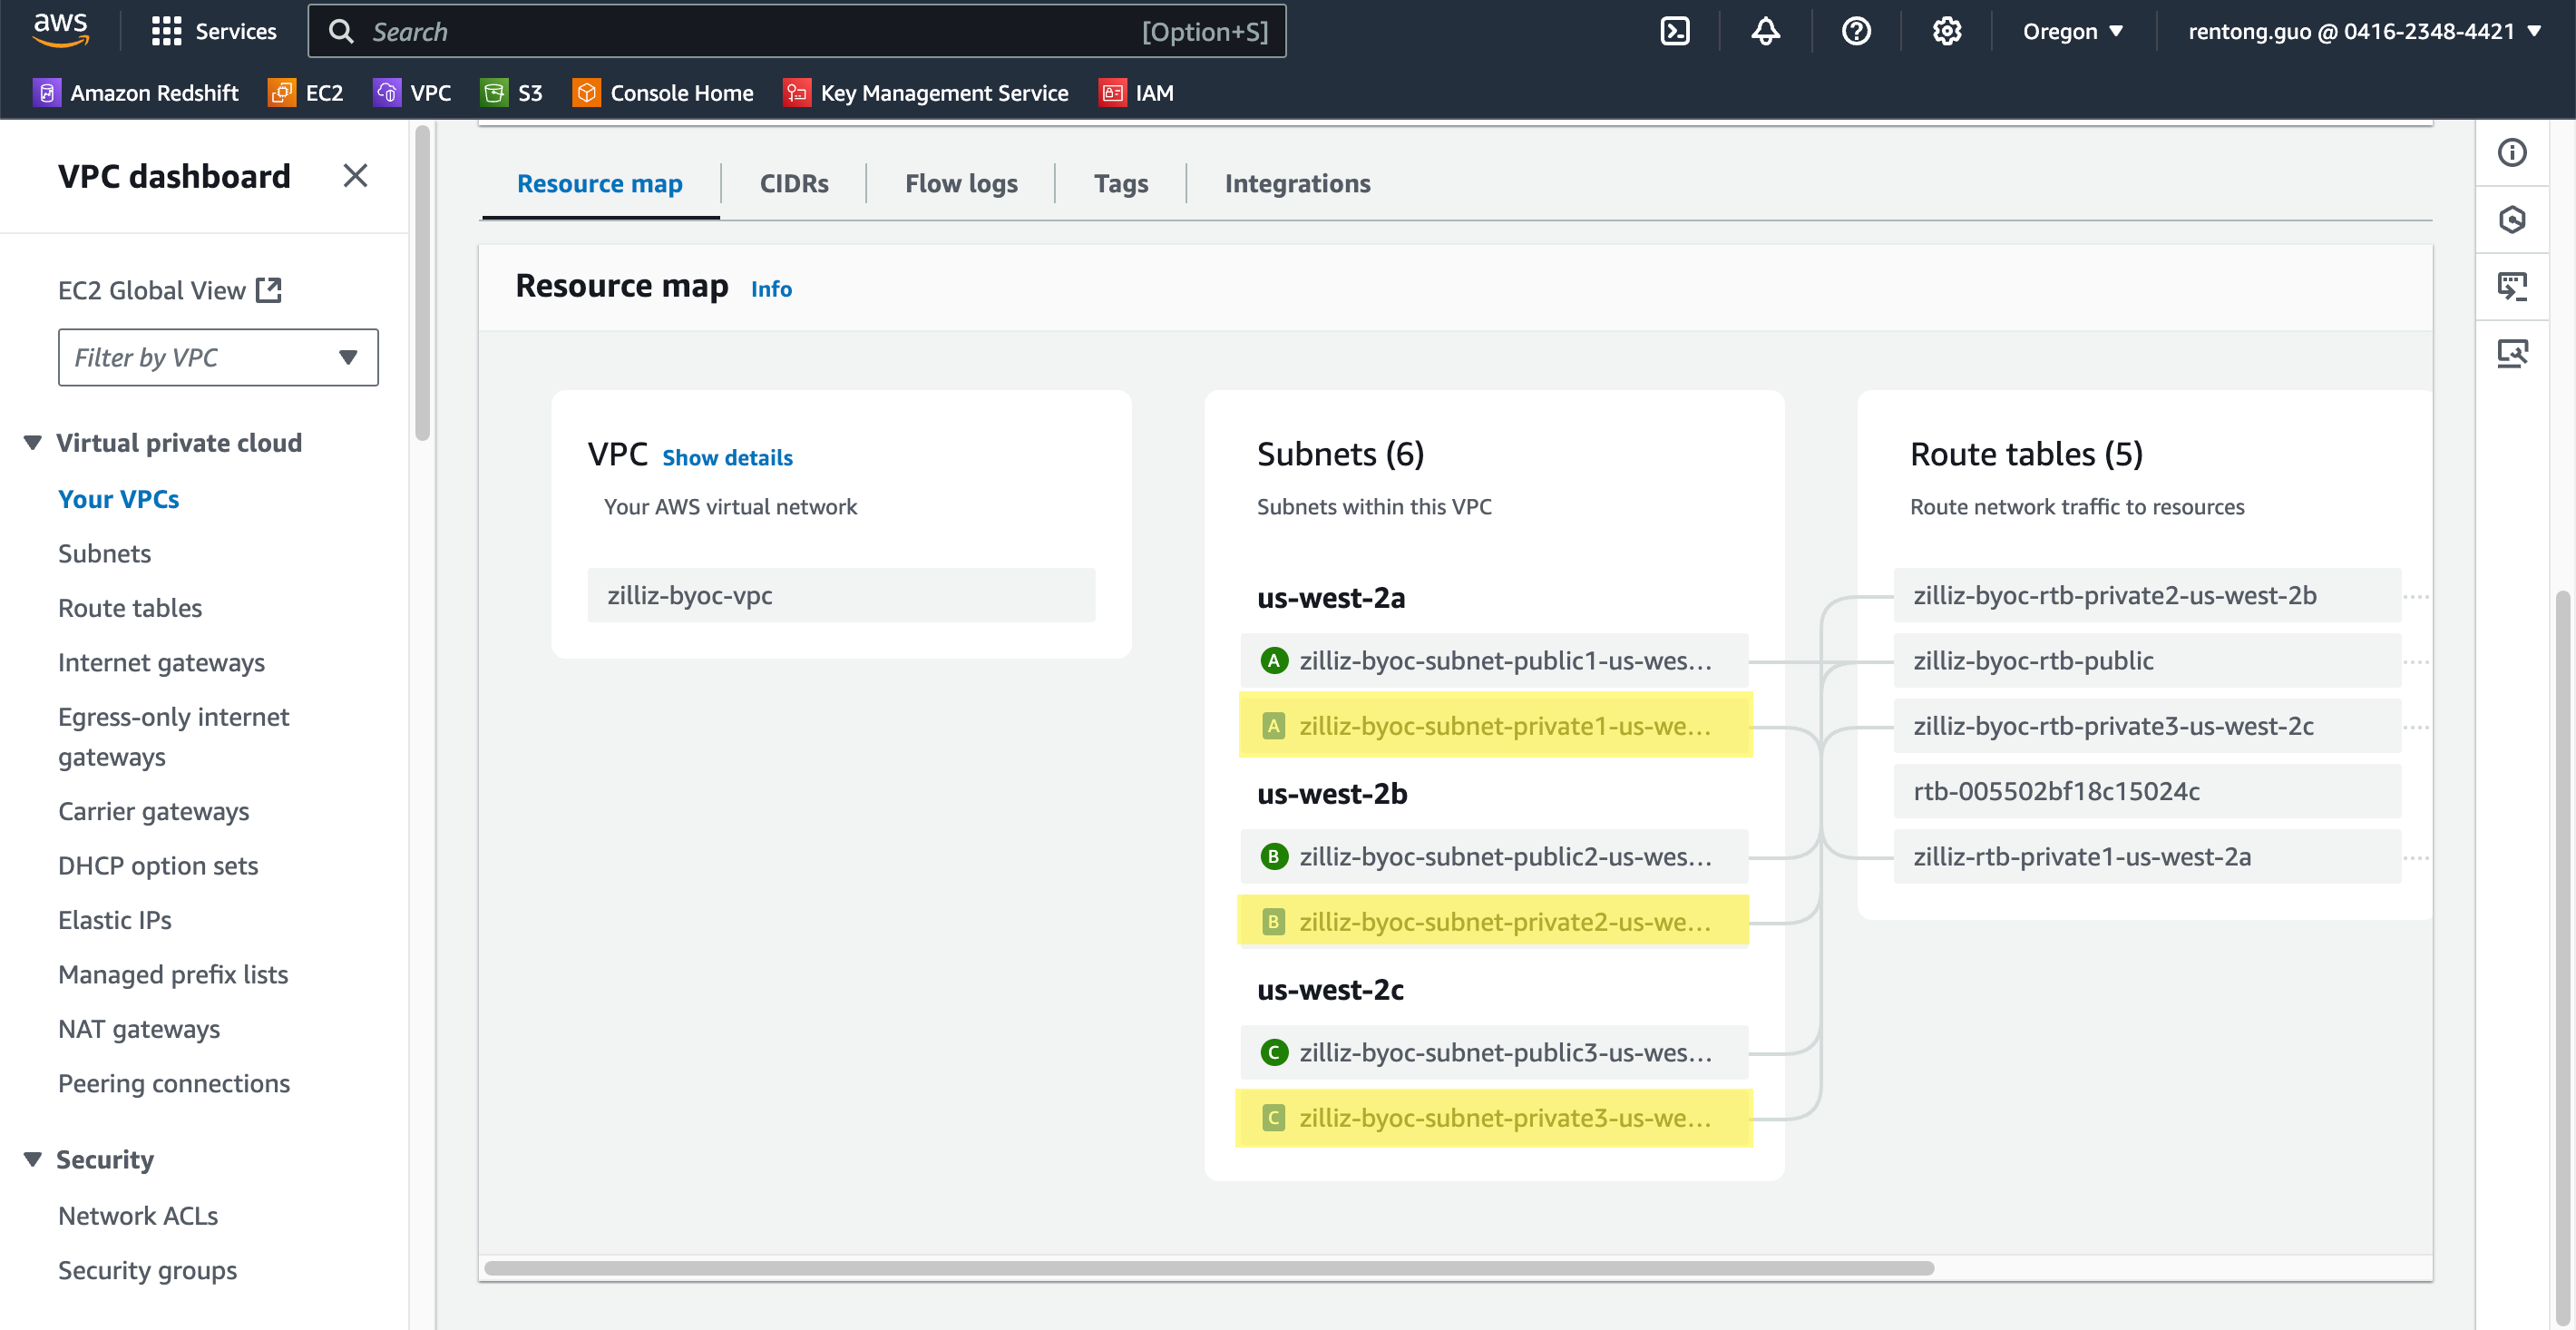
On the Subnet Details page, copy the subnet ID.
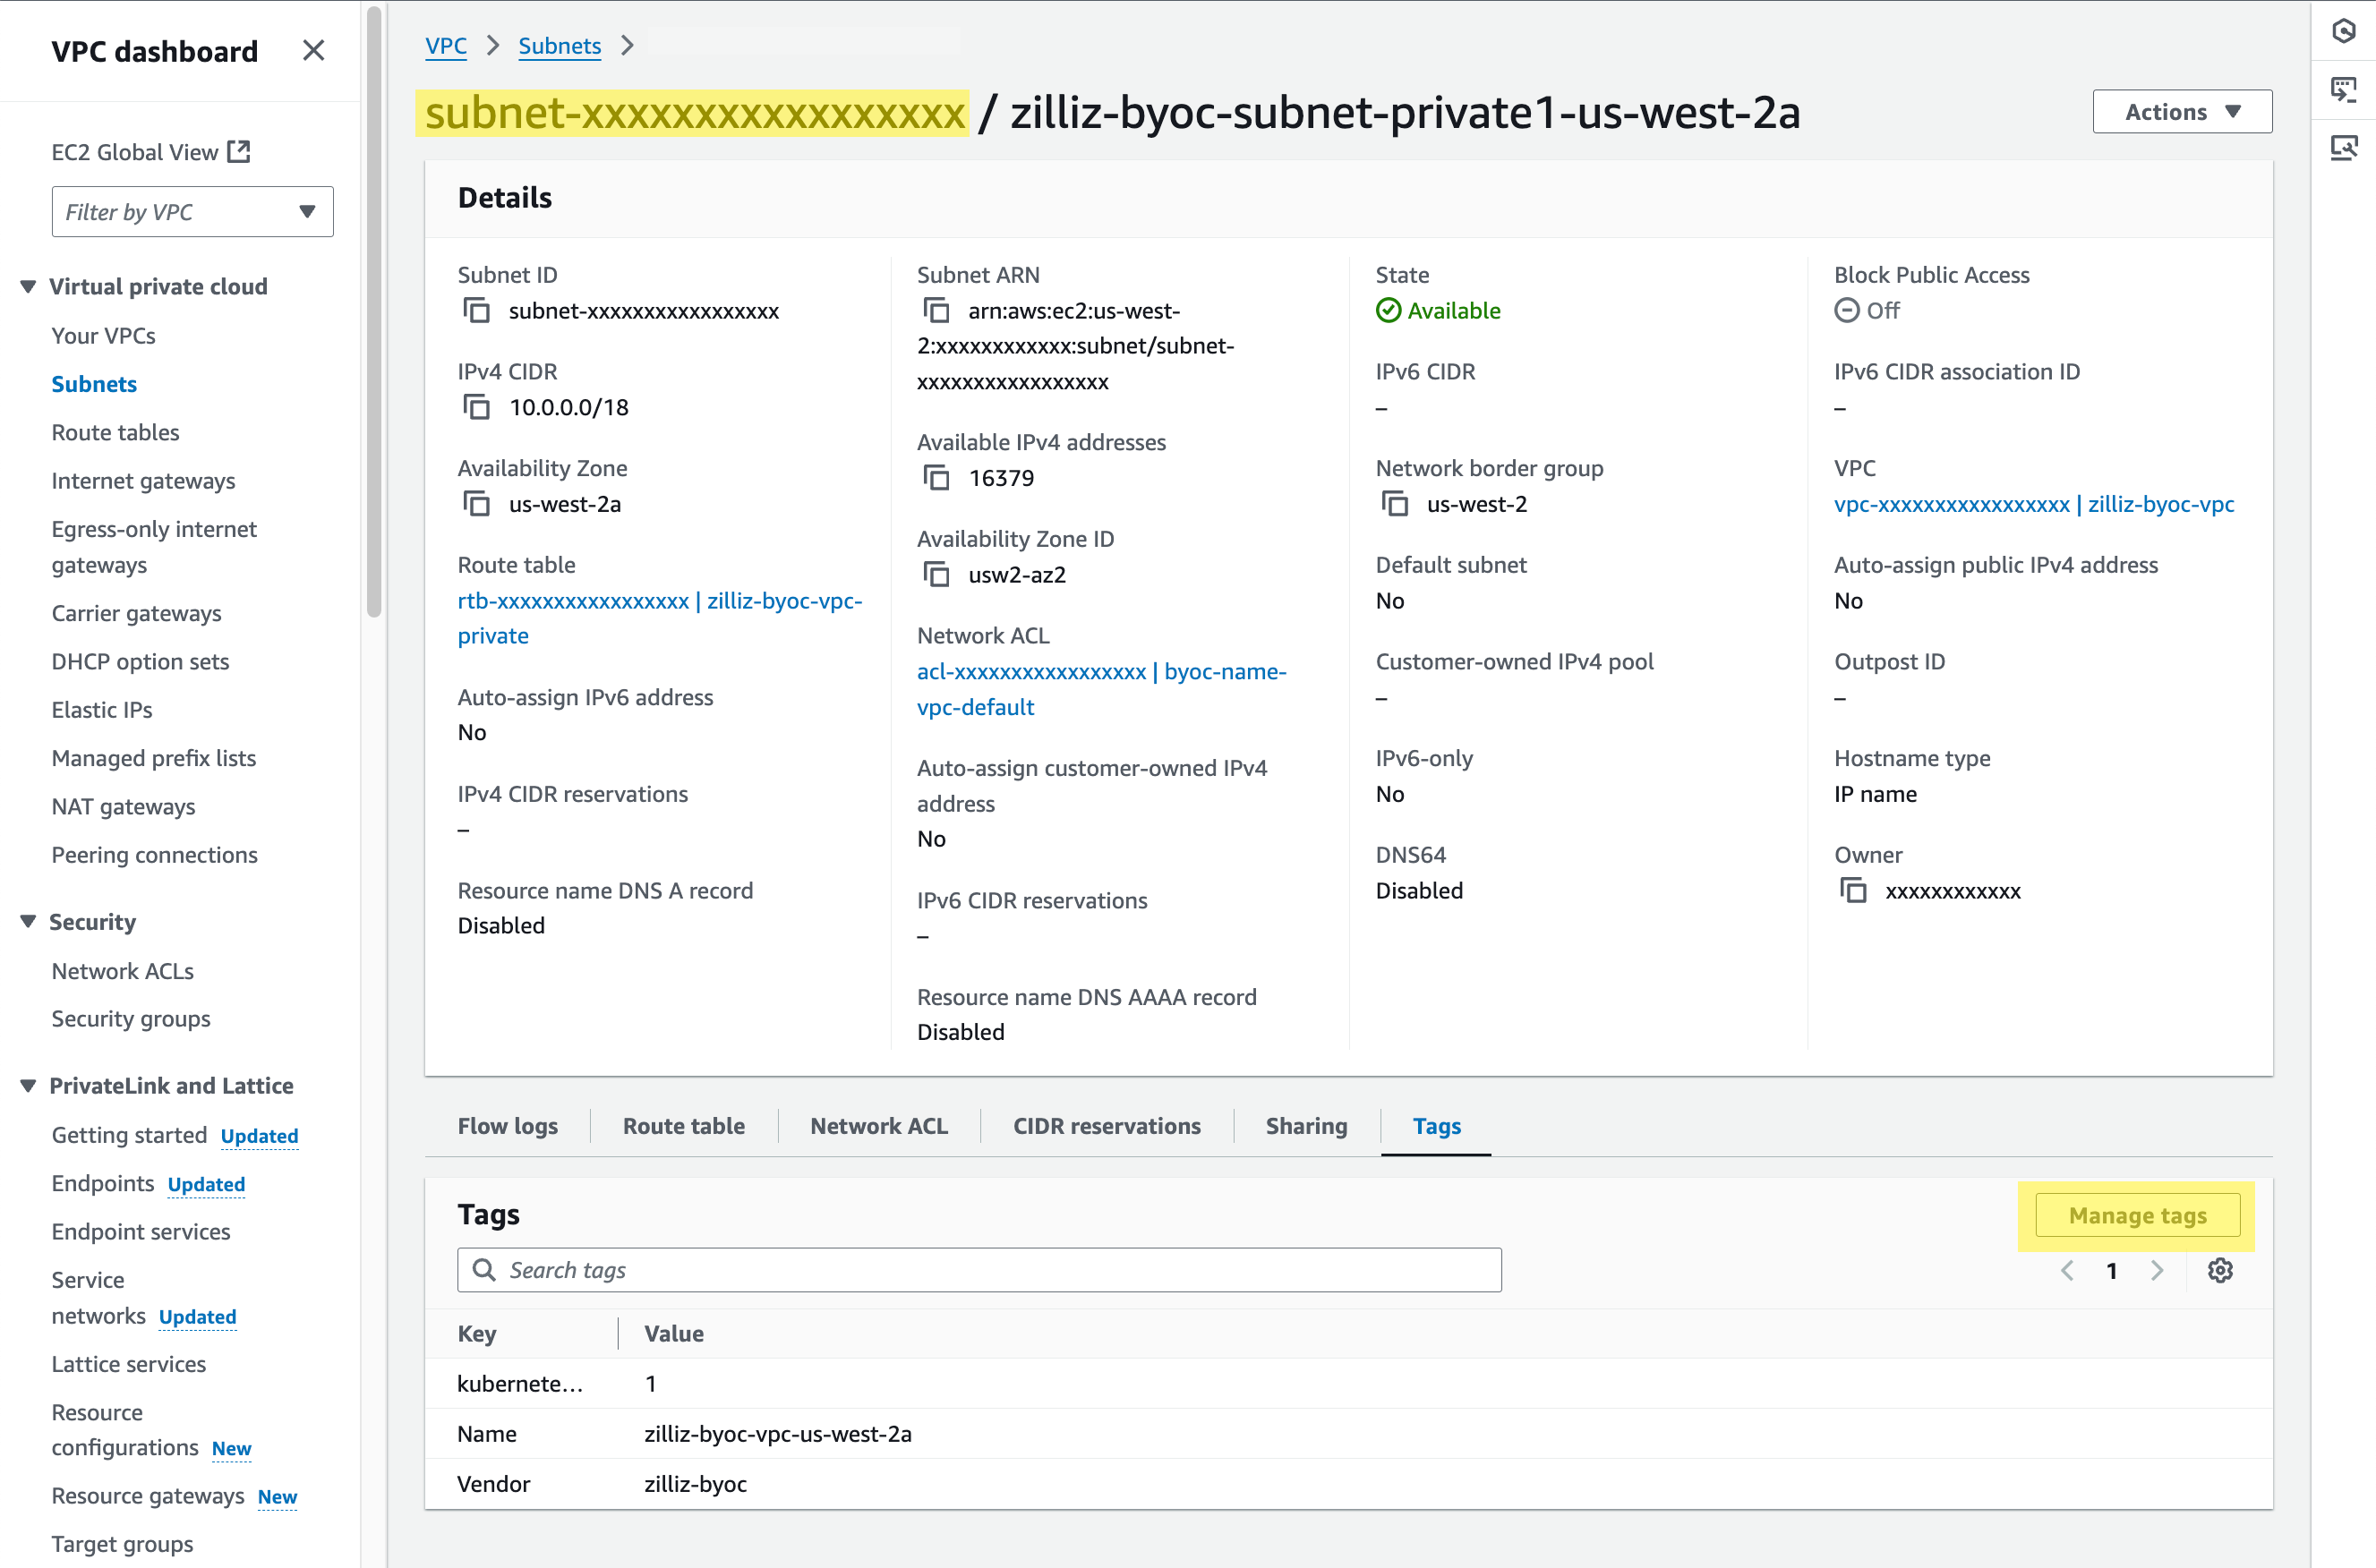
Then click Manage tags. On the page prompted open, click Add new tag, and set Key of the new tag list entry to kubernetes.io/role/internal-elb and Value to 1. Then click Save.
Step 2: Create a security group
Security groups in a VPC protect your AWS resources by controlling inbound and outbound traffic, acting as a virtual firewall for your EC2 instances. You can create security groups as follows:
Go to the VPC dashboard on AWS.
Locate Security > Security groups in the left navigation pane, and click Create security group in the upper right corner of the right pane.
Set Security group name and Description and select the VPC you previously created from the VPC drop-down list.

Click Add rule in the Inbound rules section to create an inbound rule.
Select Anywhere-IPv4 in Source or enter a CIDR block from which access is allowed in the text box on the right of the Source drop-down.

Add a record, select HTTPS in Type and Anywhere-IPv4 in Destination or enter a CIDR block to which access is allowed in the text box on the right of the Destination drop-down.
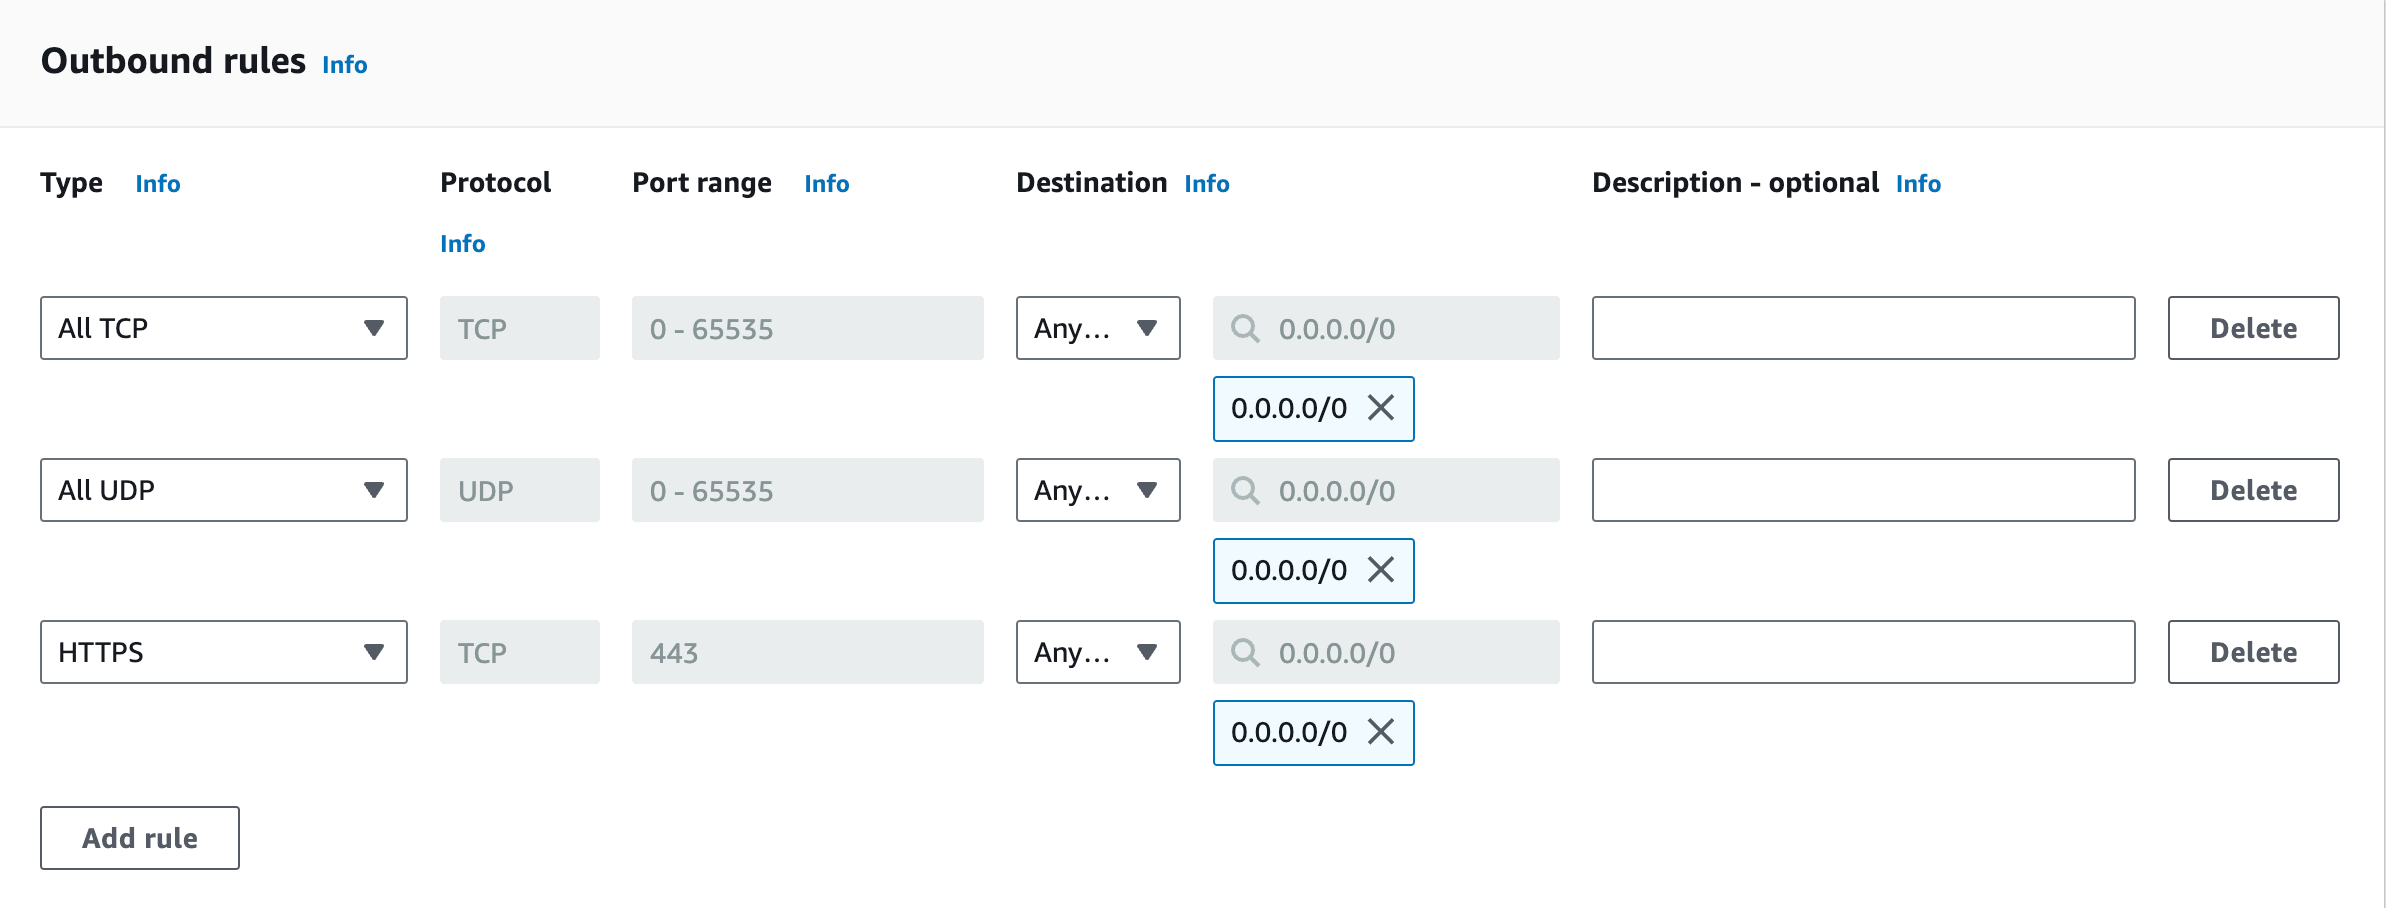
In the Tags section, add a key-value pair as depicted in the following screenshot.

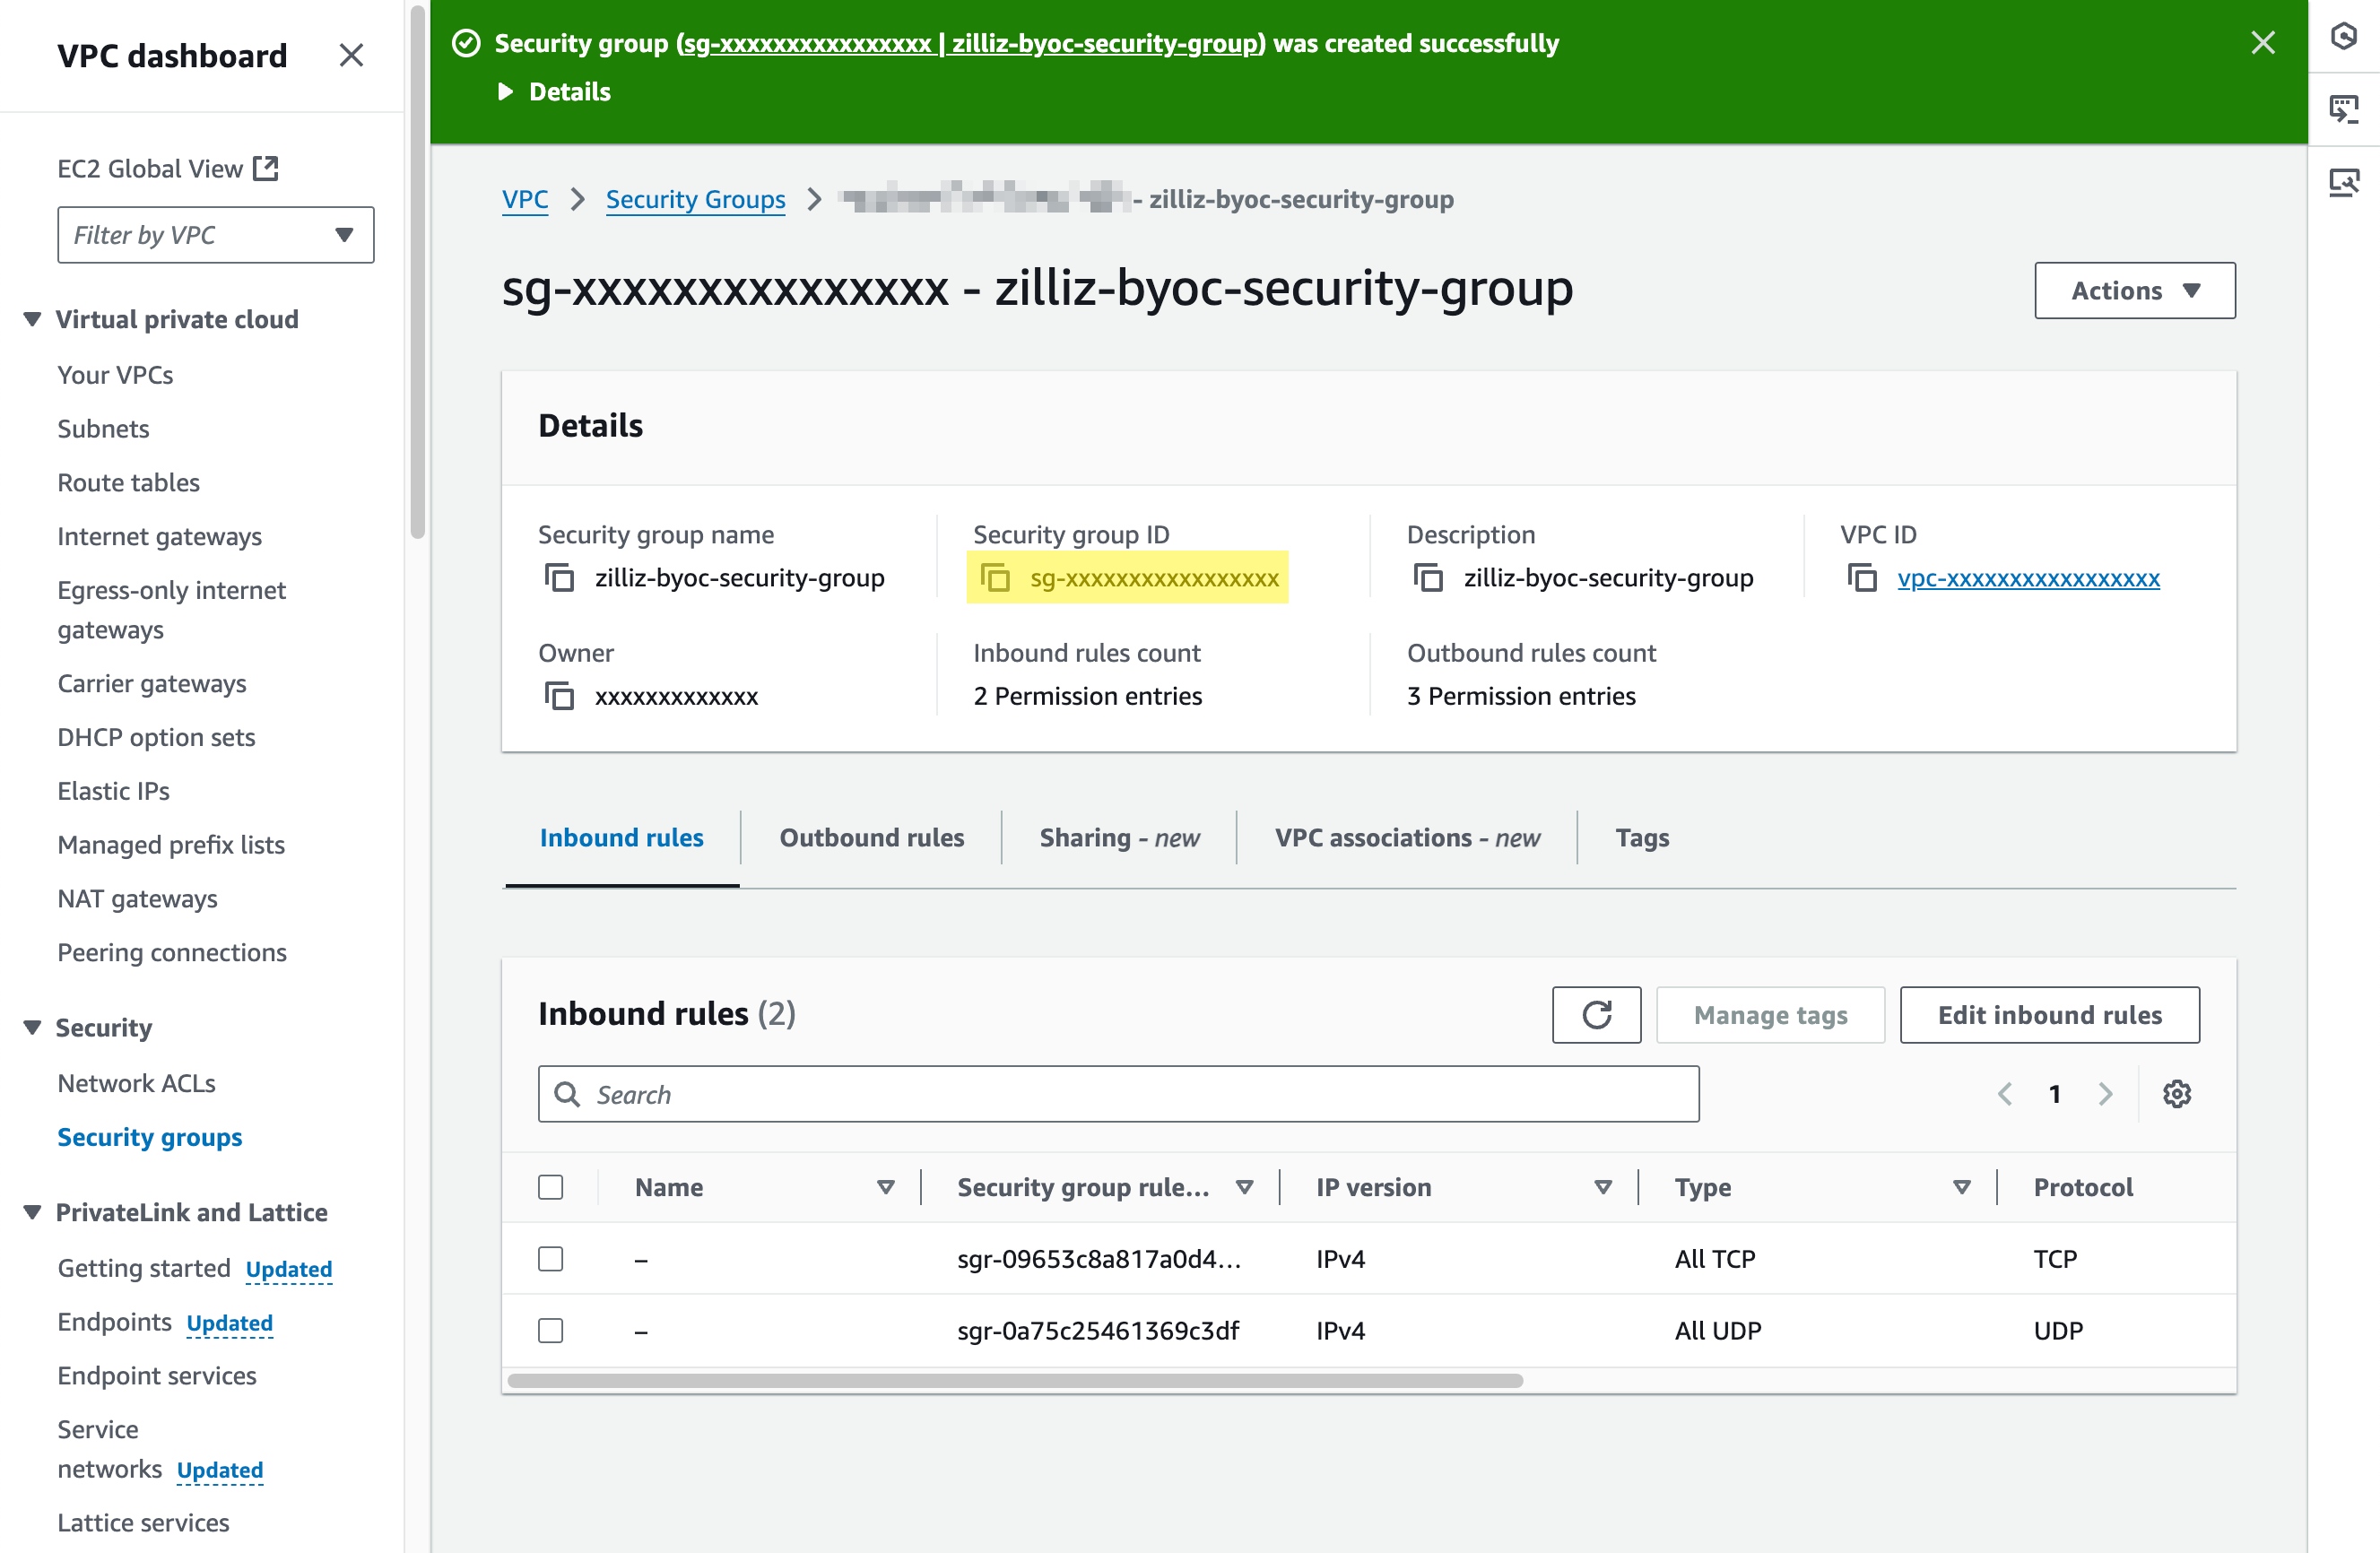
Click Create security group to save the security group.
Copy the security group ID back to Zilliz Cloud.
Step 3: (Optional) Create a VPC endpoint
VPC endpoint ensures secure cluster connectivity relay and enables private calls to Zilliz Cloud REST APIs. For guidance on managing VPC endpoints with the AWS Management Console, see the AWS article Create VPC endpoints in the AWS Management Console, or use the following procedure:
The VPC endpoint created in this section is used to set up an AWS PrivateLink. Once the VPC endpoint is ready, you must create a hosted zone and add some DNS records. For details, refer to Set up a PrivateLink (AWS).
Go to the VPC dashboard on AWS.
Locate PrivateLink and Lattice > Endpoints in the left navigation pane, and click Create endpoint in the upper right corner of the right pane.
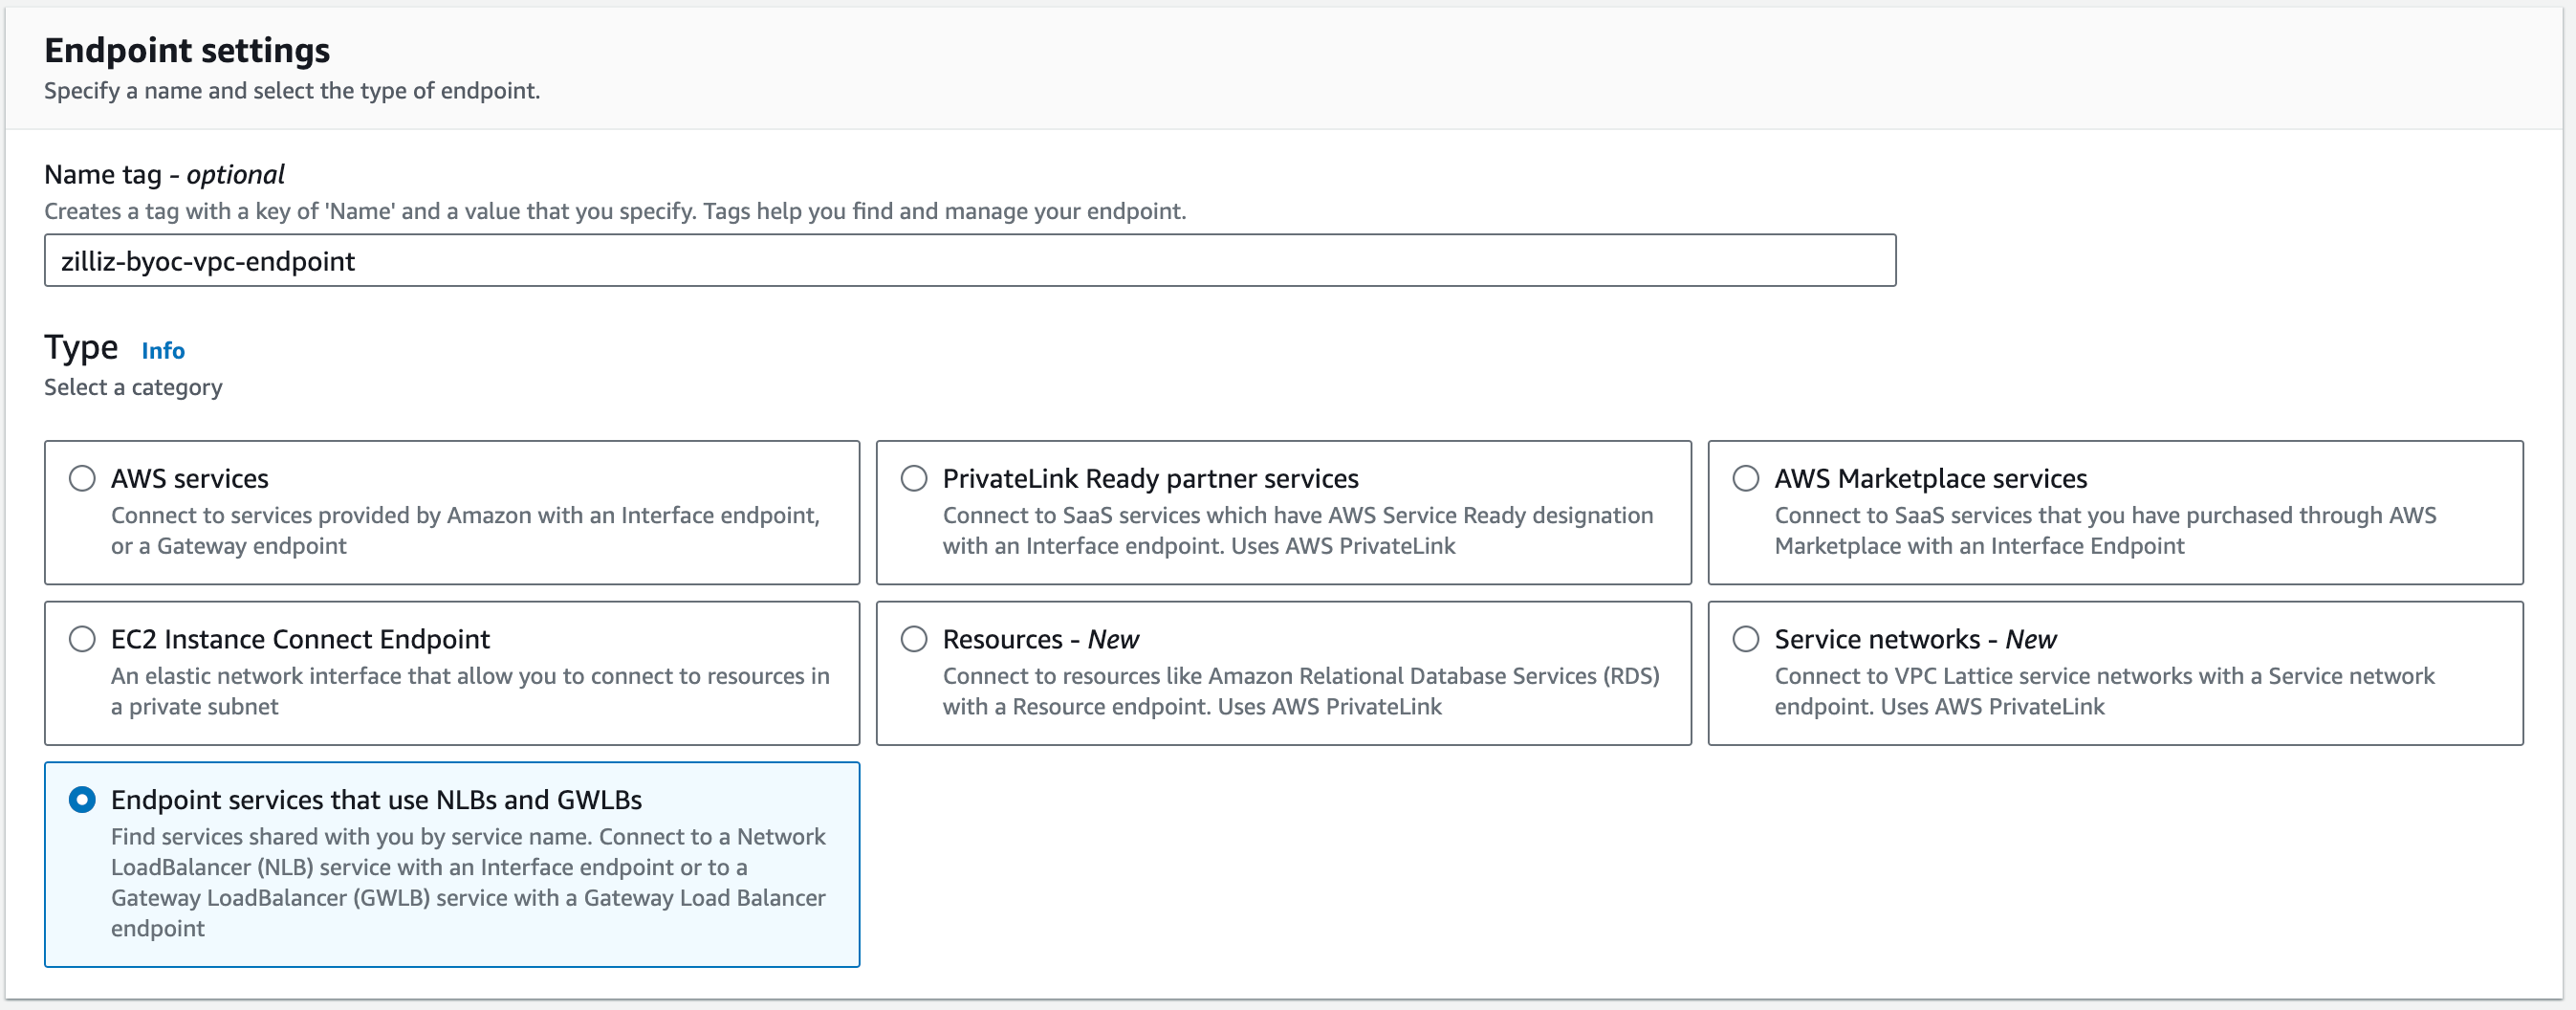
Set Name tag or leave it blank to let AWS generate one for you. For Type, choose Endpoint services that use NLBs and GWLBs.
In Service settings, fill Zilliz Cloud VPC endpoint of your region in Service name and click Verify service.
The following table lists the cloud regions currently available. If your cloud region is not listed in the table, please contact us at support@zilliz.com.
AWS Region | Location | Zilliz Cloud VPC endpoint |
|---|---|---|
us-west-2 | Oregon |
|
eu-central-1 | Frankfurt |
|

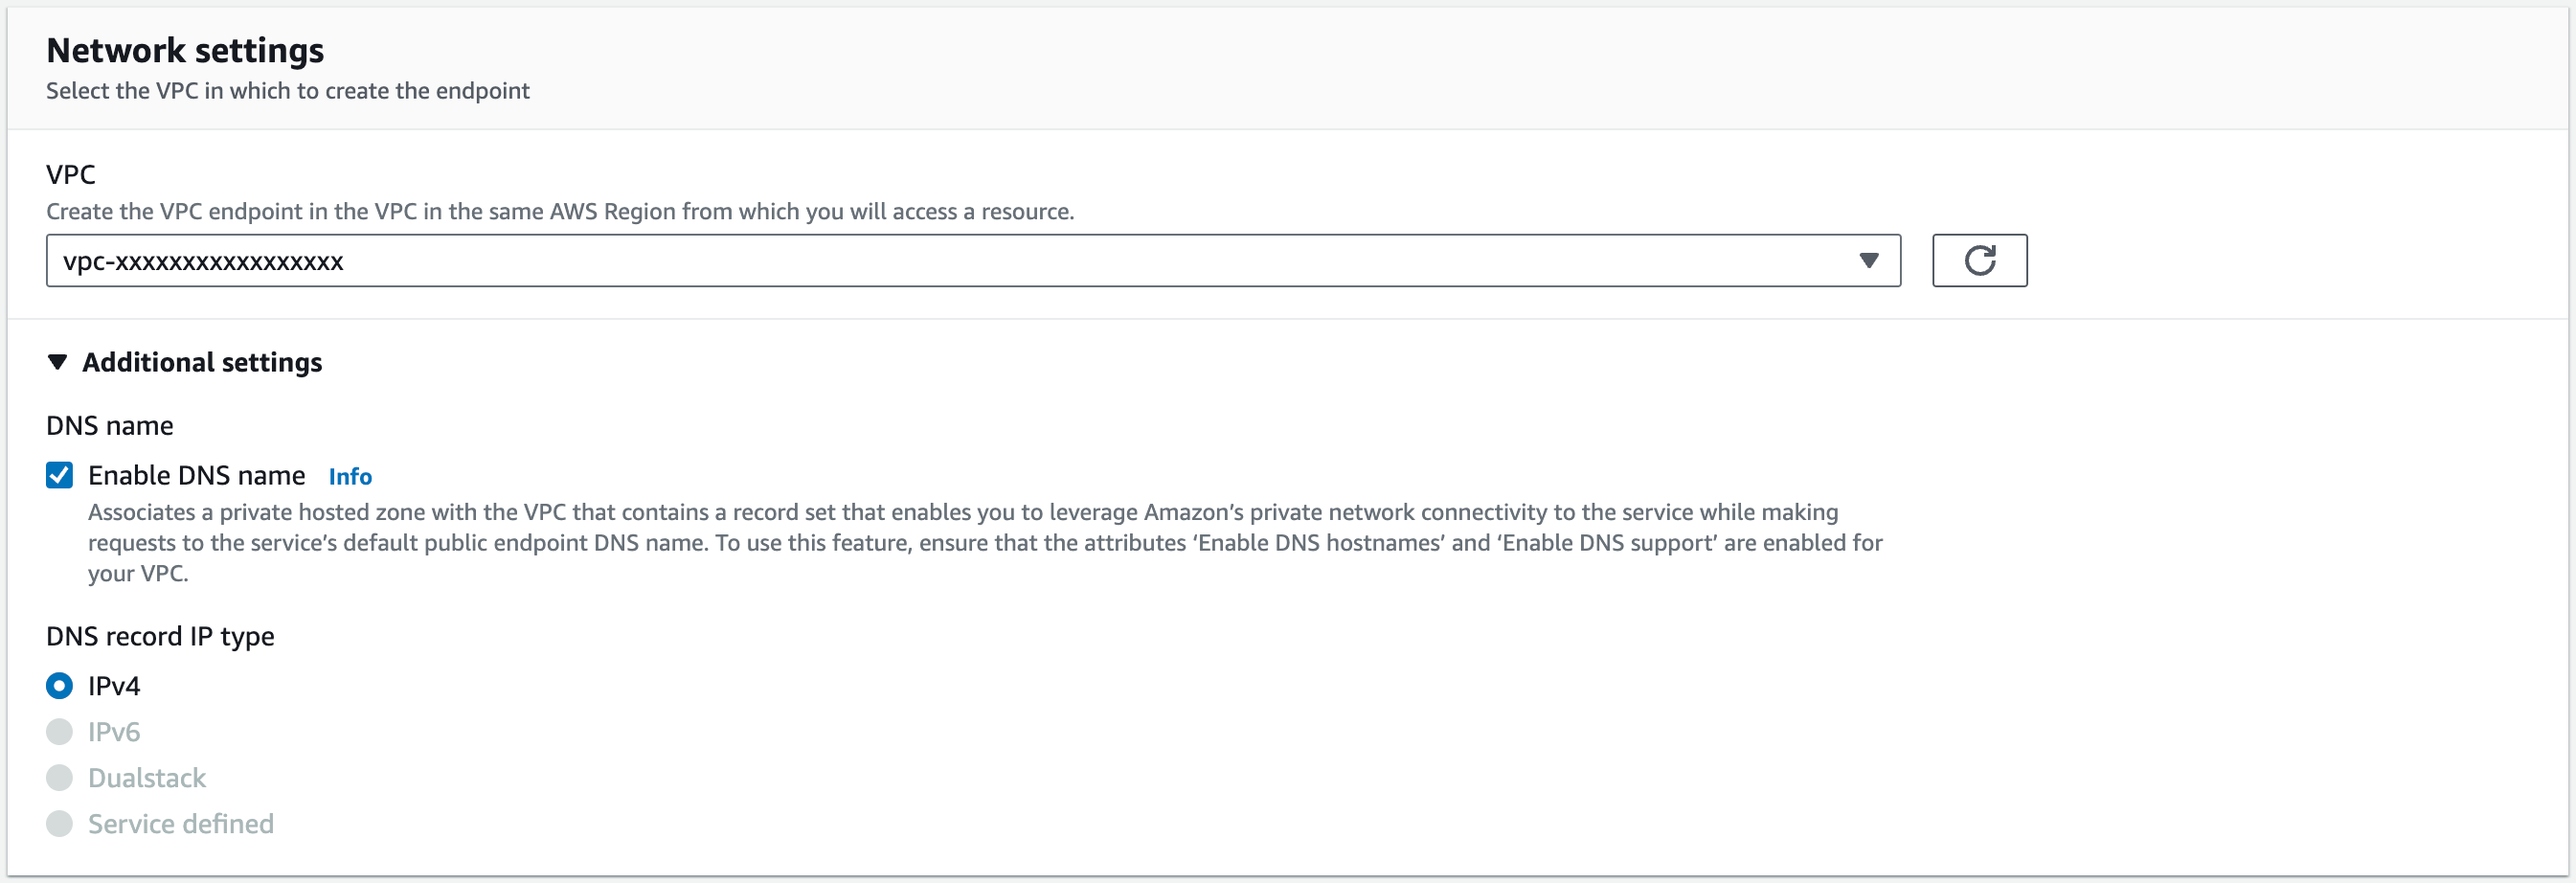
In Network settings, select the VPC created above, and select Enable DNS name.
In Subnet, select the private subnets created along with the VPC.

In Security groups, select the security group created above.
Click Create endpoint to save the above settings.
Click the created VPC endpoint ID in the Endpoints list to view its details.

Check whether the value in Private DNS names is similar to *.aws-{region}.byoc.cloud.zilliz.com.
-
If so, copy the Endpoint ID and paste it back into the Zilliz Cloud console.

-
If not, check your settings and make necessary changes.
Step 4: Submit VPC information to Zilliz Cloud
Once you have completed the above procedures on AWS, go back to Zilliz Cloud, enter the VPC ID, the subnet IDs, the security group ID, and the optional VPC endpoint ID in Network settings, and click Next to view the summary of the entire project deployment process. If everything is configured as expected, click Deploy to start the process.
