Deploy BYOC on GCP
This page describes how to manually create a fully managed Bring-Your-Own-Cloud (BYOC) data plane in your Google Cloud Platform (GCP) Virtual Private Cloud (VPC) using the Zilliz Cloud console and custom GCP configurations.
-
Zilliz BYOC is currently available in General Availability. For access and implementation details, please contact Zilliz Cloud sales.
-
This guide demonstrates how to create the necessary resources on the GCP console step-by-step. If you prefer to use a Terraform script to provision the infrastructure, see Terraform Provider.
Prerequisites
-
You must be a BYOC organization owner.
-
You have enabled the required GCP API services.
Procedure
To deploy BYOC on GCP, Zilliz Cloud needs to assume specific roles to access the Cloud Storage bucket and the GKE cluster within a customer-managed VPC on your behalf. Consequently, Zilliz Cloud needs to gather information about your Cloud Storage bucket, GKE cluster, and VPC, along with the roles necessary for accessing these infrastructure resources.
Within your BYOC organization, click the Create Project button to start the deployment.
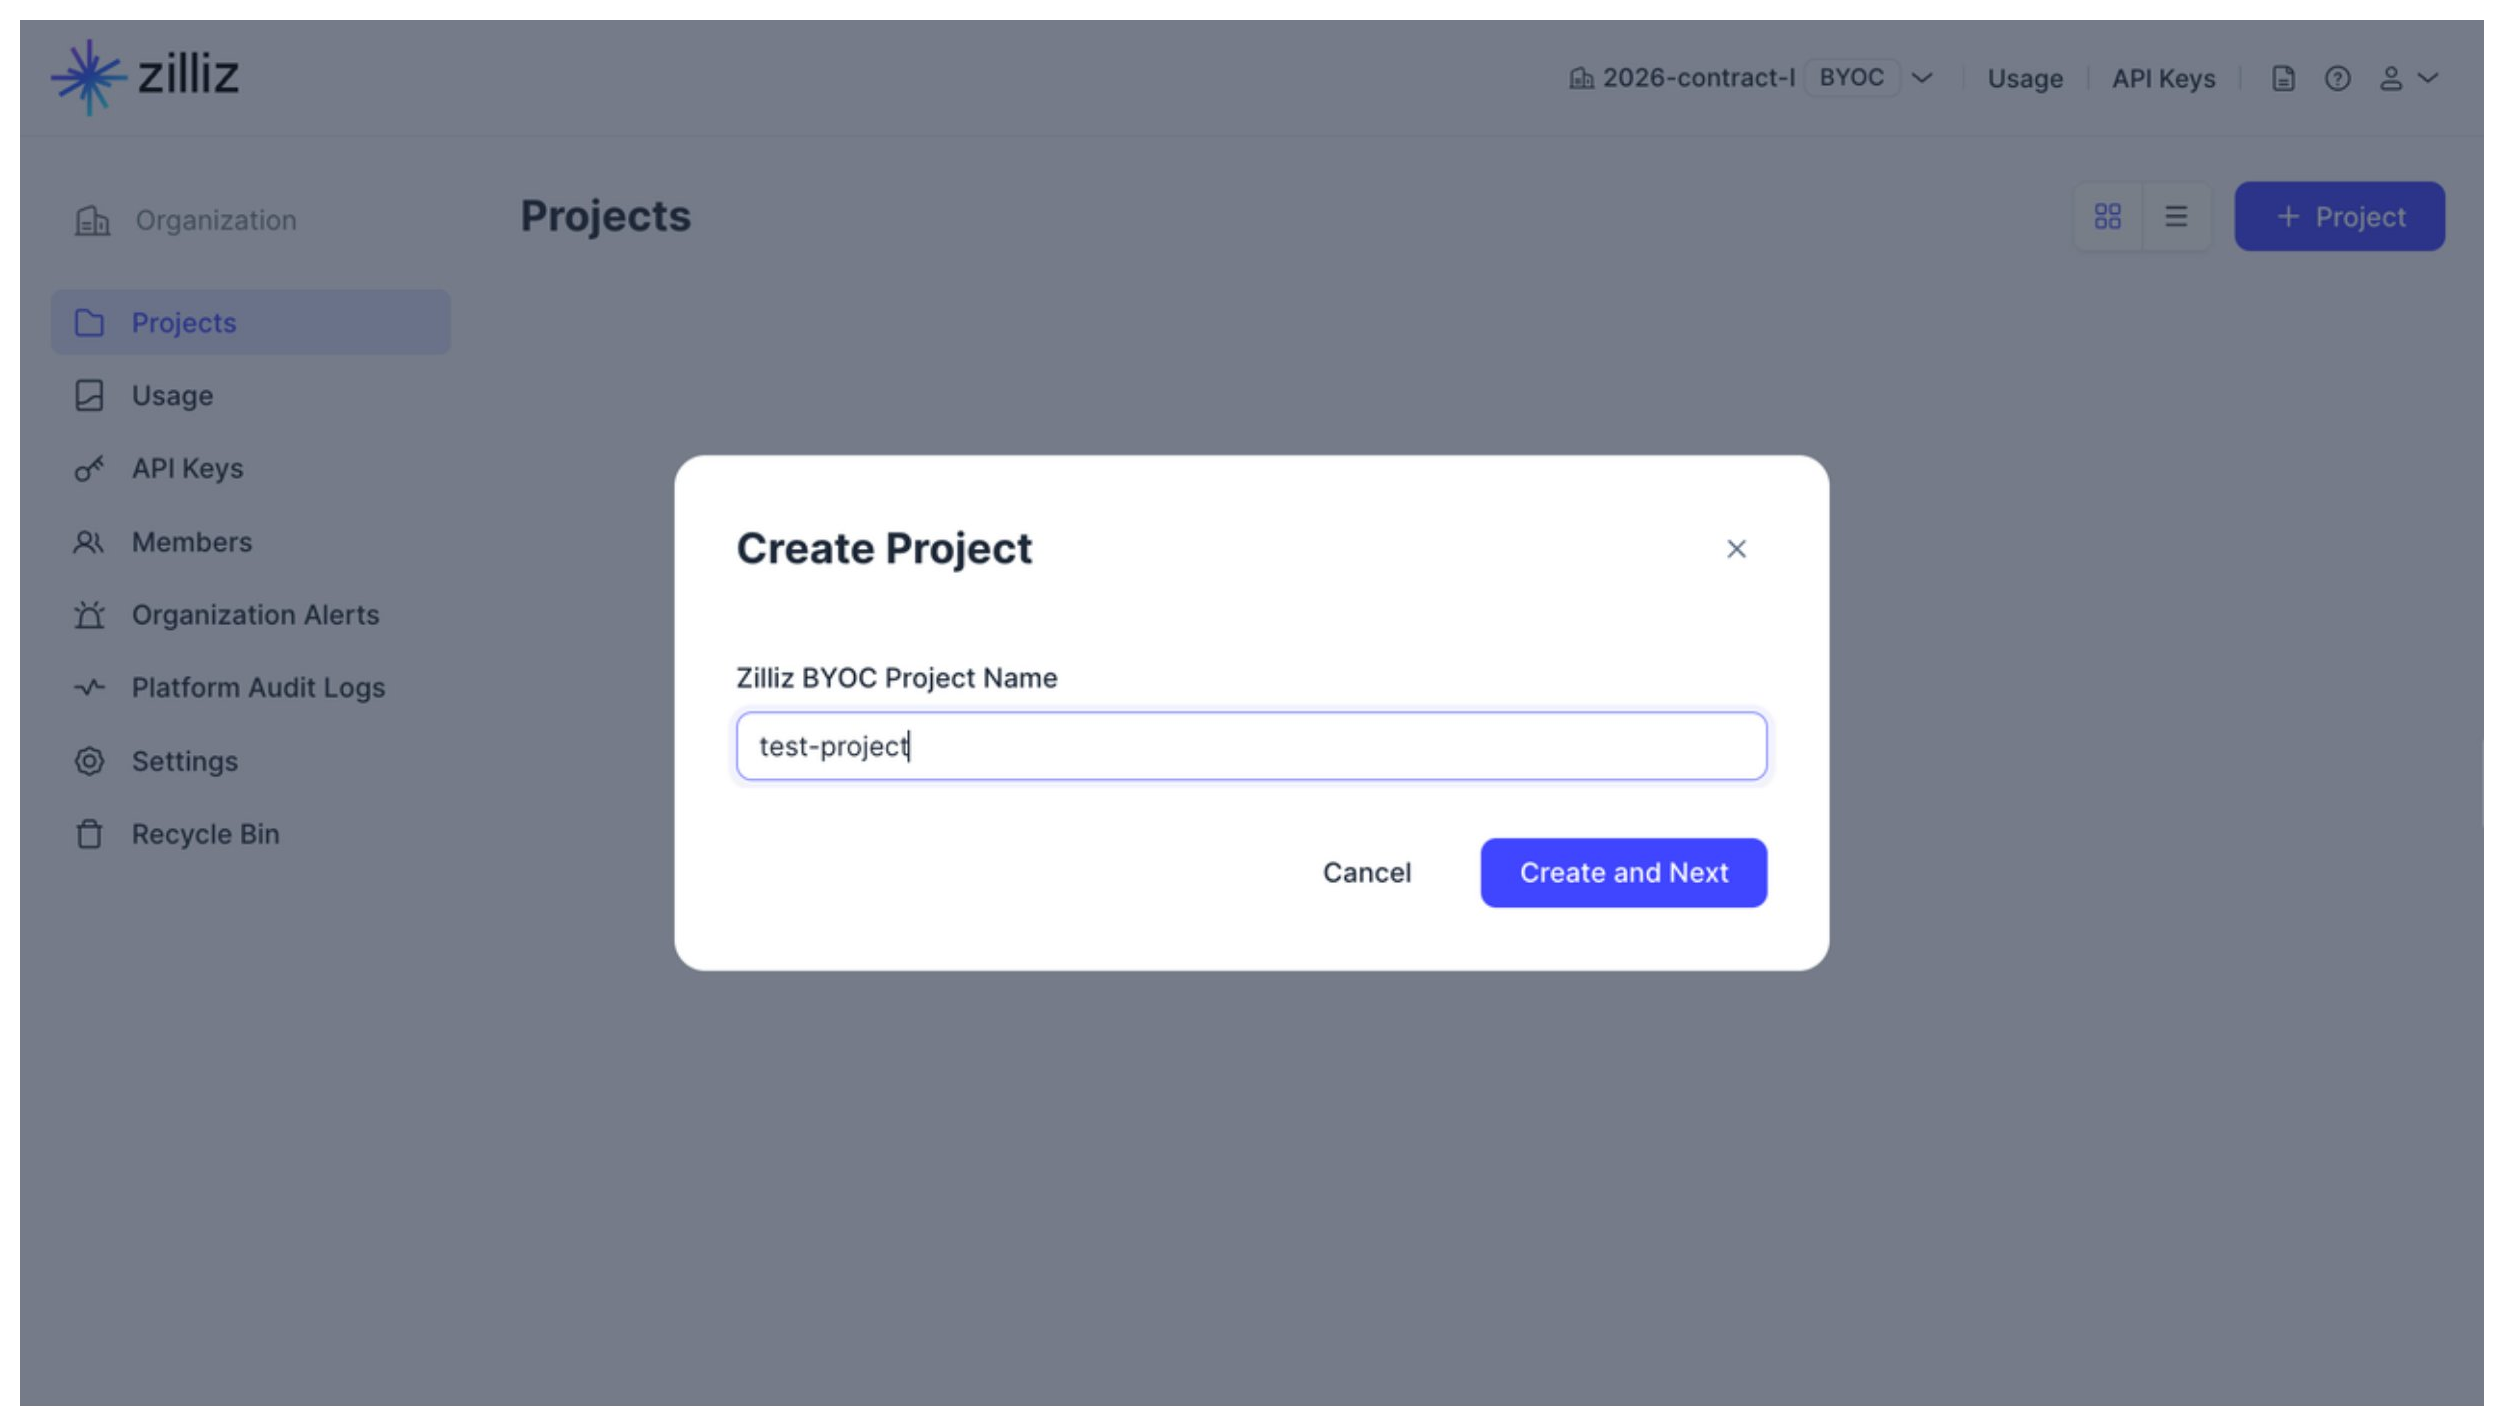
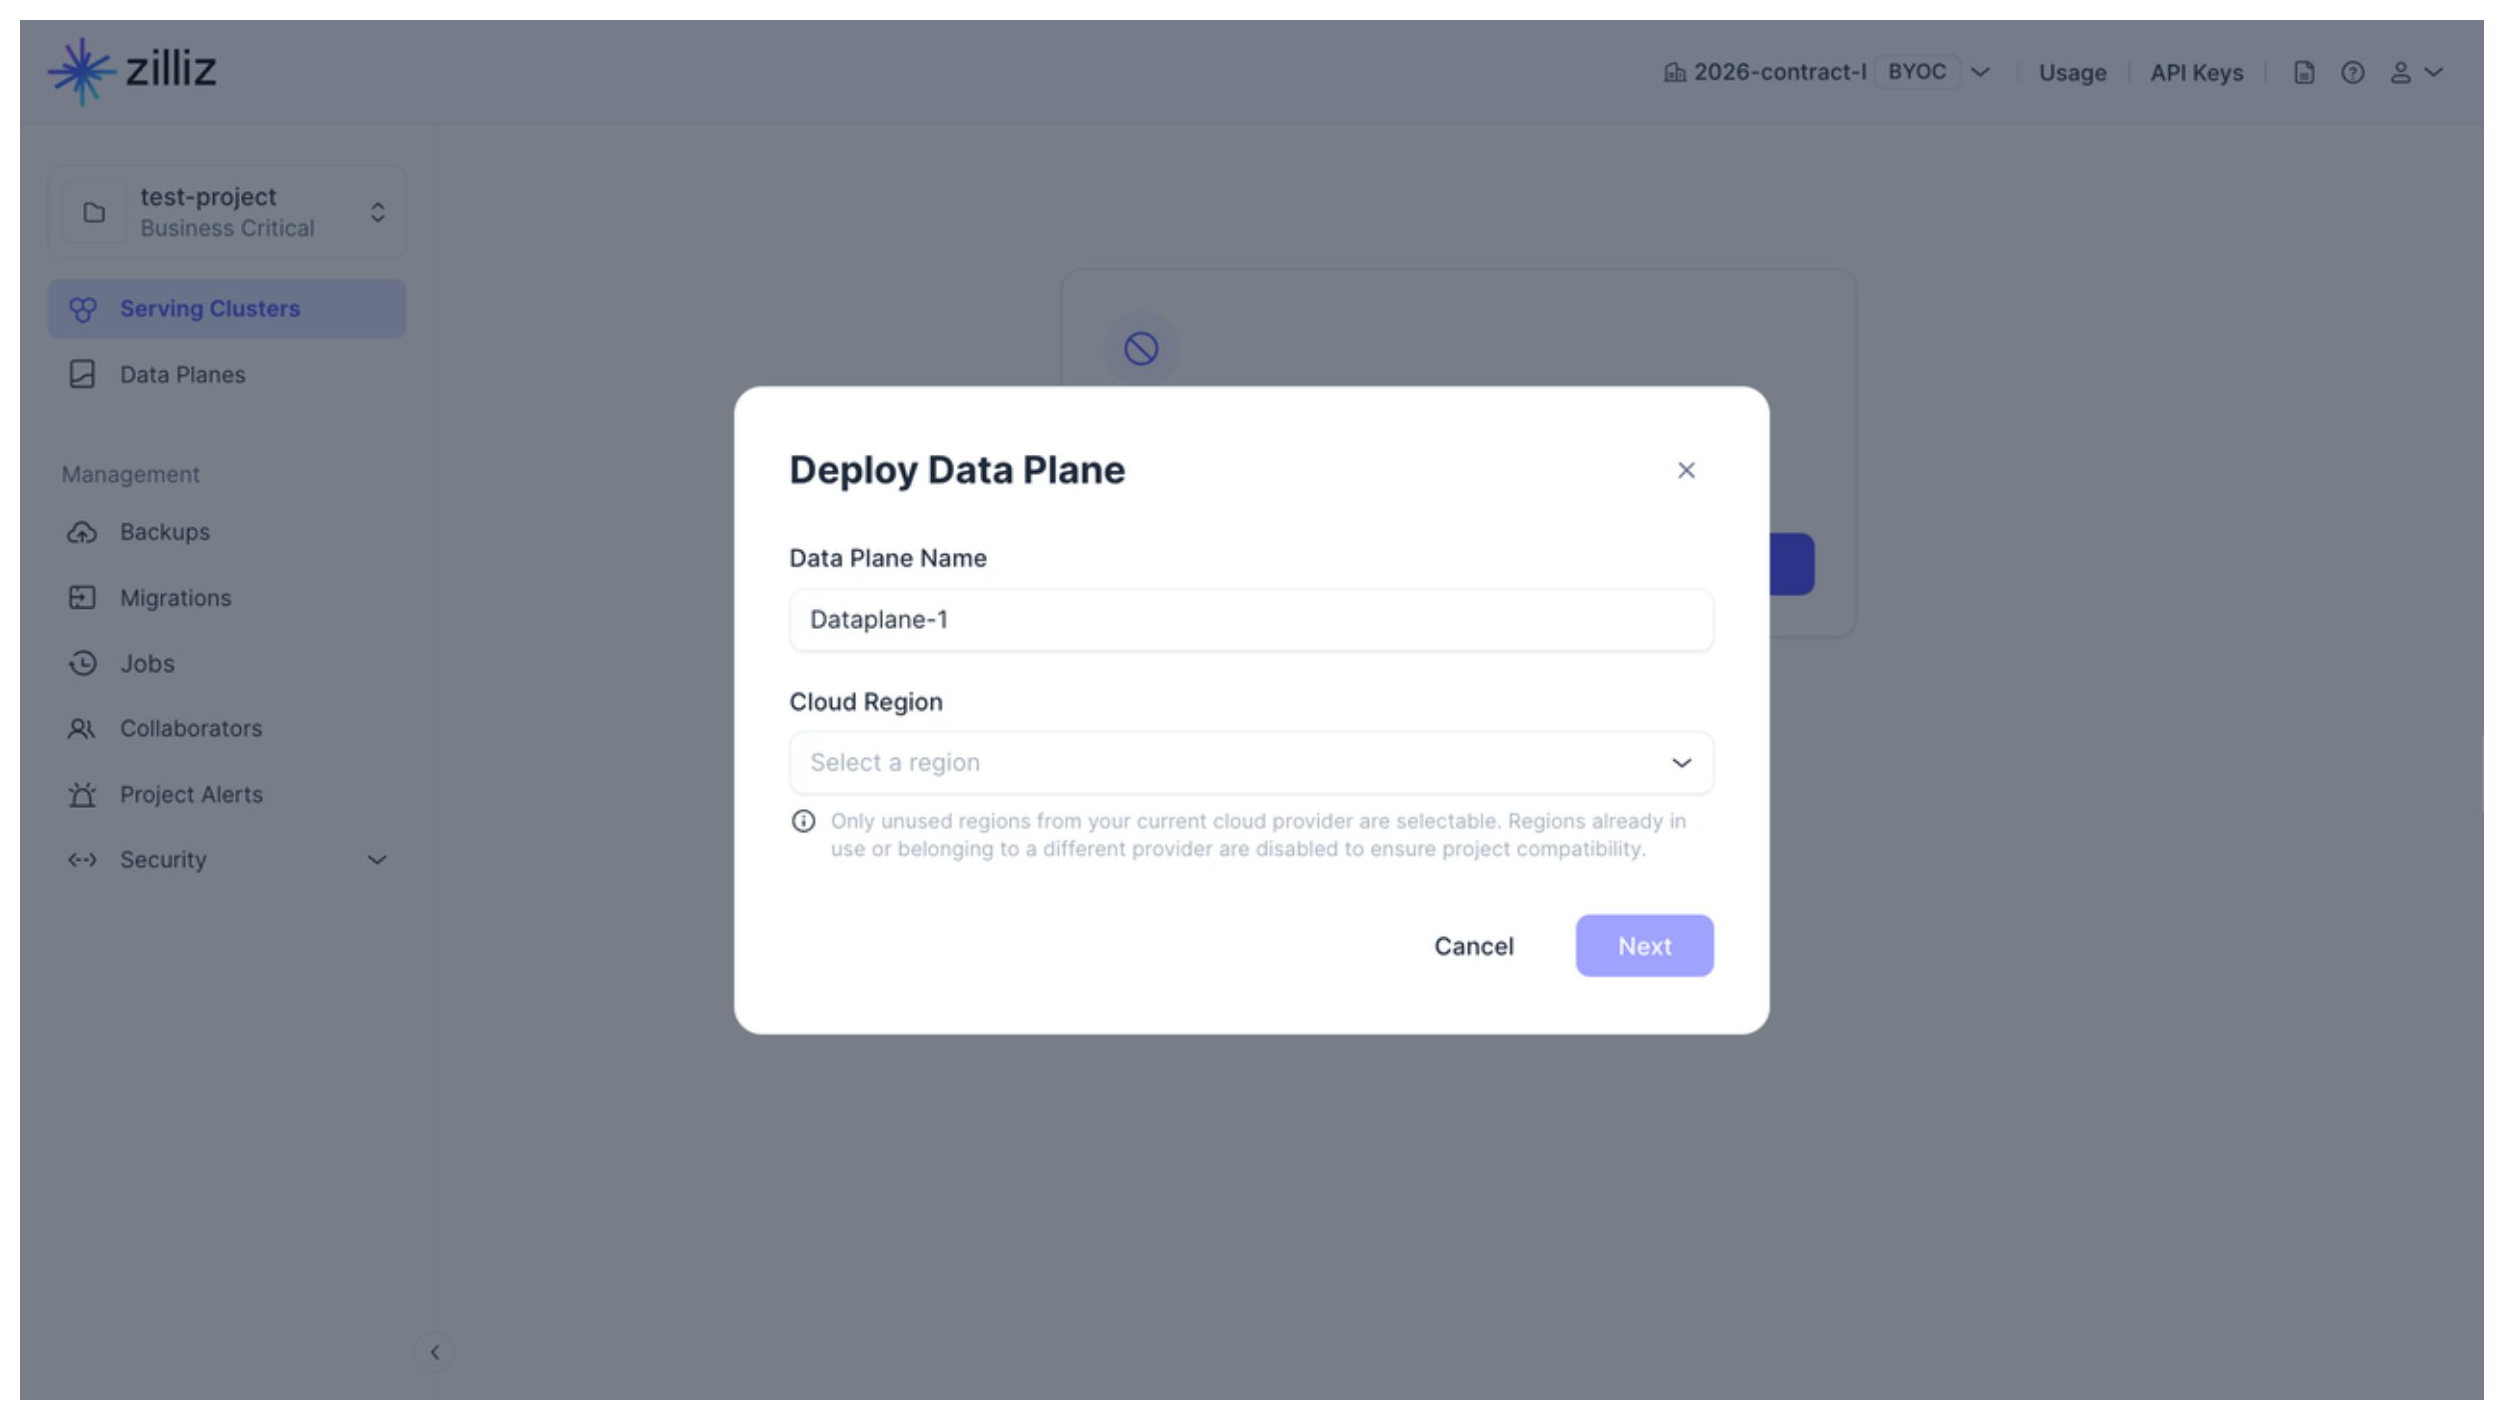
Step 1: Deploy the data plane
In this step, you need to set the Zilliz BYOC project name, determine the cloud providers and regions, and the initial project size of your deployment.
Set Data Plane Name and Cloud Region, and click Next.
Click Cancel to stop deploying the data plane. However, the project created above is still available. You can start deploying a data plane in the project at any time and add multiple data planes to a project.
Determine whether to enable GCP Private Service Connect.
This option allows private connectivity to the clusters within the current project. If you enable this option, you must create a Private Service Connect Endpoint for private connectivity. For details, refer to Prepare for Cluster Connection.
Select an architecture type that matches your application in Architecture.
This determines the architecture type of the Zilliz BYOC image to use. Available options are X86 and ARM.
In Resource Settings, you need to
-
Enable or disable Auto-scaling to allow Zilliz Cloud to automatically adjust the number of GCE instances within a defined range based on your project workloads, ensuring efficient resource use.
-
Configure Initial Project Size.
In a BYOC project, the query node, index services, Milvus components, and dependencies use different Google Compute Engine (GCE) instances. You can set instance types for these services and components.
If Auto-scaling is disabled, simply specify the number of GCE instances required for each project component in the corresponding Count field.

Once Auto-scaling is enabled, you need to specify a range for Zilliz Cloud to automatically scale the number of GCE instances based on actual project workloads by setting the corresponding Min and Max fields.

To facilitate resource settings, there are four predefined project size options. The following table shows the mapping between these project size options and the number of clusters that can be created in the project, as well as the number of entities these clusters can contain.
Size
Maximum Cluster Quantity
Maximum Number of Entities (Million)
Performance-optimized CU
Capacity-optimized CU
Tiered-storage CU
Small
3 clusters with 8 to 16 CUs
16 Million - 32 Million
64 Million - 128 Million
320 Million - 640 Million
Medium
7 clusters with 16 to 64 CUs
32 Million - 128 Million
128 Million - 512 Million
640 Million - 2.6 Billion
Large
12 clusters with 64 to 192 CUs
128 Million - 384 Million
512 Million - 1.5 Billion
2.6 Billion - 7.7 Billion
X-Large
17 clusters with 192 to 576 CUs
384 Million - 1.2 Billion
1.5 Billion - 4.6 Billion
7.7 Billion - 23 Billion
You can also customize the settings by selecting Custom in Initial Project Size and adjusting the GCE instance types and counts for all data plane components. If your preferred GCE instance types are not listed, please contact Zilliz support for further assistance.
-
Determine whether to enable Tiered Query Node.
This option determines whether you can create tiered-storage clusters. Once you select this option, you can set the instance type and count for the tiered query nodes.
 📘Notes
-
Your choice in Project Size does not affect the settings in Tiered Storage Node.
-
If Auto-scaling is disabled, the sum of the Default Query Node count and the Tiered Query Node count should be a positive integer.
-
If Auto-scaling is enabled, the sum of the Min values of both the Default Query Node and the Tiered Query Node should be a positive integer.
-
Click Next to set up credentials.
Step 2: Set up credentials
In Credential Settings, you must set up the storage and several service accounts for storage access, GKE cluster management, and data-plane deployment.

In Google Cloud Platform Project ID, enter the ID of your GCP project.
In Storage settings, set Bucket Name and Service Account Email obtained from GCP.
Zilliz Cloud will use the specified bucket as the data-plane storage and access it on your behalf using the specified service account.
For details on setting up the bucket and creating the service account, refer to Create Cloud Storage Bucket and Service Account.
In GKE Settings, set GKE Cluster Name and Service Account Email for GKE management.
Zilliz Cloud will use the specified service account to deploy a GKE cluster of the specified name on your behalf and deploy the data plane in the GKE cluster.
For details on creating the service account, refer to Create GKE Service Account.
In Cross-Account Settings, set Service Account Name for data-plane deployment.
Once your service account is ready, copy the Zilliz BYOC principal provided in the read-only text box below and paste it into your GCP console to grant Zilliz BYOC the necessary permissions to deploy the data plane of the Zilliz Cloud BYOC project.
For details on creating the cross-account service account, refer to Create a Cross-Account Service Account.
Click Next to configure network settings.
Step 3: Configure network settings
In Network Settings, create a VPC and several types of resources, such as subnet names and an optional Private Service Connect Endpoint in the VPC.

In Network Settings, set the VPC Name, Subnet Names, and the optional Private Service Connect Endpoint.
In the specified VPC, Zilliz Cloud requires
-
A primary subnet with two secondary subnets,
-
A load balancer subnet, and
-
An optional Private Service Connect endpoint.
Note that Private Service Connect Endpoint is available only when you switch on GCP Private Service Connect in General Settings above.
Click Next to view the summary.
In Deployment Summary, review the configuration settings.
Click Create if everything is as expected.
View deployment details
After you create a project, you can view its status on the project page.

Once you have deployed the project's data plane and created clusters, you can connect to these clusters either through direct VPC access or via GCP Private Service Connect. For details, refer to Connect to BYOC Clusters.
Suspend & Resume
Suspending a project halts the data plane and terminates all GCE instances associated with the GKE cluster supporting the project. This action does not impact the suspended Zilliz Cloud clusters within the project, which can be resumed once the data plane is restored.
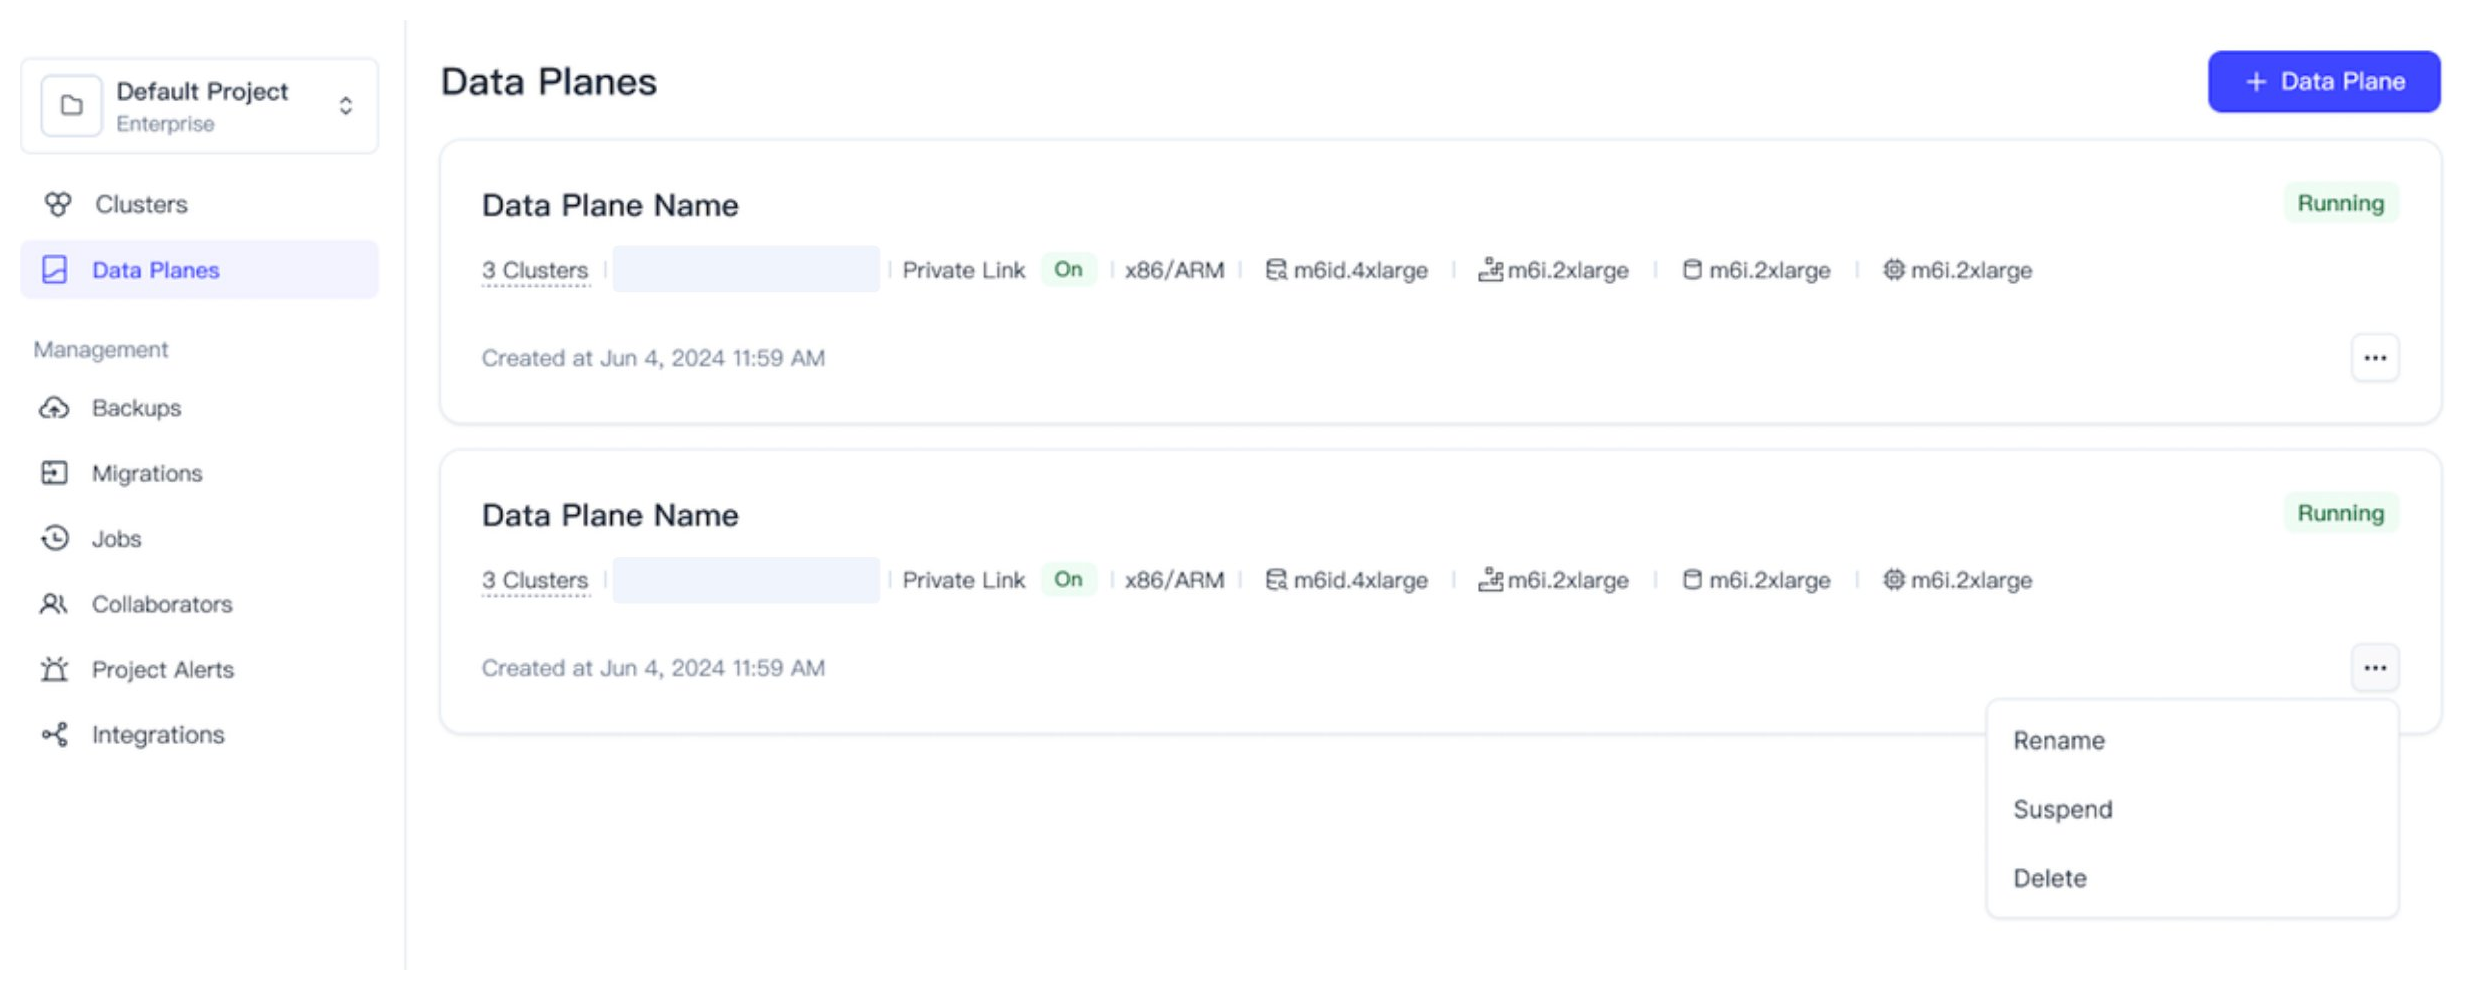
You can only suspend a running project if there are no clusters in the project or all clusters have already been suspended.

Once the status tag on a project card reads Suspended, you cannot manipulate clusters in the project. In such a case, you can click Resume to resume the project. Once the status tag turns to Running again, you can continue manipulating clusters in the project.
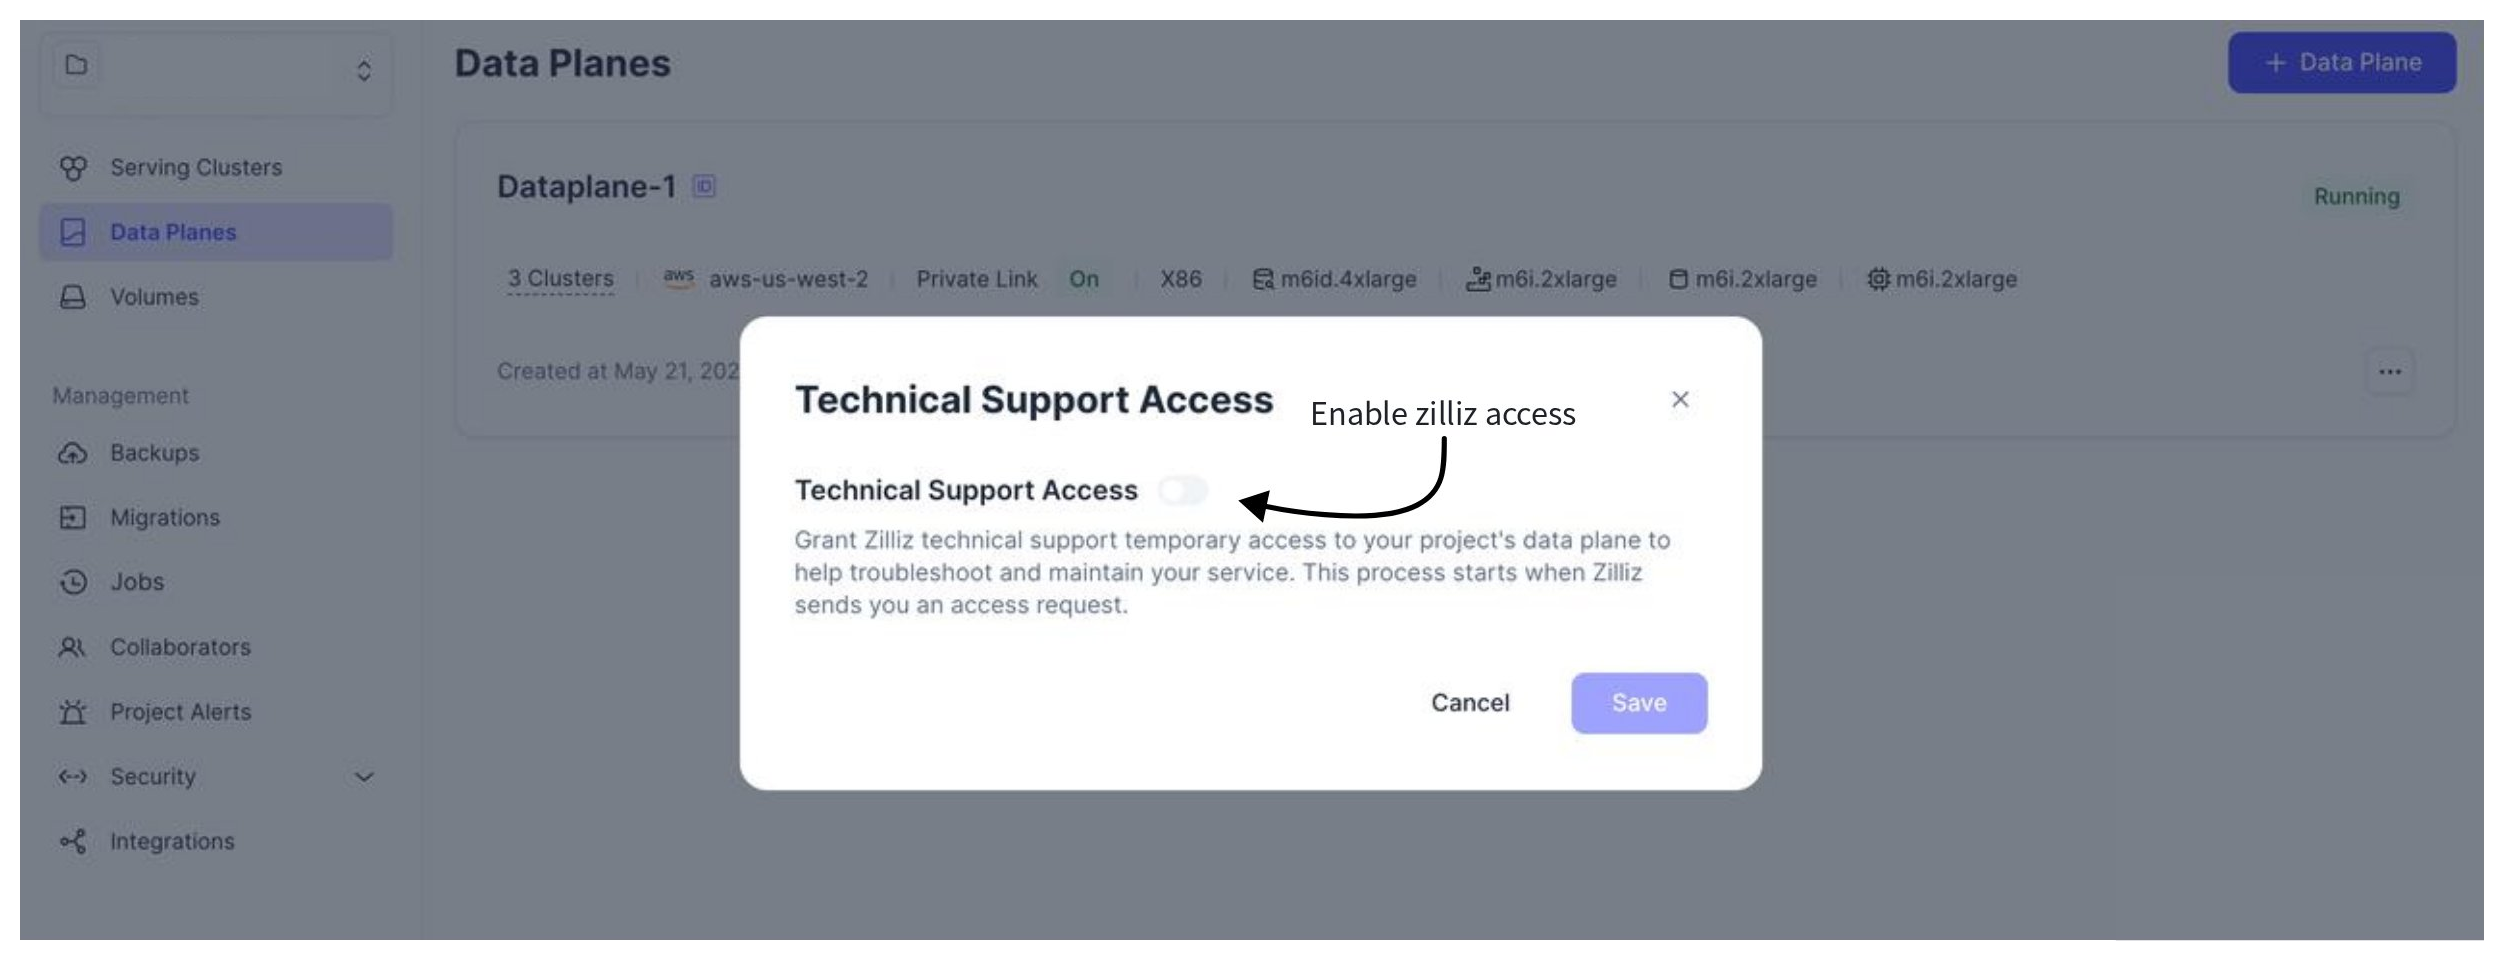
Technical support access
To assist you with troubleshooting and maintenance operations, Zilliz Cloud enables technical support to access your project's data plane by default. You can choose to disable it to meet governance and security requirements.
The following procedure demonstrates how to enable technical support access again after you disabled it when Zilliz Cloud technical support contacts you on an identified issue.
Once Zilliz Cloud identifies an issue on your data plane and you have disabled technical support access, we will inform you about it and apply for technical support access.
Find the data plane in concern, click ... at the bottom-right corner of the data plane card, and click Technical Support Access from the drop-down list.
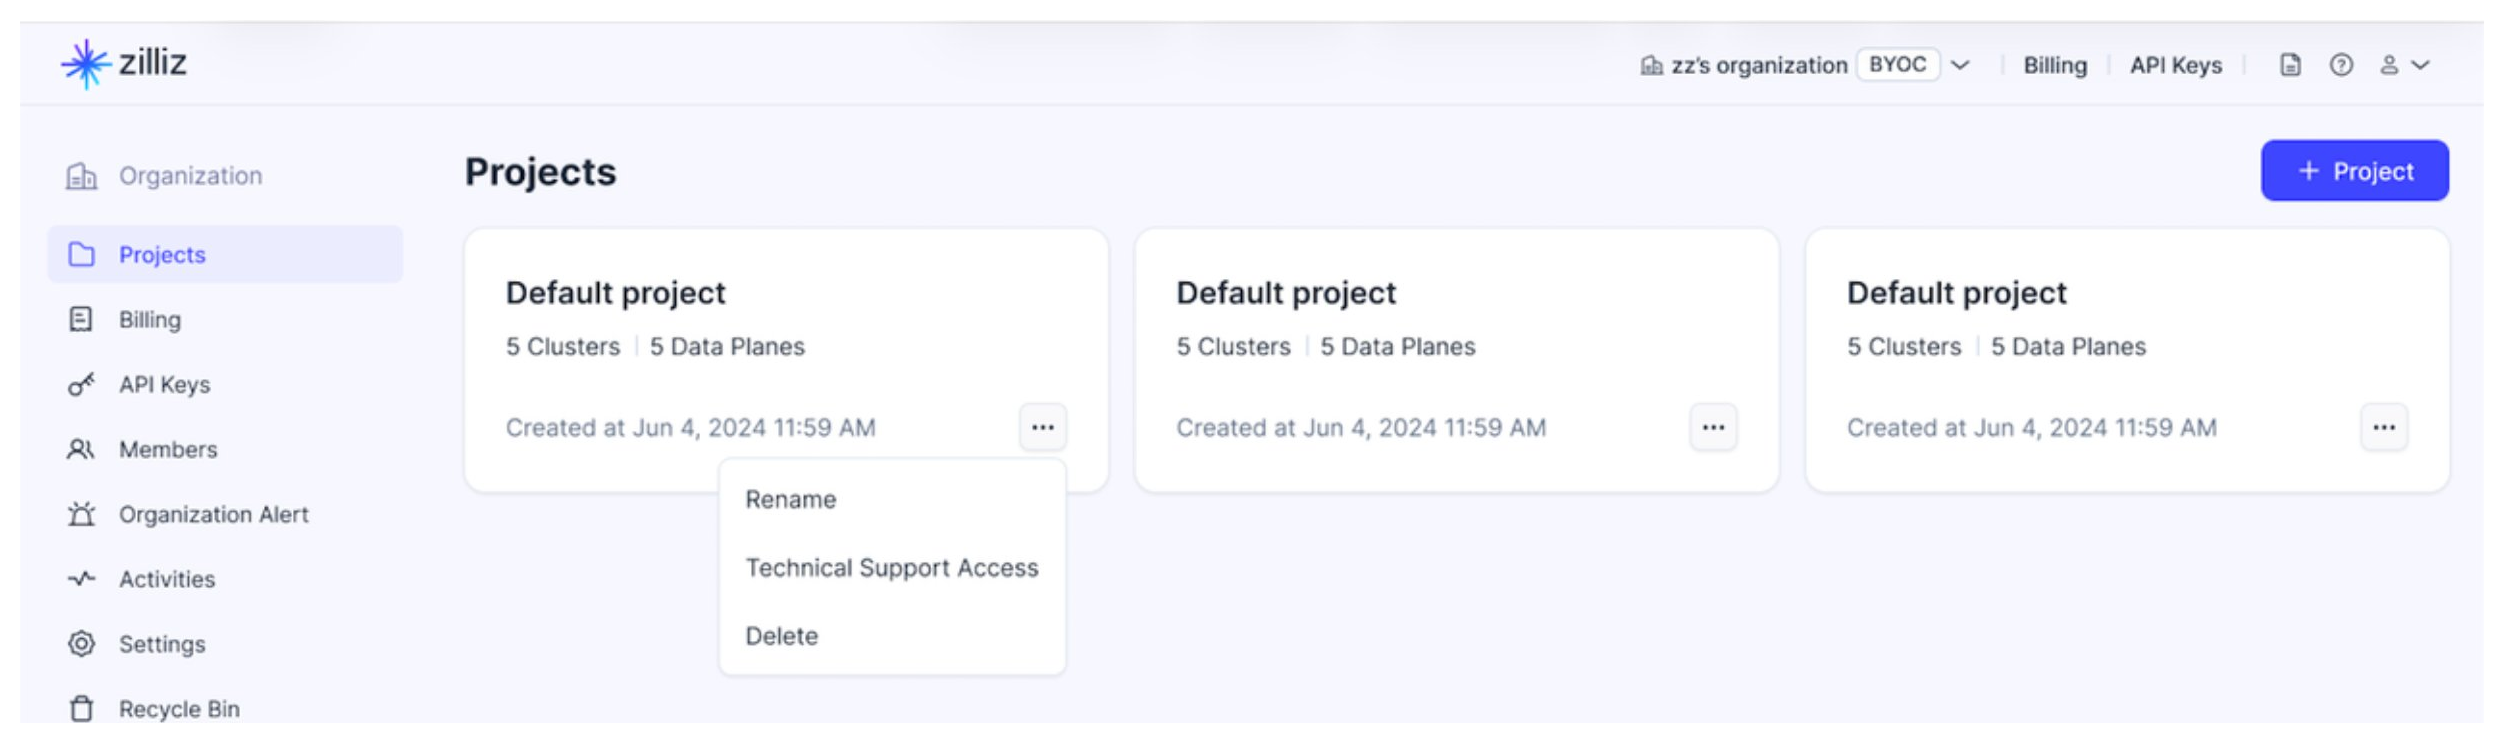
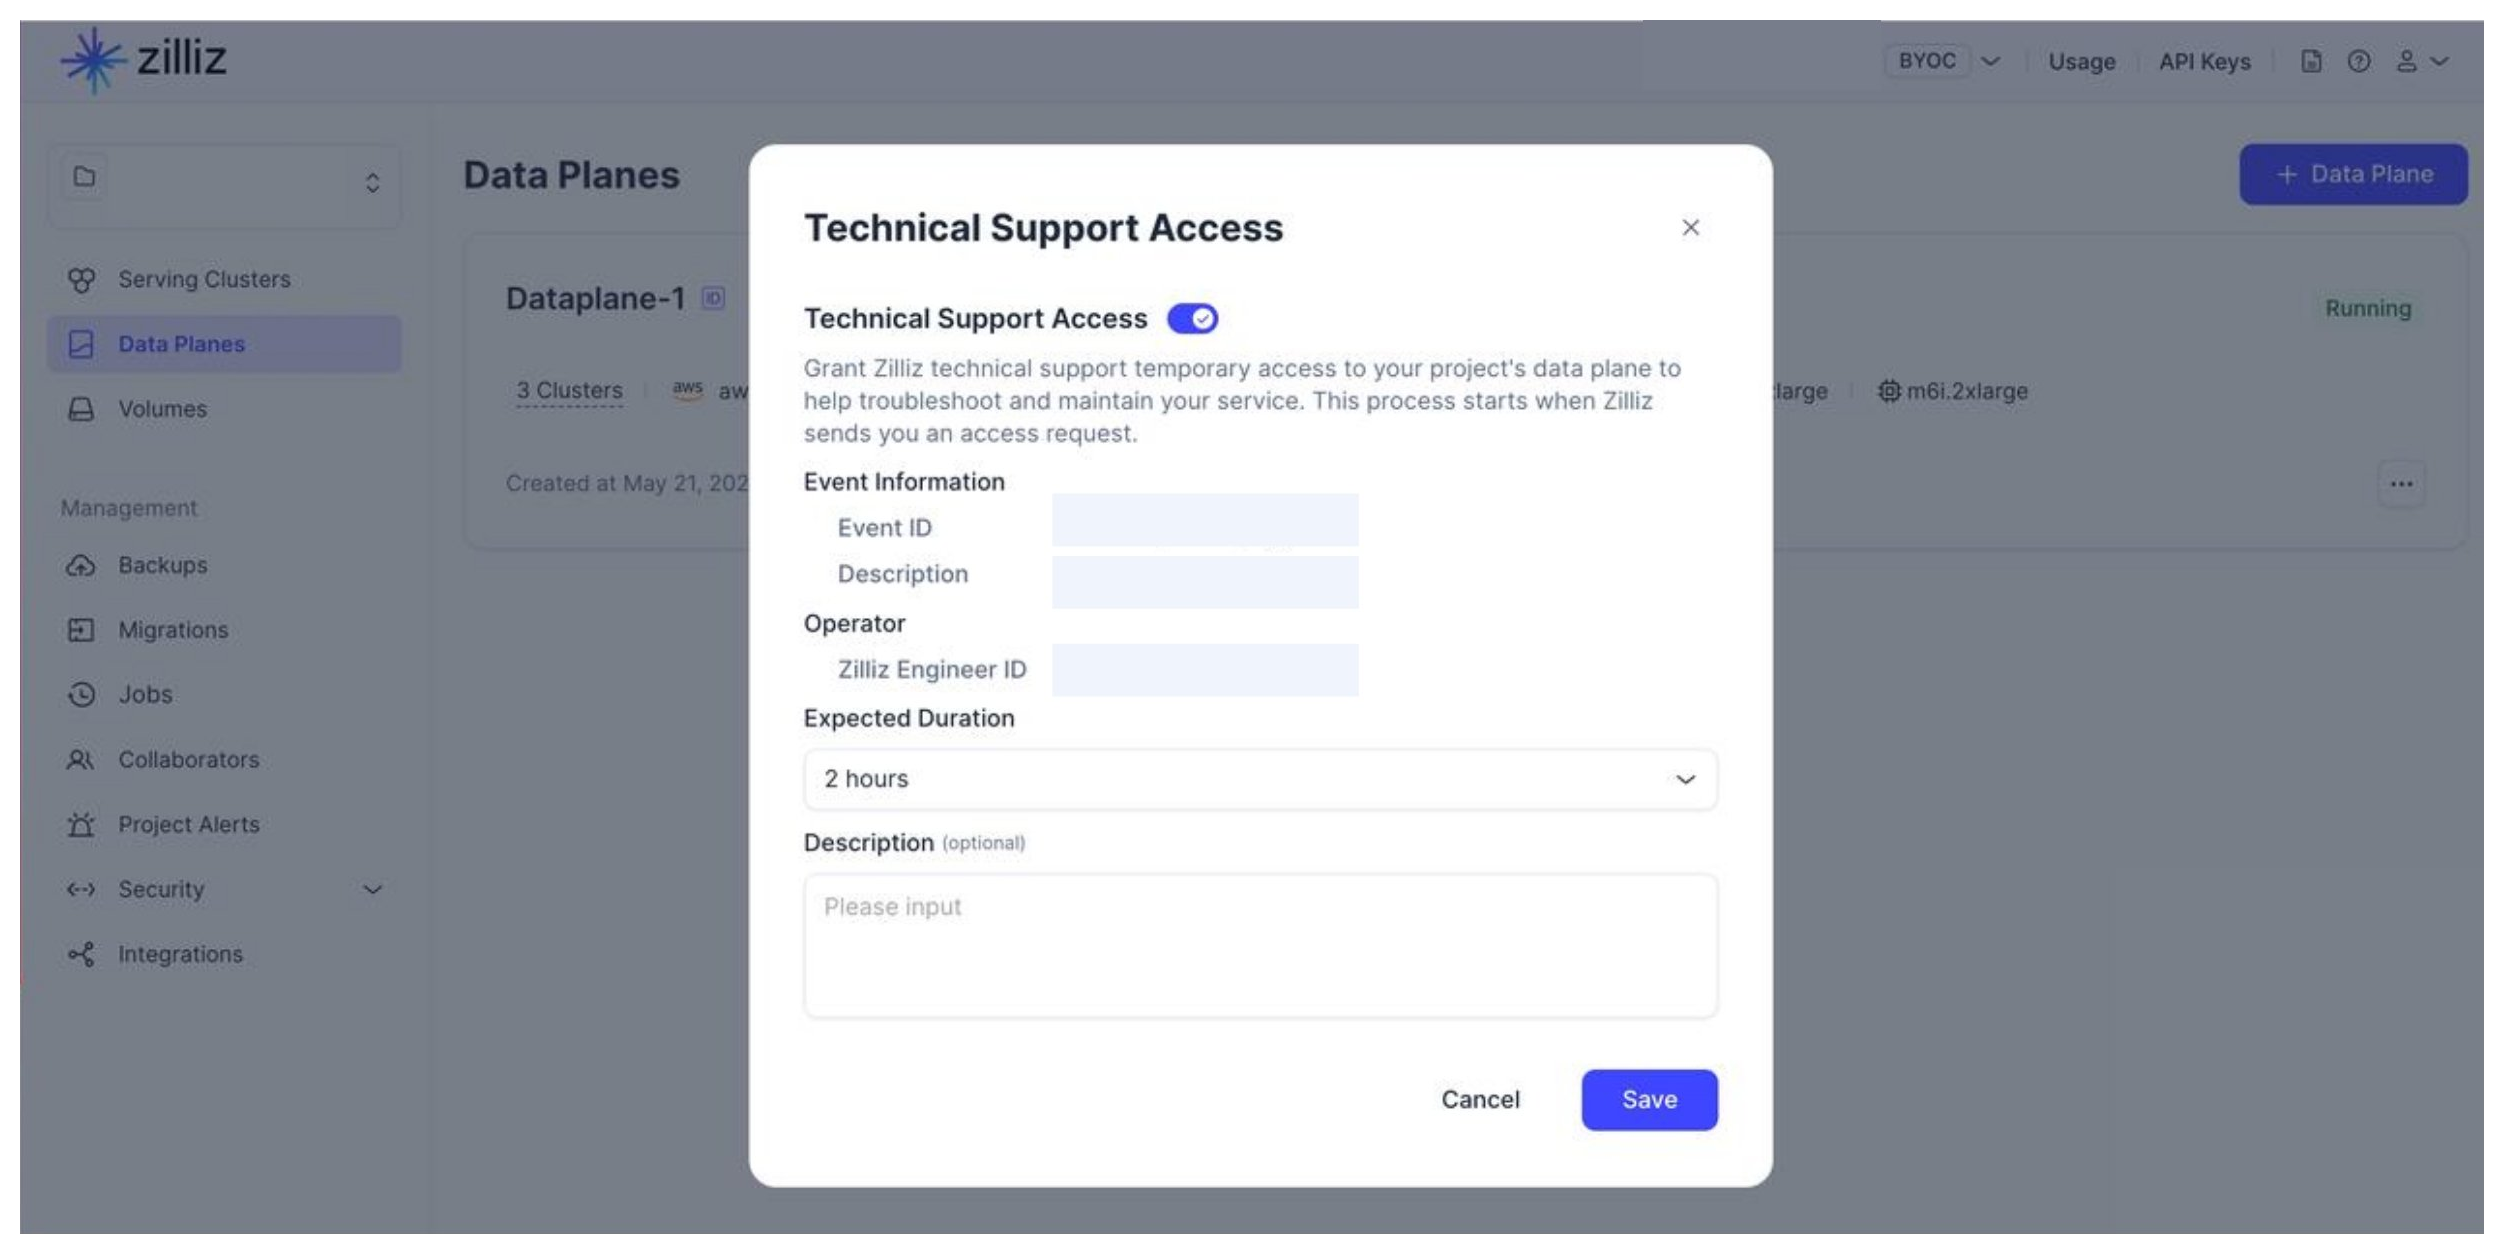
In the prompted dialog box, switch on Technical Support Access.
And you will find information about the reason why we apply for access and the ID of the issue owner assigned by Zilliz Cloud. You can decide the access lifespan in Expected Duration and provide optional requirements in Description. Once everything is set, click Save.
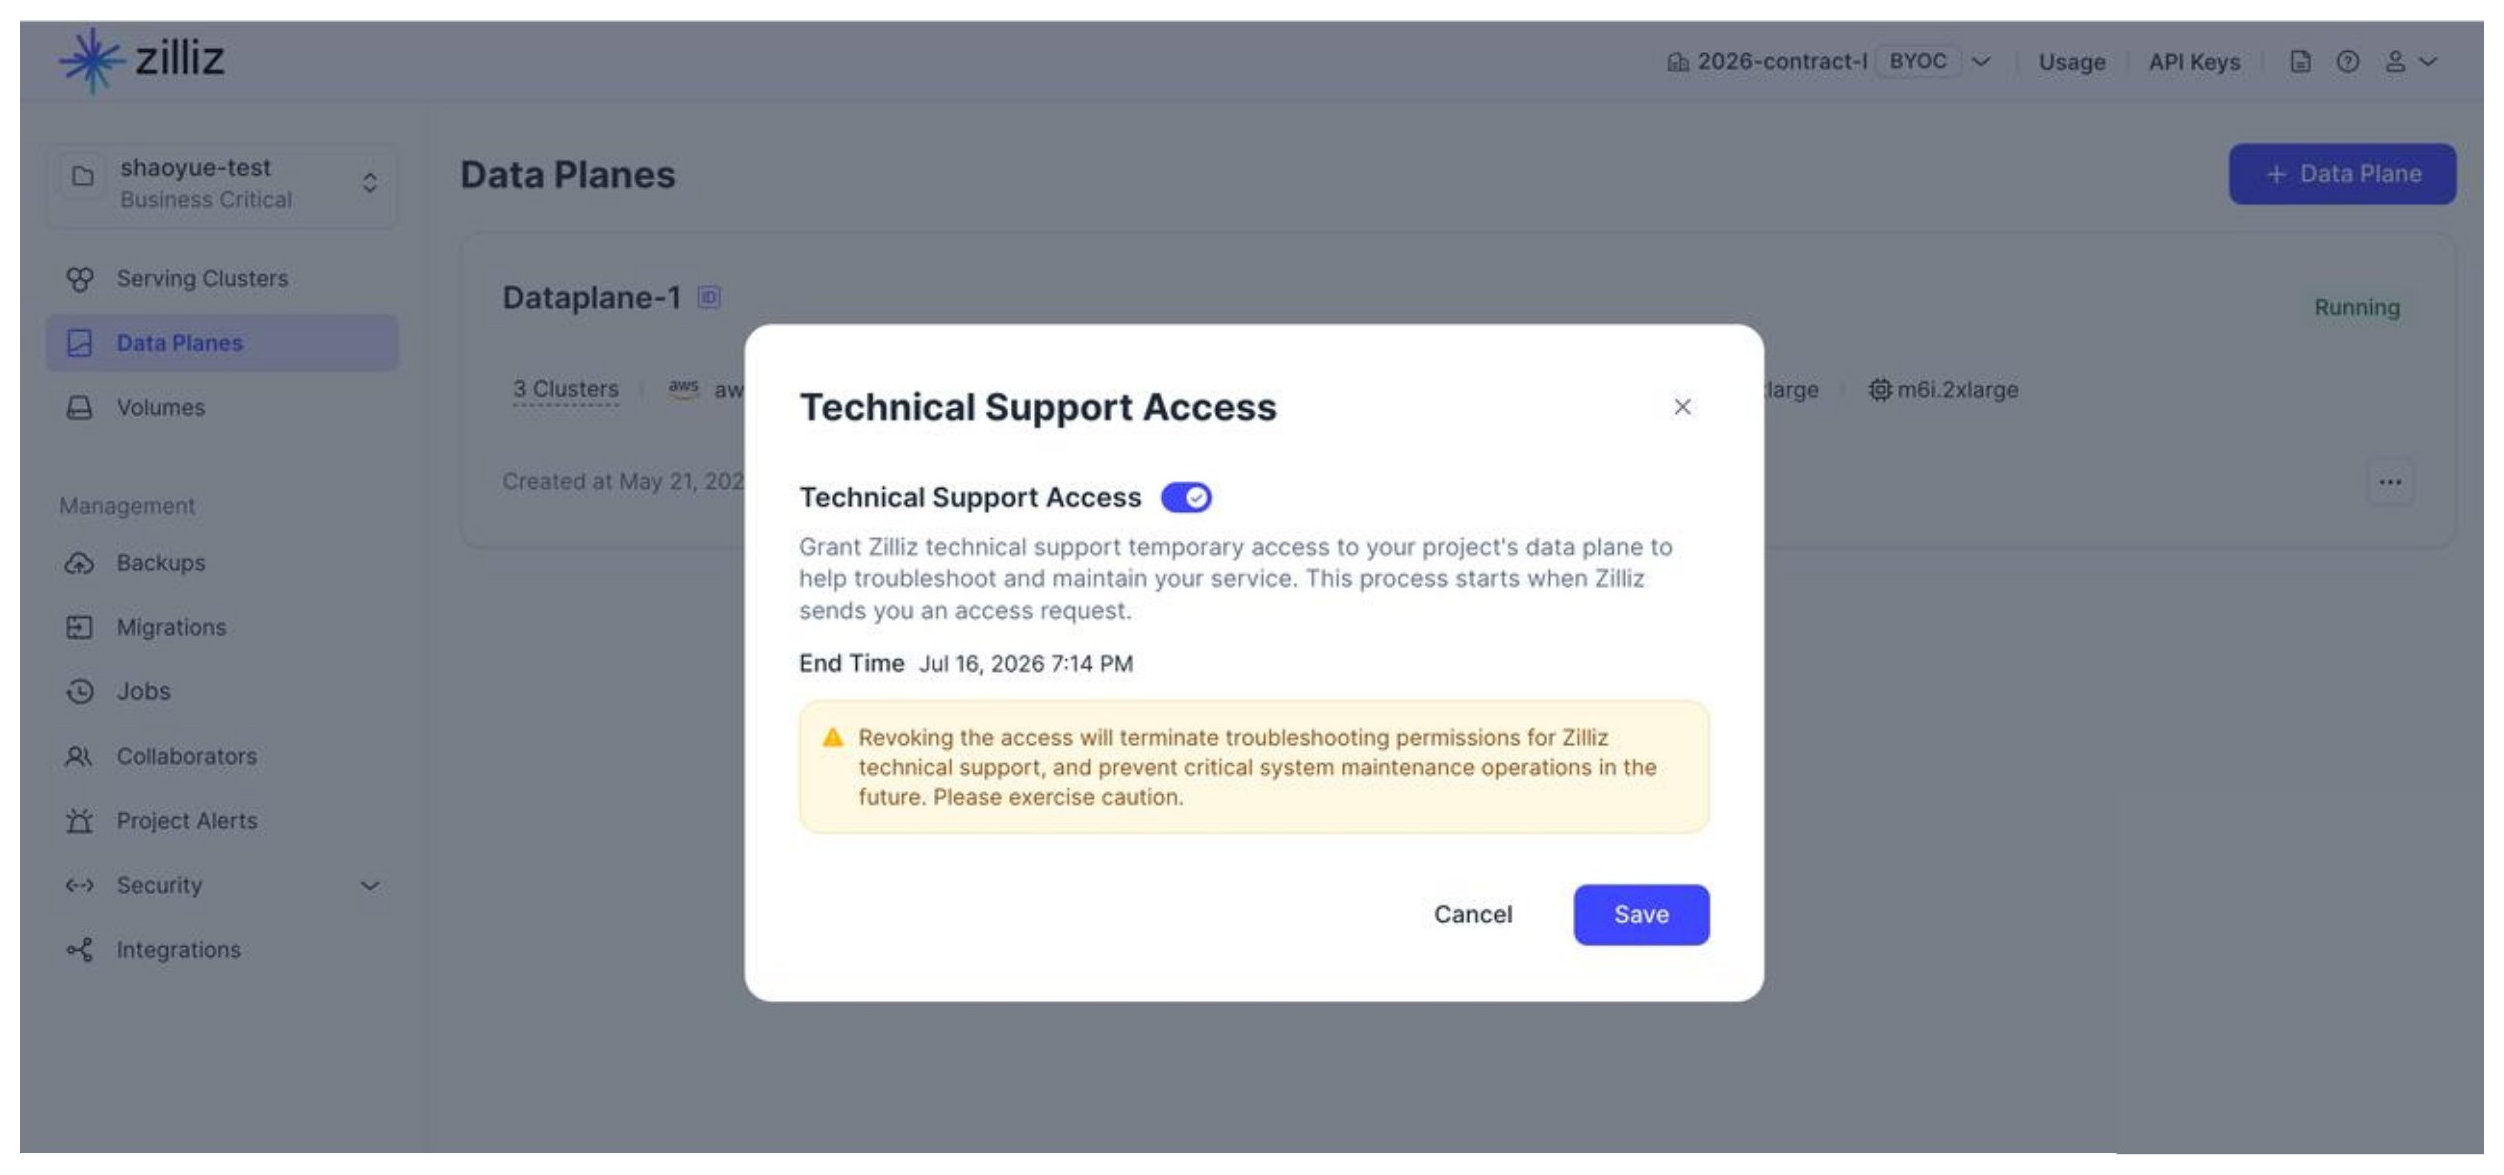
When you open the dialog box during troubleshooting, you will see the end time of this access. The technical support access will be disabled again once it expires or you explicitly disable it.
Procedures
Create Cloud Storage Bucket and Service Account [READ MORE]
This page describes the procedure for creating and configuring the root storage for your Bring-Your-Own-Cloud (BYOC) project with proper permissions.
Create GKE Service Account [READ MORE]
This page describes how to create and configure a service account for Zilliz Cloud to deploy a Google Kubernetes Engine (GKE) cluster for your Zilliz Cloud project.
Create a Cross-Account Service Account [READ MORE]
This page describes how to create and configure a cross-account service account for Zilliz Cloud to bootstrap your project data plane. This service account grants Zilliz Cloud the necessary permissions to manage VPC resources on your behalf.
Configure a Customer-Managed VPC on GCP [READ MORE]
The Zilliz Cloud Bring-Your-Own-Cloud (BYOC) solution enables you to set up a project within your own Virtual Private Cloud (VPC). With a Zilliz Cloud project running in a customer-managed VPC, you gain greater control over your network configurations, allowing you to meet specific cloud security and governance standards required by your organization.
Required Permissions [READ MORE]
This page lists the IAM policies required during the deployment of Zilliz BYOC data plane on your VPC network.
Required GCP API Services [READ MORE]
This page lists the Google Cloud Platform (GCP) API services required to create GCP resources using the Zilliz Cloud Terraform Provider and provides several ways to enable them.