Deploy BYOC-I on GCP
This page explains how to deploy a Bring-Your-Own-Cloud (BYOC) data plane with a BYOC agent in your GCP Virtual Private Cloud (VPC).
-
Zilliz BYOC is currently available in General Availability. For access and implementation details, please contact Zilliz Cloud support.
-
This guide demonstrates how to create the necessary resources on the GCP console step-by-step. If you prefer to use a Terraform script to provision the infrastructure, see Terraform Provider.
Prerequisites
Ensure that
-
You are the owner of a BYOC-I organization.
-
You have been granted the permissions listed in Required permissions.
Applicable VPC regions
The following table lists the Google Cloud Platform (GCP) regions the Zilliz Cloud BYOC solution supports. If you cannot find your cloud regions on the Zilliz Cloud console, please contact us at support@zilliz.com.
Continent | Region | Location |
|---|---|---|
North America | us-west1 | Oregon, USA |
us-east4 | Virginia, USA | |
us-central1 | Iowa, USA | |
Europe | europe-west3 | Frankfurt, Germany |
Asia | asia-southeast1 | Singapore |
Procedures
Step 1: Prepare the deployment environment
A deployment environment is a local machine, a virtual machine (GCE), or a CI/CD pipeline configured to run the Terraform configuration files and deploy the data plane of your BYOC-I project. In this step, you need to
-
Configure GCP credentials (GCP service account or access key).
For details on how to configure GCP credentials, refer to this document.
-
Install the latest Terraform binary.
For details on how to install Terraform, refer to this document.
Step 2: Create a project
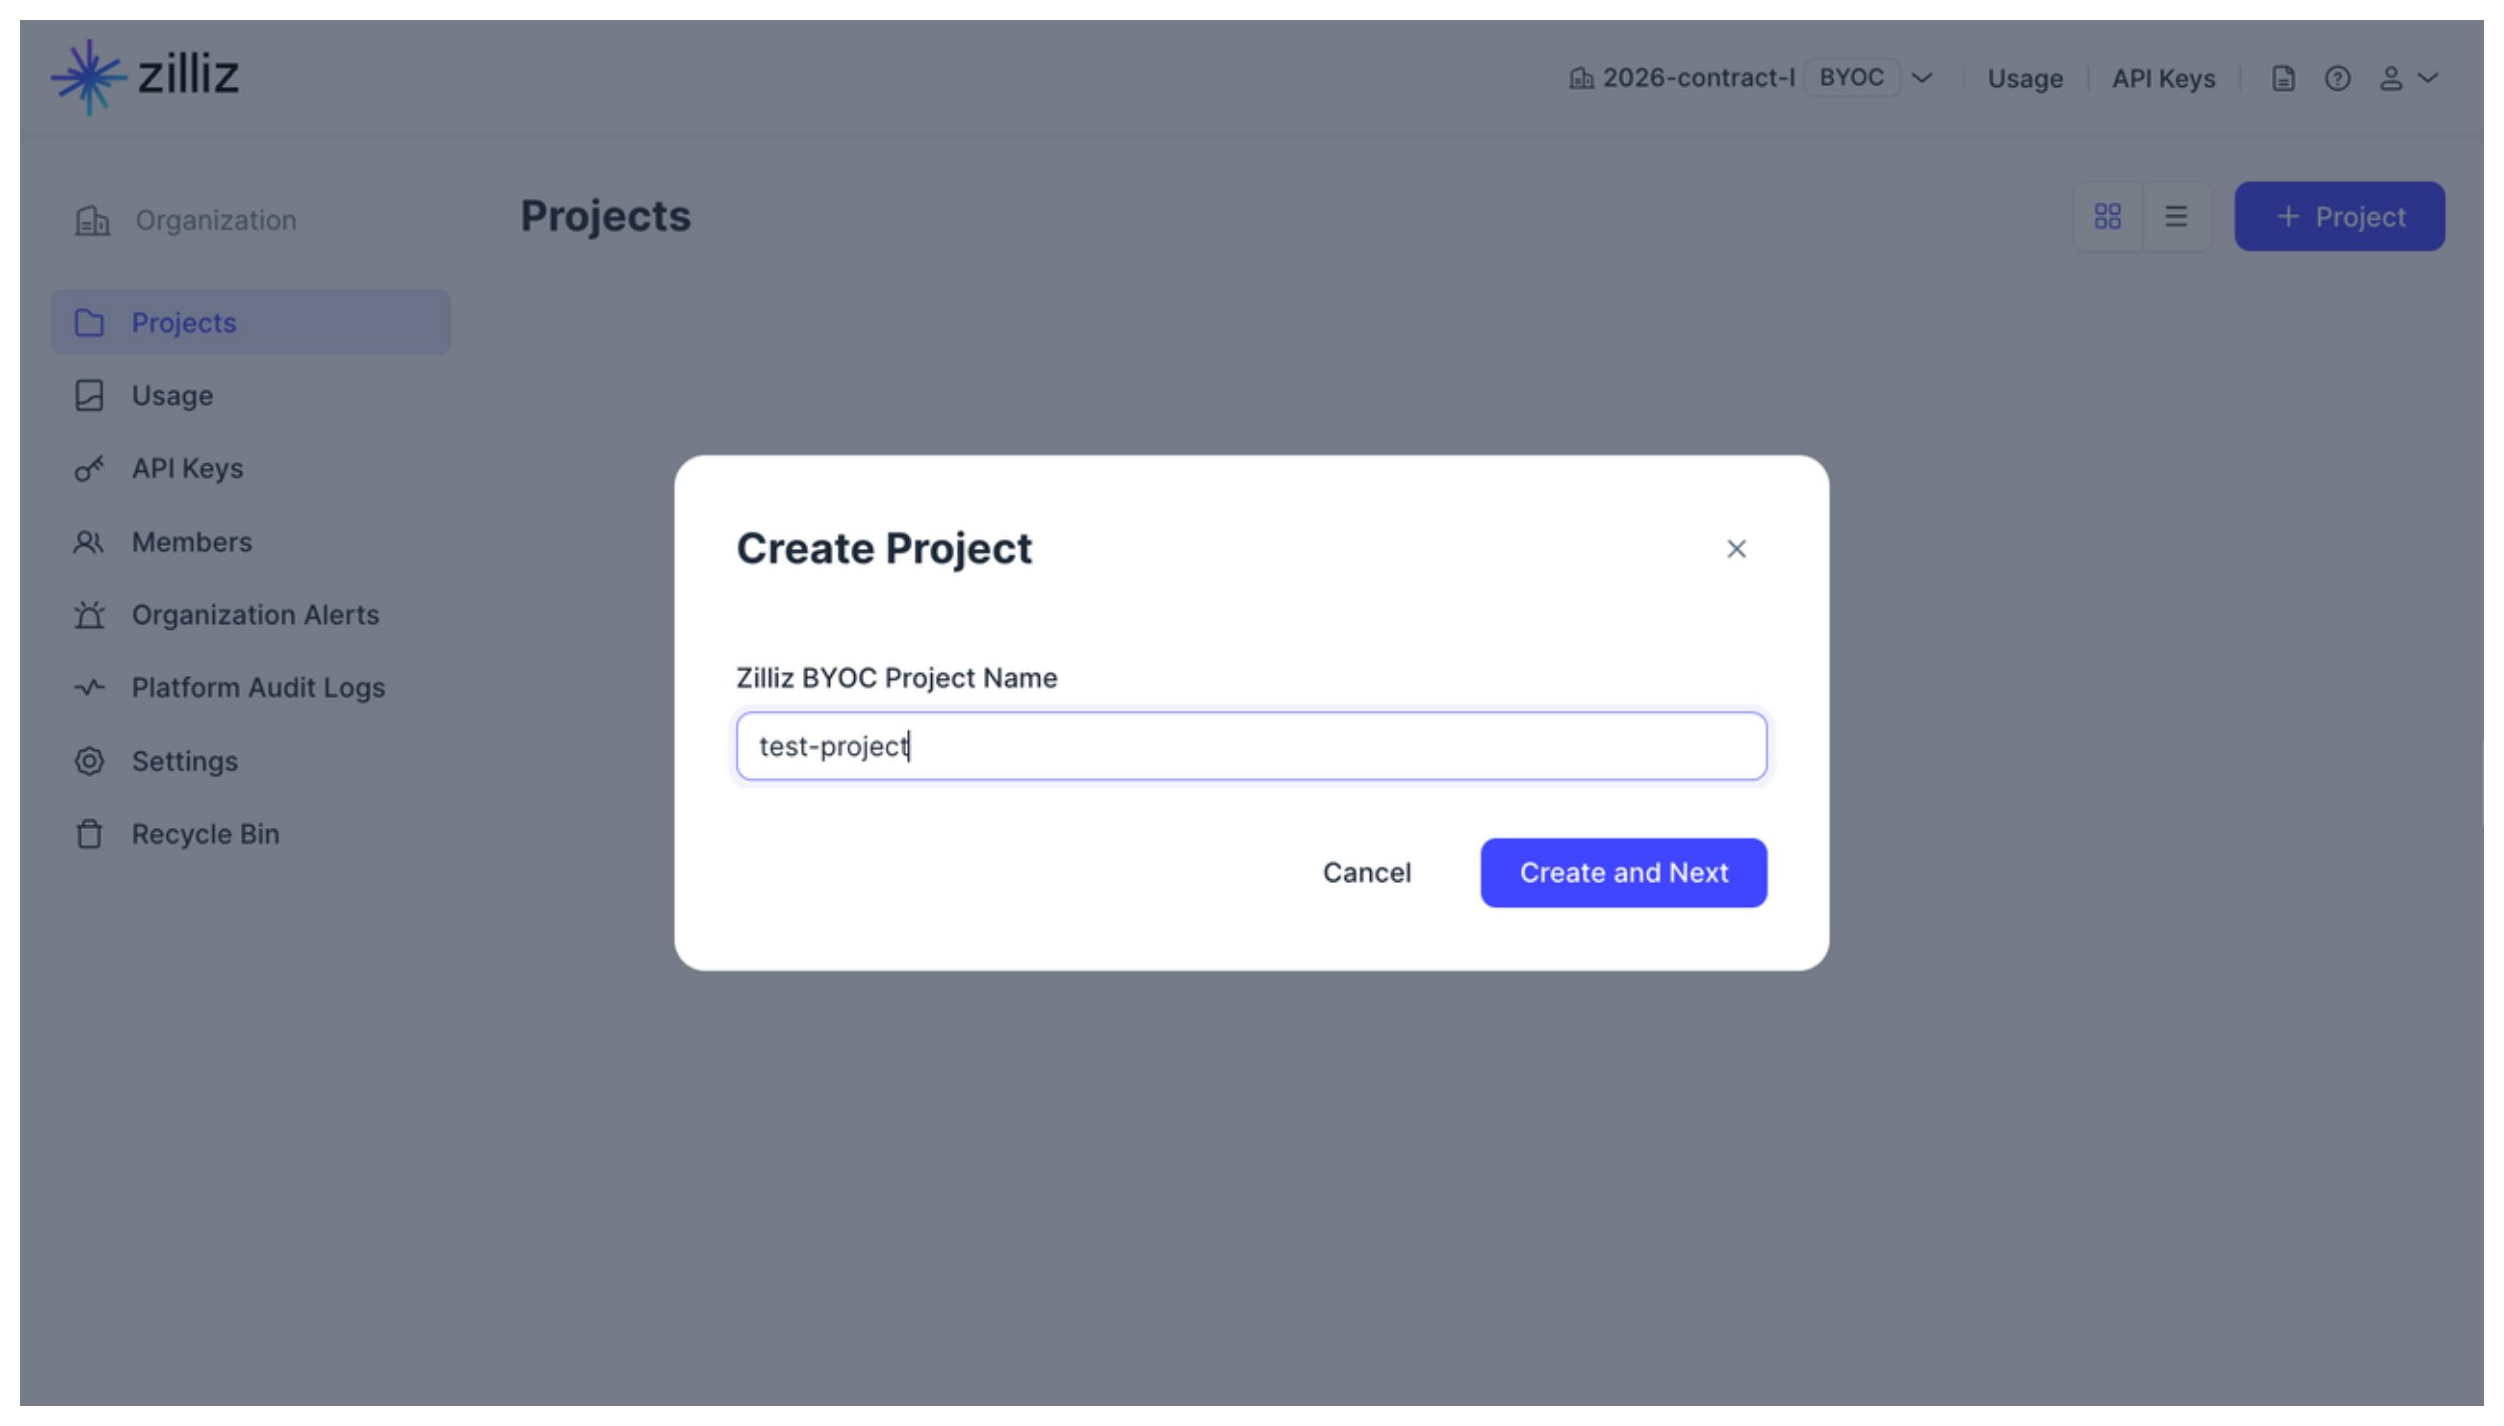
Within your BYOC-I organization, click the Create Project button to start the deployment. In the prompted dialog box, set Zilliz BYOC Project Name, and click Create and Next.
The project is created at the end of this step, and you will be redirected to the Deploy Data Plane dialog box.
Step 3: Prepare the data plane
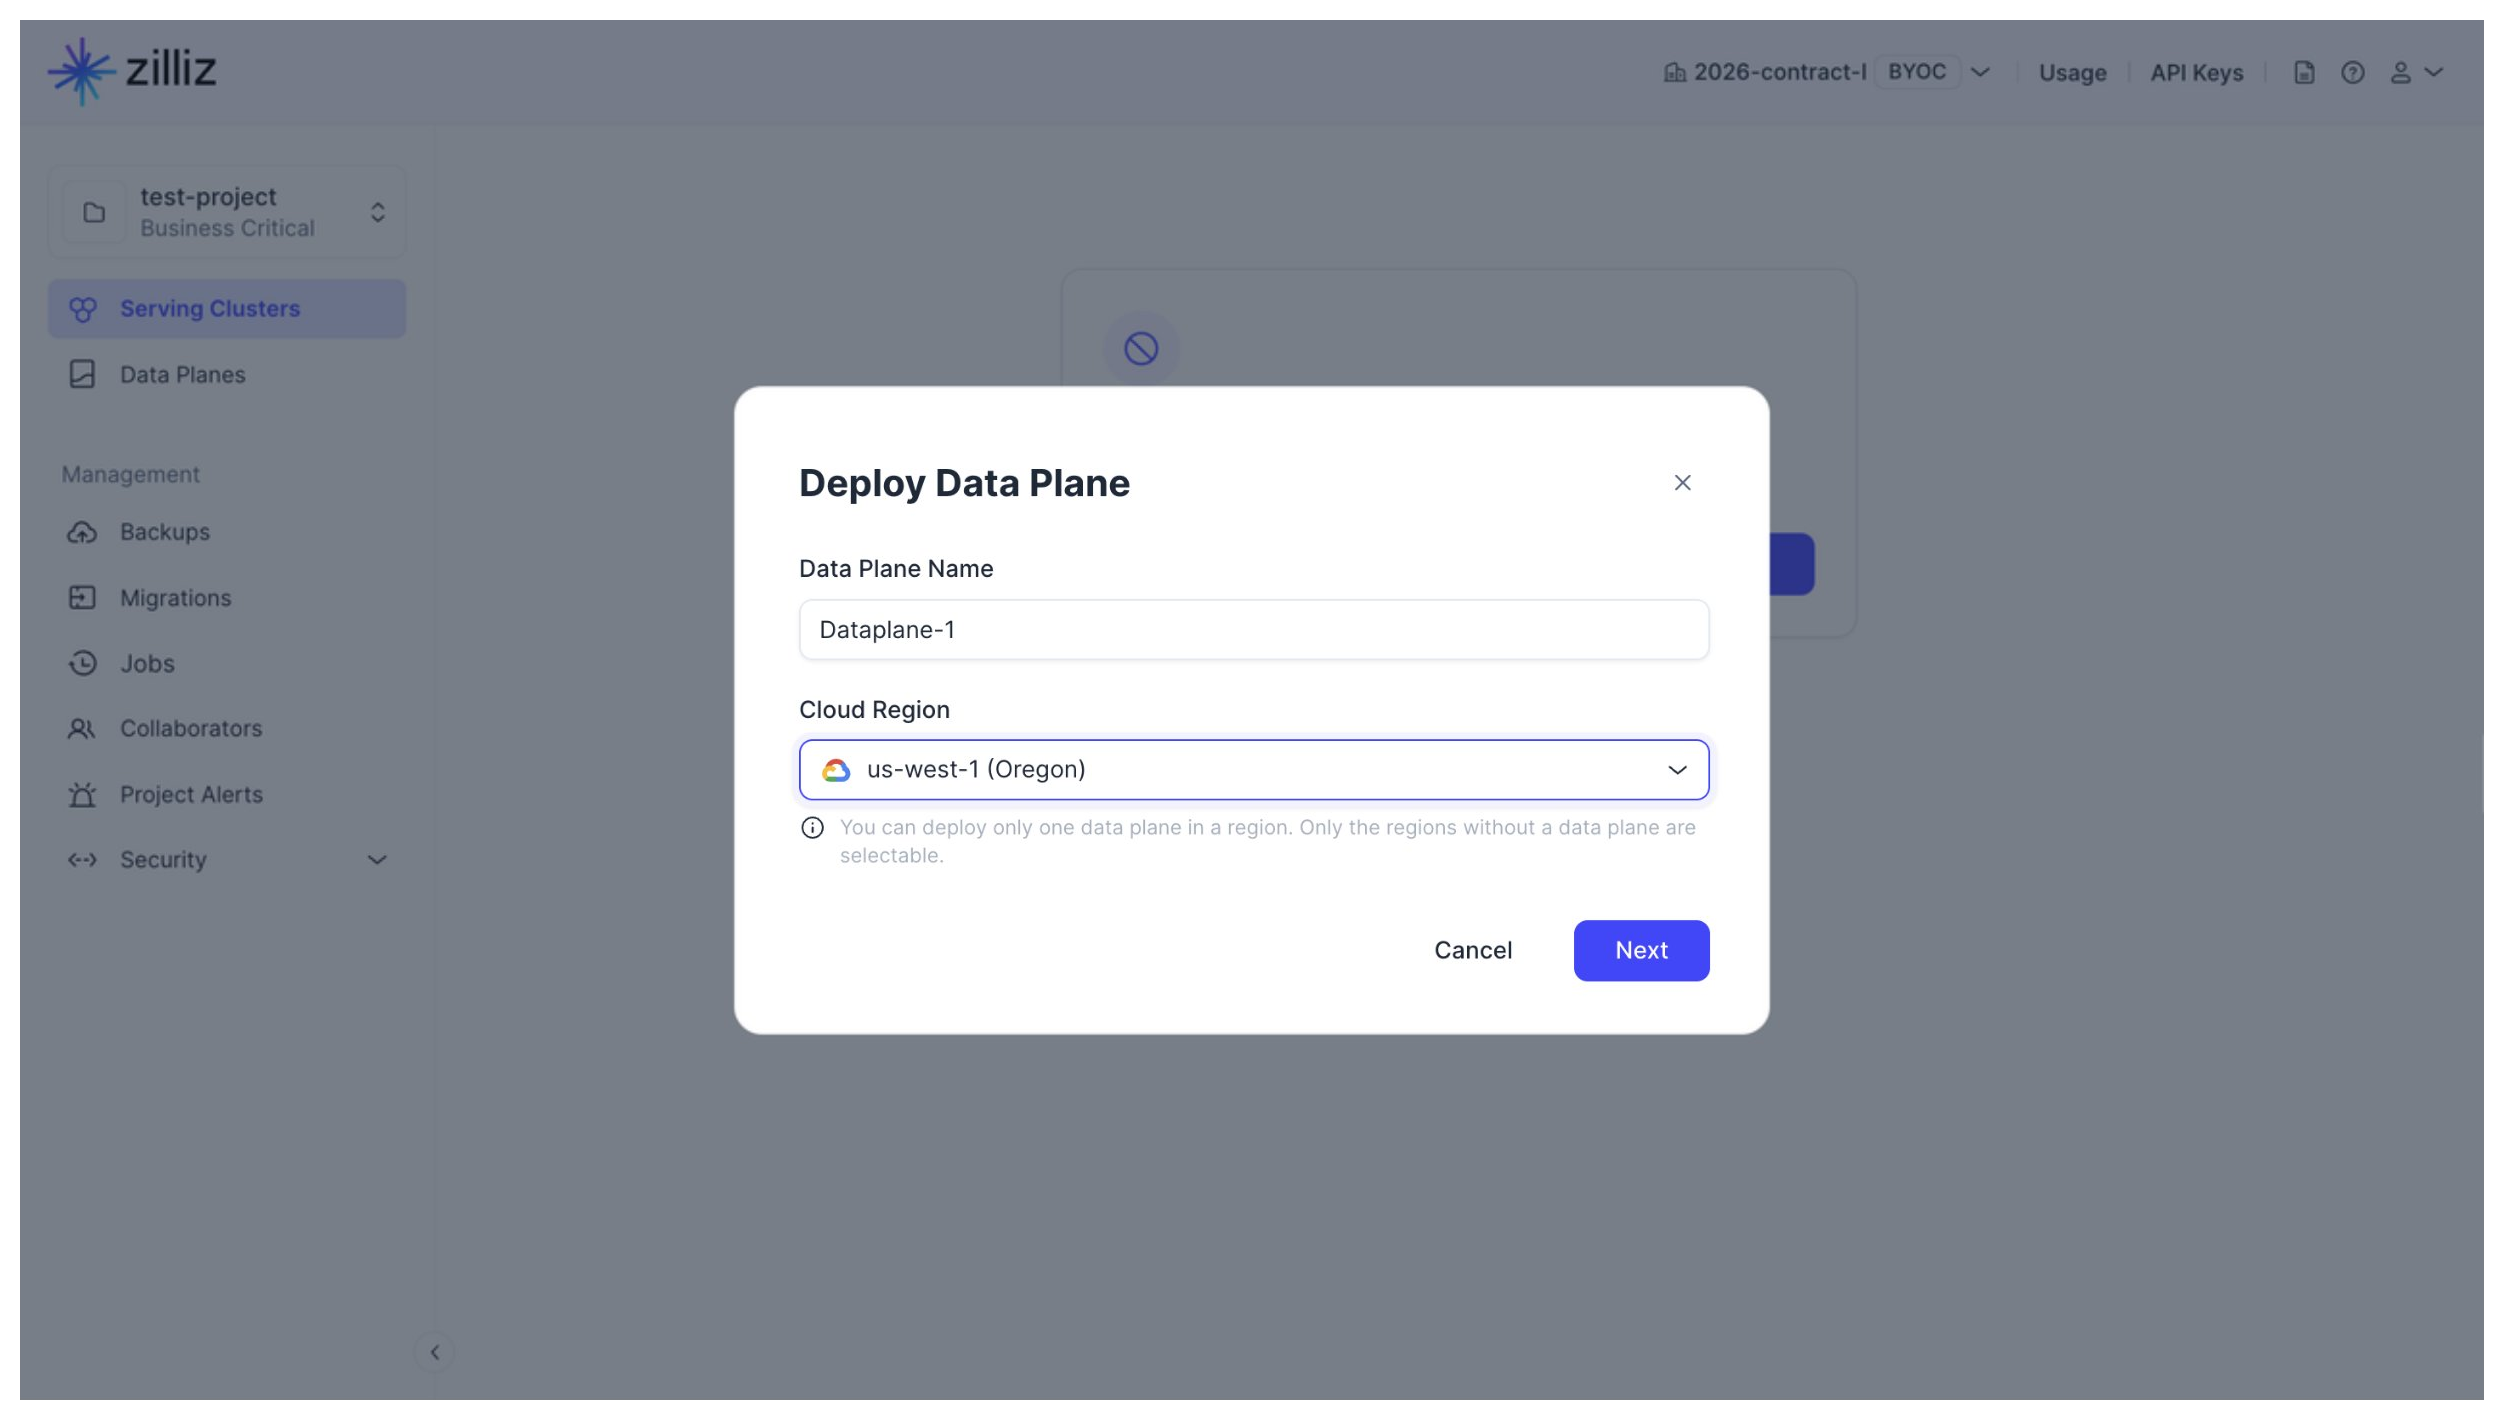
Set Data Plane Name and Cloud Region, and click Next.
Click Cancel to stop deploying the data plane. However, the project created above is still available. You can start deploying a data plane in the project at any time and add multiple data planes to a project.
Determine whether to enable GCP Private Service Connect (PSC).
This option allows private connectivity to the clusters within the current project. If you enable this option, you must create a Private Service Connect Endpoint for private connectivity. For details, refer to Prepare for Cluster Connection.
Select an architecture type that matches your application in Architecture.
This determines the architecture type of the Zilliz BYOC image to use. Available options are X86 and ARM.
In Resource Settings, you need to
-
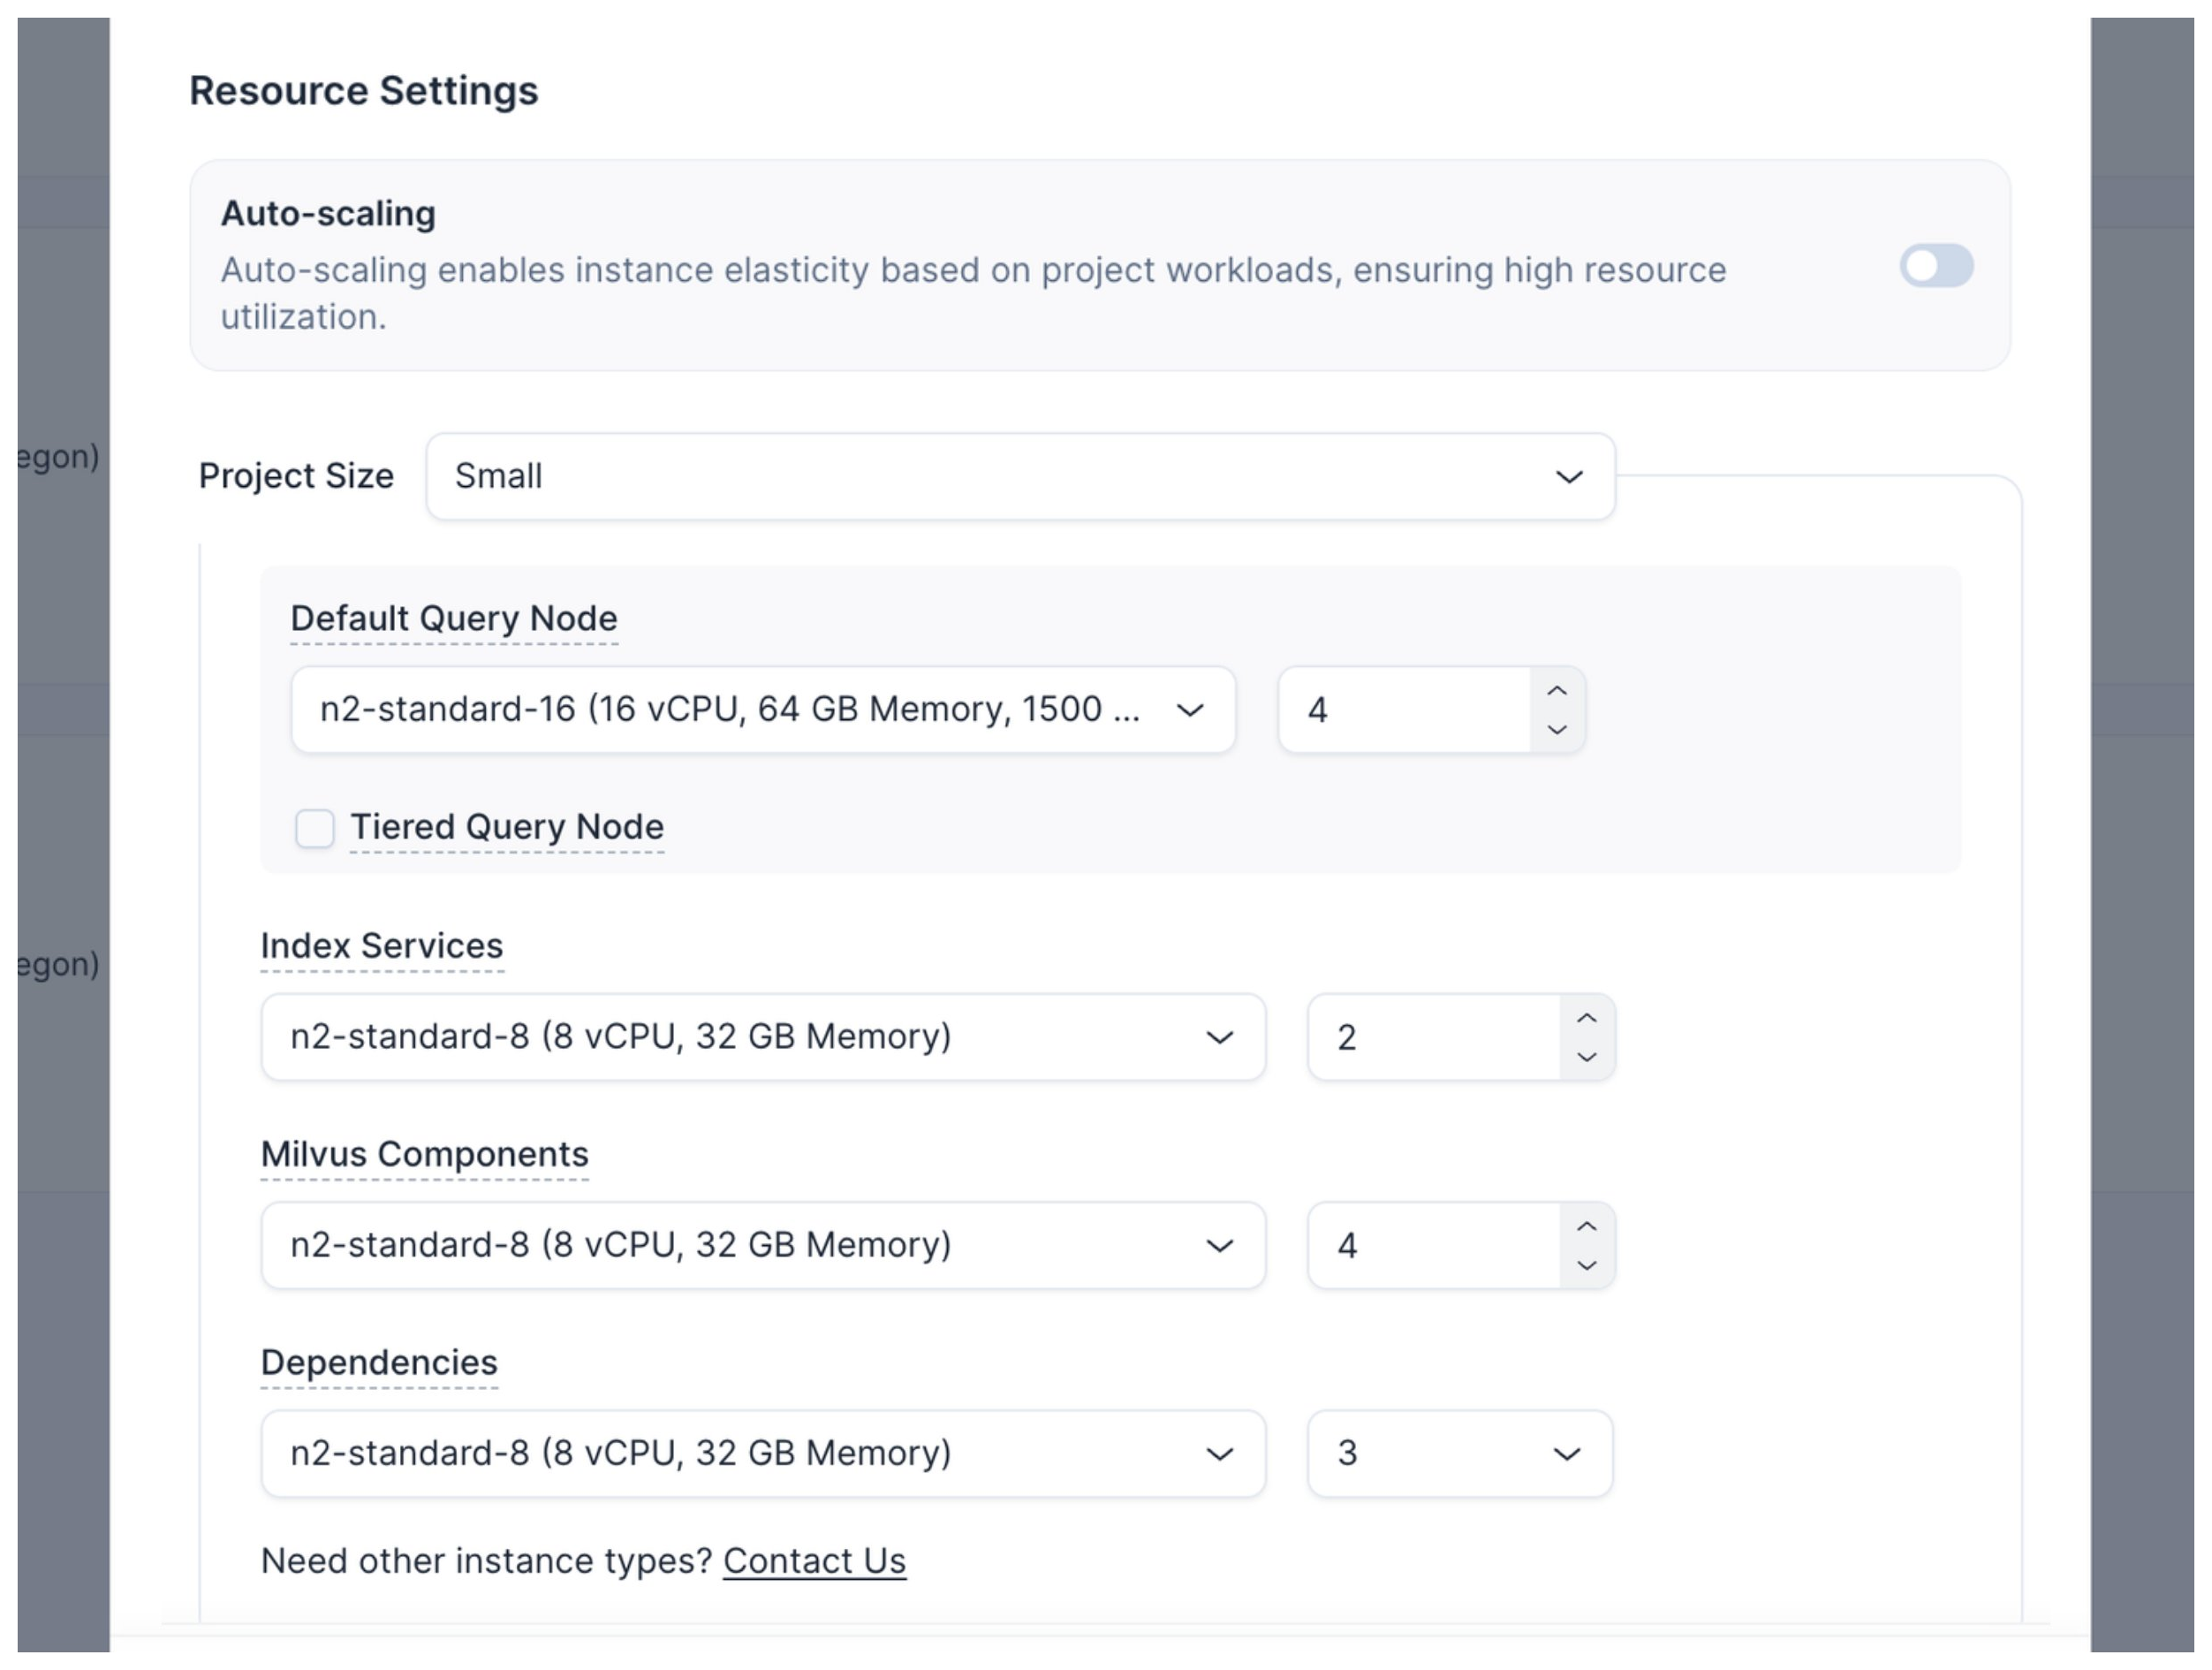
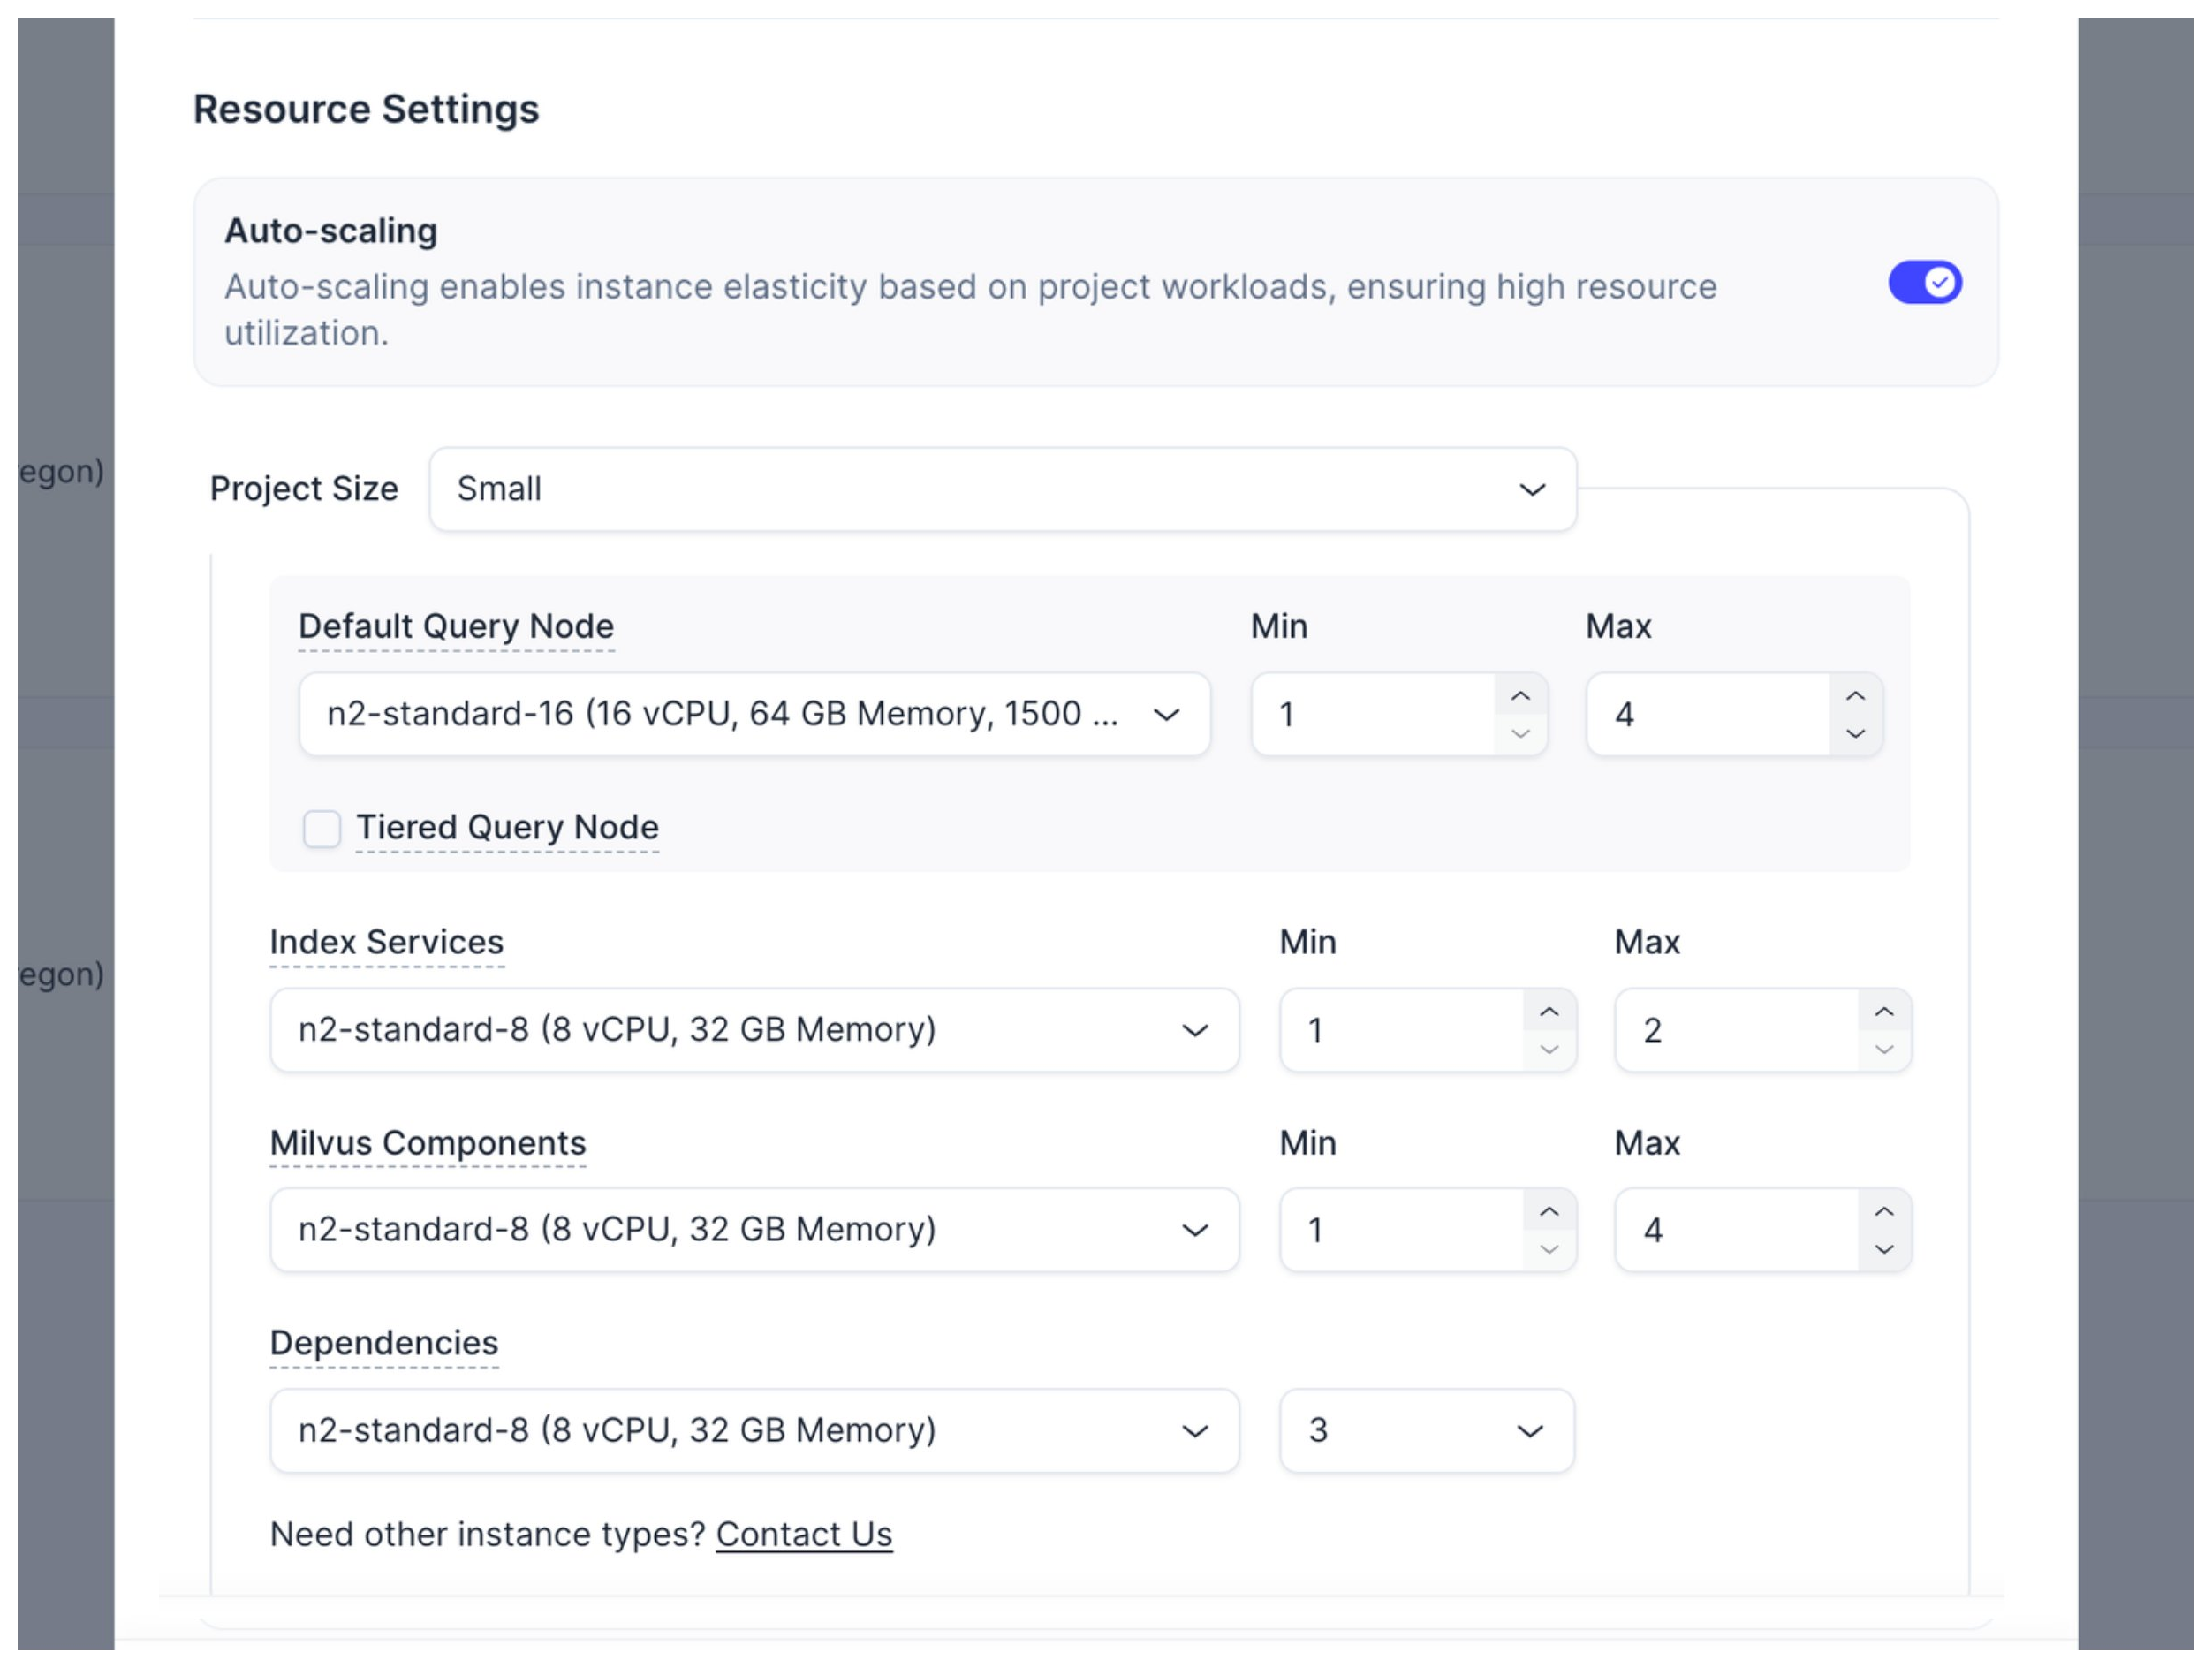
Enable or disable Auto-scaling to allow Zilliz Cloud to automatically adjust the number of GCE instances within a defined range based on your project workloads, ensuring efficient resource use.
-
Configure Initial Project Size.
In a BYOC project, the query node, index services, Milvus components, and dependencies use different types of GCE instances. You can set instance types and counts for these services and components individually.
If Auto-scaling is disabled, simply specify the number of GCE instances required for each project component in the corresponding Count field.
Once Auto-scaling is enabled, you need to specify a range for Zilliz Cloud to automatically scale the number of GCE instances based on actual project workloads by setting the corresponding Min and Max fields.
To facilitate resource settings, there are four predefined project size options. The following table shows the mapping between these project size options and the number of clusters that can be created in the project, as well as the number of entities these clusters can contain.
Size
Maximum Cluster Quantity
Maximum Number of Entities (Million)
Performance-optimized CU
Capacity-optimized CU
Tiered-storage CU
Small
3 clusters with 8 to 16 CUs
16 Million - 32 Million
64 Million - 128 Million
320 Million - 640 Million
Medium
7 clusters with 16 to 64 CUs
32 Million - 128 Million
128 Million - 512 Million
640 Million - 2.6 Billion
Large
12 clusters with 64 to 192 CUs
128 Million - 384 Million
512 Million - 1.5 Billion
2.6 Billion - 7.7 Billion
X-Large
17 clusters with 192 to 576 CUs
384 Million - 1.2 Billion
1.5 Billion - 4.6 Billion
7.7 Billion - 23 Billion
You can also customize the settings by selecting Custom in Initial Project Size and adjusting the GCE instance types and counts for all data plane components. If your preferred GCE instance types are not listed, please contact Zilliz support for further assistance.
-
Determine whether to enable Tiered Query Node.
This option determines whether you can create tiered-storage clusters. Once you select this option, you can set the instance type and count for the tiered query nodes.
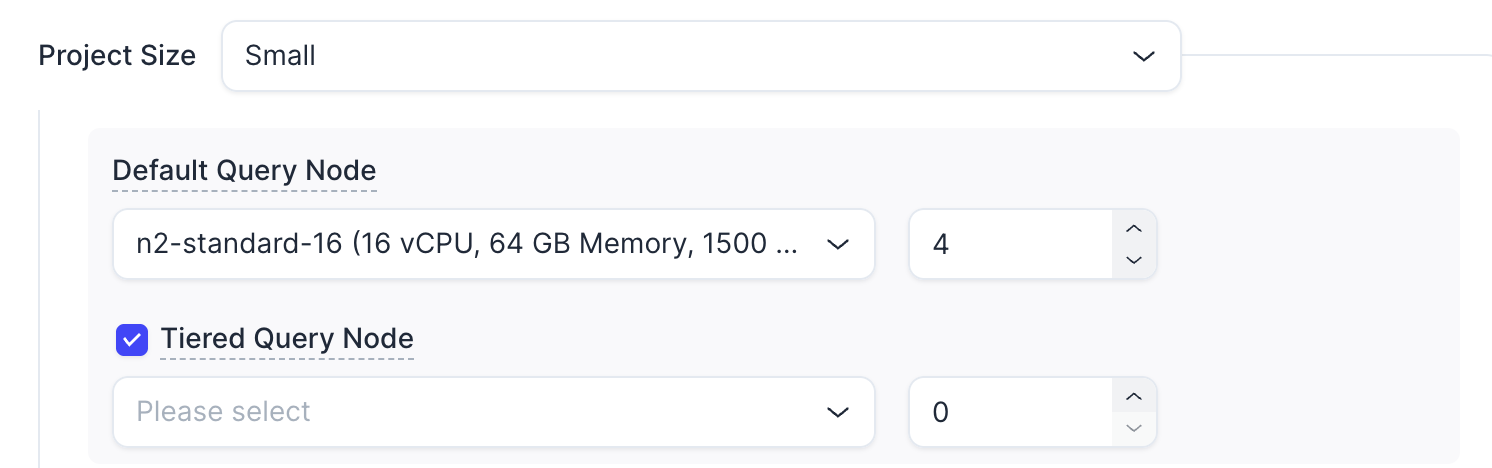 Notes
Notes-
Your choice in Project Size does not affect the settings in Tiered Storage Node.
-
If Auto-scaling is disabled, the sum of the Default Query Node count and the Tiered Query Node count should be a positive integer.
-
If Auto-scaling is enabled, the sum of the Min values of both the Default Query Node and the Tiered Query Node should be a positive integer.
-
For clusters created before Tiered Storage becomes available for BYOC, you can manually enable Tiered Storage. For details, refer to Enable Tiered Storage for Exisiting Clusters.
-
Click Next.
Step 4: Deploy the data plane
Follow the steps displayed in the dialog to deploy the data plane for the currently created project.
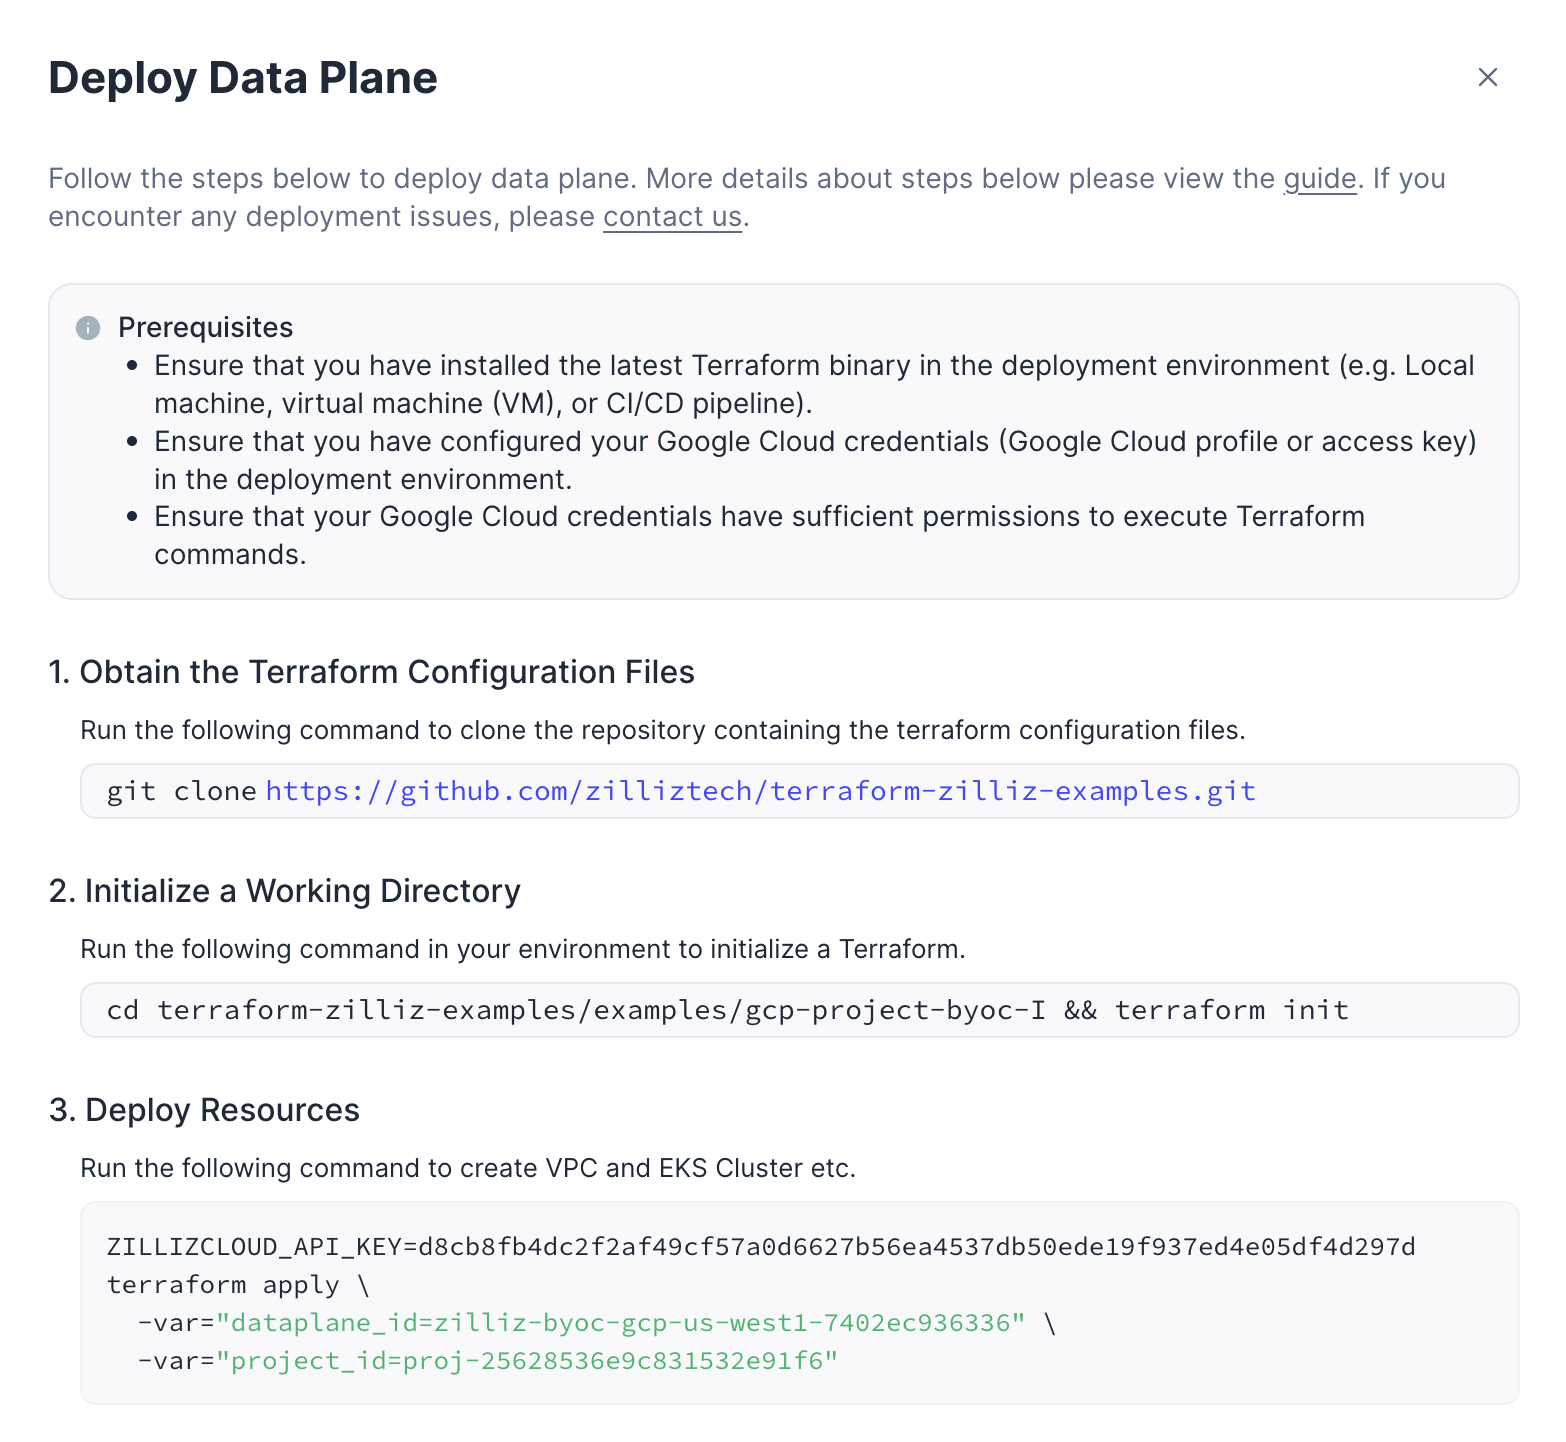
When you run terraform apply, note that you need to append -var="gcp_project_id=xxx" to the end of the command as follows:
terraform apply \
  -var="dataplane_id=zilliz-byoc-gcp-us-west1-74xxxx" \
  -var="project_id=project-xxxxx" \
  -var="gcp_project_id=YOUR_GCP_PROJECT_ID"
For details on running the above Terraform scripts, refer to the Zilliz Cloud BYOC-I Project Setup Guide.
Once you have deployed the project's data plane and created clusters, you can connect to these clusters either through direct VPC access or via GCP PSC. For details, refer to Prepare for Cluster Connection.
Manage dataplanes
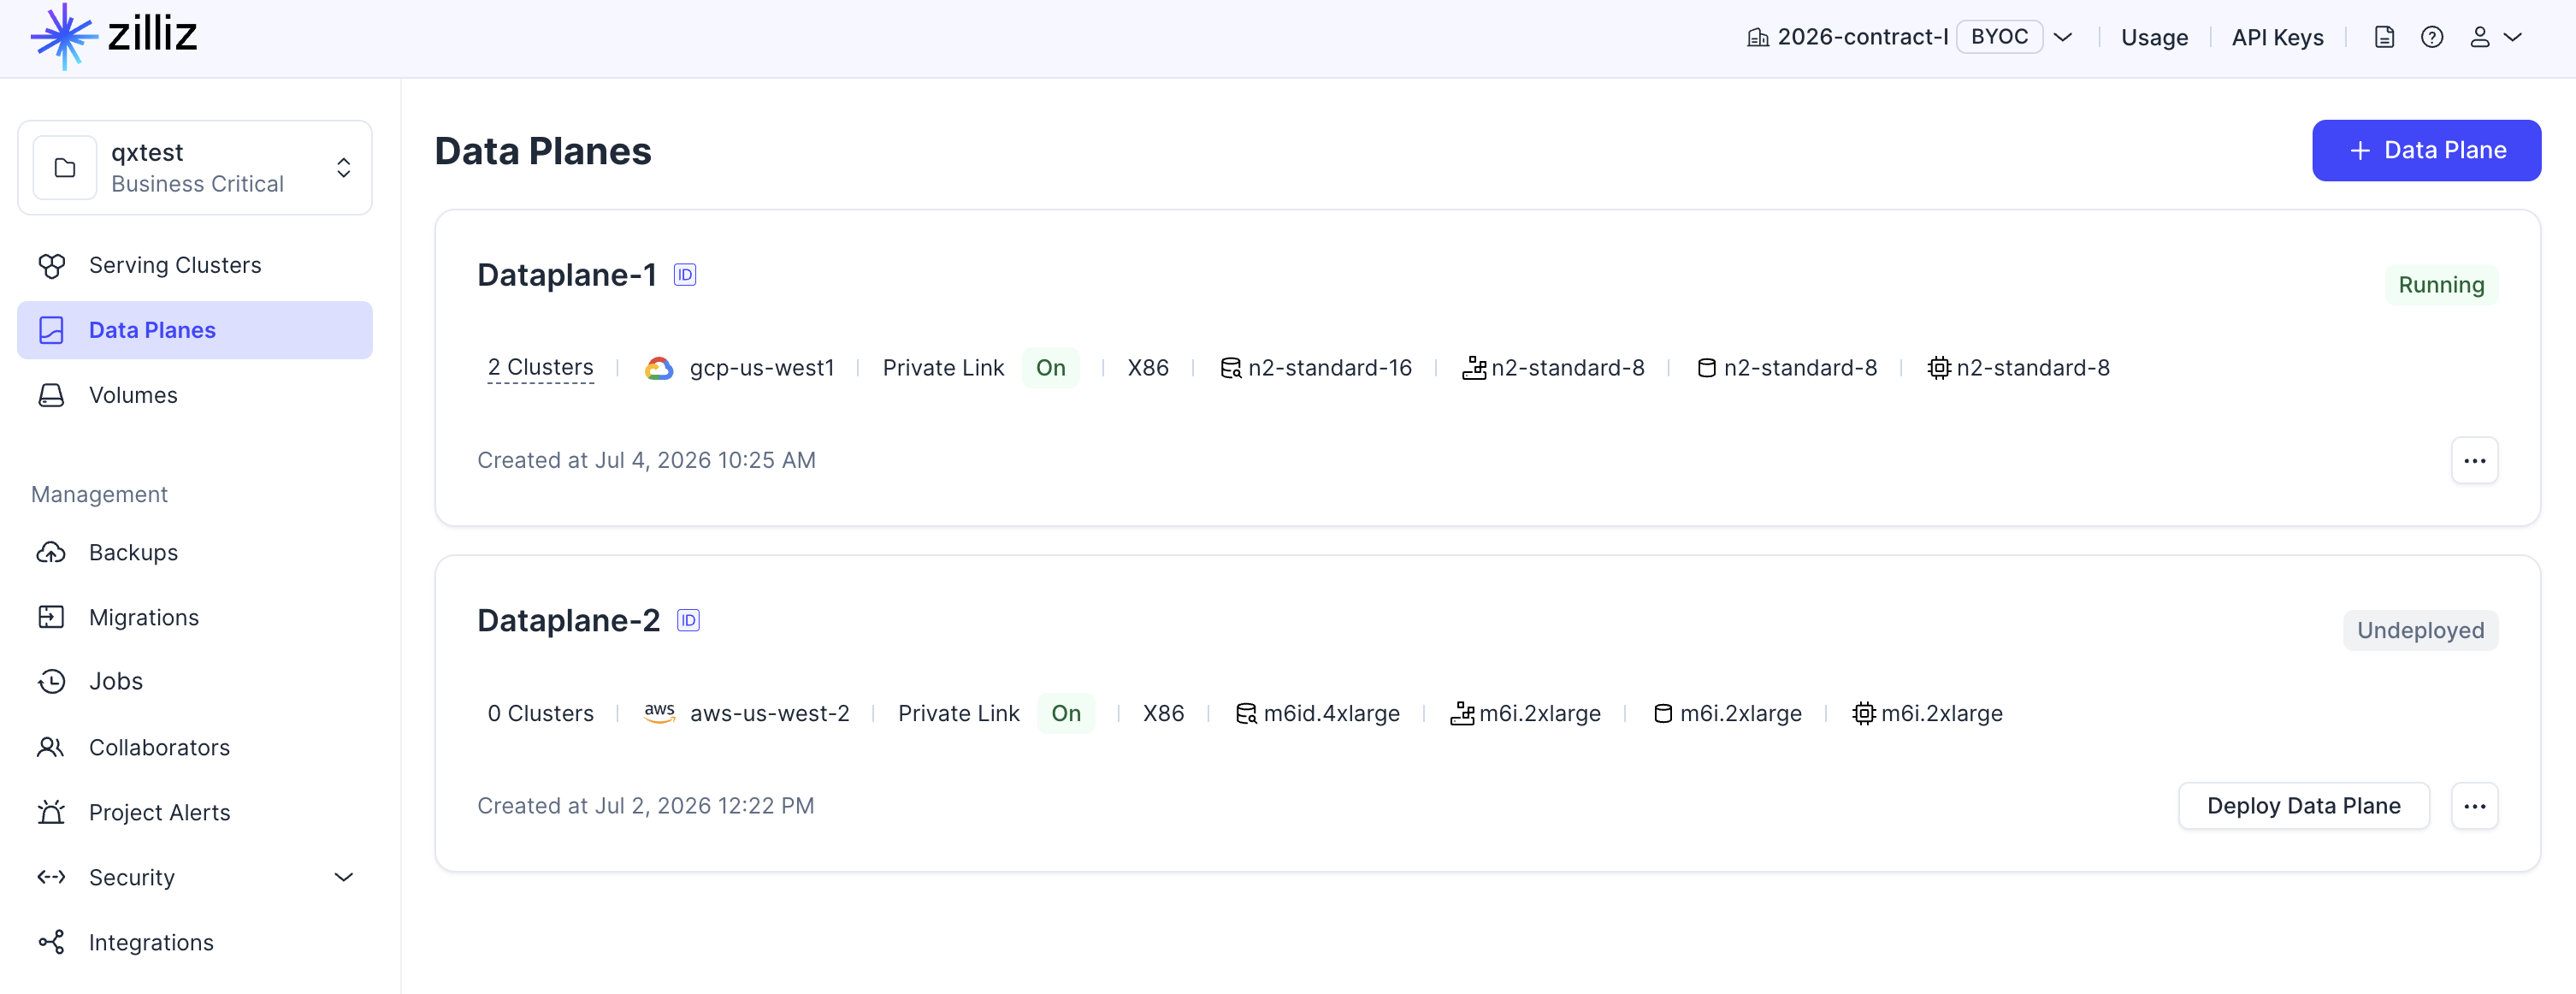
Data planes with an Undeploy tag
If the status tag on the right corner of a project card reads Undeploy, you can always click the Deploy Data Plane button on the project card to reopen it. To rename or delete the project, click the ... button in the project card and select Rename or Delete from the drop-down menu.
Data planes with a Deploying tag
Once you have prepared the deployment environment and executed the displayed commands, you must wait for the BYOC agent to activate. When the status tag on the project card reads Deploying and shows the progress percentage, you cannot rename or delete the project until the data plane is in place.
Data planes with a Running tag
Once the status tag on a project card reads Running, you can start creating clusters in the project. To rename or delete a running project, ensure that there are no clusters in the project.
Technical support access
To assist you with troubleshooting and maintenance operations, Zilliz Cloud enables technical support to access your project's data plane by default. You can choose to disable it to meet governance and security requirements.
The following procedure demonstrates how to enable technical support access again after you disabled it when Zilliz Cloud technical support contacts you on an identified issue.
Once Zilliz Cloud identifies an issue on your data plane and you have disabled technical support access, we will inform you about it and apply for technical support access.
Find the data plane in concern, click ... at the bottom-right corner of the data plane card, and click Technical Support Access from the drop-down list.
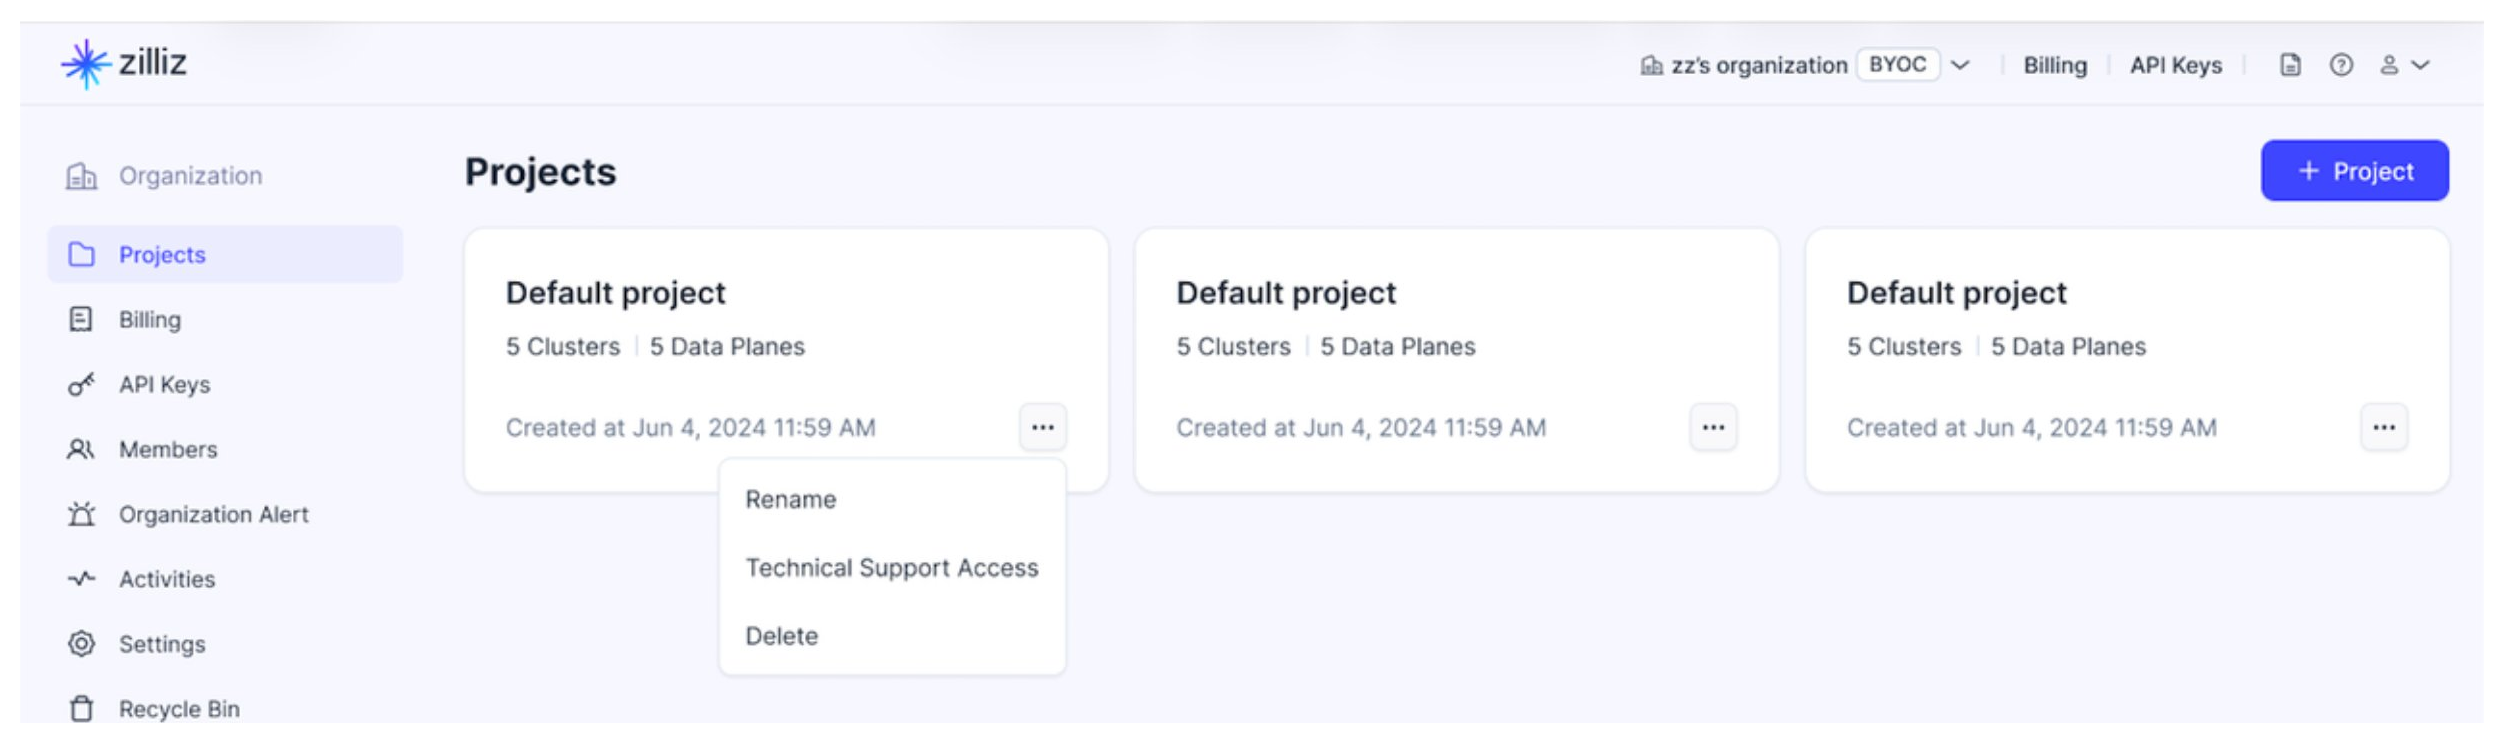
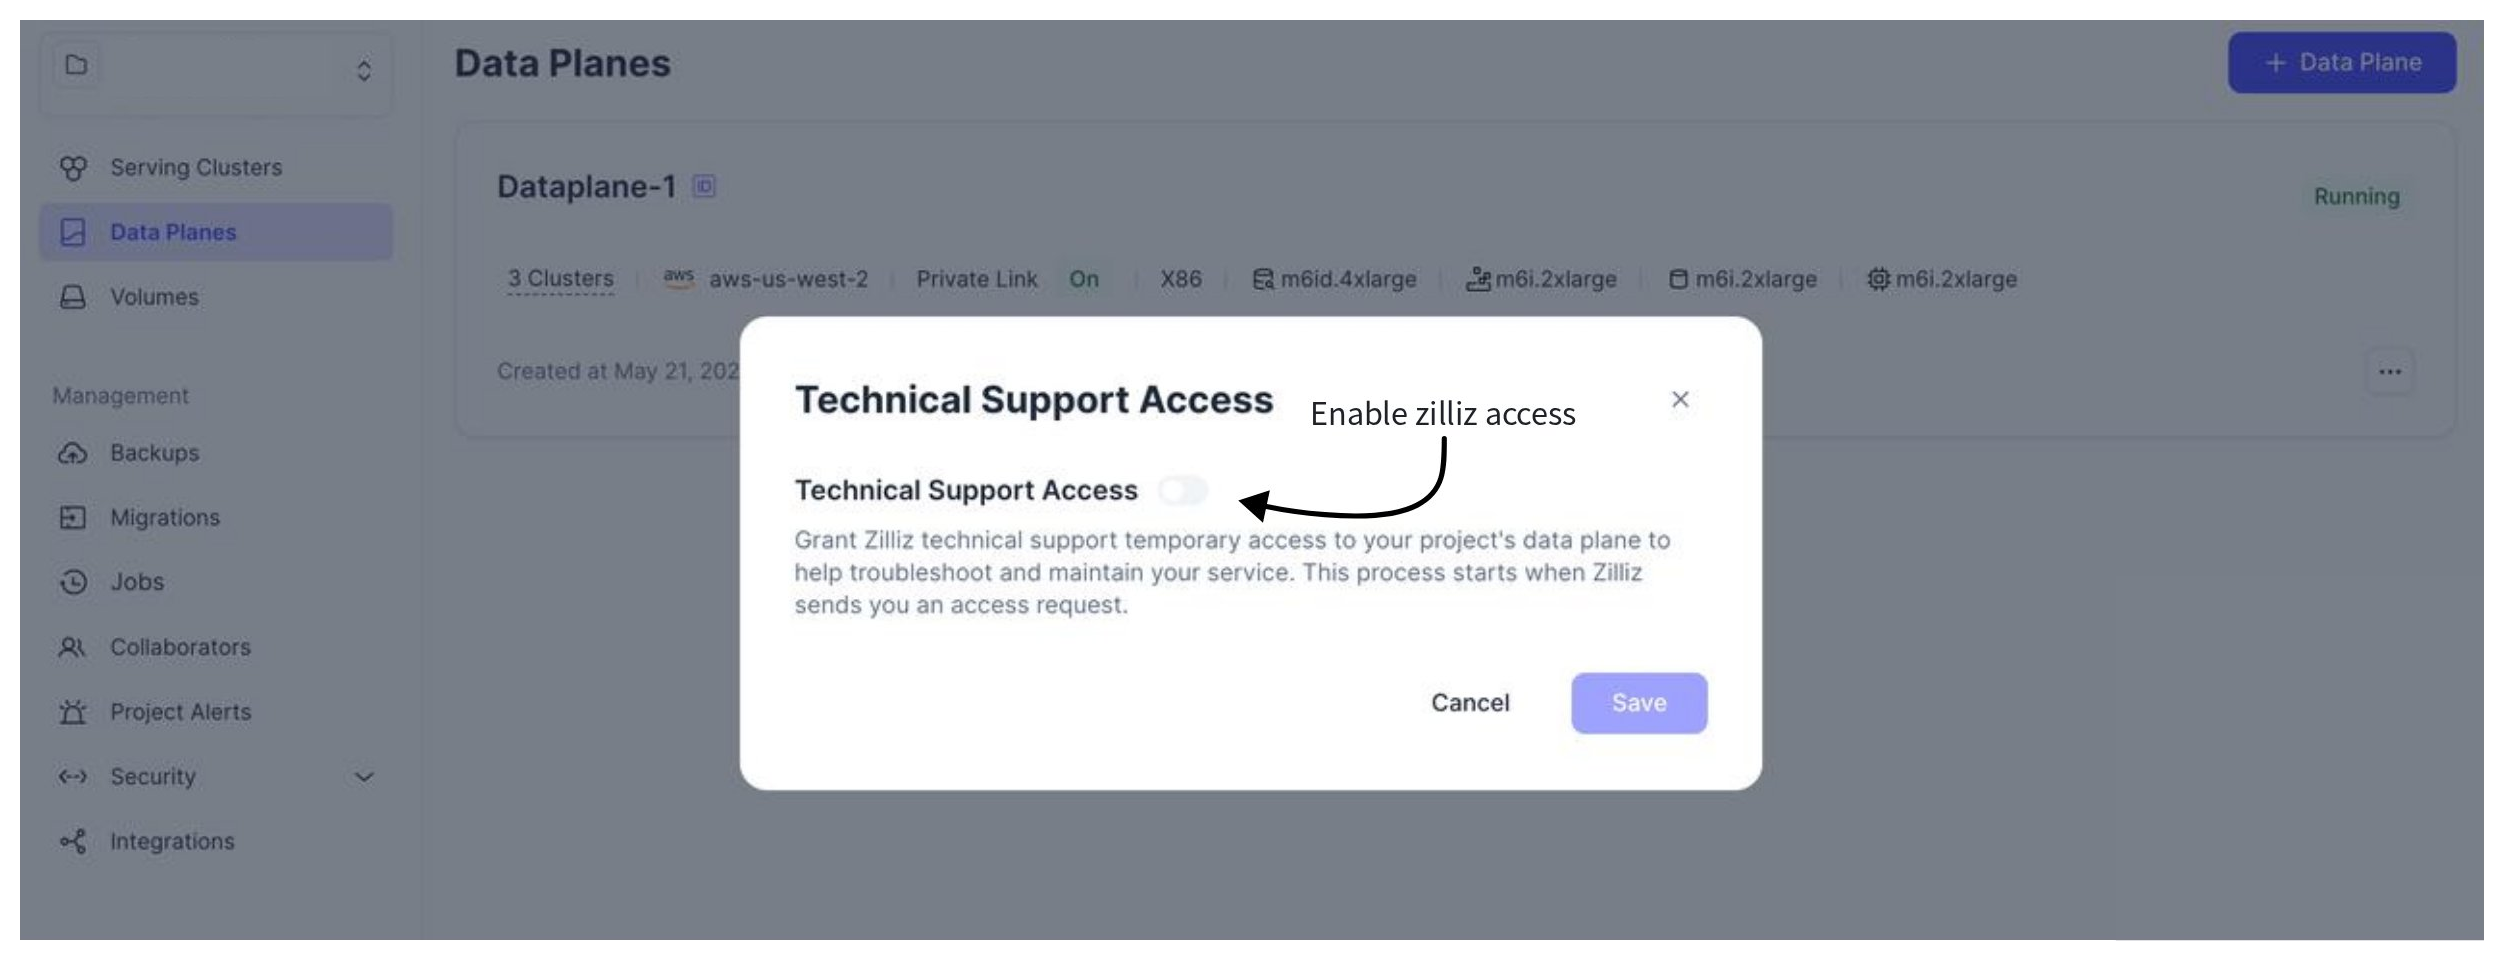
In the prompted dialog box, switch on Technical Support Access.
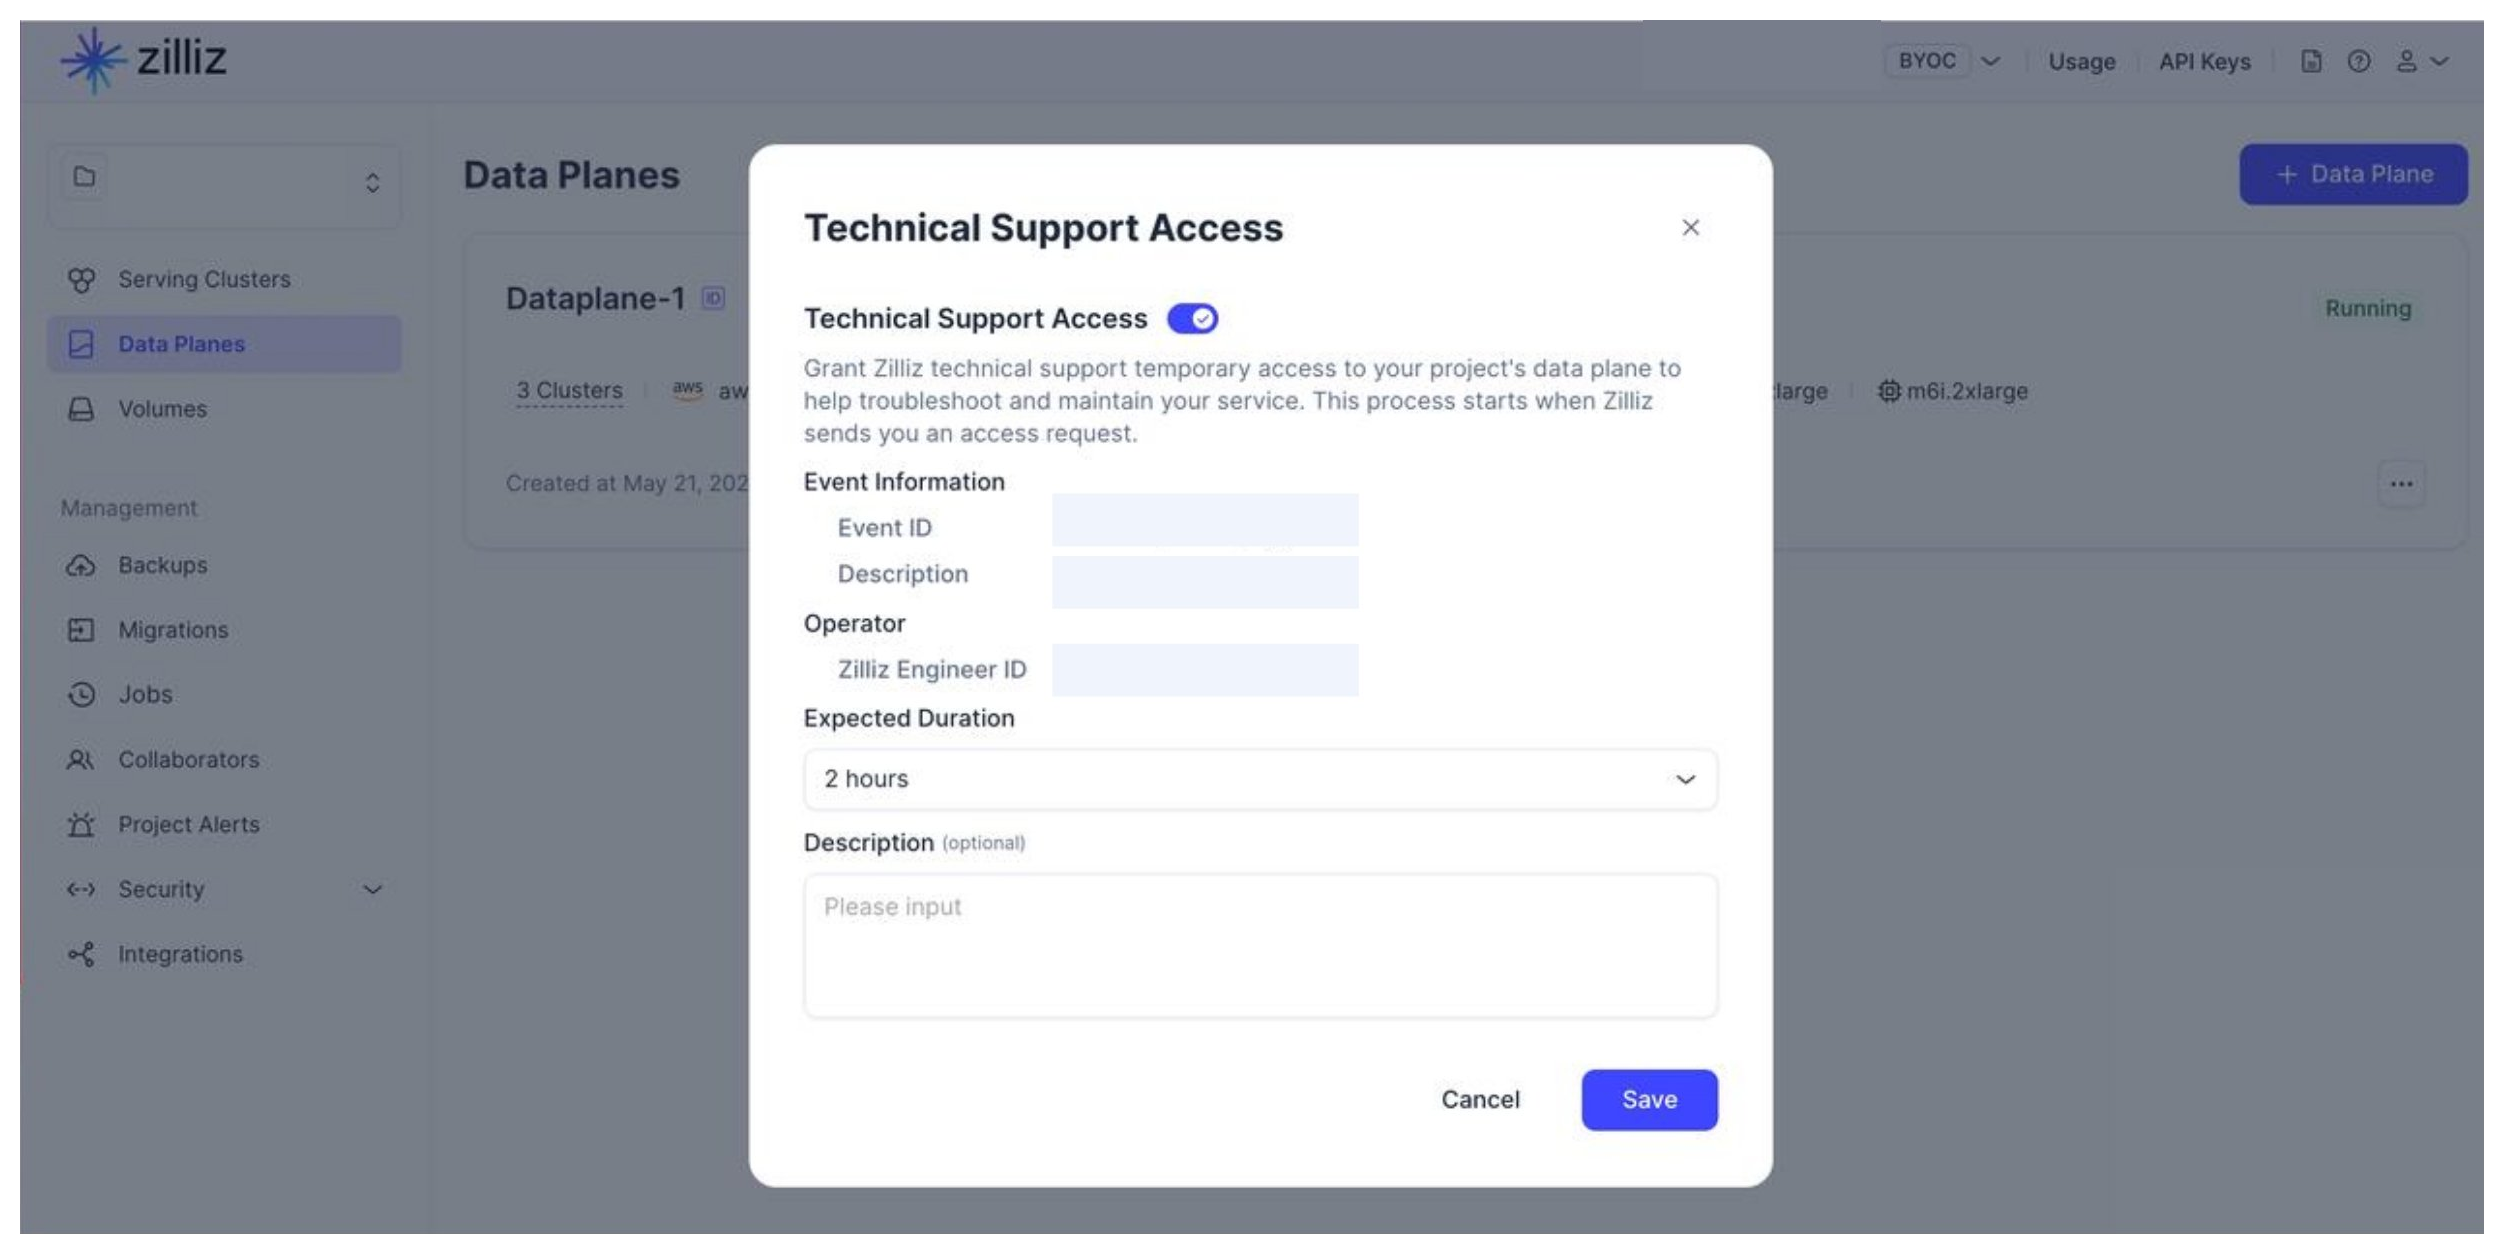
And you will find information about the reason why we apply for access and the ID of the issue owner assigned by Zilliz Cloud. You can decide the access lifespan in Expected Duration and provide optional requirements in Description. Once everything is set, click Save.
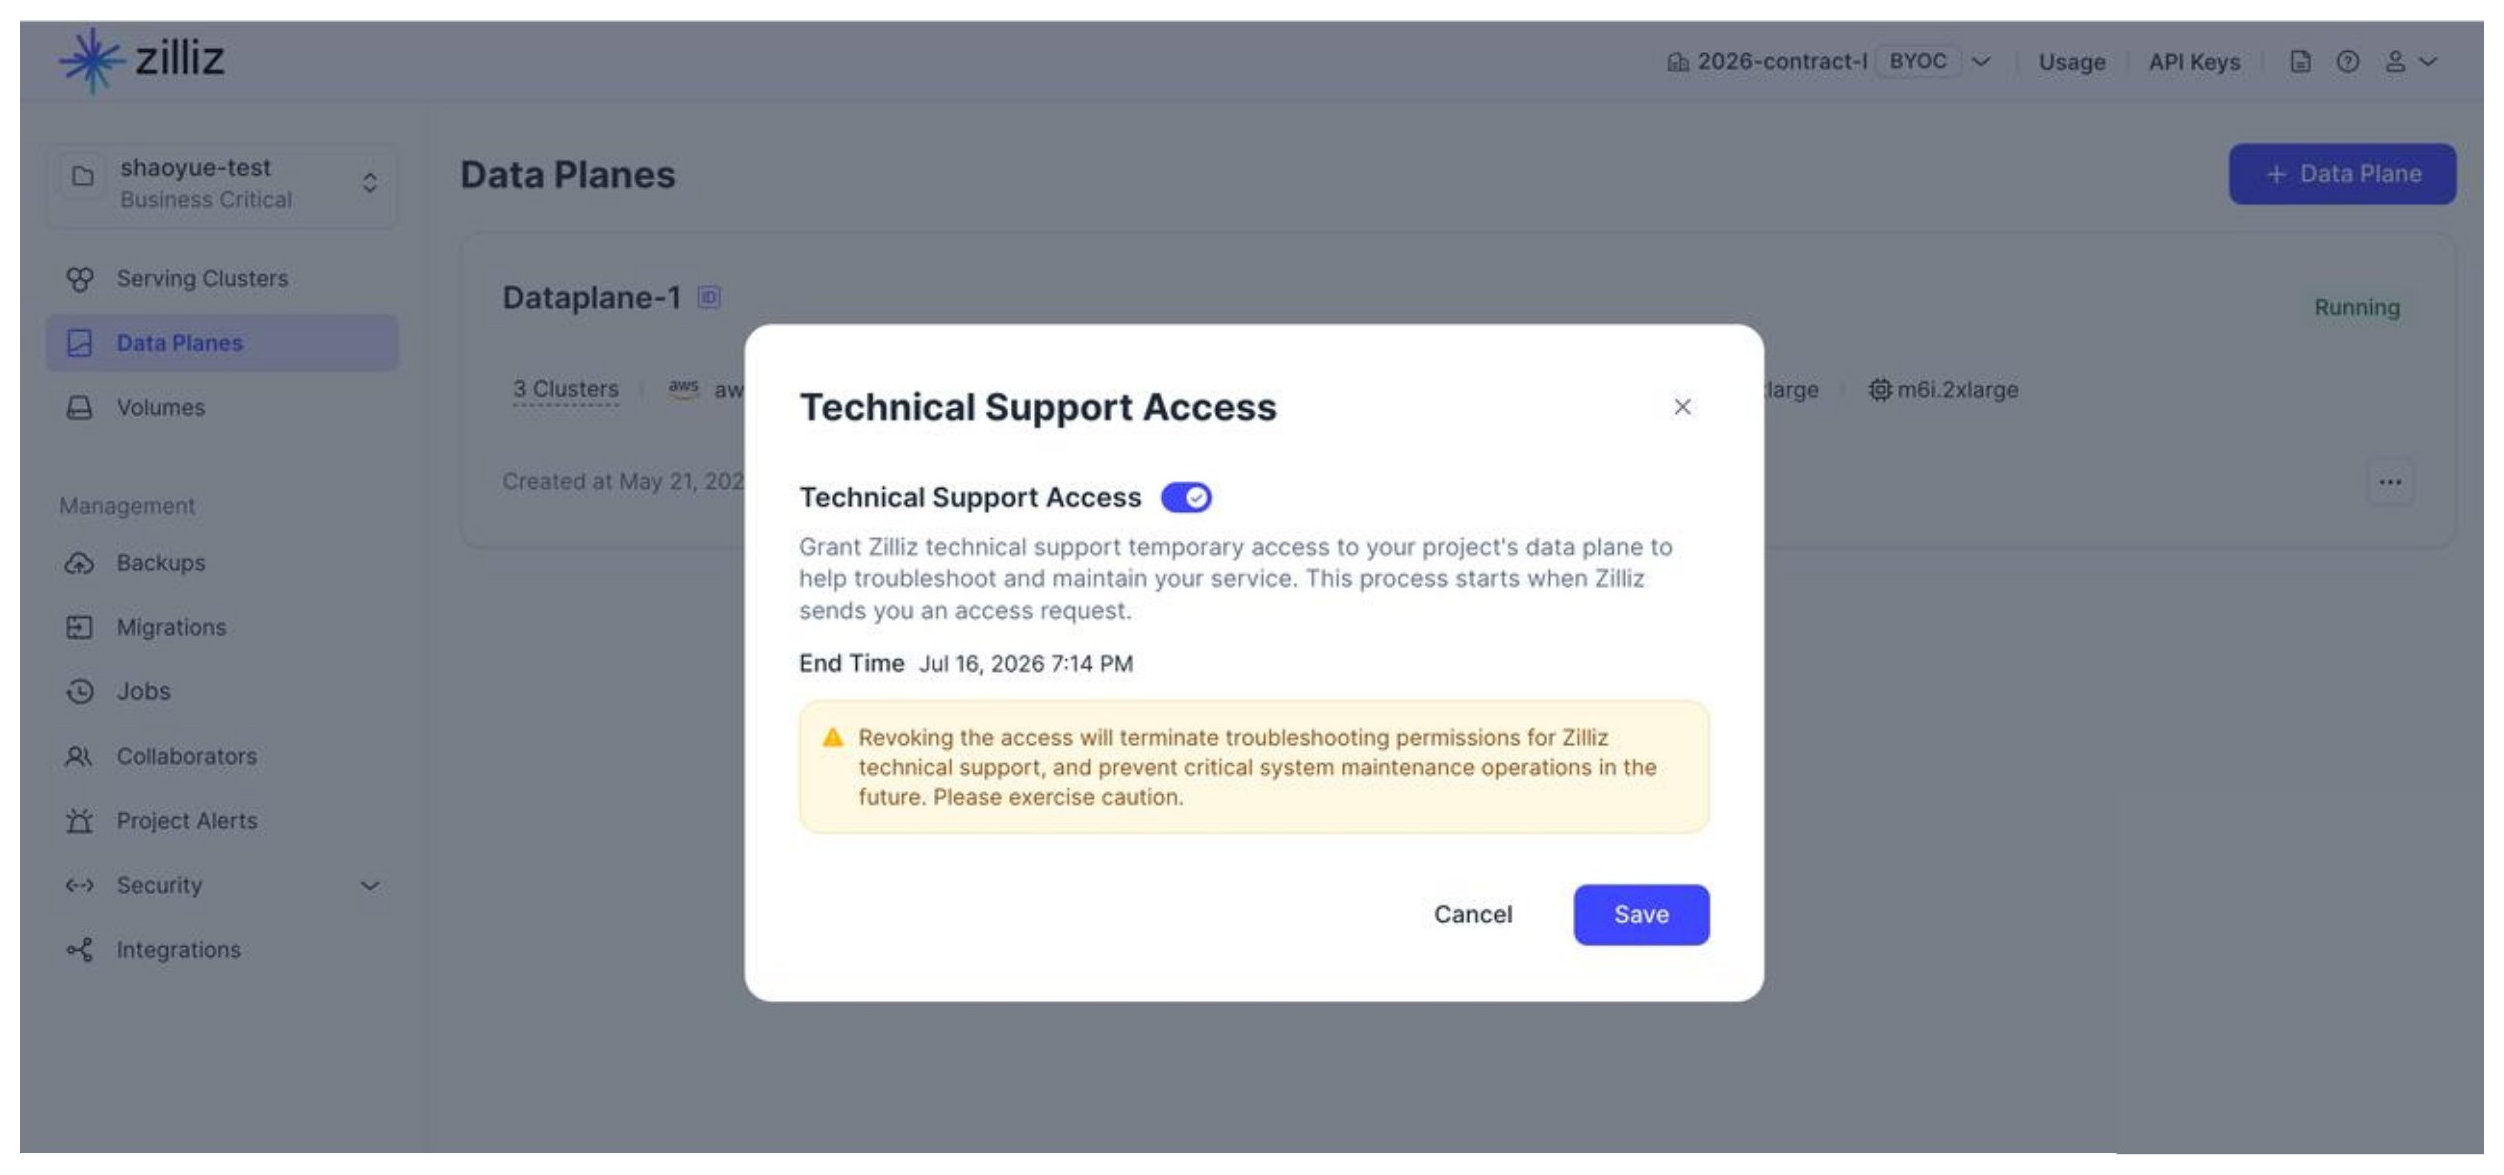
When you open the dialog box during troubleshooting, you will see the end time of this access. The technical support access will be disabled again once it expires or you explicitly disable it.
Required permissions
In this section, you will find all the key permissions required to deploy BYOC-I on GCP.
Required APIs
To deploy a GCP BYOC-I dataplane, the following APIs must be enabled in the customer GCP project:
-
Cloud Resource Manager API:
cloudresourcemanager.googleapis.com -
Artifact Registry API:
artifactregistry.googleapis.com -
Compute Engine API:
compute.googleapis.com -
Kubernetes Engine API:
container.googleapis.com -
IAM API:
iam.googleapis.com -
Cloud Storage API:
storage.googleapis.com -
Service Usage API:
serviceusage.googleapis.com
Terraform Runner Permissions
The Terraform runner must have sufficient permissions in the customer GCP project to create networking, GKE, GCS, IAM, Private Service Connect, and the temporary booter VM resources.
For the standard Terraform example, grant the Terraform runner permissions equivalent to the following roles on the target GCP project:
-
roles/serviceusage.serviceUsageAdmin -
roles/compute.networkAdmin -
roles/compute.instanceAdmin.v1 -
roles/container.admin -
roles/storage.admin -
roles/iam.serviceAccountAdmin -
roles/iam.roleAdmin -
roles/resourcemanager.projectIamAdmin -
roles/iam.serviceAccountUser
By default, the example also enables Resource Manager tags for vendor=zilliz-byoc. If Resource Manager tags are enabled, the Terraform runner also needs:
-
roles/resourcemanager.tagAdmin -
roles/resourcemanager.tagUser
If the Terraform runner cannot manage Resource Manager tags, either provide pre-created tag IDs through vendor_tag_key_id and vendor_tag_value_id, or set:
enable_resource_manager_tags = false
Service Accounts Created By Terraform
The Terraform example creates four customer-side service accounts:
-
GKE node service account
-
Maintenance service account
-
Storage service account
-
Booter service account
GKE Node Service Account
The GKE node service account is attached to the GKE node pools created for the BYOC-I dataplane. Its permissions are granted for GKE node runtime behavior, not for cloud-agent or other Zilliz-managed agent workloads.
The Terraform example grants it:
-
roles/container.defaultNodeServiceAccount, scoped by IAM condition to the target BYOC-I GKE cluster; -
roles/logging.logWriter, for node-level log writing; -
roles/monitoring.metricWriter, for node-level metric writing.
This service account is configured on the GKE node pool as the node VM service account. Zilliz does not impersonate this service account, and the BYOC-I agent does not use it as its application identity.
Maintenance Service Account
The maintenance service account is the customer-side service account that the Agent service deployed in your GKE uses for maintenance operations, such as upgrades and scaling. Zilliz Cloud neither impersonates this service account nor has access to your GKE unless you permit us to.
The Terraform example grants it:
-
a custom cluster maintenance role with
container.clusters.getandcontainer.clusters.update, scoped by IAM condition to the target BYOC-I GKE cluster; -
a custom operation viewer role with
container.operations.getandcontainer.operations.list, scoped to the target GKE location; -
a custom project reader role with
resourcemanager.projects.get; -
roles/iam.serviceAccountUseron the GKE node service account, so maintenance workflows can operate the target node pools with the configured node identity.
The Zilliz BYOC organization service account is granted roles/iam.serviceAccountTokenCreator only on this maintenance service account. It is not granted permission to impersonate the GKE node, storage, or booter service accounts.
If enable_direct_mig_resize = true, the Terraform example also grants the maintenance service account an optional custom role for direct GKE-managed instance group resizing:
-
compute.instanceGroupManagers.get -
compute.instanceGroupManagers.update -
compute.zoneOperations.get
This optional role is scoped by IAM condition to GKE-managed instance groups for the target cluster.
Storage Service Account
The storage service account is used by Kubernetes workloads that need access to the BYOC-I GCS bucket through GKE Workload Identity.
The Terraform example grants it:
-
roles/storage.objectAdmin, scoped by IAM condition to the BYOC-I GCS bucket; -
roles/storage.bucketViewer, scoped by IAM condition to the BYOC-I GCS bucket; -
roles/iam.workloadIdentityUserfor the fixed BYOC-I Kubernetes service accounts used during bootstrap; -
roles/iam.workloadIdentityUserfor the target GKE cluster Workload Identity principal set, so runtime instance namespaces and service accounts created later can use the storage identity.
The storage service account is not directly impersonated by the Zilliz BYOC organization service account. Access is mediated through GKE Workload Identity from workloads running in the customer GKE cluster.
Booter VM Permissions
GCP BYOC-I uses a short-lived booter VM to install cloud-agent into the private GKE cluster. The booter VM uses a dedicated booter service account.
The booter service account receives scoped permissions to:
-
get GKE cluster credentials;
-
create and update the Kubernetes resources required by
cloud-agent; -
read rollout status and pod logs during bootstrap;
-
delete only the configured booter VM after bootstrap.
When Resource Manager tags are enabled, the booter self-delete permission is additionally constrained by the vendor=zilliz-byoc tag.