Manage Collections (Console)
A collection is a two-dimensional table used to store vector embeddings and metadata. All entities in a collection share the same schema. You can create multiple collections for data management or multi-tenancy purposes.
This guide walks you through the collection creation and management operations on the web console. It is intended for users who prefer a visual interface. If you are familiar with SDKs, you can also create and manage collections through them. For details, see Create Collection.
If you need strong data isolation and manage only a small number of tenants, you can create a separate collection for each tenant.
However, you can only create a maximum of 16,384 collections depending on your cluster plan. Therefore, for large-scale multi-tenancy, consider using alternative strategies such as partition-based or partition-key-based multi-tenancy, depending on your use case. For details, see Implement Multi-tenancy.
Create a collection
The Zilliz Cloud console provides 3 ways to create a collection, each designed for different scenarios:
-
Create your own collection: Customize the schema and index parameters to fit your dataset and use case. Ideal for users who need fine-grained control over the schema.
-
Create sample collection: Quickly set up a collection with a predefined schema and sample dataset. Recommended for new users exploring Zilliz Cloud.
-
Clone an existing collection with data: Duplicate an existing collection within the same database. Useful in environment duplication scenarios where you need to copy both schema and data from a testing collection to a production collection.
-
Create from an existing schema: Quickly create a new collection using the schema of an existing one, with the option to edit before finalizing.
The following demo shows you where to find the features on the web UI.
Below are some of the concepts you will encounter when creating a collection.
Collection basic information
The metadata of a collection contains:
-
Collection name
-
(Optional) Collection description. Up to 1024 (in UTF-8 bytes).
-
The database to which the collection belongs. A database is a layer between clusters and collections and serves as a logical container to manage and organize collections. You can group relevant collections under the same database.
Collection schema
A schema defines the data structure of your collection and must include:
-
1 primary key (PK) field
-
At least 1 vector field. For limits on the number of vector fields allowed in a collection, see Zilliz Cloud Limits.
-
(Optional) Scalar fields for metadata
-
(Optional) Dynamic field. Enabling dynamic field provides flexibility to the collection schema because it allows you to add fields during data insertion without modifying the existing schema. It is recommended to enable dynamic field when your data structure is not fixed. For fields that are frequently used in filters or queries, define them in advance in the schema instead of using dynamic fields, as this can help maintain optimal query performance.
Most of the schema configurations cannot be modified once the collection is created. Design your schema carefully to ensure it meets current and future business needs. For best practices, see Schema Explained.
Index
An index is a data structure that organizes data to accelerate searches and queries. Zilliz Cloud supports two types of indexes:
-
Vector index: Automatically created using AUTOINDEX to accelerate vector searches. If you have multiple vector fields in the schema, you can create a separate index for each vector field. In addition, you can also edit the metric type used to calculate the distance between vectors and the index build level that controls the underlying quantization strategy for tradeoffs between index cost, performance and capacity.
-
Scalar index: By default, Zilliz Cloud does not automatically create indexes for scalar fields. However, you can manually create indexes on scalar fields that are commonly used for filtering to accelerate searches and queries.
You can skip creating indexes during collection creation and add indexes later. For details, see Indexes.
Functions
In Zilliz Cloud, functions define how text-related capabilities are applied within a collection during data injection and query execution.
Functions fall into two main categories based on when they are applied:
-
Pre-search Functions
Pre-search Functions define how raw text is converted into a vector representation that can be used for retrieval. They are configured when a collection is created and become part of the collection's schema.
Examples of Pre-search Functions include the BM25 function, model-based functions.
For a conceptual overview of how Pre-search Functions work, see Function Overview.
-
Post-search Functions
Post-search Functions refine the ordering of search results at query time. Unlike Pre-search Functions, Post-search Functions are not bound to the collection schema. They are specified as parameters in search requests and operate on candidate results returned by search.
Post-search Functions do not affect indexing or candidate retrieval.
For a conceptual overview of how Post-search Functions work, see Function Overview.
Partition & partition key
Partition: A partition is a physical subset of a collection. A partition shares the same data schema with its parent collection but contains only a portion of the data in the collection. Each collection comes with one default partition. You can manually add more partitions for multi-tenancy and data management purposes. If no extra partition is created, all data inserted into a collection will fall into the default partition. For details, see Manage Partitions
Partition key: A partition key is a search optimization solution based on partitions. When you specify a non-primary key INT64 or VARCHAR field as the partition key, 16 partitions will be automatically created by Zilliz Cloud and all inserted entities will fall into these 16 auto-generated partitions based on their partition key values. Once partition key is enabled for a collection, you will not be able to manually create partitions in this collection. For details, see Use Partition Key.
To decide whether you need to create partitions or use partition key, you can consider the following factors:
-
Multi-tenancy strategies: If you need to support millions of tenants, please use partition key. If you need strong physical data isolation between tenants, please use partitions. For details, refer to Implement Multi-tenancy.
-
Resource management: If you prefer creating and managing partitions on you own, you can choose to use partitions. If you need automatic creation and management of partitions, please use partitions keys.
-
Hot and cold data management: If you need efficient handling of hot and cold data, please use partition key. To use partition key for hot and cold data management in Dedicated clusters, please contact us.
mmap
Memory mapping (mmap) is a memory usage optimization that enables direct access to large files on disk without loading them to memory. After enabling mmap, you can store more data under the same CU size specifications.
For details about the cluster-level default mmap settings, see Use mmap.
During collection creation, you can optionally configure mmap settings at the collection or field level, depending on your use case. Settings at lower levels take precedence over higher levels: Field > Collection > Cluster.
-
Collection-level mmap: Enable mmap for raw data across the entire collection. This setting can be modified later, but requires releasing the collection first.
-
Field-level mmap: Enable mmap for raw data and scalar indexes of selected fields via custom settings. Generally, it is recommended to enable mmap for fields whose data size is large and are not frequently filtered or queried. The setting applies only to the selected fields and can later be modified. To modify field-level mmap settings, you need to release the collection first.
Please be cautious with mmap settings. Changing the default mmap settings may cause performance degradation or load failures due to out-of-memory (OOM) issues. For best practices, see Use mmap.
The demo below shows the entrance of this feature on the Zilliz Cloud web console.
Shard
A shard is a horizontal slice of a collection that corresponds to a data input channel. Every collection comes with one shard by default. You can add more shards to increase write throughput.
As a general guideline, consider adding 1 shard for every 100 million rows of data. The maximum number of shards allowed depends on the cluster plan and cluster CU size. For details, see Zilliz Cloud Limits.
The number of shards can be later edited via the clone collection feature once the collection is created.
Full text search
The Zilliz Cloud console supports configuring the functions and analyzer to use in a full text search. For details about full text search, see Full Text Search.
The demo below shows the entrance of this feature on the Zilliz Cloud web console.
Text Match
The Zilliz Cloud console also supports configuring the field and analyzer for text match. For details about text match, see Text Match.
The demo below shows the entrance of this feature on the Zilliz Cloud web console.
Manage collection
Zilliz Cloud supports the following management operations on created collections via the web console.
-
Rename a collection: You can change the name of an existing collection.
-
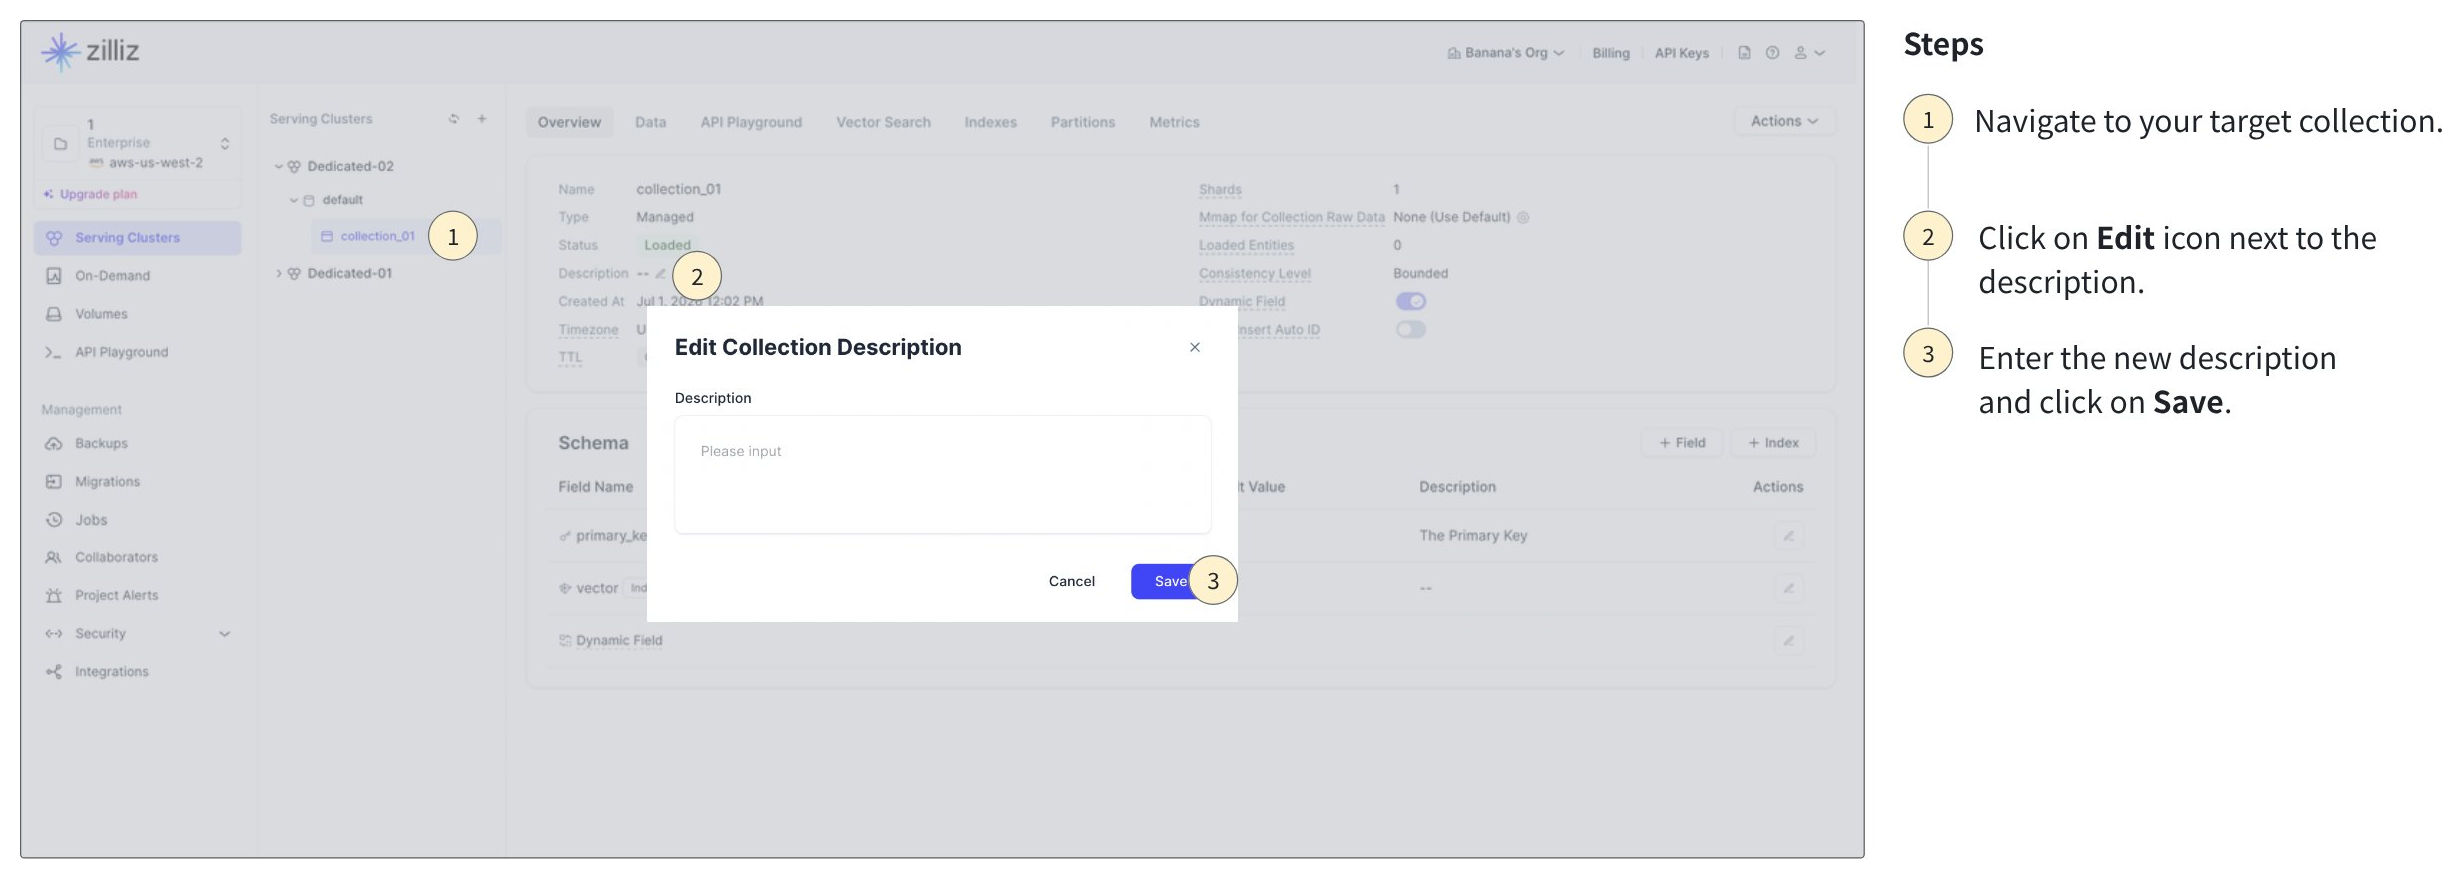
Edit collection description: You can change the description of an existing collection.
-
Edit collection schema and settings: Currently, Zilliz Cloud only supports editing the following schema and settings.
-
You can edit the
max_lengthvalue of an existing VARCHAR field. -
You can edit the
max_capacityvalue of an existing ARRAY field as well as themax_lengthvalue if the ARRAY type is VARCHAR. -
You can add new scalar fields to an existing schema.
-
To change shard settings, use the Clone collection feature instead.
-
To modify mmap, or partition key settings, use the SDKs instead. For details, see Modify Collection.
-
If you have not enabled dynamic field when creating a collection, you can later enable it by using the SDK or web console. For details about the SDKs, see Modify Collection. For details about how to enable dynamic field on the web console, refer to the demo above.
Other collection schema settings are not editable. To apply changes, create a new collection with the desired configuration and import the data into it.
-
-
Load & release collection: On the Zilliz Cloud web console, collections are automatically loaded to memory and made available for search and query immediately after creation. To free up memory space, you can release unused collections. The Zilliz Cloud web console supports loading or releasing a single collection or batch load or release multiple collections.
-
Move collection to another database: You can group related collections within the same database and move collections between databases as needed.
-
Manage partitions within a collection: For collections with partition key enabled, you do not need to manually manage partitions. For collections with partition key disabled, you can manually manage partitions and perform the following operations:
-
Create partition: You can create a maximum of 1,024 partitions in each collection. For details, see Zilliz Cloud Limits.
-
Drop partition: The default partition cannot be dropped and dropping a partition irreversibly deletes all data within it. You must release a collection first before dropping any partitions in it.
-
-
View collection alias: You can view the aliases of all collections in a cluster on the collection list page.
-
Edit collection timezone: The collection timezone defines the timezone for all TIMESTAMPTZ entities in this collection. By default, it uses UTC, but you can choose a different timezone to match your application’s needs.
-
Edit collection TTL: Time-to-live (TTL) is a collection property that determines the expiration time for data in a collection. For details, see Set Collection TTL.
-
Enable Allow Insert Auto ID: The
allow_insert_auto_idproperty allows a collection with AutoID enabled to accept user-provided primary key values during insert, upsert, and bulk import. For details, see Modify Collection. -
Drop collection: To reduce resource overhead, you can drop collections that are no longer needed. Dropping a collection irreversibly deletes all data within it.
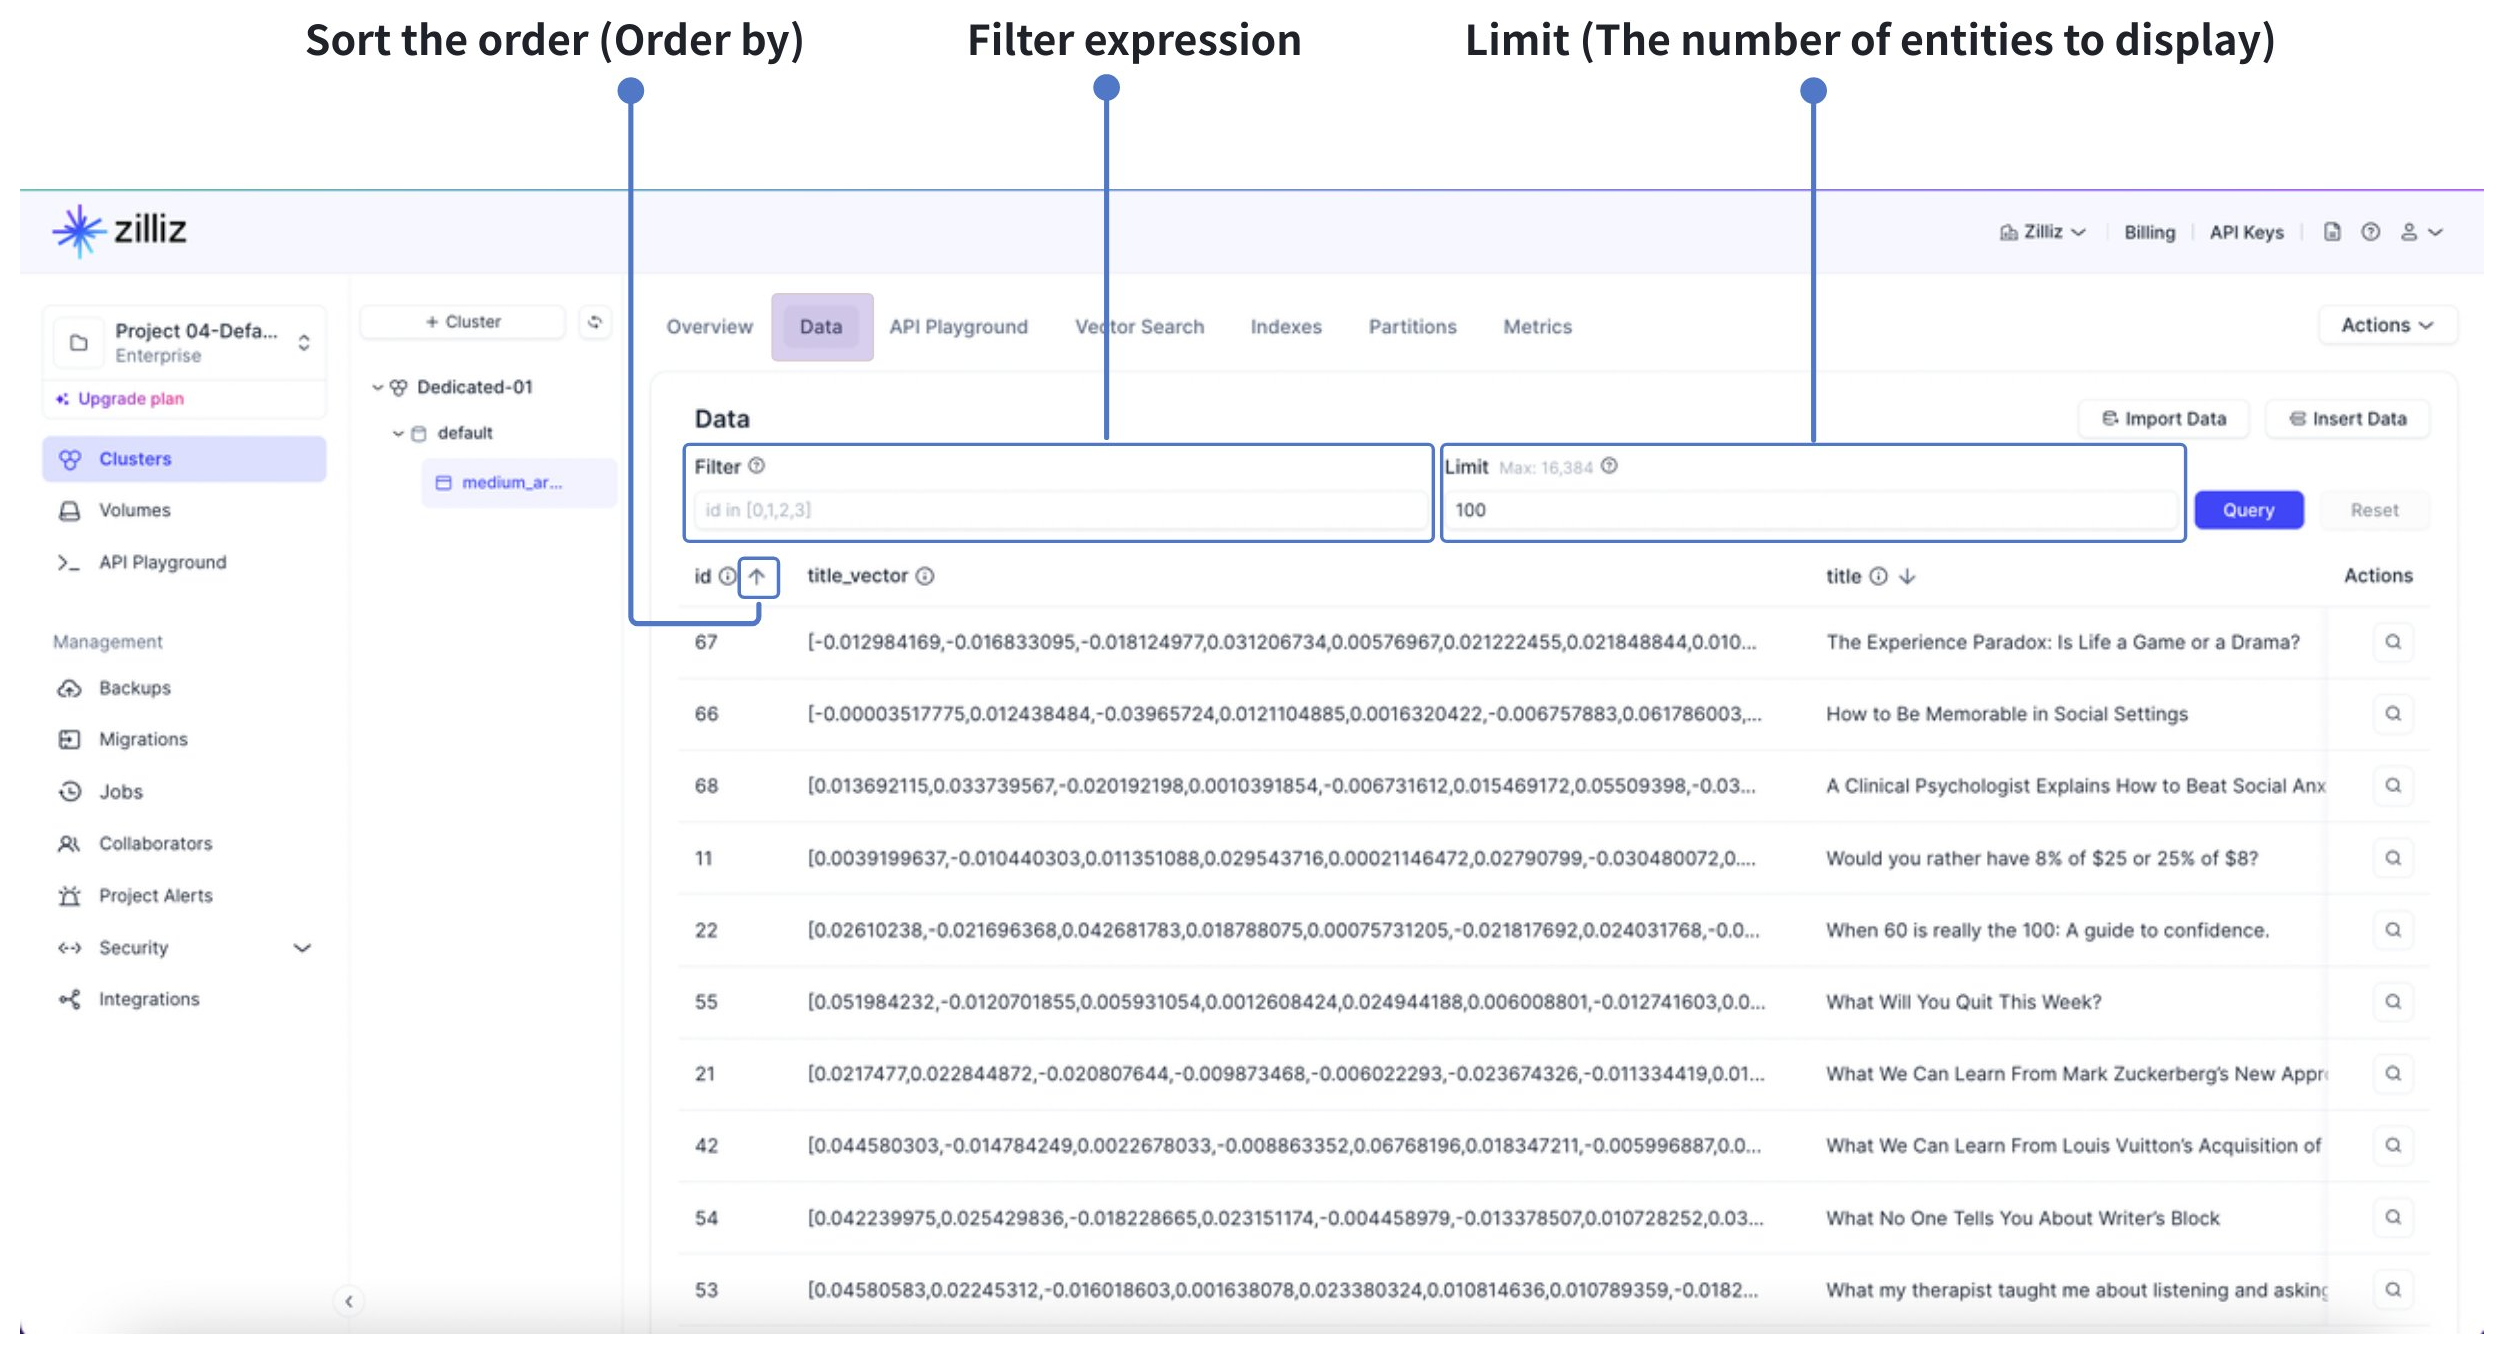
Preview collection data
Use the Data tab to preview entities in a collection directly from the Zilliz Cloud console.
You can define a filter expression, configure the limit parameter to control the number of entities displayed in preview (100 by default, up to 16,384), and query matching entities to inspect field values in a table.
You can also use Order By to sort the data preview in ascending or descending order by a primary key field, numeric fields, or scalar fields.