Prepare for Cluster Connection
All BYOC clusters are hosted entirely on your own virtual networks (AWS VPC, GCP VPC, or Microsoft Azure VNet) and do not have public endpoints. This guide explains the two approaches to connecting to these BYOC clusters.
Terms and their equivalents used by cloud providers
This guide applies to all BYOC clusters, regardless of the cloud provider. To address terminology differences and simplify descriptions, the terms used in the guide are listed below, along with their mappings to those used by different providers.
Terms | AWS | GCP | Azure |
|---|---|---|---|
Virtual network | VPC | VPC | VNet |
Security group | Security group | Firewall rules | Network Security Group (NSG) |
Load balancer | Network Load Balancer (NLB) | Cloud Load Balancer | Load Balancer |
Private endpoint | PrivateLink | Private Service Connect (PSC) | Private Link |
Virtual network endpoint | VPC Endpoint | PSC Endpoint | Private Endpoint |
Virtual network endpoint service | VPC Endpoint Service | PSC Publishing | Private Link Service |
Available connection modes
You can connect to your BYOC clusters in either of the following modes:
-
In this mode, the clients, usually your applications that interact with BYOC clusters, reside in the same virtual network as the BYOC clusters. This mode is the default choice and requires no additional network configuration.
To use this, leave the private endpoint unselected during the data plane deployment.
-
In this mode, clients may reside in multiple virtual networks or across different accounts. This requires a one-time setup, but adding new clusters or connecting additional client virtual networks becomes straightforward once the private endpoint is in place.
To use this, enable the private endpoint during the data plane deployment.
The following table compares these two modes in terms of setup complexity, availability, per-cluster access control, cross-account support, and multi-virtual-network scalability.
Mode 1: Direct VPC Access | Mode 2: PrivateLink Access | |
|---|---|---|
Best for | Clients in the same VPC as the data plane | Clients in multiple VPCs or different accounts |
Setup complexity | Low — works by default after deployment | One-time setup; simpler to scale as new clusters are added, automatically accessible via wildcard DNS |
Availability | Default for all BYOC deployments | Currently requires contacting Zilliz Support to enable (self-service coming soon) |
Per-cluster access control | Security Group per cluster load balancer | Kubernetes Envoy Gateway SecurityPolicy |
Cross-account support | No | Yes |
Multi-virtual-network scalability | Low — each new client VPC requires a separate VPC Peering and routing configurations. | High — new client VPCs connect via a single Endpoint Service; new clusters are reachable immediately. |
Direct VPC access
Each BYOC cluster is actually a Kubernetes cluster and exposes a load balancer as its entry point. The load balancer forwards incoming traffic to the cluster on port 19530. Zilliz manages the cluster endpoint via a public hosted zone, so traffic can be resolved from any network if your clients have established layer-3 connections to the load balancer.
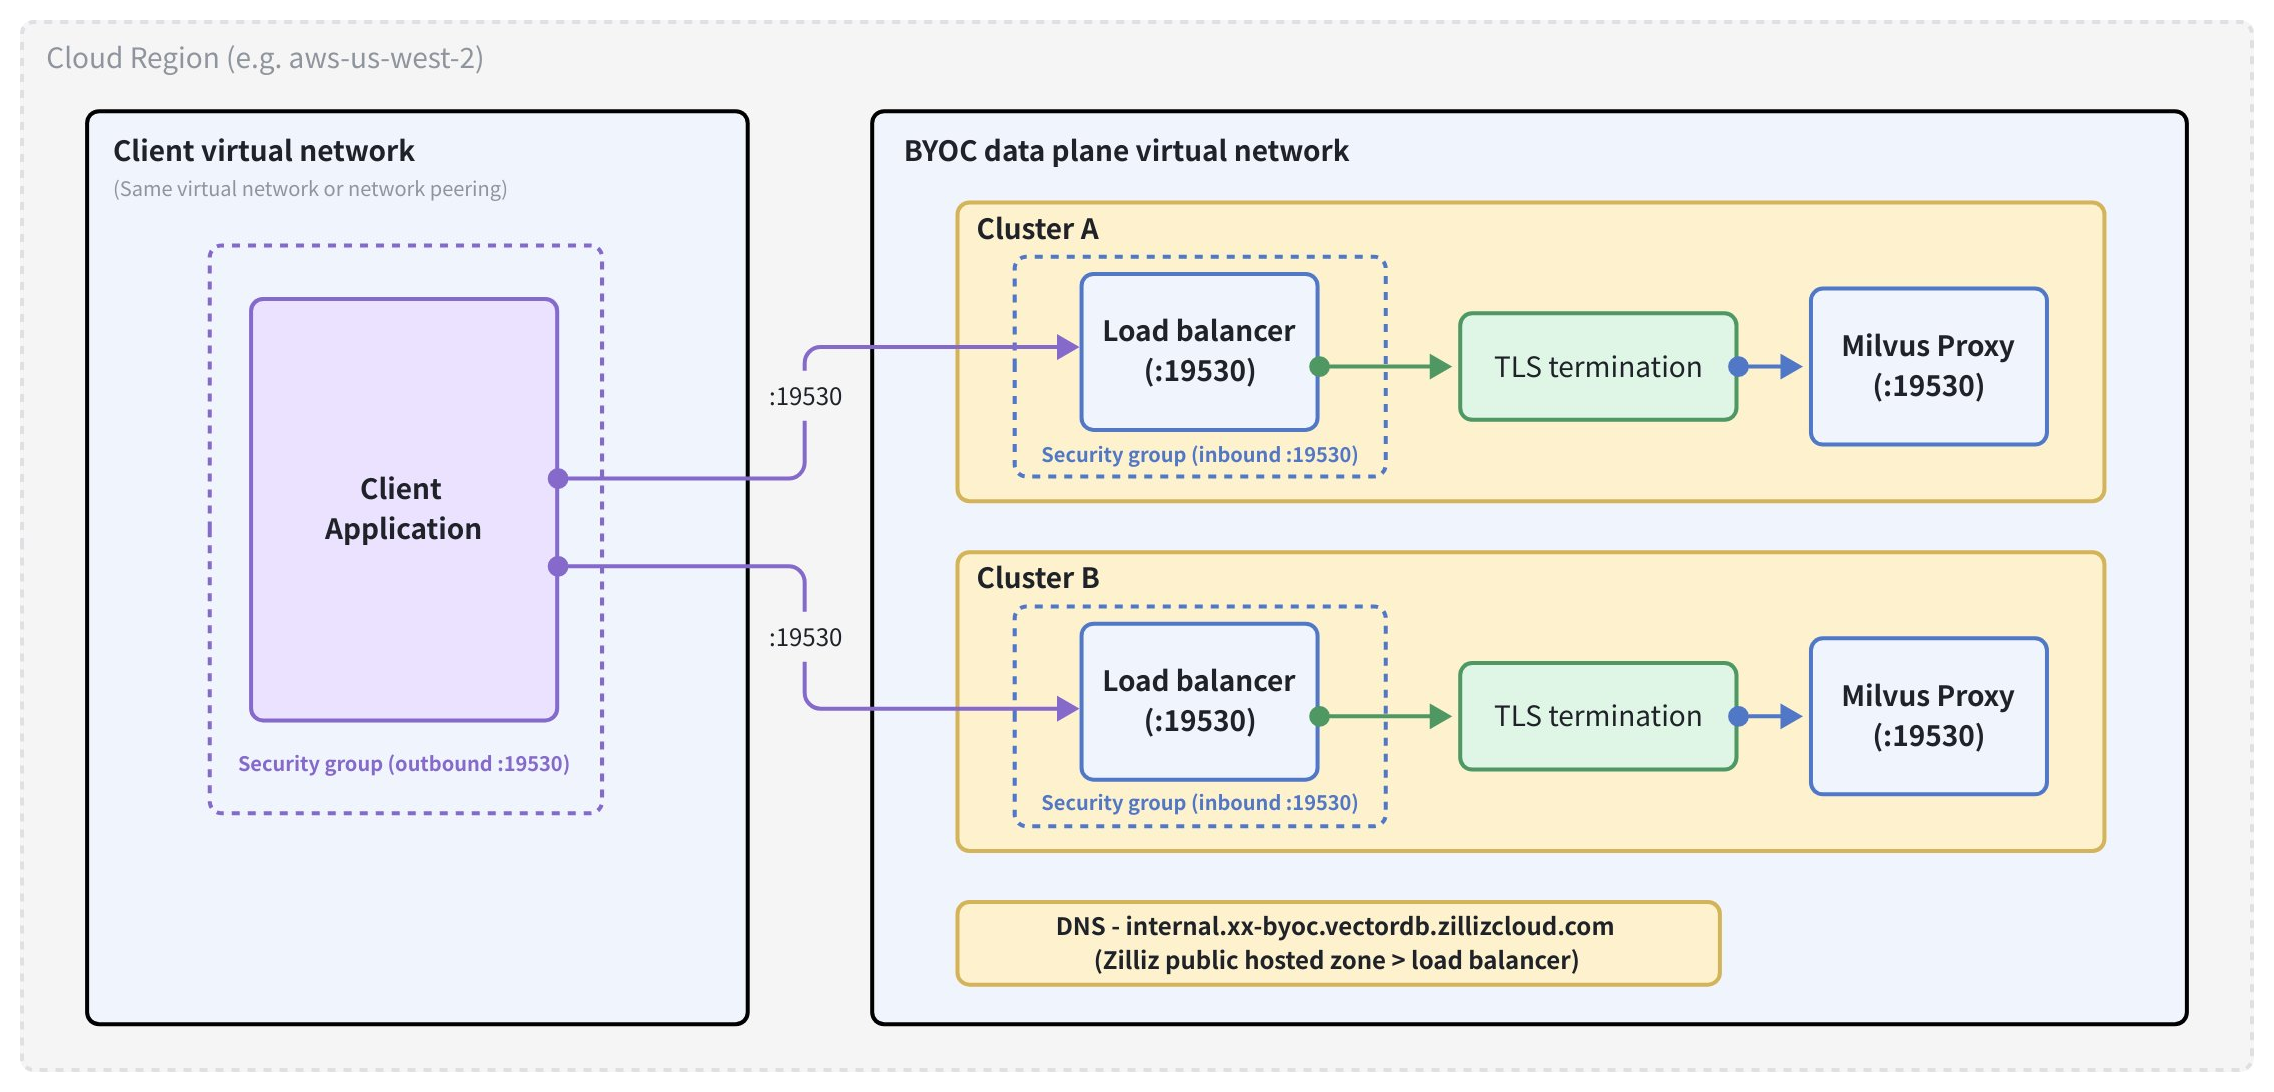
The diagram above illustrates the traffic flow from your client application to BYOC clusters, where cluster-specific load balancers forward traffic to Milvus Proxy in each cluster. Each cluster has its own load balancer, allowing you to implement cluster-level access control.
Prerequisites
-
The client application is running in the same virtual network as the data plane of your BYOC project, or the client virtual network and the data plane virtual network are connected via a virtual network peering with appropriate route table entries.
-
The security group associated with your client allows outbound traffic on port 19530 to the data plane virtual network segment.
-
The data plane security group allows inbound traffic on port 19530 from your client's network segment or security group.
Step 1: Get your cluster endpoint
Open the Zilliz Cloud console.
Navigate to your BYOC project and select your cluster.
On the Cluster Details page, locate the Connect card.
Copy the Cluster Endpoint — it is in the format https://${cluster-id}-internal.${region}.byoc.vectordb.zillizcloud.com:19530.
For those BYOC clusters deployed using Terraform, you can also retrieve their endpoints from the Terraform output.
Step 2: Connect to the cluster
Then you can connect the cluster with the copied cluster endpoint and credentials. For details, refer to Connect to Cluster.
Private endpoint access
If you have enabled the private endpoint during the deployment of your BYOC project data plane, a shared gateway is deployed in the data plane virtual network with a single load balancer as its entry point. The gateway terminates TLS and routes traffic to the correct cluster based on the request hostname.
In this case, you need to expose the load balancer as a virtual network endpoint, allowing any number of client virtual networks, including those in other cloud provider accounts, to connect to your BYOC clusters via that endpoint.
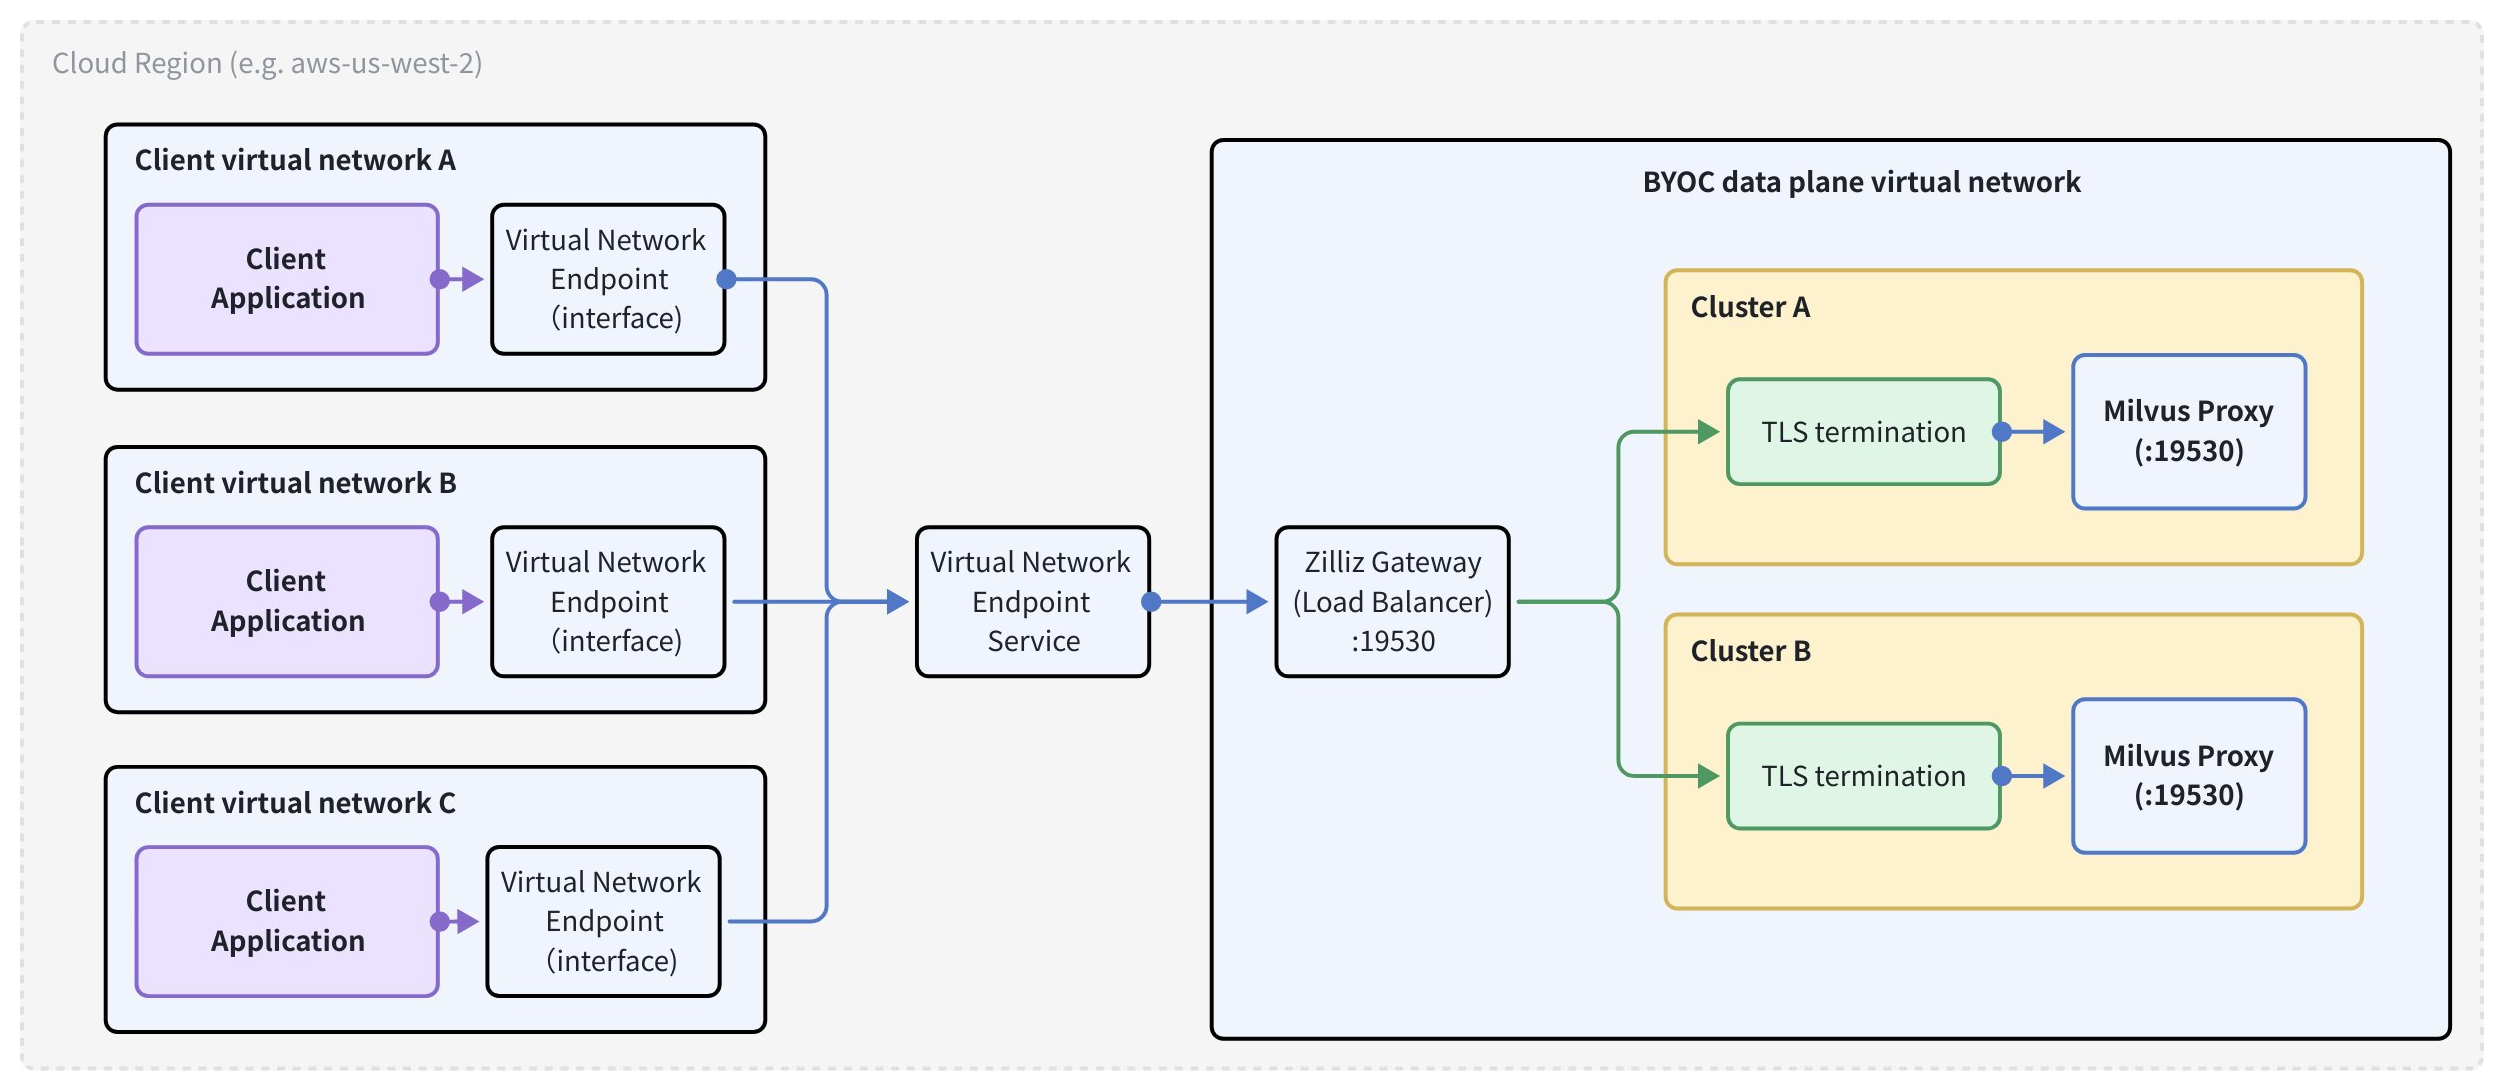
As illustrated in the diagram above, traffic between the client application and a BYOC cluster passes through the virtual network endpoint in the client virtual network, the virtual network endpoint service, the shared load balancer in the data plane virtual network that serves as the Zilliz Gateway, the cluster-specific TLS termination gateway, and the Milvus Proxy in each cluster.
The cluster endpoint (*.${region}.byoc.vectordb.zillizcloud.com) resolves to a public address managed by Zilliz Cloud. Therefore, each client virtual network must override DNS resolution by adding a DNS record that points the wildcard domain to the virtual network's private IP addresses.
If you deselect the private endpoint option during the data plane deployment and require private endpoint access, contact us so that we can enable the gateway deployment in your data plane.
Prerequisites
-
You have a BYOC project, and Zilliz Technical Support has confirmed that the gateway is deployed.
-
You have permissions to manage virtual network endpoints, virtual network endpoint services, and DNS records.
-
Client virtual networks are in the same region as the data plane of your BYOC project.
Step 1: Create a Virtual Network Endpoint Service
- AWS
- GCP
- Azure
The load balancer is named zilliz-gateway in your data plane. You need to create a virtual network endpoint service from this load balancer so that client virtual networks can connect to it.
There are three options available. You can create a virtual network endpoint on the AWS console, in AWS CloudShell, or using the Terraform script Zilliz provides.
On AWS Console
Go to the VPC console and choose PrivateLink and Lattice > Endpoint services.
Click Create endpoint service.
Under Load balancer type, select Network.
Under Available load balancers, select the NLB named zilliz-gateway.
Set Acceptance required according to your access control preference (disable for automatic acceptance).
Click Create endpoint service.
Note the Service name (e.g., com.amazonaws.vpce.${region}.vpce-svc-xxxxxxxxxxxxxxxxx) — you will share this with all client VPC owners.
In AWS CloudShell
Run the following commands to create the virtual network endpoint.
# Get the ARN of the zilliz-gateway NLB
NLB_ARN=$(aws elbv2 describe-load-balancers \
  --query "LoadBalancers[?LoadBalancerName=='zilliz-gateway'].LoadBalancerArn" \
  --output text)

# Create the endpoint service
aws ec2 create-vpc-endpoint-service-configuration \
  --network-load-balancer-arns "$NLB_ARN" \
  --no-acceptance-required \
  --query "ServiceConfiguration.ServiceName" \
  --output text
Using Terraform
Run the following commands to create the virtual network endpoint.
data "aws_lb" "zilliz_gateway" {
  name = "zilliz-gateway"
}

resource "aws_vpc_endpoint_service" "zilliz_gateway" {
  network_load_balancer_arns = [data.aws_lb.zilliz_gateway.arn]
  acceptance_required        = false
}

output "endpoint_service_name" {
  value = aws_vpc_endpoint_service.zilliz_gateway.service_name
}
Step 2: Create a Virtual Network Endpoint in each client virtual network
- AWS
- GCP
- Azure
On AWS Console
Repeat the following procedure for every client VPC that needs to connect to your BYOC clusters.
Go to the VPC console and choose PrivateLink and Lattice > Endpoints.
Click Create endpoint.
Under Service category, select Other endpoint services.
Paste the Service name from Step 1 and click Verify service.
Select the VPC where your client application runs.
Select the subnets in each availability zone you want to use.
Assign a security group that allows inbound traffic on port 19530.
Click Create endpoint.
Wait for the endpoint status to become Available.
For each VPC Endpoint created above, retrieve the private IP address assigned in each subnet as follows:
Go to the VPC console and click Endpoints.
Select the endpoint and go to the Subnets tab.
Note the IP address listed for each subnet. You will use these as the A record targets.
In AWS CloudShell
Replace placeholders with your values and run the commands.
# Replace with your values
SERVICE_NAME="com.amazonaws.vpce.${region}.vpce-svc-xxxxxxxxxxxxxxxxx"
VPC_ID="vpc-xxxxxxxxxxxxxxxxx"
SUBNET_IDS="subnet-aaa subnet-bbb subnet-ccc"
SECURITY_GROUP_ID="sg-xxxxxxxxxxxxxxxxx"

aws ec2 create-vpc-endpoint \
  --vpc-endpoint-type Interface \
  --service-name "$SERVICE_NAME" \
  --vpc-id "$VPC_ID" \
  --subnet-ids $SUBNET_IDS \
  --security-group-ids "$SECURITY_GROUP_ID"
Using Terraform
Replace placeholders with your values and run the commands.
resource "aws_vpc_endpoint" "zilliz_byoc" {
  vpc_id              = var.client_vpc_id
  service_name        = aws_vpc_endpoint_service.zilliz_gateway.service_name
  vpc_endpoint_type   = "Interface"
  subnet_ids          = var.client_subnet_ids
  security_group_ids  = [var.client_security_group_id]
}
Step 3: Configure DNS records
- AWS
- GCP
- Azure
The cluster endpoint domain (*.aws-${region}.byoc.vectordb.zillizcloud.com) resolves to a publicly reachable Zilliz-managed IP address. To redirect this to your VPC Endpoint, you must create a private Route 53 hosted zone that overrides DNS resolution within your VPC.
Repeat the following procedure for every client VPC that needs to connect to your BYOC clusters.
Open the Route 53 console and go to Hosted zones.
Click Create hosted zone.
Set Domain name to aws-${region}.byoc.vectordb.zillizcloud.com (replace ${region} with your AWS region, e.g., aws-us-west-2.byoc.vectordb.zillizcloud.com).
Set Type to Private hosted zone.
Associate it with your client VPC.
Click Create hosted zone.
Inside the hosted zone, click Create record.
Set Record name to * (wildcard).
Set Record type to A.
Enter the endpoint IP addresses from above (one per line if using multivalue).
Click Create records.
In AWS CloudShell
Replace placeholders with your values and run the commands.
REGION="us-west-2"
VPC_ID="vpc-xxxxxxxxxxxxxxxxx"
HOSTED_ZONE_NAME="aws-${REGION}.byoc.vectordb.zillizcloud.com"
ENDPOINT_IPS='["10.0.1.x", "10.0.2.x", "10.0.3.x"]'  # Replace with your endpoint IPs

# Create the private hosted zone
HOSTED_ZONE_ID=$(aws route53 create-hosted-zone \
  --name "$HOSTED_ZONE_NAME" \
  --caller-reference "$(date +%s)" \
  --hosted-zone-config "PrivateZone=true" \
  --vpc "VPCRegion=${REGION},VPCId=${VPC_ID}" \
  --query "HostedZone.Id" \
  --output text)

# Add the wildcard A record
aws route53 change-resource-record-sets \
  --hosted-zone-id "$HOSTED_ZONE_ID" \
  --change-batch "{
    \"Changes\": [{
      \"Action\": \"CREATE\",
      \"ResourceRecordSet\": {
        \"Name\": \"*.${HOSTED_ZONE_NAME}\",
        \"Type\": \"A\",
        \"TTL\": 60,
        \"ResourceRecords\": $(echo $ENDPOINT_IPS | jq '[.[] | {\"Value\": .}]')
      }
    }]
  }"
To associate additional VPCs with the same hosted zone:
aws route53 associate-vpc-with-hosted-zone \
  --hosted-zone-id "$HOSTED_ZONE_ID" \
  --vpc "VPCRegion=${REGION},VPCId=${ADDTIONAL_VPC_ID}"
Using Terraform
Replace placeholders with your values and run the commands.
locals {
  region         = "us-west-2"
  endpoint_ips   = ["10.0.1.x", "10.0.2.x", "10.0.3.x"]  # Replace with your endpoint IPs
}

resource "aws_route53_zone" "zilliz_byoc" {
  name = "aws-${local.region}.byoc.vectordb.zillizcloud.com"

  vpc {
    vpc_id = var.client_vpc_id
  }
}

resource "aws_route53_record" "zilliz_byoc_wildcard" {
  zone_id = aws_route53_zone.zilliz_byoc.zone_id
  name    = "*.aws-${local.region}.byoc.vectordb.zillizcloud.com"
  type    = "A"
  ttl     = 60
  records = local.endpoint_ips
}

# Associate additional VPCs if needed
resource "aws_route53_zone_association" "additional_vpc" {
  for_each = toset(var.additional_vpc_ids)

  zone_id = aws_route53_zone.zilliz_byoc.zone_id
  vpc_id  = each.value
}
Step 4: Connect to the cluster
Then you can connect the cluster with the copied cluster endpoint and credentials. For details, refer to Connect to Cluster.
Troubshootings
The following table lists common issues you may encounter during preparation.
Symptom | Likely cause | Resolution |
|---|---|---|
Connection timeout (Mode 1) | Security group blocking port 19530 | Add an inbound rule on port 19530 in the data plane security group, or an outbound rule in the client security group. |
Connection timeout (Mode 2) | DNS not overridden, or VPC Endpoint not ready | Verify the hosted zone is associated with the correct VPC; confirm the endpoint status is Available |
DNS resolves to an incorrect IP address (Mode 2) | Private hosted zone not associated with client VPC | Associate the Route 53 hosted zone with all client VPCs |
TLS error |
| Ensure the endpoint URI starts with |