Quickstart to On-Demand Search
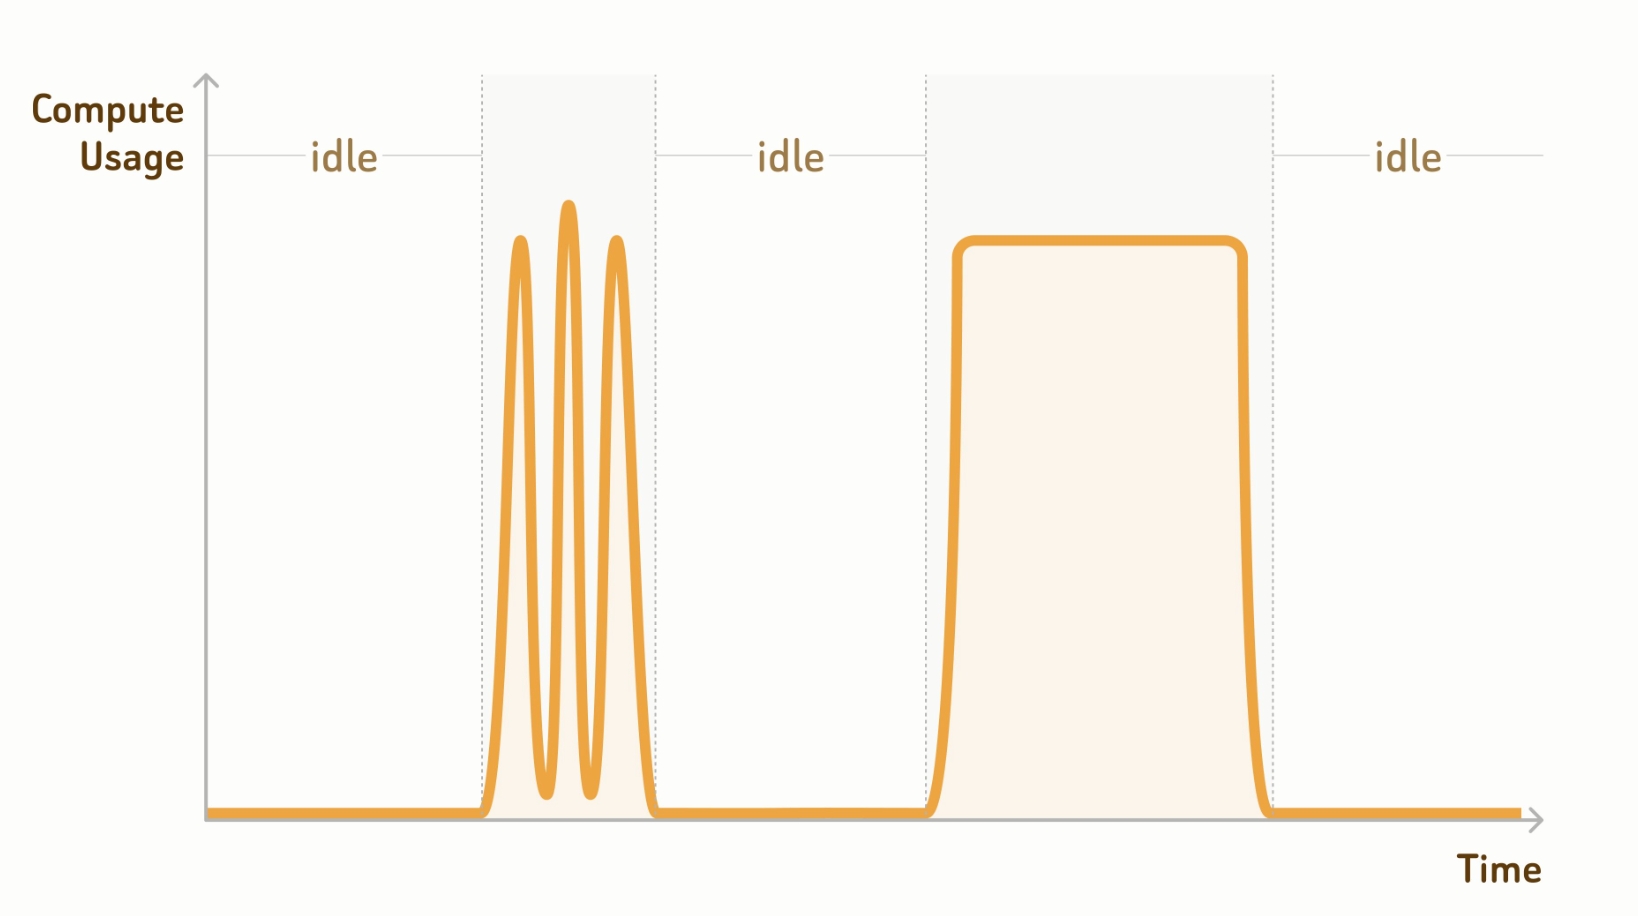
Zilliz Cloud provides on-demand compute resources, allowing you to run similarity searches and queries on demand. As shown in the figure below, compute resources automatically suspend when no requests arrive, and suspended compute resources do not incur charges.
Step 1: Connect to a project endpoint.
Before working on a database, connect to the project endpoint. You can obtain the project endpoint on the quickstart page after enabling on-demand compute on the Zilliz Cloud console.
-
Managed collection operations require an API key for authentication. This flow does not support
username:passwordauthentication. -
Managed collections in databases for on-demand compute do not require load operations.
- Python
- Java
- Go
- Rust
- C++
- NodeJS
- cURL
from pymilvus import MilvusClient

# connect to database
client = MilvusClient(
    # a project-specific on-demand compute endpoint
    uri="https://{project-id}.{region}.api.zillizcloud.com",
    token="YOUR_API_KEY"
)
import io.milvus.v2.client.ConnectConfig;
import io.milvus.v2.client.MilvusClientV2;

MilvusClientV2 client = new MilvusClientV2(ConnectConfig.builder()
    .uri("https://{project-id}.{region}.api.zillizcloud.com")
    .token("YOUR_API_KEY")
    .build());
import (
    "context"
    "log"

    "github.com/milvus-io/milvus/client/v3/milvusclient"
)

ctx := context.Background()

client, err := milvusclient.New(ctx, &milvusclient.ClientConfig{
    Address: "https://{project-id}.{region}.api.zillizcloud.com",
    APIKey:  "YOUR_API_KEY",
})
if err != nil {
    log.Fatal(err)
}
use milvus::v2::prelude::*;

// connect to database
let config = ConnectConfig::new()
    .uri("https://{project-id}.{region}.api.zillizcloud.com")
    .token("YOUR_API_KEY");
let client = ClientV2::new(&config).await?;
#include "milvus/MilvusClientV2.h"

auto client = milvus::MilvusClientV2::Create();
milvus::ConnectParam connect_param(
    "https://{project-id}.{region}.api.zillizcloud.com",
    "YOUR_API_KEY"
);

auto status = client->Connect(connect_param);
if (!status.IsOk()) {
    std::cout << status.Message() << std::endl;
}
import { MilvusClient } from '@zilliz/milvus2-sdk-node';

const client = new MilvusClient({
  address: 'https://{project-id}.{region}.api.zillizcloud.com',
  token: 'YOUR_API_KEY',
});

await client.connectPromise;
export PROJECT_ENDPOINT="https://{project-id}.{region}.api.zillizcloud.com"
export TOKEN="YOUR_API_KEY"
Step 2: (Optional) Create a database.
Zilliz Cloud ships with a default database. If you choose that, skip this step. You can also create a database as follows.
- Python
- Java
- Go
- Rust
- C++
- NodeJS
- cURL
- Zilliz CLI
client.create_database(
    db_name="my_database"
)
import io.milvus.v2.service.database.request.CreateDatabaseReq;

client.createDatabase(CreateDatabaseReq.builder()
    .databaseName("my_database")
    .build());
import (
    "log"

    "github.com/milvus-io/milvus/client/v3/milvusclient"
)

err = client.CreateDatabase(ctx, milvusclient.NewCreateDatabaseOption("my_database"))
if err != nil {
    log.Fatal(err)
}
use milvus::v2::prelude::*;

client
    .create_database(
        CreateDatabaseRequest::builder()
            .database_name("my_database")
            .build()?,
    )
    .await?;
#include <iostream>
#include "milvus/MilvusClientV2.h"

milvus::CreateDatabaseRequest request;
request.WithDatabaseName("my_database");

auto status = client->CreateDatabase(request);
if (!status.IsOk()) {
    std::cout << status.Message() << std::endl;
}
await client.createDatabase({
  db_name: 'my_database',
});
curl --request POST \
--url "${PROJECT_ENDPOINT}/v2/vectordb/databases/create" \
--header "Authorization: Bearer ${TOKEN}" \
--header "Content-Type: application/json" \
-d '{
    "dbName": "my_database"
}'
zilliz database create --name my_database
Step 3: Create a managed collection.
Once the database is ready, you can create managed collections in it. Unlike an external collection that maps collection columns to external data files, a managed collection asks you to import data for significant performance gains.
The following example demonstrates how to set up the collection schema and create a collection.
- Python
- Java
- Go
- Rust
- C++
- NodeJS
- cURL
- Zilliz CLI
from pymilvus import MilvusClient, DataType

schema = MilvusClient.create_schema()

schema.add_field(
    field_name="product_id",
    datatype=DataType.INT64,
    is_primary=True
)

schema.add_field(
    field_name="product_name",
    datatype=DataType.VARCHAR,
    max_length=512
)

schema.add_field(
    field_name="embedding",
    datatype=DataType.FLOAT_VECTOR,
    dim=768
)
import io.milvus.v2.common.DataType;
import io.milvus.v2.service.collection.request.AddFieldReq;
import io.milvus.v2.service.collection.request.CreateCollectionReq;

CreateCollectionReq.CollectionSchema schema = client.createSchema();

schema.addField(AddFieldReq.builder()
    .fieldName("product_id")
    .dataType(DataType.Int64)
    .isPrimaryKey(true)
    .build());

schema.addField(AddFieldReq.builder()
    .fieldName("product_name")
    .dataType(DataType.VarChar)
    .maxLength(512)
    .build());

schema.addField(AddFieldReq.builder()
    .fieldName("embedding")
    .dataType(DataType.FloatVector)
    .dimension(768)
    .build());
import "github.com/milvus-io/milvus/client/v3/entity"

schema := entity.NewSchema().
    WithField(entity.NewField().
        WithName("product_id").
        WithDataType(entity.FieldTypeInt64).
        WithIsPrimaryKey(true)).
    WithField(entity.NewField().
        WithName("product_name").
        WithDataType(entity.FieldTypeVarChar).
        WithMaxLength(512)).
    WithField(entity.NewField().
        WithName("embedding").
        WithDataType(entity.FieldTypeFloatVector).
        WithDim(768))
use milvus::v2::prelude::*;

let schema = CollectionSchema::new()
    .add_field(
        FieldSchema::new()
            .name("product_id")
            .data_type(DataType::Int64)
            .primary_key(true),
    )
    .add_field(
        FieldSchema::new()
            .name("product_name")
            .data_type(DataType::VarChar)
            .max_length(512),
    )
    .add_field(
        FieldSchema::new()
            .name("embedding")
            .data_type(DataType::FloatVector)
            .dimension(768),
    );
#include <memory>
#include "milvus/MilvusClientV2.h"

auto schema = std::make_shared<milvus::CollectionSchema>();

schema->AddField(milvus::FieldSchema("product_id", milvus::DataType::INT64)
    .WithPrimaryKey(true));
schema->AddField(milvus::FieldSchema("product_name", milvus::DataType::VARCHAR)
    .WithMaxLength(512));
schema->AddField(milvus::FieldSchema("embedding", milvus::DataType::FLOAT_VECTOR)
    .WithDimension(768));
import { DataType } from '@zilliz/milvus2-sdk-node';

const schema = [
  {
    name: 'product_id',
    data_type: DataType.Int64,
    is_primary_key: true,
  },
  {
    name: 'product_name',
    data_type: DataType.VarChar,
    max_length: 512,
  },
  {
    name: 'embedding',
    data_type: DataType.FloatVector,
    dim: 768,
  },
];
export schema='{
    "fields": [
        {
            "fieldName": "product_id",
            "dataType": "Int64",
            "isPrimary": true
        },
        {
            "fieldName": "embedding",
            "dataType": "FloatVector",
            "elementTypeParams": {
                "dim": "768"
            }
        },
        {
            "fieldName": "product_name",
            "dataType": "VarChar",
            "elementTypeParams": {
                "max_length": 512
            }
        }
    ]
}'
cat > schema.json <<'JSON'
{
  "fields": [
    {
      "fieldName": "product_id",
      "dataType": "Int64",
      "isPrimary": true
    },
    {
      "fieldName": "product_name",
      "dataType": "VarChar",
      "elementTypeParams": {
        "max_length": 512
      }
    },
    {
      "fieldName": "embedding",
      "dataType": "FloatVector",
      "elementTypeParams": {
        "dim": "768"
      }
    }
  ]
}
JSON
Then you can create a collection with the above schema. If you decide to use the default database, you can safely skip the db_name parameter.
- Python
- Java
- Go
- Rust
- C++
- NodeJS
- cURL
- Zilliz CLI
client.use_database(
    db_name="my_database"
)

# create the collection
client.create_collection(
    collection_name="prod_collection",
    schema=schema
)
import io.milvus.v2.service.collection.request.CreateCollectionReq;

client.useDatabase("my_database");

client.createCollection(CreateCollectionReq.builder()
    .collectionName("prod_collection")
    .collectionSchema(schema)
    .build());
import (
    "log"

    "github.com/milvus-io/milvus/client/v3/milvusclient"
)

err = client.UseDatabase(ctx, milvusclient.NewUseDatabaseOption("my_database"))
if err != nil {
    log.Fatal(err)
}

err = client.CreateCollection(ctx,
    milvusclient.NewCreateCollectionOption("prod_collection", schema))
if err != nil {
    log.Fatal(err)
}
use milvus::v2::prelude::*;

client
    .use_database("my_database")
    .await?;

client
    .create_collection(
        CreateCollectionRequest::builder()
            .collection_name("prod_collection")
            .schema(schema)
            .build()?,
    )
    .await?;
#include <iostream>
#include "milvus/MilvusClientV2.h"

auto status = client->UseDatabase("my_database");
if (!status.IsOk()) {
    std::cout << status.Message() << std::endl;
}

milvus::CreateCollectionRequest request;
request.WithCollectionName("prod_collection")
       .WithCollectionSchema(schema);

status = client->CreateCollection(request);
if (!status.IsOk()) {
    std::cout << status.Message() << std::endl;
}
await client.useDatabase({
  db_name: 'my_database',
});

await client.createCollection({
  collection_name: 'prod_collection',
  fields: schema,
});
curl --request POST \
--url "${PROJECT_ENDPOINT}/v2/vectordb/collections/create" \
--header "Authorization: Bearer ${TOKEN}" \
--header "Content-Type: application/json" \
-d "{
    \"dbName\": \"my_database\",
    \"collectionName\": \"prod_collection\",
    \"schema\": $schema
}"
zilliz collection create \
  --database my_database \
  --name prod_collection \
  --body file://schema.json
Step 4: Create indexes.
You need to create indexes for all vector fields and, optionally, for selected scalar fields.
- Python
- Java
- Go
- Rust
- C++
- NodeJS
- cURL
- Zilliz CLI
index_params = client.prepare_index_params()

# Add indexes
index_params.add_index(
    field_name="embedding",
    index_type="AUTOINDEX",
    metric_type="COSINE"
)

index_params.add_index(
    field_name="product_name",
    index_type="AUTOINDEX"
)

client.create_index(
    db_name="my_database",
    collection_name="prod_collection",
    index_params=index_params
)
import io.milvus.v2.common.IndexParam;
import io.milvus.v2.service.index.request.CreateIndexReq;

import java.util.Arrays;
import java.util.List;

List<IndexParam> indexParams = Arrays.asList(
    IndexParam.builder()
        .fieldName("embedding")
        .indexName("embedding")
        .indexType(IndexParam.IndexType.AUTOINDEX)
        .metricType(IndexParam.MetricType.COSINE)
        .build(),
    IndexParam.builder()
        .fieldName("product_name")
        .indexName("product_name")
        .indexType(IndexParam.IndexType.AUTOINDEX)
        .build()
);

client.createIndex(CreateIndexReq.builder()
    .databaseName("my_database")
    .collectionName("prod_collection")
    .indexParams(indexParams)
    .build());
import (
    "log"

    "github.com/milvus-io/milvus/client/v3/entity"
    "github.com/milvus-io/milvus/client/v3/index"
    "github.com/milvus-io/milvus/client/v3/milvusclient"
)

vectorIndex := index.NewAutoIndex(entity.COSINE)
vectorIndexTask, err := client.CreateIndex(ctx,
    milvusclient.NewCreateIndexOption("prod_collection", "embedding", vectorIndex).
        WithIndexName("embedding"))
if err != nil {
    log.Fatal(err)
}
if err := vectorIndexTask.Await(ctx); err != nil {
    log.Fatal(err)
}

scalarIndexTask, err := client.CreateIndex(ctx,
    milvusclient.NewCreateIndexOption("prod_collection", "product_name", index.NewInvertedIndex()).
        WithIndexName("product_name"))
if err != nil {
    log.Fatal(err)
}
if err := scalarIndexTask.Await(ctx); err != nil {
    log.Fatal(err)
}
use milvus::v2::prelude::*;

client
    .create_index(
        CreateIndexRequest::builder()
            .collection_name("prod_collection")
            .index_params(vec![
                IndexParam::new()
                    .field_name("embedding")
                    .index_type(IndexType::AutoIndex)
                    .metric_type(MetricType::Cosine),
                IndexParam::new()
                    .field_name("product_name")
                    .index_type(IndexType::AutoIndex),
            ])
            .build()?,
    )
    .await?;
#include "milvus/MilvusClientV2.h"

milvus::CreateIndexRequest request;
request.WithDatabaseName("my_database")
       .WithCollectionName("prod_collection")
       .AddIndex(milvus::IndexDesc(
           "embedding",
           "embedding",
           milvus::IndexType::AUTOINDEX,
           milvus::MetricType::COSINE))
       .AddIndex(milvus::IndexDesc(
           "product_name",
           "product_name",
           milvus::IndexType::AUTOINDEX));

auto status = client->CreateIndex(request);
await client.createIndex([
  {
    collection_name: 'prod_collection',
    field_name: 'embedding',
    index_name: 'embedding',
    index_type: 'AUTOINDEX',
    metric_type: 'COSINE',
  },
  {
    collection_name: 'prod_collection',
    field_name: 'product_name',
    index_name: 'product_name',
    index_type: 'AUTOINDEX',
  },
]);
export indexParams='[
    {
        "fieldName": "embedding",
        "metricType": "COSINE",
        "indexName": "embedding",
        "indexType": "AUTOINDEX"
    },
    {
        "fieldName": "product_name",
        "indexName": "product_name",
        "indexType": "AUTOINDEX"
    }
]'

curl --request POST \
--url "${PROJECT_ENDPOINT}/v2/vectordb/indexes/create" \
--header "Authorization: Bearer ${TOKEN}" \
--header "Content-Type: application/json" \
-d "{
    \"dbName\": \"my_database\",
    \"collectionName\": \"prod_collection\",
    \"indexParams\": $indexParams
}"
zilliz index create \
  --database my_database \
  --collection prod_collection \
  --body '{"indexParams":[{"fieldName":"embedding","metricType":"COSINE","indexName":"embedding","indexType":"AUTOINDEX"},{"fieldName":"product_name","indexName":"product_name","indexType":"AUTOINDEX"}]}'
Step 5: Import data.
Once everything is set up, you can import the processed data. The following example assumes that you have stored the processed data in an external storage bucket.
For the data format in your bucket or storage integrations, refer to Format Options.
- Python
- Java
- Go
- Rust
- C++
- NodeJS
- cURL
- Zilliz CLI
from pymilvus.bulk_writer import bulk_import

# The path should be relative to the root
# of a zilliz cloud volume or an external storage
OBJECT_URLS = [[
    "https://s3.us-west-2.amazonaws.com/your-bucket/path/in/external/storage.json"
]]
ACCESS_KEY = "YOUR_STORAGE_ACCESS_KEY"
SECRET_KEY = "YOUR_STORAGE_SECRET_KEY"

res = bulk_import(
    api_key="YOUR_ZILLIZ_API_KEY",
    url="https://api.cloud.zilliz.com",
    project_id="proj-xxxxxxxxxxxxxxxxxxx",
    region_id="aws-us-west-2",
    db_name="my_database",
    collection_name="prod_collection",
    object_urls=OBJECT_URLS,
    access_key=ACCESS_KEY,
    secret_key=SECRET_KEY
)

# job-xxxxxxxxxxxxxxxxxxxxx
import io.milvus.bulkwriter.request.import_.CloudImportRequest;
import io.milvus.bulkwriter.restful.BulkImportUtils;

import java.util.Collections;
import java.util.List;

String cloudEndpoint = "https://api.cloud.zilliz.com";

List<List<String>> objectUrls = Collections.singletonList(
    Collections.singletonList("https://s3.us-west-2.amazonaws.com/your-bucket/path/in/external/storage.json")
);

CloudImportRequest request = CloudImportRequest.builder()
    .apiKey("YOUR_ZILLIZ_API_KEY")
    .projectId("proj-xxxxxxxxxxxxxxxxxxx")
    .regionId("aws-us-west-2")
    .dbName("my_database")
    .collectionName("prod_collection")
    .objectUrls(objectUrls)
    .accessKey("YOUR_STORAGE_ACCESS_KEY")
    .secretKey("YOUR_STORAGE_SECRET_KEY")
    .build();

String res = BulkImportUtils.bulkImport(cloudEndpoint, request);
System.out.println(res);

// job-xxxxxxxxxxxxxxxxxxxxx
// Note: milvus-sdk-go (client/v3) exposes cloud bulk import via
// "github.com/milvus-io/milvus/client/v3/bulkwriter" for cluster-based
// (clusterId) imports as of v3.0.0, but project-database (on-demand) imports
// with projectId/regionId are not supported. Use the REST API (bash) instead.
use milvus::v2::bulk_import::{BulkImport, BulkImportConfig, BulkImportRequest};

let import_client = BulkImport::new(
    &BulkImportConfig::new()
        .url("https://api.cloud.zilliz.com")
        .api_key("YOUR_ZILLIZ_API_KEY"),
)?;

let request = BulkImportRequest::builder()
    .database_name("my_database")
    .collection_name("prod_collection")
    .project_id("proj-xxxxxxxxxxxxxxxxxxx")
    .region_id("aws-us-west-2")
    .object_url("https://s3.us-west-2.amazonaws.com/your-bucket/path/in/external/storage.json")
    .access_key("YOUR_STORAGE_ACCESS_KEY")
    .secret_key("YOUR_STORAGE_SECRET_KEY")
    .build()?;

let resp = import_client.bulk_import(request).await?;
// job-xxxxxxxxxxxxxxxxxxxxx
#include "milvus/BulkImport.h"

nlohmann::json res = milvus::BulkImport::CreateImportJobs(
    "https://api.cloud.zilliz.com",             // url
    "prod_collection",                          // collection_name
    {"https://s3.us-west-2.amazonaws.com/your-bucket/path/in/external/storage.json"},  // files
    "my_database",                              // db_name
    "YOUR_ZILLIZ_API_KEY",                      // api_key
    "",                                         // partition_name
    {{"projectId", "proj-xxxxxxxxxxxxxxxxxxx"},
     {"regionId", "aws-us-west-2"},
     {"accessKey", "YOUR_STORAGE_ACCESS_KEY"},
     {"secretKey", "YOUR_STORAGE_SECRET_KEY"}});

// job-xxxxxxxxxxxxxxxxxxxxx
import { HttpClient } from '@zilliz/milvus2-sdk-node';

const client = new HttpClient({
  endpoint: 'https://api.cloud.zilliz.com',
  token: 'YOUR_ZILLIZ_API_KEY',
});

const res = await client.createImportJobs({
  projectId: 'proj-xxxxxxxxxxxxxxxxxxx',
  regionId: 'aws-us-west-2',
  dbName: 'my_database',
  collectionName: 'prod_collection',
  // The node SDK exposes object URLs via `files` (accessKey/secretKey are not
  // part of HttpImportCreateReq as of v3.0.6).
  files: [[
    'https://s3.us-west-2.amazonaws.com/your-bucket/path/in/external/storage.json',
  ]],
});

// job-xxxxxxxxxxxxxxxxxxxxx
export CLOUD_PLATFORM_ENDPOINT="https://api.cloud.zilliz.com"

curl --request POST \
  --url "${CLOUD_PLATFORM_ENDPOINT}/v2/vectordb/jobs/import/create" \
  --header "Authorization: Bearer ${TOKEN}" \
  --header "Accept: application/json" \
  --header "Content-Type: application/json" \
  -d '{
    "projectId": "proj-xxxxxxxxxxxxxxxxxx",
    "regionId": "aws-us-west-2",
    "dbName": "my_database",
    "collectionName": "prod_collection",
    "objectUrls": [["https://s3.us-west-2.amazonaws.com/your-bucket/path/in/external/storage.json"]],
    "accessKey": "YOUR_STORAGE_ACCESS_KEY",
    "secretKey": "YOUR_STORAGE_SECRET_KEY"
  }'

# job-xxxxxxxxxxxxxxxxxxxxx
zilliz import start \
  --cluster-id inxx-xxxxxxxxxxxxxxxxxxx \
  --collection prod_collection \
  --body '{"projectId":"proj-xxxxxxxxxxxxxxxxxxx","regionId":"aws-us-west-2","dbName":"my_database","objectUrls":[["https://s3.us-west-2.amazonaws.com/your-bucket/path/in/external/storage.json"]],"accessKey":"YOUR_STORAGE_ACCESS_KEY","secretKey":"YOUR_STORAGE_SECRET_KEY"}'

# job-xxxxxxxxxxxxxxxxxxxxx
With the returned job ID, you can monitor its progress.
- Python
- Java
- Go
- Rust
- C++
- NodeJS
- cURL
- Zilliz CLI
import json
from pymilvus.bulk_writer import get_import_progress

# Get bulk-insert job progress
resp = get_import_progress(
    api_key="YOUR_ZILLIZ_API_KEY",
    url="https://api.cloud.zilliz.com",
    project_id="proj-xxxxxxxxxxxxxxxxxxx",
    region_id="aws-us-west-2",
    job_id="job-xxxxxxxxxxxxxxxxxxxxx",
)

print(json.dumps(resp.json(), indent=4))
import io.milvus.bulkwriter.request.describe.CloudDescribeImportRequest;
import io.milvus.bulkwriter.restful.BulkImportUtils;

String cloudEndpoint = "https://api.cloud.zilliz.com";

CloudDescribeImportRequest request = CloudDescribeImportRequest.builder()
    .apiKey("YOUR_ZILLIZ_API_KEY")
    .projectId("proj-xxxxxxxxxxxxxxxxxxx")
    .regionId("aws-us-west-2")
    .jobId("job-xxxxxxxxxxxxxxxxxxxxx")
    .build();

String resp = BulkImportUtils.getImportProgress(cloudEndpoint, request);
System.out.println(resp);
// Note: bulk-import progress (get_import_progress) for project databases is
// not supported in milvus-sdk-go as of client/v3.0.0. Use the REST API (bash) instead.
use milvus::v2::bulk_import::GetImportProgressRequest;

let request = GetImportProgressRequest::builder()
    .database_name("my_database")
    .project_id("proj-xxxxxxxxxxxxxxxxxxx")
    .region_id("aws-us-west-2")
    .job_id("job-xxxxxxxxxxxxxxxxxxxxx")
    .build()?;

let progress = import_client.get_import_progress(request).await?;
nlohmann::json progress = milvus::BulkImport::GetImportJobProgress(
    "https://api.cloud.zilliz.com",             // url
    "job-xxxxxxxxxxxxxxxxxxxxx",                // job_id
    "my_database",                              // db_name
    "YOUR_ZILLIZ_API_KEY");                     // api_key
import { HttpClient } from '@zilliz/milvus2-sdk-node';

const client = new HttpClient({
  endpoint: 'https://api.cloud.zilliz.com',
  token: 'YOUR_ZILLIZ_API_KEY',
});

const resp = await client.getImportJobProgress({
  projectId: 'proj-xxxxxxxxxxxxxxxxxxx',
  regionId: 'aws-us-west-2',
  jobId: 'job-xxxxxxxxxxxxxxxxxxxxx',
});

console.log(JSON.stringify(resp, null, 2));
  # Use jobId returned from create API
  curl --request POST \
    --url "${CLOUD_PLATFORM_ENDPOINT}/v2/vectordb/jobs/import/get_progress" \
    --header "Authorization: Bearer ${TOKEN}" \
    --header "Accept: application/json" \
    --header "Content-Type: application/json" \
    -d '{
      "projectId": "proj-xxxxxxxxxxxxxxxxxxx",
      "regionId": "aws-us-west-2",
      "jobId": "job-xxxxxxxxxxxxxxxxxxxxx"
    }'
zilliz import status \
  --cluster-id inxx-xxxxxxxxxxxxxxxxxxx \
  --job-id job-xxxxxxxxxxxxxxxxxxxxx
Step 6: Create an on-demand cluster
Once your collection is ready, you need to attach it to an on-demand cluster for on-demand searches. The following command creates a cluster and returns its ID.
export CONTROL_PLANE_ENDPOINT="https://api.cloud.zilliz.com"

curl --request POST \
--url "${CONTROL_PLANE_ENDPOINT}/v2/clusters/createOnDemandCluster" \
--header "Authorization: Bearer ${TOKEN}" \
--header "Content-Type: application/json" \
-d '{
    "projectId": "proj-xxxxxxxxxxxxxxxxxxx",
    "regionId": "aws-us-west-2",
    "clusterName": "my-on-demand",
    "cuSize": 8,
    "autoSuspend": 60
}'

# inxx-xxxxxxxxxxxxx
By default, the cluster automatically suspends for 60 seconds after the last request, and you can set it to a value that suits your use cases.
Step 7: Conduct searches.
When you need to conduct searches, queries, or hybrid searches, you can attach to the on-demand cluster created in the previous step through a session.
- Python
- Java
- Go
- Rust
- C++
- NodeJS
- cURL
- Zilliz CLI
from pymilvus import MilvusClient

client = MilvusClient(
    uri="https://{project-id}.{region}.api.zillizcloud.com",
    token="YOUR_API_KEY"
)

session = client.session(cluster_id="inxx-xxxxxxxxxxxxxxx")

# Must match collection vector dimension (example: 768)
query_vector = [0.3580376395471989, -0.6023495712049978, 0.18414012509913835, -0.26286205330961354, ..., 0.9029438446296592]

res = session.search(
    db_name="my_database",
    collection_name="prod_collection",
    anns_field="embedding",
    data=[query_vector],
    limit=3,
    output_fields=["product_id", "product_name"]
)
import io.milvus.v2.client.MilvusClientV2Session;
import io.milvus.v2.service.vector.request.SearchReq;
import io.milvus.v2.service.vector.request.data.FloatVec;
import io.milvus.v2.service.vector.response.SearchResp;

import java.util.Arrays;
import java.util.Collections;

MilvusClientV2Session session = client.session("inxx-xxxxxxxxxxxxxxx");

// Must match collection vector dimension (example: 768)
float[] queryVector = new float[] {
    0.35803764f, -0.6023496f, 0.18414013f, -0.26286206f, /* ... */ 0.90294385f
};

SearchResp res = session.search(SearchReq.builder()
    .databaseName("my_database")
    .collectionName("prod_collection")
    .annsField("embedding")
    .data(Collections.singletonList(new FloatVec(queryVector)))
    .limit(3)
    .outputFields(Arrays.asList("product_id", "product_name"))
    .build());
import (
    "log"

    "github.com/milvus-io/milvus/client/v3/entity"
    "github.com/milvus-io/milvus/client/v3/milvusclient"
)

// Note: on-demand sessions (client.session) are not supported in
// milvus-sdk-go as of client/v3.0.0; the search below runs on the
// default connection of the client.
queryVector := []float32{0.35803764, -0.6023496, 0.18414013, -0.26286206, 0.90294385 /* ...remaining dims */}

resultSets, err := client.Search(ctx, milvusclient.NewSearchOption(
    "prod_collection",
    3,
    []entity.Vector{entity.FloatVector(queryVector)},
).WithANNSField("embedding").WithOutputFields("product_id", "product_name"))
if err != nil {
    log.Fatal(err)
}
_ = resultSets
use milvus::v2::prelude::*;

let session = client.session("inxx-xxxxxxxxxxxxxxx")?;

let query_vector = vec![0.3580376395471989f32, -0.6023495712049978, 0.18414012509913835, -0.26286205330961354, 0.9029438446296592 /* ...remaining dims */];

let search = session
    .search(
        SearchRequest::builder()
            .collection_name("prod_collection")
            .vector_field("embedding")
            .vectors(SearchVectors::Float(vec![query_vector]))
            .output_fields(["product_id", "product_name"])
            .limit(3)
            .build()?,
    )
    .await?;
#include <iostream>
#include <utility>
#include <vector>
#include "milvus/MilvusClientV2.h"

milvus::MilvusClientV2SessionPtr session;
auto status = client->Session("inxx-xxxxxxxxxxxxxxx", session);
if (!status.IsOk()) {
    std::cout << status.Message() << std::endl;
}

std::vector<std::vector<float>> query_vectors = {
    {0.3580376395471989f, -0.6023495712049978f, 0.18414012509913835f, -0.26286205330961354f, 0.9029438446296592f /* ...remaining dims */}};

milvus::SearchResponse response;
status = session->Search(
    milvus::SearchRequest()
        .WithDatabaseName("my_database")
        .WithCollectionName("prod_collection")
        .WithAnnsField("embedding")
        .WithLimit(3)
        .WithFloatVectors(std::move(query_vectors))
        .AddOutputField("product_id")
        .AddOutputField("product_name"),
    response);
if (!status.IsOk()) {
    std::cout << status.Message() << std::endl;
}
import { MilvusClient } from '@zilliz/milvus2-sdk-node';

const session = client.session('inxx-xxxxxxxxxxxxxxx');

// Must match collection vector dimension (example: 768)
const queryVector = [
  0.3580376395471989,
  -0.6023495712049978,
  0.18414012509913835,
  -0.26286205330961354,
  // ...
  0.9029438446296592,
];

const res = await session.search({
  db_name: 'my_database',
  collection_name: 'prod_collection',
  anns_field: 'embedding',
  data: [queryVector],
  limit: 3,
  output_fields: ['product_id', 'product_name'],
});
curl --request POST \
  --url "${PROJECT_ENDPOINT}/v2/vectordb/entities/search?cluster_id=inxx-xxxxxxxxxxxxxxx" \
  --header "Authorization: Bearer ${TOKEN}" \
  --header "Content-Type: application/json" \
  -d '{
    "dbName": "my_database",
    "collectionName": "prod_collection",
    "data": [
        [
            0.3580376395471989,
            -0.6023495712049978,
            0.18414012509913835,
            -0.26286205330961354,
            ...,
            0.9029438446296592
        ]
    ],
    "annsField": "embedding",
    "limit": 3,
    "outputFields": ["product_id", "product_name"]
  }'
zilliz context set --cluster-id inxx-xxxxxxxxxxxxxxx

QUERY_VECTOR=$(python3 - <<'PY'
import json

query_vector = [
    0.3580376395471989,
    -0.6023495712049978,
    0.18414012509913835,
    -0.26286205330961354,
] + [0.0] * 763 + [0.9029438446296592]

print(json.dumps([query_vector]))
PY
)

zilliz vector search \
  --database my_database \
  --collection prod_collection \
  --anns-field embedding \
  --data "$QUERY_VECTOR" \
  --limit 3 \
  --output-fields '["product_id","product_name"]'
Then, you can explore your data and find the most valuable subset. Then you can connect to a serving cluster, import the data into it, and serve it for production.