Quickstart to Serving Cluster
A serving cluster is a self-contained server that combines both compute and storage for real-time production serving. Once you have cleaned your data through your Extract-Transform-Load (ETL) pipelines, you can import it into a serving cluster to deliver significant performance gains.
Before you start
Zilliz Cloud provides a Bring-Your-Own-Cloud (BYOC) solution, allowing organizations to host applications and data in their own cloud accounts rather than on Zilliz Cloud's infrastructure. For details about our BYOC solution, read BYOC Overview.
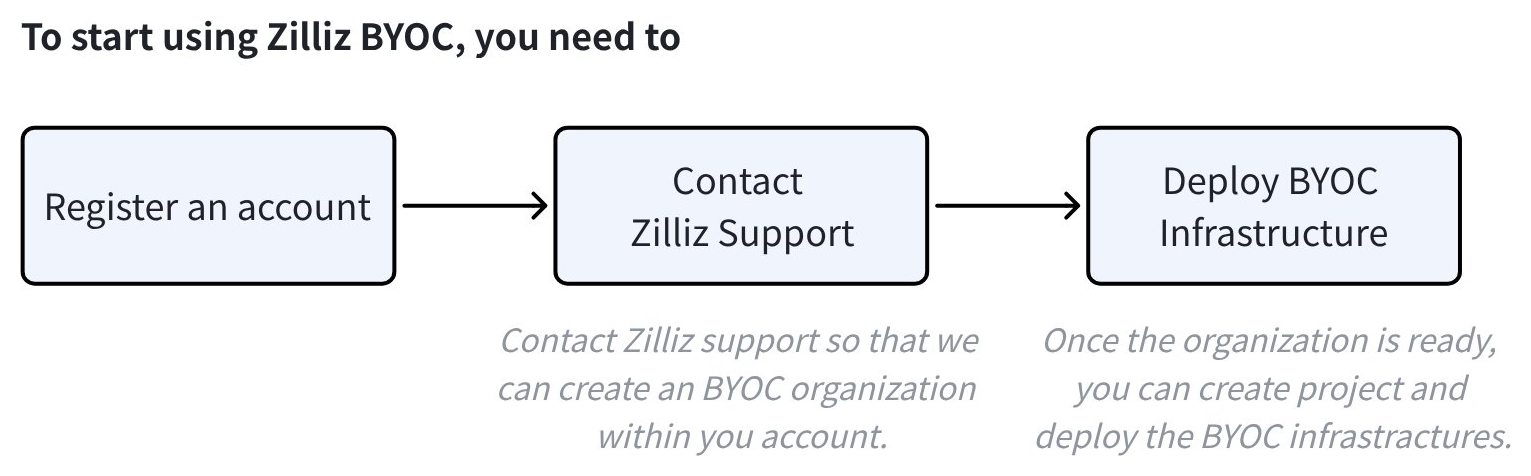
The following figure illustrates the steps to get started with our BYOC solution.
Before going through this quick start, ensure that:
-
You have registered an account with Zilliz Cloud.
For instructions, refer to Register with Zilliz Cloud.
-
You have contacted Zilliz Cloud sales and provided your account to us.
NotesZilliz BYOC is currently available in General Availability. For access and implementation details, please contact Zilliz Cloud sales.
-
You have created a project in the BYOC organization and deployed the data plane infrastructure for the project.
Zilliz BYOC operates within your Virtual Private Cloud (VPC), requiring you to initiate the deployment of data plane components. You can deploy the data plane in your VPCs hosted on the following cloud providers:
If your cloud provider is not available above, contact Zilliz Cloud support.
-
You have determined the way to connect to your BYOC cluster. For details, refer to Prepare for Cluster Connection.
The following procedure assumes that you have already created a serving cluster and obtained its endpoint and access credentials.
Step 1: Set up connection
Once you have obtained the cluster credentials, you can use it to connect to your cluster.
- Python
- Java
- Go
- Rust
- C++
- NodeJS
- cURL
from pymilvus import MilvusClient, DataType

SERVING_CLUSTER_ENDPOINT = "https://{cluster-id}.{region}.vectordb.zillizcloud.com:19530"
TOKEN = "YOUR_ZILLIZ_API_KEY"
# A valid token could be either
# - An API key, or
# - Use your Zilliz Cloud API key

# 1. Set up a Milvus client
client = MilvusClient(
    uri=SERVING_CLUSTER_ENDPOINT,
    token=TOKEN
)
import io.milvus.v2.client.ConnectConfig;
import io.milvus.v2.client.MilvusClientV2;
String SERVING_CLUSTER_ENDPOINT = "https://{cluster-id}.{region}.vectordb.zillizcloud.com:19530";
String TOKEN = "YOUR_ZILLIZ_API_KEY";

ConnectConfig config = ConnectConfig.builder()
    .uri(SERVING_CLUSTER_ENDPOINT)
    .token(TOKEN)
    .build();
MilvusClientV2 client = new MilvusClientV2(config);
import (
    "context"

    "github.com/milvus-io/milvus/client/v3/milvusclient"
)
SERVING_CLUSTER_ENDPOINT := "https://{cluster-id}.{region}.vectordb.zillizcloud.com:19530"
TOKEN := "YOUR_ZILLIZ_API_KEY"

ctx := context.Background()
cli, err := milvusclient.New(ctx, &milvusclient.ClientConfig{
    Address: SERVING_CLUSTER_ENDPOINT,
    APIKey:  TOKEN,
})
if err != nil {
    panic(err)
}
use milvus::v2::prelude::*;

const SERVING_CLUSTER_ENDPOINT: &str = "https://{cluster-id}.{region}.vectordb.zillizcloud.com:19530";
const TOKEN: &str = "YOUR_ZILLIZ_API_KEY";

// 1. Set up a Milvus client
let config = ConnectConfig::new().uri(SERVING_CLUSTER_ENDPOINT).token(TOKEN);
let client = ClientV2::new(&config).await?;
#include "milvus/MilvusClientV2.h"
#include <iostream>

const std::string SERVING_CLUSTER_ENDPOINT = "https://{cluster-id}.{region}.vectordb.zillizcloud.com:19530";
const std::string TOKEN = "YOUR_ZILLIZ_API_KEY";

// 1. Set up a Milvus client
auto client = milvus::MilvusClientV2::Create();
auto status = client->Connect(milvus::ConnectParam(SERVING_CLUSTER_ENDPOINT).WithToken(TOKEN));
if (!status.IsOk()) {
    std::cout << status.Message() << std::endl;
}
import { MilvusClient } from '@zilliz/milvus2-sdk-node';
const SERVING_CLUSTER_ENDPOINT = "https://{cluster-id}.{region}.vectordb.zillizcloud.com:19530";
const TOKEN = "YOUR_ZILLIZ_API_KEY";

const client = new MilvusClient({
  address: SERVING_CLUSTER_ENDPOINT,
  token: TOKEN,
});

await client.connectPromise;
export CLOUD_PLATFORM_ENDPOINT="https://api.cloud.zilliz.com"
export SERVING_CLUSTER_ENDPOINT="https://{cluster-id}.{region}.vectordb.zillizcloud.com:19530"
export TOKEN="YOUR_ZILLIZ_API_KEY"
# A valid token could be either
# - An API key, or
# - Use your Zilliz Cloud API key
Step 2: (Optional) Create a database.
A serving cluster ships with a default database. If you choose that, skip this step. You can also create a database as follows:
- Python
- Java
- Go
- Rust
- C++
- NodeJS
- cURL
# connect to the serving cluster
client = MilvusClient(
    # a cluster-specific endpoint
    uri=SERVING_CLUSTER_ENDPOINT,
    token=TOKEN
)

client.create_database(
    db_name="my_database"
)
import io.milvus.v2.service.database.request.CreateDatabaseReq;

client.createDatabase(CreateDatabaseReq.builder()
    .databaseName("my_database")
    .build());
import "github.com/milvus-io/milvus/client/v3/milvusclient"

err = cli.CreateDatabase(ctx, milvusclient.NewCreateDatabaseOption("my_database"))
if err != nil {
    panic(err)
}
use milvus::v2::prelude::*;

client
    .create_database(
        CreateDatabaseRequest::builder()
            .database_name("my_database")
            .build()?,
    )
    .await?;
#include <iostream>

auto status = client->CreateDatabase(
    milvus::CreateDatabaseRequest().WithDatabaseName("my_database"));
if (!status.IsOk()) {
    std::cout << status.Message() << std::endl;
}
await client.createDatabase({
  db_name: 'my_database',
});
curl --request POST \
--url "${SERVING_CLUSTER_ENDPOINT}/v2/vectordb/databases/create" \
--header "Authorization: Bearer ${TOKEN}" \
--header "Content-Type: application/json" \
-d '{
    "dbName": "my_database"
}'
Step 3: Create a collection.
Once the database is ready, you can create managed collections in it. Unlike an external collection that maps collection columns to external data files, a managed collection asks you to import data for significant performance gains.
The following example demonstrates how to set up the collection schema and create a collection.
- Python
- Java
- Go
- Rust
- C++
- NodeJS
- cURL
from pymilvus import MilvusClient, DataType

schema = MilvusClient.create_schema()

schema.add_field(
    field_name="product_id",
    datatype=DataType.INT64,
    is_primary=True
)

schema.add_field(
    field_name="product_name",
    datatype=DataType.VARCHAR,
    max_length=512
)

schema.add_field(
    field_name="embedding",
    datatype=DataType.FLOAT_VECTOR,
    dim=768
)
import io.milvus.v2.common.DataType;
import io.milvus.v2.service.collection.request.AddFieldReq;
import io.milvus.v2.service.collection.request.CreateCollectionReq;

CreateCollectionReq.CollectionSchema collectionSchema = CreateCollectionReq.CollectionSchema.builder()
    .build();
collectionSchema.addField(AddFieldReq.builder()
    .fieldName("product_id")
    .dataType(DataType.Int64)
    .isPrimaryKey(true)
    .build());
collectionSchema.addField(AddFieldReq.builder()
    .fieldName("product_name")
    .dataType(DataType.VarChar)
    .maxLength(512)
    .build());
collectionSchema.addField(AddFieldReq.builder()
    .fieldName("embedding")
    .dataType(DataType.FloatVector)
    .dimension(768)
    .build());
import "github.com/milvus-io/milvus/client/v3/entity"

schema := entity.NewSchema().
    WithField(entity.NewField().WithName("product_id").WithDataType(entity.FieldTypeInt64).WithIsPrimaryKey(true)).
    WithField(entity.NewField().WithName("product_name").WithDataType(entity.FieldTypeVarChar).WithMaxLength(512)).
    WithField(entity.NewField().WithName("embedding").WithDataType(entity.FieldTypeFloatVector).WithDim(768))
use milvus::v2::prelude::*;

let schema = CollectionSchema::new()
    .add_field(
        FieldSchema::new()
            .name("product_id")
            .data_type(DataType::Int64)
            .primary_key(true),
    )
    .add_field(
        FieldSchema::new()
            .name("product_name")
            .data_type(DataType::VarChar)
            .max_length(512),
    )
    .add_field(
        FieldSchema::new()
            .name("embedding")
            .data_type(DataType::FloatVector)
            .dimension(768),
    );
milvus::CollectionSchemaPtr schema = std::make_shared<milvus::CollectionSchema>();
schema->AddField(milvus::FieldSchema("product_id", milvus::DataType::INT64, "product id", true, false));
milvus::FieldSchema name_field("product_name", milvus::DataType::VARCHAR, "product name");
name_field.SetMaxLength(512);
schema->AddField(name_field);
schema->AddField(milvus::FieldSchema("embedding", milvus::DataType::FLOAT_VECTOR, "embedding").WithDimension(768));
import { DataType } from '@zilliz/milvus2-sdk-node';

const fields = [
  { name: 'product_id', data_type: DataType.Int64, is_primary_key: true },
  { name: 'product_name', data_type: DataType.VarChar, max_length: 512 },
  { name: 'embedding', data_type: DataType.FloatVector, dim: 768 },
];
export schema='{
    "fields": [
        {
            "fieldName": "product_id",
            "dataType": "Int64",
            "isPrimary": true
        },
        {
            "fieldName": "embedding",
            "dataType": "FloatVector",
            "elementTypeParams": {
                "dim": "768"
            }
        },
        {
            "fieldName": "product_name",
            "dataType": "VarChar",
            "elementTypeParams": {
                "max_length": 512
            }
        }
    ]
}'
Then you can create a collection with the above schema. If you decide to use the default database, you can safely skip the db_name parameter.
- Python
- Java
- Go
- Rust
- C++
- NodeJS
- cURL
client.use_database(
    db_name="my_database"
)

# create the collection
client.create_collection(
    collection_name="prod_collection",
    schema=schema
)
import io.milvus.v2.service.collection.request.CreateCollectionReq;

client.useDatabase("my_database");

client.createCollection(CreateCollectionReq.builder()
    .collectionName("prod_collection")
    .collectionSchema(collectionSchema)
    .build());
import "github.com/milvus-io/milvus/client/v3/milvusclient"

err = cli.UseDatabase(ctx, milvusclient.NewUseDatabaseOption("my_database"))
if err != nil {
    panic(err)
}

err = cli.CreateCollection(ctx, milvusclient.NewCreateCollectionOption("prod_collection", schema))
if err != nil {
    panic(err)
}
use milvus::v2::prelude::*;

client
    .use_database("my_database")
    .await?;

client
    .create_collection(
        CreateCollectionRequest::builder()
            .collection_name("prod_collection")
            .schema(schema)
            .build()?,
    )
    .await?;
#include <iostream>

auto status = client->UseDatabase("my_database");
if (!status.IsOk()) {
    std::cout << status.Message() << std::endl;
}

status = client->CreateCollection(
    milvus::CreateCollectionRequest()
        .WithCollectionName("prod_collection")
        .WithCollectionSchema(schema));
if (!status.IsOk()) {
    std::cout << status.Message() << std::endl;
}
await client.useDatabase({ db_name: 'my_database' });

await client.createCollection({
  collection_name: 'prod_collection',
  fields,
});
curl --request POST \
--url "${SERVING_CLUSTER_ENDPOINT}/v2/vectordb/collections/create" \
--header "Authorization: Bearer ${TOKEN}" \
--header "Content-Type: application/json" \
-d "{
    \"dbName\": \"my_database\",
    \"collectionName\": \"prod_collection\",
    \"schema\": $schema
}"
Step 4: Create indexes.
You need to create indexes for all vector fields and, optionally, for selected scalar fields.
- Python
- Java
- Go
- Rust
- C++
- NodeJS
- cURL
index_params = client.prepare_index_params()

# Add indexes
index_params.add_index(
    field_name="embedding",
    index_type="AUTOINDEX",
    metric_type="COSINE"
)

index_params.add_index(
    field_name="product_name",
    index_type="AUTOINDEX"
)

client.create_index(
    db_name="my_database",
    collection_name="prod_collection",
    index_params=index_params
)
import io.milvus.v2.common.IndexParam;
import io.milvus.v2.service.index.request.CreateIndexReq;
import java.util.ArrayList;
import java.util.List;

List<IndexParam> indexParams = new ArrayList<>();
indexParams.add(IndexParam.builder()
    .fieldName("embedding")
    .indexType(IndexParam.IndexType.AUTOINDEX)
    .metricType(IndexParam.MetricType.COSINE)
    .build());
indexParams.add(IndexParam.builder()
    .fieldName("product_name")
    .indexType(IndexParam.IndexType.AUTOINDEX)
    .build());

client.createIndex(CreateIndexReq.builder()
    .databaseName("my_database")
    .collectionName("prod_collection")
    .indexParams(indexParams)
    .build());
import (
    "github.com/milvus-io/milvus/client/v3/entity"

    "github.com/milvus-io/milvus/client/v3/index"
    "github.com/milvus-io/milvus/client/v3/milvusclient"
)

task, err := cli.CreateIndex(ctx, milvusclient.NewCreateIndexOption(
    "prod_collection",
    "embedding",
    index.NewAutoIndex(entity.COSINE),
).WithIndexName("embedding"))
if err != nil {
    panic(err)
}
if err = task.Await(ctx); err != nil {
    panic(err)
}

task, err = cli.CreateIndex(ctx, milvusclient.NewCreateIndexOption(
    "prod_collection",
    "product_name",
    index.NewAutoIndex(entity.COSINE),
).WithIndexName("product_name"))
if err != nil {
    panic(err)
}
if err = task.Await(ctx); err != nil {
    panic(err)
}
use milvus::v2::prelude::*;

client
    .create_index(
        CreateIndexRequest::builder()
            .collection_name("prod_collection")
            .index_params(vec![
                IndexParam::new()
                    .field_name("embedding")
                    .index_type(IndexType::AutoIndex)
                    .metric_type(MetricType::Cosine),
                IndexParam::new()
                    .field_name("product_name")
                    .index_type(IndexType::AutoIndex),
            ])
            .build()?,
    )
    .await?;
#include <iostream>

milvus::IndexDesc index_embedding("embedding", "embedding", milvus::IndexType::AUTOINDEX, milvus::MetricType::COSINE);
milvus::IndexDesc index_name("product_name", "product_name", milvus::IndexType::AUTOINDEX);

auto status = client->CreateIndex(
    milvus::CreateIndexRequest()
        .WithDatabaseName("my_database")
        .WithCollectionName("prod_collection")
        .WithIndexes({index_embedding, index_name}));
if (!status.IsOk()) {
    std::cout << status.Message() << std::endl;
}
await client.createIndex([
  {
    collection_name: 'prod_collection',
    field_name: 'embedding',
    index_type: 'AUTOINDEX',
    metric_type: 'COSINE',
    index_name: 'embedding',
  },
  {
    collection_name: 'prod_collection',
    field_name: 'product_name',
    index_type: 'AUTOINDEX',
    index_name: 'product_name',
  },
]);
export indexParams='[
    {
        "fieldName": "embedding",
        "metricType": "COSINE",
        "indexName": "embedding",
        "indexType": "AUTOINDEX"
    },
    {
        "fieldName": "product_name",
        "indexName": "product_name",
        "indexType": "AUTOINDEX"
    }
]'

curl --request POST \
--url "${SERVING_CLUSTER_ENDPOINT}/v2/vectordb/indexes/create" \
--header "Authorization: Bearer ${TOKEN}" \
--header "Content-Type: application/json" \
-d "{
    \"dbName\": \"my_database\",
    \"collectionName\": \"prod_collection\",
    \"indexParams\": $indexParams
}"
Step 5: Load the collection.
Once indexes are ready, load the collection into memory.
- Python
- Java
- Go
- Rust
- C++
- NodeJS
- cURL
client.load_collection(
    db_name="my_database",
    collection_name="prod_collection"
)
import io.milvus.v2.service.collection.request.LoadCollectionReq;

client.loadCollection(LoadCollectionReq.builder()
    .databaseName("my_database")
    .collectionName("prod_collection")
    .build());
import "github.com/milvus-io/milvus/client/v3/milvusclient"

loadTask, err := cli.LoadCollection(ctx, milvusclient.NewLoadCollectionOption("prod_collection"))
if err != nil {
    panic(err)
}
if err = loadTask.Await(ctx); err != nil {
    panic(err)
}
use milvus::v2::prelude::*;

client
    .load_collection(
        LoadCollectionRequest::builder()
            .collection_name("prod_collection")
            .build()?,
    )
    .await?;
#include <iostream>

auto status = client->LoadCollection(
    milvus::LoadCollectionRequest()
        .WithDatabaseName("my_database")
        .WithCollectionName("prod_collection"));
if (!status.IsOk()) {
    std::cout << status.Message() << std::endl;
}
await client.loadCollection({
  collection_name: 'prod_collection',
});
curl --request POST \
--url "${SERVING_CLUSTER_ENDPOINT}/v2/vectordb/collections/load" \
--header "Authorization: Bearer ${TOKEN}" \
--header "Content-Type: application/json" \
-d '{
    "dbName": "my_database",
    "collectionName": "prod_collection"
}'
Step 6: Import data.
Once everything is set up, you can import the processed data. The following example assumes that you have stored the processed data in an external storage bucket.
For the data format in your bucket or storage integrations, refer to Format Options.
- Python
- Java
- Go
- Rust
- C++
- NodeJS
- cURL
from pymilvus.bulk_writer import bulk_import

# The path should be relative to the root
# of a zilliz cloud volume or an external storage
OBJECT_URLS = [[
    "https://s3.us-west-2.amazonaws.com/your-bucket/path/in/external/storage.json"
]]

ACCESS_KEY = "YOUR_STORAGE_ACCESS_KEY"
SECRET_KEY = "YOUR_STORAGE_SECRET_KEY"

res = bulk_import(
    api_key="YOUR_ZILLIZ_API_KEY",
    url="https://api.cloud.zilliz.com",
    cluster_id="inxx-xxxxxxxxxxxxxxxxxxx",
    db_name="my_database",
    collection_name="prod_collection",
    object_urls=OBJECT_URLS,
    access_key=ACCESS_KEY,
    secret_key=SECRET_KEY
)

# job-xxxxxxxxxxxxxxxxxxxxx
import io.milvus.bulkwriter.request.import_.CloudImportRequest;
import io.milvus.bulkwriter.restful.BulkImportUtils;
import java.util.Collections;

String CLOUD_PLATFORM_ENDPOINT = "https://api.cloud.zilliz.com";
String API_KEY = "YOUR_ZILLIZ_API_KEY";

CloudImportRequest importReq = CloudImportRequest.builder()
    .apiKey(API_KEY)
    .clusterId("inxx-xxxxxxxxxxxxxxxxxxx")
    .dbName("my_database")
    .collectionName("prod_collection")
    .objectUrls(Collections.singletonList(Collections.singletonList(
        "https://s3.us-west-2.amazonaws.com/your-bucket/path/in/external/storage.json")))
    .accessKey("YOUR_STORAGE_ACCESS_KEY")
    .secretKey("YOUR_STORAGE_SECRET_KEY")
    .build();

String job = BulkImportUtils.bulkImport(CLOUD_PLATFORM_ENDPOINT, importReq);
// job-xxxxxxxxxxxxxxxxxxxxx
import "github.com/milvus-io/milvus/client/v3/bulkwriter"

CLOUD_PLATFORM_ENDPOINT := "https://api.cloud.zilliz.com"
API_KEY := "YOUR_ZILLIZ_API_KEY"

resp, err := bulkwriter.BulkImport(ctx, bulkwriter.NewCloudBulkImportOption(
    CLOUD_PLATFORM_ENDPOINT,
    "prod_collection",
    API_KEY,
    "https://s3.us-west-2.amazonaws.com/your-bucket/path/in/external/storage.json",
    "inxx-xxxxxxxxxxxxxxxxxxx",
    "YOUR_STORAGE_ACCESS_KEY",
    "YOUR_STORAGE_SECRET_KEY",
))
if err != nil {
    panic(err)
}
// job-xxxxxxxxxxxxxxxxxxxxx
use milvus::v2::bulk_import::{BulkImport, BulkImportConfig, BulkImportRequest};

let config = BulkImportConfig::new()
    .url("https://api.cloud.zilliz.com")
    .api_key("YOUR_ZILLIZ_API_KEY");
let import_client = BulkImport::new(&config)?;

let request = BulkImportRequest::builder()
    .database_name("my_database")
    .collection_name("prod_collection")
    .cluster_id("inxx-xxxxxxxxxxxxxxxxxxx")
    .object_url("https://s3.us-west-2.amazonaws.com/your-bucket/path/in/external/storage.json")
    .access_key("YOUR_STORAGE_ACCESS_KEY")
    .secret_key("YOUR_STORAGE_SECRET_KEY")
    .build()?;

let resp = import_client.bulk_import(request).await?;
// job-xxxxxxxxxxxxxxxxxxxxx
#include "milvus/BulkImport.h"

std::string CLOUD_PLATFORM_ENDPOINT = "https://api.cloud.zilliz.com";
std::string API_KEY = "YOUR_ZILLIZ_API_KEY";

nlohmann::json res = milvus::BulkImport::CreateImportJobs(
    CLOUD_PLATFORM_ENDPOINT,        // url
    "prod_collection",              // collection_name
    {"https://s3.us-west-2.amazonaws.com/your-bucket/path/in/external/storage.json"},  // files
    "my_database",                  // db_name
    API_KEY,                        // api_key
    "",                             // partition_name
    {{"clusterId", "inxx-xxxxxxxxxxxxxxxxxxx"},
     {"accessKey", "YOUR_STORAGE_ACCESS_KEY"},
     {"secretKey", "YOUR_STORAGE_SECRET_KEY"}});

// job-xxxxxxxxxxxxxxxxxxxxx
import { HttpClient } from '@zilliz/milvus2-sdk-node';

const httpClient = new HttpClient({
  endpoint: 'https://api.cloud.zilliz.com',
  token: 'YOUR_ZILLIZ_API_KEY',
});

const res = await httpClient.createImportJobs({
  projectId: 'proj-xxxxxxxxxxxxxxxxxxx',
  regionId: 'aws-us-west-2',
  dbName: 'my_database',
  collectionName: 'prod_collection',
  files: [['https://s3.us-west-2.amazonaws.com/your-bucket/path/in/external/storage.json']],
  options: {
    accessKey: 'YOUR_STORAGE_ACCESS_KEY',
    secretKey: 'YOUR_STORAGE_SECRET_KEY',
  },
});

// job-xxxxxxxxxxxxxxxxxxxxx
export CLOUD_PLATFORM_ENDPOINT="https://api.cloud.zilliz.com"

# replace url and token with your own
curl --request POST \
     --url "${CLOUD_PLATFORM_ENDPOINT}/v2/vectordb/jobs/import/create" \
     --header "Authorization: Bearer ${TOKEN}" \
     --header "Accept: application/json" \
     --header "Content-Type: application/json" \
     -d '{
        "clusterId": "inxx-xxxxxxxxxxxxxxx",
        "collectionName": "prod_collection",
        "objectUrls": [["https://s3.{region}.amazonaws.com/{bucket}/path/in/external/storage.json"]],
        "accessKey": "YOUR_STORAGE_ACCESS_KEY",
        "secretKey": "YOUR_STORAGE_SECRET_KEY"
    }'

 # job-xxxxxxxxxxxxxxxxxxxxx
With the returned job ID, you can monitor its progress.
- Python
- Java
- Go
- Rust
- C++
- NodeJS
- cURL
import json
from pymilvus.bulk_writer import get_import_progress

# Get bulk-insert job progress
resp = get_import_progress(
    api_key="YOUR_ZILLIZ_API_KEY",
    url="https://api.cloud.zilliz.com",
    cluster_id="inxx-xxxxxxxxxxxxxxxxxxx",
    job_id="job-xxxxxxxxxxxxxxxxxxxxx",
)

print(json.dumps(resp.json(), indent=4))
import io.milvus.bulkwriter.request.describe.CloudDescribeImportRequest;
import io.milvus.bulkwriter.restful.BulkImportUtils;

String CLOUD_PLATFORM_ENDPOINT = "https://api.cloud.zilliz.com";
String API_KEY = "YOUR_ZILLIZ_API_KEY";

CloudDescribeImportRequest progressReq = CloudDescribeImportRequest.builder()
    .apiKey(API_KEY)
    .clusterId("inxx-xxxxxxxxxxxxxxxxxxx")
    .jobId("job-xxxxxxxxxxxxxxxxxxxxx")
    .build();

String progress = BulkImportUtils.getImportProgress(CLOUD_PLATFORM_ENDPOINT, progressReq);
import "github.com/milvus-io/milvus/client/v3/bulkwriter"

CLOUD_PLATFORM_ENDPOINT := "https://api.cloud.zilliz.com"
API_KEY := "YOUR_ZILLIZ_API_KEY"

progress, err := bulkwriter.GetImportProgress(ctx, bulkwriter.NewCloudGetImportProgressOption(
    CLOUD_PLATFORM_ENDPOINT,
    "job-xxxxxxxxxxxxxxxxxxxxx",
    API_KEY,
    "inxx-xxxxxxxxxxxxxxxxxxx",
))
if err != nil {
    panic(err)
}
use milvus::v2::bulk_import::{GetImportProgressRequest};

let request = GetImportProgressRequest::builder()
    .database_name("my_database")
    .cluster_id("inxx-xxxxxxxxxxxxxxxxxxx")
    .job_id("job-xxxxxxxxxxxxxxxxxxxxx")
    .build()?;

let progress = import_client.get_import_progress(request).await?;
std::string CLOUD_PLATFORM_ENDPOINT = "https://api.cloud.zilliz.com";
std::string API_KEY = "YOUR_ZILLIZ_API_KEY";

nlohmann::json progress = milvus::BulkImport::GetImportJobProgress(
    CLOUD_PLATFORM_ENDPOINT,        // url
    "job-xxxxxxxxxxxxxxxxxxxxx",    // job_id
    "my_database",                  // db_name
    API_KEY);                       // api_key
import { HttpClient } from '@zilliz/milvus2-sdk-node';

const httpClient = new HttpClient({
  endpoint: 'https://api.cloud.zilliz.com',
  token: 'YOUR_ZILLIZ_API_KEY',
});

const resp = await httpClient.getImportJobProgress({
  projectId: 'proj-xxxxxxxxxxxxxxxxxxx',
  regionId: 'aws-us-west-2',
  dbName: 'my_database',
  jobId: 'job-xxxxxxxxxxxxxxxxxxxxx',
});

console.log(JSON.stringify(resp, null, 2));
curl --request POST \
     --url "${CLOUD_PLATFORM_ENDPOINT}/v2/vectordb/jobs/import/describe" \
     --header "Authorization: Bearer ${TOKEN}" \
     --header "Accept: application/json" \
     --header "Content-Type: application/json" \
     -d '{
        "clusterId": "inxx-xxxxxxxxxxxxxxx",
        "jobId": "job-xxxxxxxxxxxxxxxxxxxxx"
    }'
Step 7: Serve your data.
Once the import completes, you can invite users to consume your data through searches, queries, and hybrid searches.
- Python
- Java
- Go
- Rust
- C++
- NodeJS
- cURL
query_vector = [0.3580376395471989, -0.6023495712049978, 0.18414012509913835, -0.26286205330961354, 0.9029438446296592, ...]
res = client.search(
    db_name="my_database",
    collection_name="prod_collection",
    anns_field="embedding",
    data=[query_vector],
    limit=3,
    output_fields=["product_name"]
)
import io.milvus.v2.service.vector.request.SearchReq;
import io.milvus.v2.service.vector.request.data.FloatVec;
import io.milvus.v2.service.vector.response.SearchResp;
import java.util.Arrays;
import java.util.Collections;
import java.util.List;

List<Float> queryVector = Arrays.asList(0.35803764f, -0.6023496f, 0.18414013f, -0.26286206f, 0.90294385f /* ...remaining dims */);
SearchResp searchResp = client.search(SearchReq.builder()
    .databaseName("my_database")
    .collectionName("prod_collection")
    .annsField("embedding")
    .data(Collections.singletonList(new FloatVec(queryVector)))
    .limit(3)
    .outputFields(Collections.singletonList("product_name"))
    .build());
import (
    "github.com/milvus-io/milvus/client/v3/entity"

    "github.com/milvus-io/milvus/client/v3/milvusclient"
)

queryVector := []float32{0.35803764, -0.6023496, 0.18414013, -0.26286206, 0.90294385 /* ...remaining dims */}
resultSets, err := cli.Search(ctx, milvusclient.NewSearchOption(
    "prod_collection",
    3,
    []entity.Vector{entity.FloatVector(queryVector)},
).WithANNSField("embedding").WithOutputFields("product_name"))
if err != nil {
    panic(err)
}
_ = resultSets
use milvus::v2::prelude::*;

let query_vector = vec![0.3580376395471989f32, -0.6023495712049978, 0.18414012509913835, -0.26286205330961354, 0.9029438446296592 /* ...remaining dims */];

let search = client
    .search(
        SearchRequest::builder()
            .collection_name("prod_collection")
            .vector_field("embedding")
            .vectors(SearchVectors::Float(vec![query_vector]))
            .output_fields(["product_name"])
            .limit(3)
            .build()?,
    )
    .await?;
#include <iostream>

std::vector<std::vector<float>> query_vectors = {
    {0.3580376395471989f, -0.6023495712049978f, 0.18414012509913835f, -0.26286205330961354f, 0.9029438446296592f /* ...remaining dims */}};

milvus::SearchResponse response;
auto status = client->Search(
    milvus::SearchRequest()
        .WithDatabaseName("my_database")
        .WithCollectionName("prod_collection")
        .WithAnnsField("embedding")
        .WithLimit(3)
        .WithFloatVectors(std::move(query_vectors))
        .AddOutputField("product_name"),
    response);
if (!status.IsOk()) {
    std::cout << status.Message() << std::endl;
}
const queryVector = [0.3580376395471989, -0.6023495712049978, 0.18414012509913835, -0.26286205330961354, 0.9029438446296592 /* ...remaining dims */];

const results = await client.search({
  db_name: 'my_database',
  collection_name: 'prod_collection',
  anns_field: 'embedding',
  data: [queryVector],
  limit: 3,
  output_fields: ['product_name'],
});
curl --request POST \
--url "${SERVING_CLUSTER_ENDPOINT}/v2/vectordb/entities/search" \
--header "Authorization: Bearer ${TOKEN}" \
--header "Content-Type: application/json" \
-d '{
    "dbName": "my_database",
    "collectionName": "prod_collection",
    "data": [
        [
            0.3580376395471989,
            -0.6023495712049978,
            0.18414012509913835,
            -0.26286205330961354,
            0.9029438446296592,
            ...
        ]
    ],
    "annsField": "embedding",
    "limit": 3,
    "outputFields": [
        "product_name"
    ]
}'