Configure SCIM Provisioning with Microsoft Entra
This guide describes how to configure SCIM provisioning from Microsoft Entra to Zilliz Cloud. With SCIM provisioning, Microsoft Entra can provision organization users to your Zilliz Cloud organization.
If your organization already uses Microsoft Entra for SSO, keep the existing SSO application for user sign-in. Configure SCIM provisioning separately in a dedicated enterprise application. For an overview of how SSO, SCIM, synced groups, and Access Control work together, see SCIM Provisioning Overview.
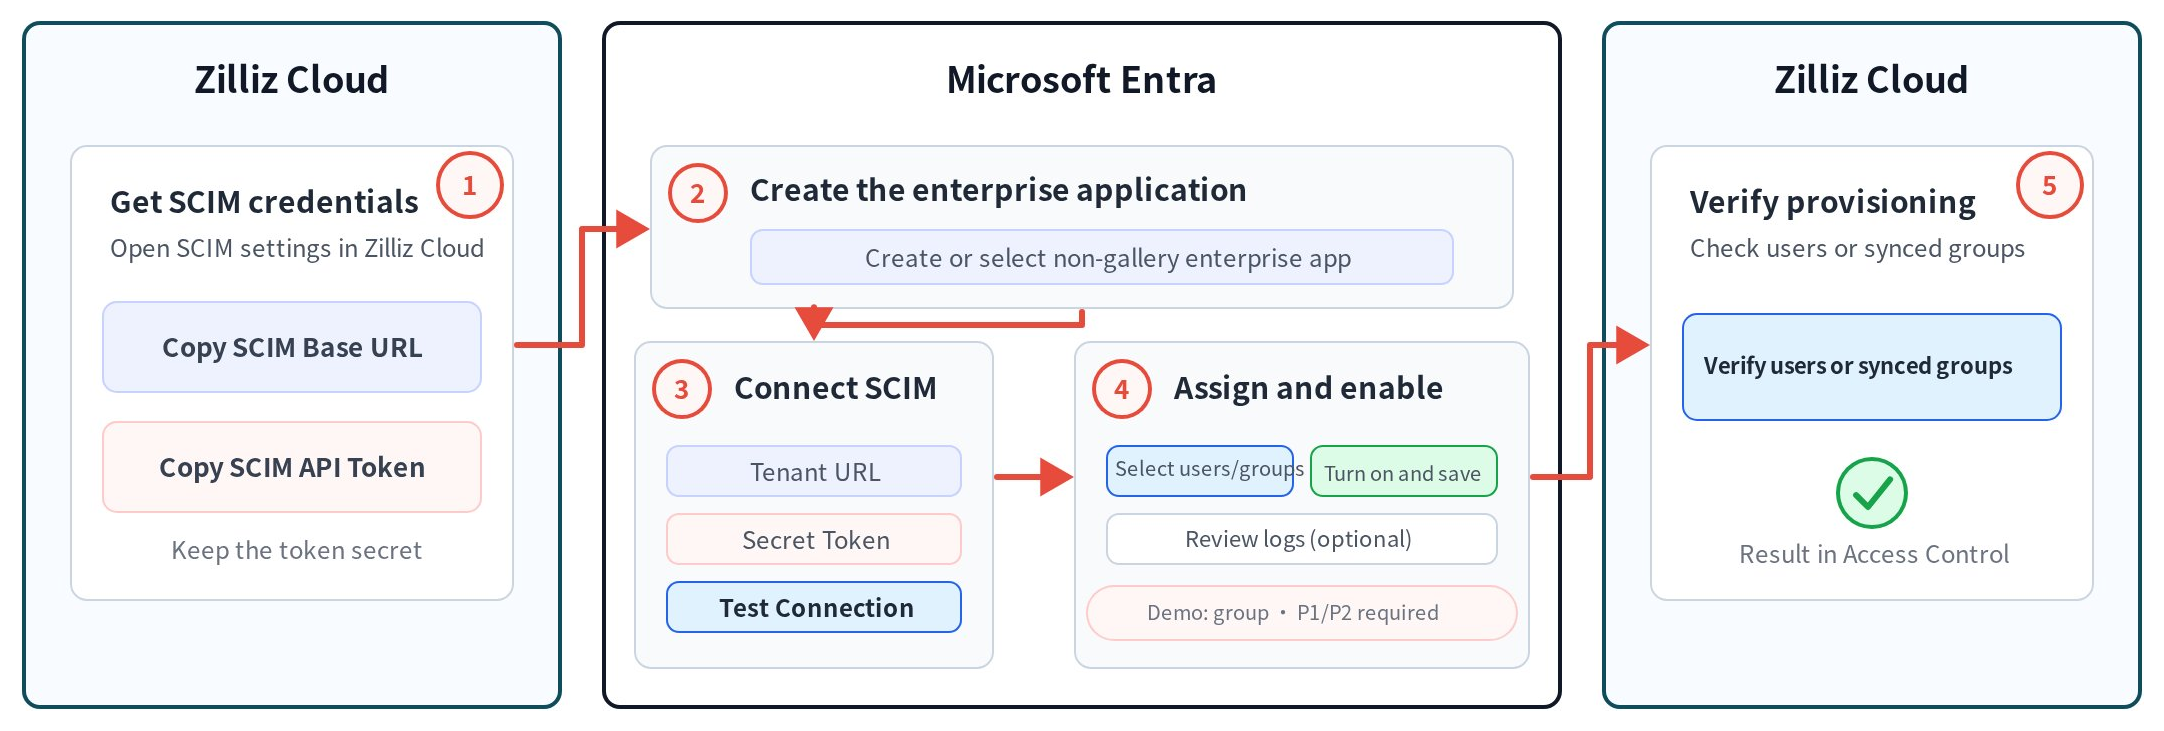
The following diagram shows the setup flow between Zilliz Cloud and Microsoft Entra.
Before you start
-
You have configured and verified SSO for your Zilliz Cloud organization.
-
You are the Organization Owner of the Zilliz Cloud organization where you want to configure SCIM provisioning.
-
You can create or manage an enterprise application and its provisioning configuration in Microsoft Entra.
Step 1: Get the SCIM Base URL and API Token in Zilliz Cloud
In Zilliz Cloud, SCIM provisioning settings provide the connection details that Microsoft Entra needs to call the Zilliz Cloud SCIM API.
In the left-side navigation pane, click Settings.
Scroll to System for Cross-domain Identity Management (SCIM), then click Enable.
In the Enable SCIM dialog, click Enable.
Copy the SCIM Base URL and SCIM API Token.
You will use these values when configuring provisioning in Microsoft Entra. Treat the SCIM API Token as a secret.
Step 2: Create a SCIM app in Microsoft Entra
Create a non-gallery enterprise application for SCIM provisioning. If your organization already has a dedicated Zilliz Cloud SCIM enterprise application, select that application instead of creating another one. For Microsoft's general non-gallery SCIM workflow, see Develop and plan provisioning for a SCIM endpoint.
In the Microsoft Entra admin center, go to Entra ID > Enterprise apps.
Click + New application, then click + Create your own application.
Enter a name for the application.
Select Integrate any other application you don't find in the gallery, then click Create.
Step 3: Configure SCIM provisioning in Microsoft Entra
Configure the enterprise application with the SCIM credentials from Zilliz Cloud. Microsoft documents Tenant URL, Secret Token, and Test Connection for non-gallery SCIM provisioning. For the broader workflow, see Configure automatic user provisioning.
In the enterprise application, open Provisioning, then click + New configuration.
In Tenant URL, enter the SCIM Base URL from Zilliz Cloud.
In Secret Token, enter the SCIM API Token from Zilliz Cloud.
Click Test Connection.
After the connection test succeeds, click Create.
The SCIM API Token is used as a bearer token. Review the default mappings and provisioning scope before starting provisioning. Do not add or remap attributes solely by analogy with another SCIM integration. For mapping concepts, see Customize application attributes.
Step 4: Provision users and groups from Microsoft Entra
Assign the users or groups that you want to provision, then enable provisioning. The following procedure uses a group as an example; select target groups or individual users based on your provisioning needs. For Microsoft's assignment workflow and licensing requirements, see Assign users and groups to an application.
In the enterprise application, open Users and groups.
Click Add user/group, then open the member selector.
Open the Groups tab, select the target group, click Select, then click Assign.
Return to Provisioning, then set Provisioning Status to On.
Click Save.
After you enable provisioning, open Provisioning logs as needed to monitor operations or troubleshoot failures. Group-based application assignment requires Microsoft Entra ID P1 or P2. For provisioning cycles, scope, and logs, see Understand how application provisioning works.
Step 5: Verify provisioning in Zilliz Cloud
After Microsoft Entra runs the provisioning job, verify the expected users or synced groups in Zilliz Cloud. The following procedure uses a synced group as an example.
In the Zilliz Cloud organization, click Access Control, then open the Groups tab.
Select the synced group and review its details.
SCIM synchronizes identity data only. Assign organization and project roles separately in Zilliz Cloud. If you assigned individual users instead of a group, verify them in the organization member view. The recorded example confirms that a provisioned group is visible in Zilliz Cloud; it does not verify every later group lifecycle operation.
Troubleshooting
| Issue | What to check |
|---|---|
| The connection test fails | Verify that Tenant URL contains the complete Zilliz SCIM Base URL and Secret Token contains the current SCIM API Token. Recopy both values from Zilliz Cloud. |
| An assigned user or synced group does not appear in Zilliz Cloud | Verify the assignment, provisioning scope, mappings, job status, and the exact user or group operation result in Provisioning logs. |
| Provisioning reports a mapping, scope, or status error | Review the default mappings, matching properties, selected scope, and job status. Use Microsoft's provisioning and attribute-mapping documentation before changing the configuration. |
| A group cannot be assigned | Confirm that the tenant has Microsoft Entra ID P1 or P2. Individual-user assignment can still be tested separately. |
| Group assignment succeeds but no synced group appears | Review Provisioning logs for the group and membership operations, confirm the assignment and provisioning scope, and verify that Provisioning Status is On. |