Configure SCIM Provisioning with Okta
This guide describes how to configure SCIM provisioning from Okta to Zilliz Cloud. With SCIM provisioning, Okta can push users, groups, and group memberships to your Zilliz Cloud organization.
If your organization already uses Okta for SSO, keep your existing Okta SSO app for user sign-in. Create a separate Okta SCIM app for provisioning. For an overview of how SSO, SCIM, synced groups, and Access Control work together, see SCIM Provisioning Overview.
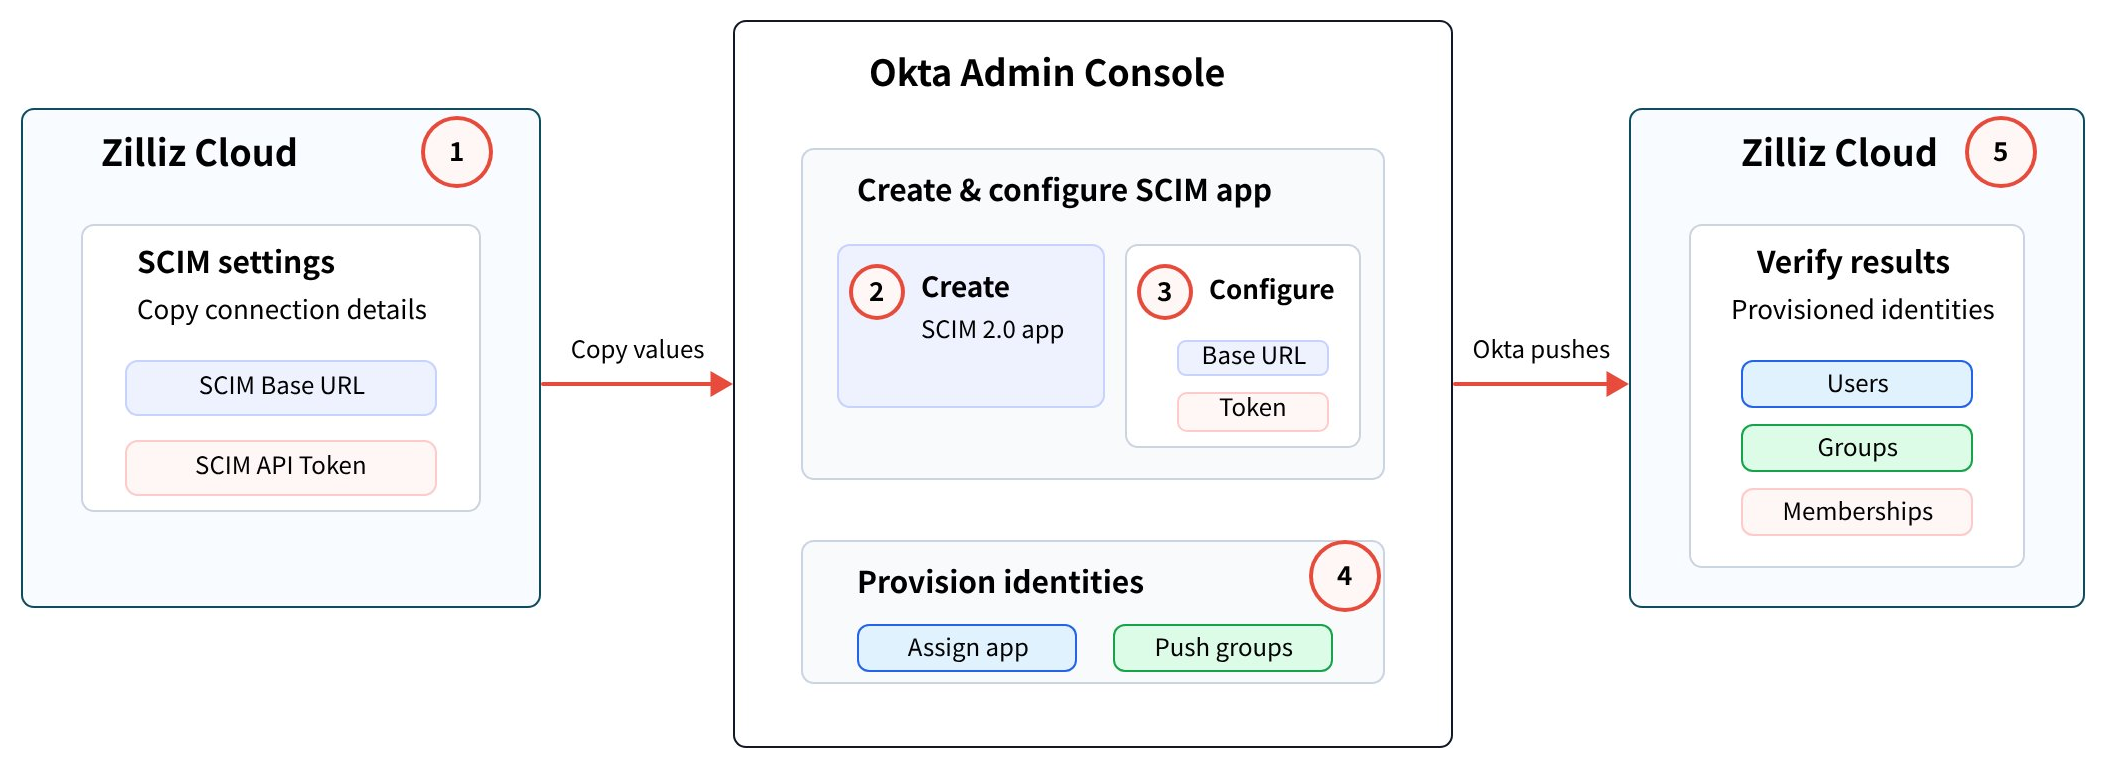
The following diagram shows the setup flow between Zilliz Cloud and Okta.
Before you start
-
You have configured and verified SSO for your Zilliz Cloud organization.
-
You are the Organization Owner of the Zilliz Cloud organization where you want to configure SCIM provisioning.
-
You have admin access to the Okta Admin Console.
Step 1: Get the SCIM Base URL and API Token in Zilliz Cloud
In Zilliz Cloud, SCIM provisioning settings provide the connection details that Okta needs to call the Zilliz Cloud SCIM API.
The following screenshot shows the SCIM provisioning settings in Zilliz Cloud.
In the left-side navigation pane, click Settings.
Scroll to System for Cross-domain Identity Management (SCIM), then click Enable.
In the Enable SCIM dialog, click Enable.
Copy the SCIM Base URL and SCIM API Token. You will use these values when configuring API integration in Okta.
Step 2: Create a SCIM app in Okta Admin
Create a separate SCIM app in Okta Admin to provision identities to Zilliz Cloud. In this step, add Okta's SCIM 2.0 Test App (OAuth Bearer Token) integration and set the application username format to email, so provisioned users can be matched by email address in Zilliz Cloud. For Okta's general SCIM app creation workflow, see Okta documentation.
In the left-side navigation pane, click Applications, then choose Applications.
Click Browse App Catalog, search for SCIM 2.0 Test App (OAuth Bearer Token), then open SCIM 2.0 Test App.
Click Add Integration.
Enter a name for the application, for example Zilliz Cloud SCIM, then click Next.
Scroll to Application username format, then select Email.
Click Done.
Step 3: Configure SCIM provisioning in Okta Admin
Configure the Okta SCIM app with the SCIM Base URL and SCIM API Token from Zilliz Cloud. Then configure which provisioning actions Okta sends to Zilliz Cloud.
In the Okta SCIM app, open the Provisioning tab, then click Configure API Integration.
Select Enable API integration.
In SCIM 2.0 Base Url and OAuth Bearer Token, paste the SCIM Base URL and SCIM API Token you copied from Zilliz Cloud.
Clear Import Groups. In the Disable Import Groups dialog, click Continue.
Click Save.
Open Provisioning > To App, then click Edit.
Configure the provisioning actions that you want Okta to send to Zilliz Cloud.
Click Save.
Do not enable Import Groups. Zilliz Cloud is not the source of group definitions. Manage groups in Okta and use Push Groups to provision them to Zilliz Cloud.
Step 4: Provision users and groups from Okta
After the SCIM app is configured, choose which users and groups Okta should provision to Zilliz Cloud.
4.1 Assign users or groups to the Okta SCIM app
Use assignments to provision users to Zilliz Cloud.
In the Okta SCIM app, open the Assignments tab.
Click Assign, then choose Assign to People.
Find the user you want to assign, then click Assign.
Review the user attributes, then click Save and Go Back.
Verify the Assigned status, then click Done.
Assignments provision users through the SCIM /Users endpoint. Assigning an Okta group to the app provisions the users in that group, but it does not provision the group object itself as a synced group in Zilliz Cloud.
4.2 Push groups to Zilliz Cloud
Use Push Groups to provision Okta group objects and group memberships to Zilliz Cloud. For Okta's general Group Push workflow, see Okta documentation.
In the Okta SCIM app, open the Push Groups tab.
Click Push Groups, then choose Find groups by name.
Select the group you want to push to Zilliz Cloud.
Click Save.
Click All, then verify the group push status.
Push Groups provisions group objects and group memberships through the SCIM /Groups endpoint. After groups are synced, manage group names and membership in Okta.
Step 5: Verify provisioning in Zilliz Cloud
After Okta provisions groups, verify that they appear in Zilliz Cloud.
In the Zilliz Cloud organization, click Access Control.
Open the Groups tab.
Verify that groups pushed from Okta appear as synced groups.
After users and groups are synced, assign access in Zilliz Cloud Access Control. SCIM syncs identity data only and does not automatically grant organization roles or project roles.
Troubleshooting
| Issue | What to check |
|---|---|
| Okta API credential test fails | Verify that the SCIM connector base URL matches the SCIM Base URL from Zilliz Cloud. Verify that the OAuth Bearer Token uses the SCIM API Token from Zilliz Cloud. |
| Users are assigned in Okta but do not appear in Zilliz Cloud | Verify that the users are assigned to the Okta SCIM app. Review the Provisioning > To App settings in Okta. |
| Users appear but groups do not appear in Zilliz Cloud | Assignments provision users through /Users. To provision group objects and group memberships, configure Push Groups. |
| Group membership does not match Okta | Manage group membership in Okta and verify that the group is configured under Push Groups. |
| A user is not matched as expected | Verify that the Okta username format and mapped email value match the user's email address used in Zilliz Cloud. |