Data Backfill
Private PreviewData backfill lets you update selected fields of existing entities in a Zilliz Cloud collection using data stored in Parquet files on a Zilliz Cloud volume. The backfill job matches input records to existing entities by primary key and writes the specified field values back to the collection. You can use it to populate newly added fields, fill missing values, or replace existing field values at scale.
For a complete workflow for evolving the schema of a live collection, including switching writes, creating a snapshot, backfilling historical entities, and committing the backfill, see Schema Evolution.
Overview
The following diagram shows the procedures for data backfill prechecks and data backfill, two separate API endpoints that can be chained together. The former aims at validating the input data and backfill configuration before any collection data is modified, while the latter performs the actual backfill against the target collection.
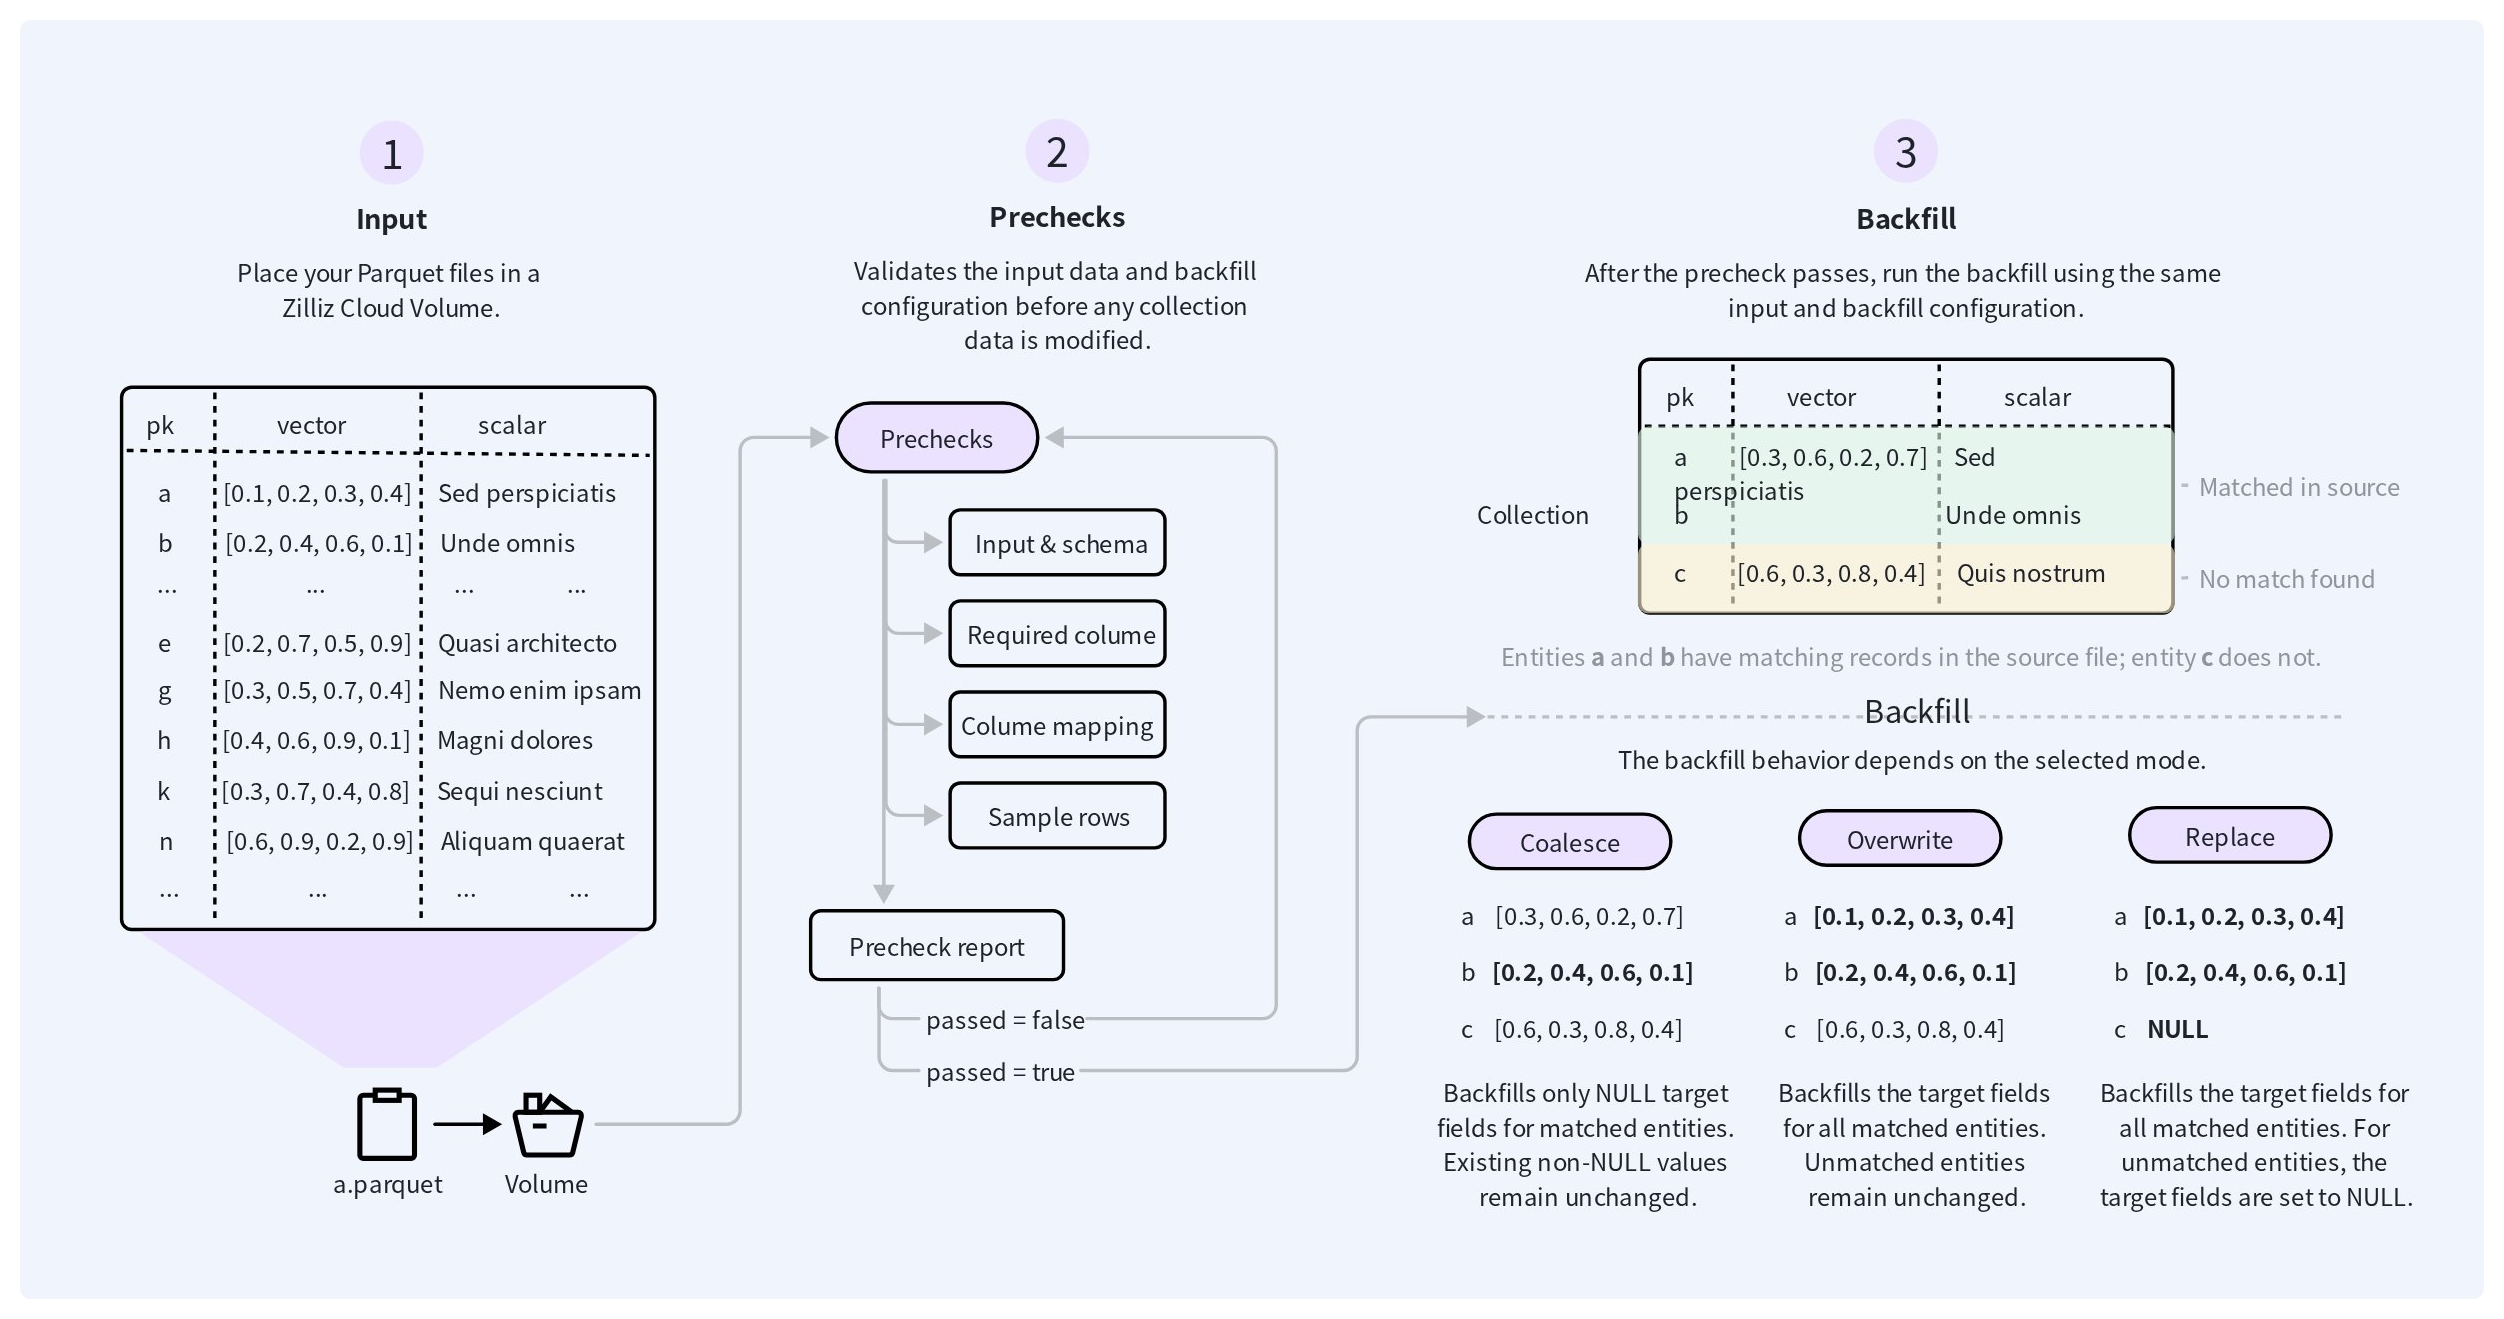
Match source records to existing entities
The input data files must contain a pk column that Zilliz Cloud uses to match source records to existing entities in the target collection. The fields to backfill can use the same names as the target collection fields or be explicitly mapped via columnMapping. A backfill updates only the fields specified in the request and does not insert new entities.
Validate before backfill
Before running a backfill, you can run a precheck using the same input and field configuration. The precheck validates the input schema, required source columns, column mappings, and a sample of the input rows without modifying collection data. A successful precheck job does not by itself mean that the input passed validation; check that precheckReport.passed is true before proceeding with the backfill.
Choose a backfill mode
When creating the backfill job, use mode to control how the input is applied to the target fields:
| Mode | Behavior |
|---|---|
coalesce | Backfills only NULL target fields for matched entities. Existing non-NULL values remain unchanged. This is the default mode. |
overwrite | Backfills the target fields for all matched entities. Unmatched entities remain unchanged. |
replace | Backfills the target fields for all matched entities. For unmatched entities, the target fields are set to NULL. |
Use coalesce when you want to populate missing values without changing values that have already been written. Use overwrite when the input should take precedence over matched entities. Use replace only when the input represents the complete desired population for the selected fields, because target fields of unmatched entities are cleared.
Before you start
Before conducting a data backfill precheck and backfilling the data, ensure that:
-
The target collection and the fields you want to backfill already exist.
-
Your source data is stored in data files in a Zilliz Cloud volume.
-
Each input record contains a
pkcolumn used to match an existing entity. -
If source column names differ from target field names, prepare a
columnMapping. -
The target cluster and input volume are in the same project and region.
For the general requirements for running Spark batch jobs, including authentication, supported file formats, input files, and output behavior, see Spark Batch Jobs.
Create a data backfill job with prechecks
Prepare the input data files to include a column corresponding to the primary key of the target collection. If any source column name differs from its corresponding field name in the target collection, use columnMapping to provide a complete mapping for the primary key and all fields included in the backfill job.
Prepare an idempotency key.
An idempotency key is a unique string that remains unchanged when retrying the same job request. For details, refer to Idempotent submission.
For precheck and backfill jobs, use different idempotency keys to avoid possible conflicts.
Optionally run a precheck.
Before starting the backfill, you can run a precheck to validate the input data and configuration without modifying the target collection. Although optional, running a precheck is recommended.
The request payload of a precheck is similar to the following:
export precheck_payload='{
  "description": "validate backfill data",
  "clusterId": "in-xxxxxxxx",
  "dbName": "default",
  "collectionName": "products",
  "fields": ["title", "price", "embedding"],
  "input": {
    "type": "volume",
    "volumeName": "product-data",
    "path": "backfill/products.parquet",
    "format": "parquet"
  },
  "columnMapping": {
    "source_id": "id",
    "source_title": "title",
    "source_price": "price",
    "source_embedding": "embedding"
  },
  "resourceSize": "SMALL",
  "timeoutSeconds": 3600
}'
The following table lists the job-specific parameters.
| Parameter | Required | Description |
|---|---|---|
clusterId | Y | ID of a Zilliz Cloud cluster. The value is a string of no more than 256 characters. |
dbName | N | Name of the database inside the specified cluster. The value is a string of no more than 256 characters. |
collectionName | Y | Name of a collection in the specified cluster and database. The value is a string of no more than 256 characters. |
fields | Y | Fields in the target collection to backfill. Zilliz Cloud uses the names to locate the target fields for the backfill task. The value is an array list of strings. |
input | Y | Input data for the backfill. It points to a data file stored in a Zilliz Cloud volume. For details, refer to the general Request payload. |
columnMapping | N | Maps source columns in the input data to fields in the target collection when their names differ. Use columnMapping when the column names in the source data differ from the field names in the target collection. If specified, columnMapping must include the mapping for the primary key and all fields involved in the backfill task. |
If columnMapping is omitted, the source columns, including the primary-key column, must have the same names as their corresponding fields in the target collection.
Then you can submit the precheck as follows:
export API_KEY="xxxxxxxxxxxxxxxxxxxxxxxxxxxxxxxxxxxxxxxxxxx"

curl --request POST \
    --url "https://api.cloud.zilliz.com/v2/projects/{projectId}/jobs/backfill/precheck" \
    --header "Authorization: Bearer ${API_KEY}" \
    --header "Idempotency-Key: spark-job-20260730-005" \
    --header "Content-Type: application/json" \
    --data "${precheck_payload}"
The request returns a job ID. Use the returned job ID to retrieve its progress and precheck reports.
Click here to view a possible precheck response.
{
  "passed": false,
  "dbName": "default",
  "collectionName": "products",
  "input": "volume://product-data/backfill/products.parquet",
  "fields": ["title", "price", "embedding"],
  "columnMapping": {
    "source_id": "id",
    "source_title": "title",
    "source_price": "price",
    "source_embedding": "embedding"
  },
  "requiredSourceColumns": [
    "source_id",
    "source_title",
    "source_price",
    "source_embedding"
  ],
  "errors": [
    {
      "code": "SOURCE_COLUMN_MISSING",
      "sourceColumn": "source_embedding",
      "targetField": "embedding",
      "expectedType": "FloatVector",
      "message": "source column is missing: source_embedding"
    }
  ],
  "checkedRows": 0
}
Check the precheck result. A successfully completed precheck job does not necessarily mean that the input passed validation. Check passed; if it is false, review errors and correct the input or configuration before running the backfill.
The following table lists possible validation errors.
| Error Code | Description |
|---|---|
SOURCE_COLUMN_MISSING | Indicates that the specified column is missing from the source data files. |
SOURCE_COLUMN_TYPE_MISMATCH | Indicates that the data type of the specified column differs from that of its counterpart in the target collection. |
Submit the backfill.
The backfill request uses the same input and field configuration as the precheck request. In addition, set mode to control how the input values are applied to the target collection. coalesce is the default mode. For details, see Choose a backfill mode.
export backfill_payload='{
  "description": "backfill product data",
  "clusterId": "in-xxxxxxxx",
  "dbName": "default",
  "collectionName": "products",
  "fields": ["title", "price", "embedding"],
  "input": {
    "type": "volume",
    "volumeName": "product-data",
    "path": "backfill/products.parquet",
    "format": "parquet"
  },
  "columnMapping": {
    "source_id": "id",
    "source_title": "title",
    "source_price": "price",
    "source_embedding": "embedding"
  },
  "mode": "coalesce",
  "resourceSize": "SMALL",
  "timeoutSeconds": 3600
}'
Once you select the backfill mode, submit the backfill request as follows:
export API_KEY="xxxxxxxxxxxxxxxxxxxxxxxxxxxxxxxxxxxxxxxxxxx"

curl --request POST \
    --url "https://api.cloud.zilliz.com/v2/projects/{projectId}/jobs/backfill" \
    --header "Authorization: Bearer ${API_KEY}" \
    --header "Idempotency-Key: spark-job-20260730-006" \
    --header "Content-Type: application/json" \
    --data "${backfill_payload}"
Click here to view a possible backfill job response.
{
  "code": 0,
  "data": {
    "jobId": "job-xxxxxxxx",
    "projectId": "proj-xxxxxxxx",
    "type": "SPARK",
    "description": "backfill product attributes",
    "status": "FAILED",
    "regionId": "aws-us-west-2",
    "clusterId": "in-xxxxxxxx",
    "artifact": null,
    "details": {
      "dbName": "default",
      "collectionName": "products",
      "input": {
        "type": "volume",
        "volumeName": "product-data",
        "path": "backfill/products.parquet",
        "format": "parquet"
      },
      "fields": ["title", "price", "embedding"],
      "columnMapping": {
        "source_id": "id",
        "source_title": "title",
        "source_price": "price",
        "source_embedding": "embedding"
      },
      "mode": "coalesce",
      "resourceSize": "SMALL"
    },
    "precheckReport": null,
    "failureReason": {
      "code": "SPARK_EXECUTION_FAILED",
      "message": "The Spark job failed.",
      "retryable": false
    },
    "createdAt": "2026-08-21T02:00:00Z",
    "submittedAt": "2026-08-21T02:00:30Z",
    "startedAt": "2026-08-21T02:01:00Z",
    "finishedAt": "2026-08-21T02:10:00Z",
    "durationSeconds": 540
  }
}
The request returns a job ID. Use it to monitor the backfill job. The job details include information about the target collection, input data, column mapping, and allocated resources.
Monitor the job
After submitting the request, use the returned job ID to monitor the job until it reaches a terminal state. You can view the job status and details, list existing jobs, or cancel the job while it is still in a cancelable state.
When the job succeeds, verify that the expected output is available at the path specified in the request.
For instructions, job states, and state transitions, see Manage Spark Batch Jobs.
Validate the results
After the backfill job succeeds, verify that the target fields were updated as expected. Query a representative sample of entities and compare the backfilled values with the corresponding records in the source data.
Also verify that the selected backfill mode was applied correctly. For coalesce, existing non-NULL values should remain unchanged. For overwrite, unmatched entities should remain unchanged. For replace, the target fields of unmatched entities should be NULL.
For large backfills, consider checking the coverage of the updated fields to identify missing or unexpected values before using the backfilled data in production.
Next step
After validating the backfilled data, you can start using the updated fields in your application or continue with the workflow that required the backfill.
For example, if you are backfilling data as part of a schema change, see Schema Evolution for the complete migration workflow.