Import from NumPy FilesAbout to Deprecate
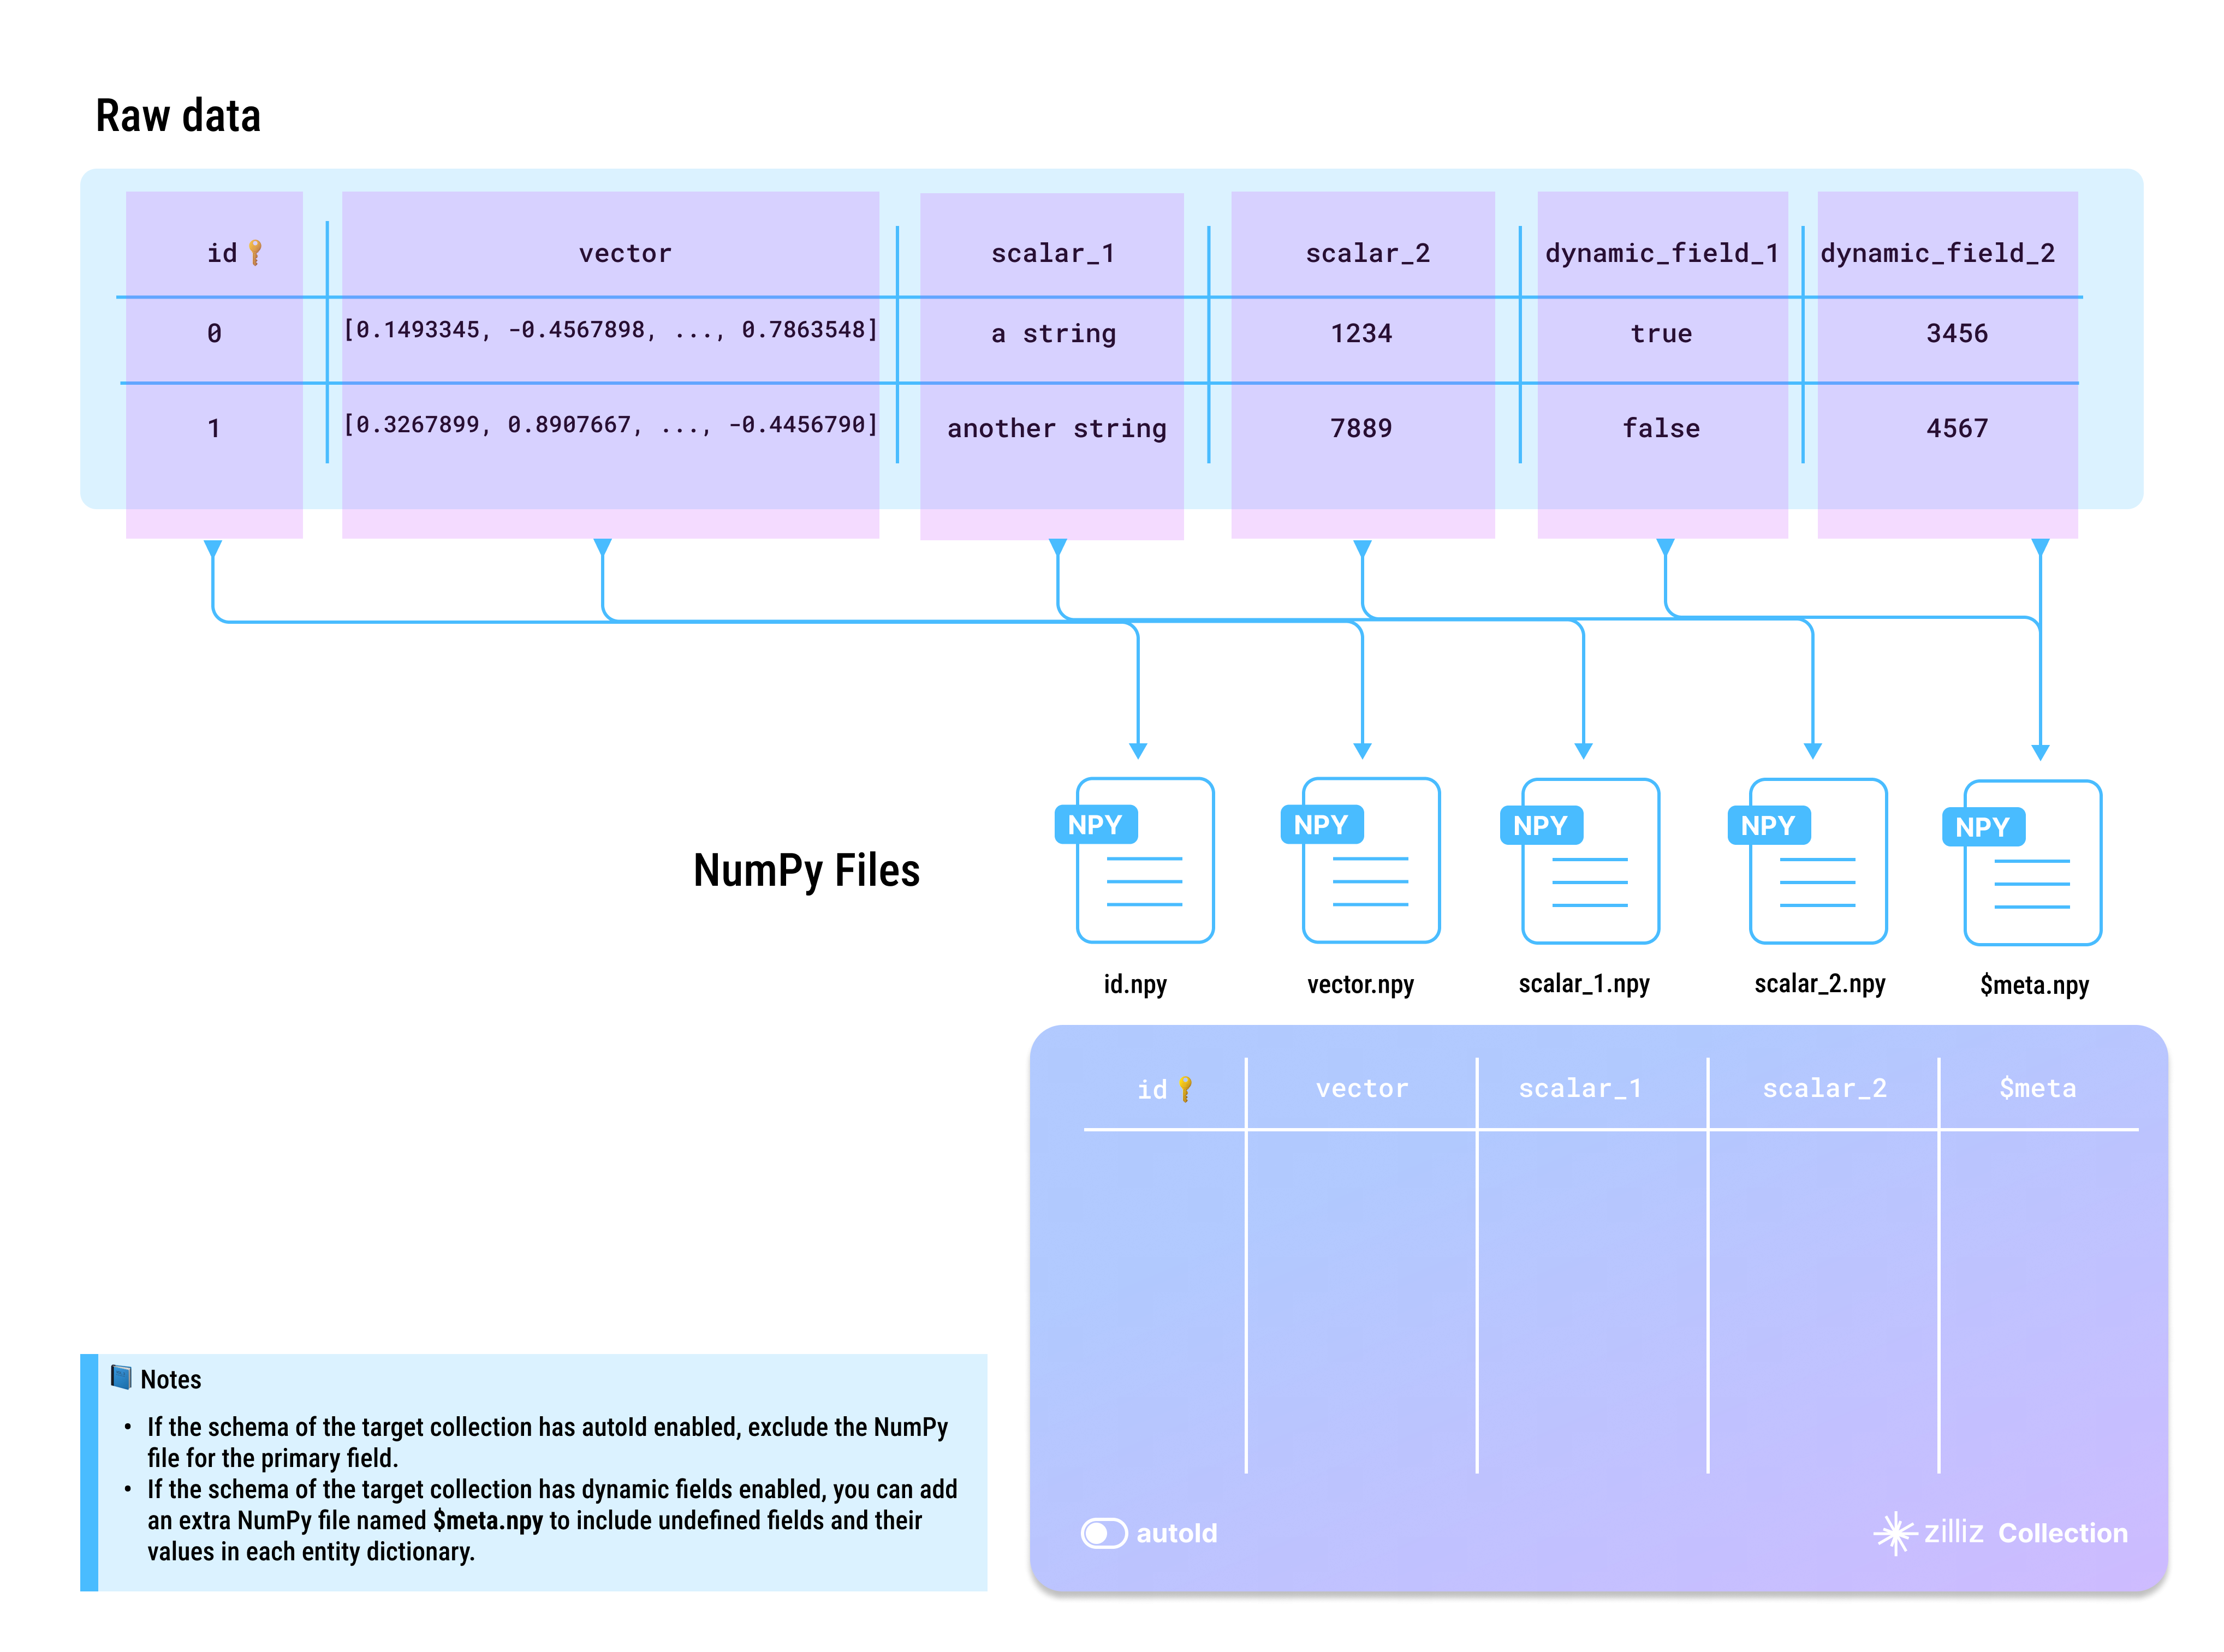
The .npy format is NumPy's standard binary format for saving a single array, including its shape and dtype information, ensuring it can be correctly reconstructed on different machines. You are advised to use the BulkWriter tool to prepare your raw data into Parquet files. The following figure demonstrates how your raw data can be mapped into a set of .npy file.
This feature has been deprecated. You are not recommended to use it in production.

- Whether to enable AutoID
The id field serves as the primary field of the collection. To make the primary field automatically increment, you can enable AutoID in the schema. In this case, you should exclude the id field from each row in the source data.
- Whether to enable dynamic fields
When the target collection enables dynamic fields, if you need to store fields that are not included in the pre-defined schema, you can specify the $meta column during the write operation and provide the corresponding key-value data.
- Case-sensitive
Dictionary keys and collection field names are case-sensitive. Ensure that the dictionary keys in your data exactly match the field names in the target collection. If there is a field named id in the target collection, each entity dictionary should have a key named id. Using ID or Id results in errors.
Directory structure
To prepare your data as NumPy files, place all files from the same subset into a folder, then group these folders within the source folder, as shown in the tree diagram below.
├── numpy-folders
│       ├── 1
│       │   ├── id.npy
│       │   ├── vector.npy
│       │   ├── scalar_1.npy
│       │   ├── scalar_2.npy
│       │   └── $meta.npy
│       └── 2
│           ├── id.npy
│           ├── vector.npy
│           ├── scalar_1.npy
│           ├── scalar_2.npy
│           └── $meta.npy
Import data
Once your data is ready, you can use either of the following methods to import them into your Zilliz Cloud collection.
If your files are relatively small, it is recommended to use the folder or multiple-path method to import them all at once. This approach allows for internal optimizations during the import process, which helps reduce resource consumption later.
You can also import your data on the Zilliz Cloud console using Milvus SDKs. For details, refer to Import Data (Console) and Import Data (SDK).
Import files from a list of NumPy file folders (Recommended)
When importing files from multiple paths, include each NumPy file folder path in a separate list, then group all the lists into a higher-level list as in the following code example.
curl --request POST \
     --url "https://api.cloud.zilliz.com/v2/vectordb/jobs/import/create" \
     --header "Authorization: Bearer ${TOKEN}" \
     --header "Accept: application/json" \
     --header "Content-Type: application/json" \
     -d '{
        "clusterId": "inxx-xxxxxxxxxxxxxxx",
        "collectionName": "medium_articles",
        "partitionName": "",
        "objectUrls": [
            ["s3://bucket-name/numpy-folder-1/1/"],
            ["s3://bucket-name/numpy-folder-2/1/"],
            ["s3://bucket-name/numpy-folder-3/1/"]
         ],
        "accessKey": "",
        "secretKey": ""
    }'
Import files from a NumPy file folder
If the source folder contains only the NumPy file folder to import, you can simply include the source folder in the request as follows:
curl --request POST \
     --url "https://api.cloud.zilliz.com/v2/vectordb/jobs/import/create" \
     --header "Authorization: Bearer ${TOKEN}" \
     --header "Accept: application/json" \
     --header "Content-Type: application/json" \
     -d '{
        "clusterId": "inxx-xxxxxxxxxxxxxxx",
        "collectionName": "medium_articles",
        "partitionName": "",
        "objectUrls": [
            ["s3://bucket-name/numpy-folder/1/"]
         ],
        "accessKey": "",
        "secretKey": ""
    }'
If the folder contains multiple formats of files, the request will fail.
Storage paths
Zilliz Cloud supports data import from your cloud storage. The table below lists the possible storage paths for your data files.
Cloud | Quick Examples |
|---|---|
AWS S3 | s3://bucket-name/numpy-folder/ |
Google Cloud Storage | gs://bucket-name/numpy-folder/ |
Azure Bolb | https://myaccount.blob.core.windows.net/bucket-name/numpy-folder/ |
Limits
There are some limits you need to observe when you import data in NumPy files from your cloud storage.
A valid set of NumPy files should be named after the fields in the schema of the target collection, and the data in them should match the corresponding field definitions.
Import Method | Cluster Plan | Max Subdirectories per Import | Max Size per Subdirectory | Max Total Import Size |
|---|---|---|---|---|
From local file | Not supported | |||
From object storage | Free | 1,000 subdirectories | 1 GB | 1 GB |
Serverless & Dedicated | 1,000 subdirectories | 10 GB | 1 TB | |
You can either rebuild your data on your own by referring to Prepare the data file or use the BulkWriter tool to generate the source data file. Click here to download the prepared sample data based on the schema in the above diagram.