Integrate with Azure Blob Storage
Zilliz Cloud allows you to integrate with Azure Blob Storage to export backup files or audit logs to designated containers.
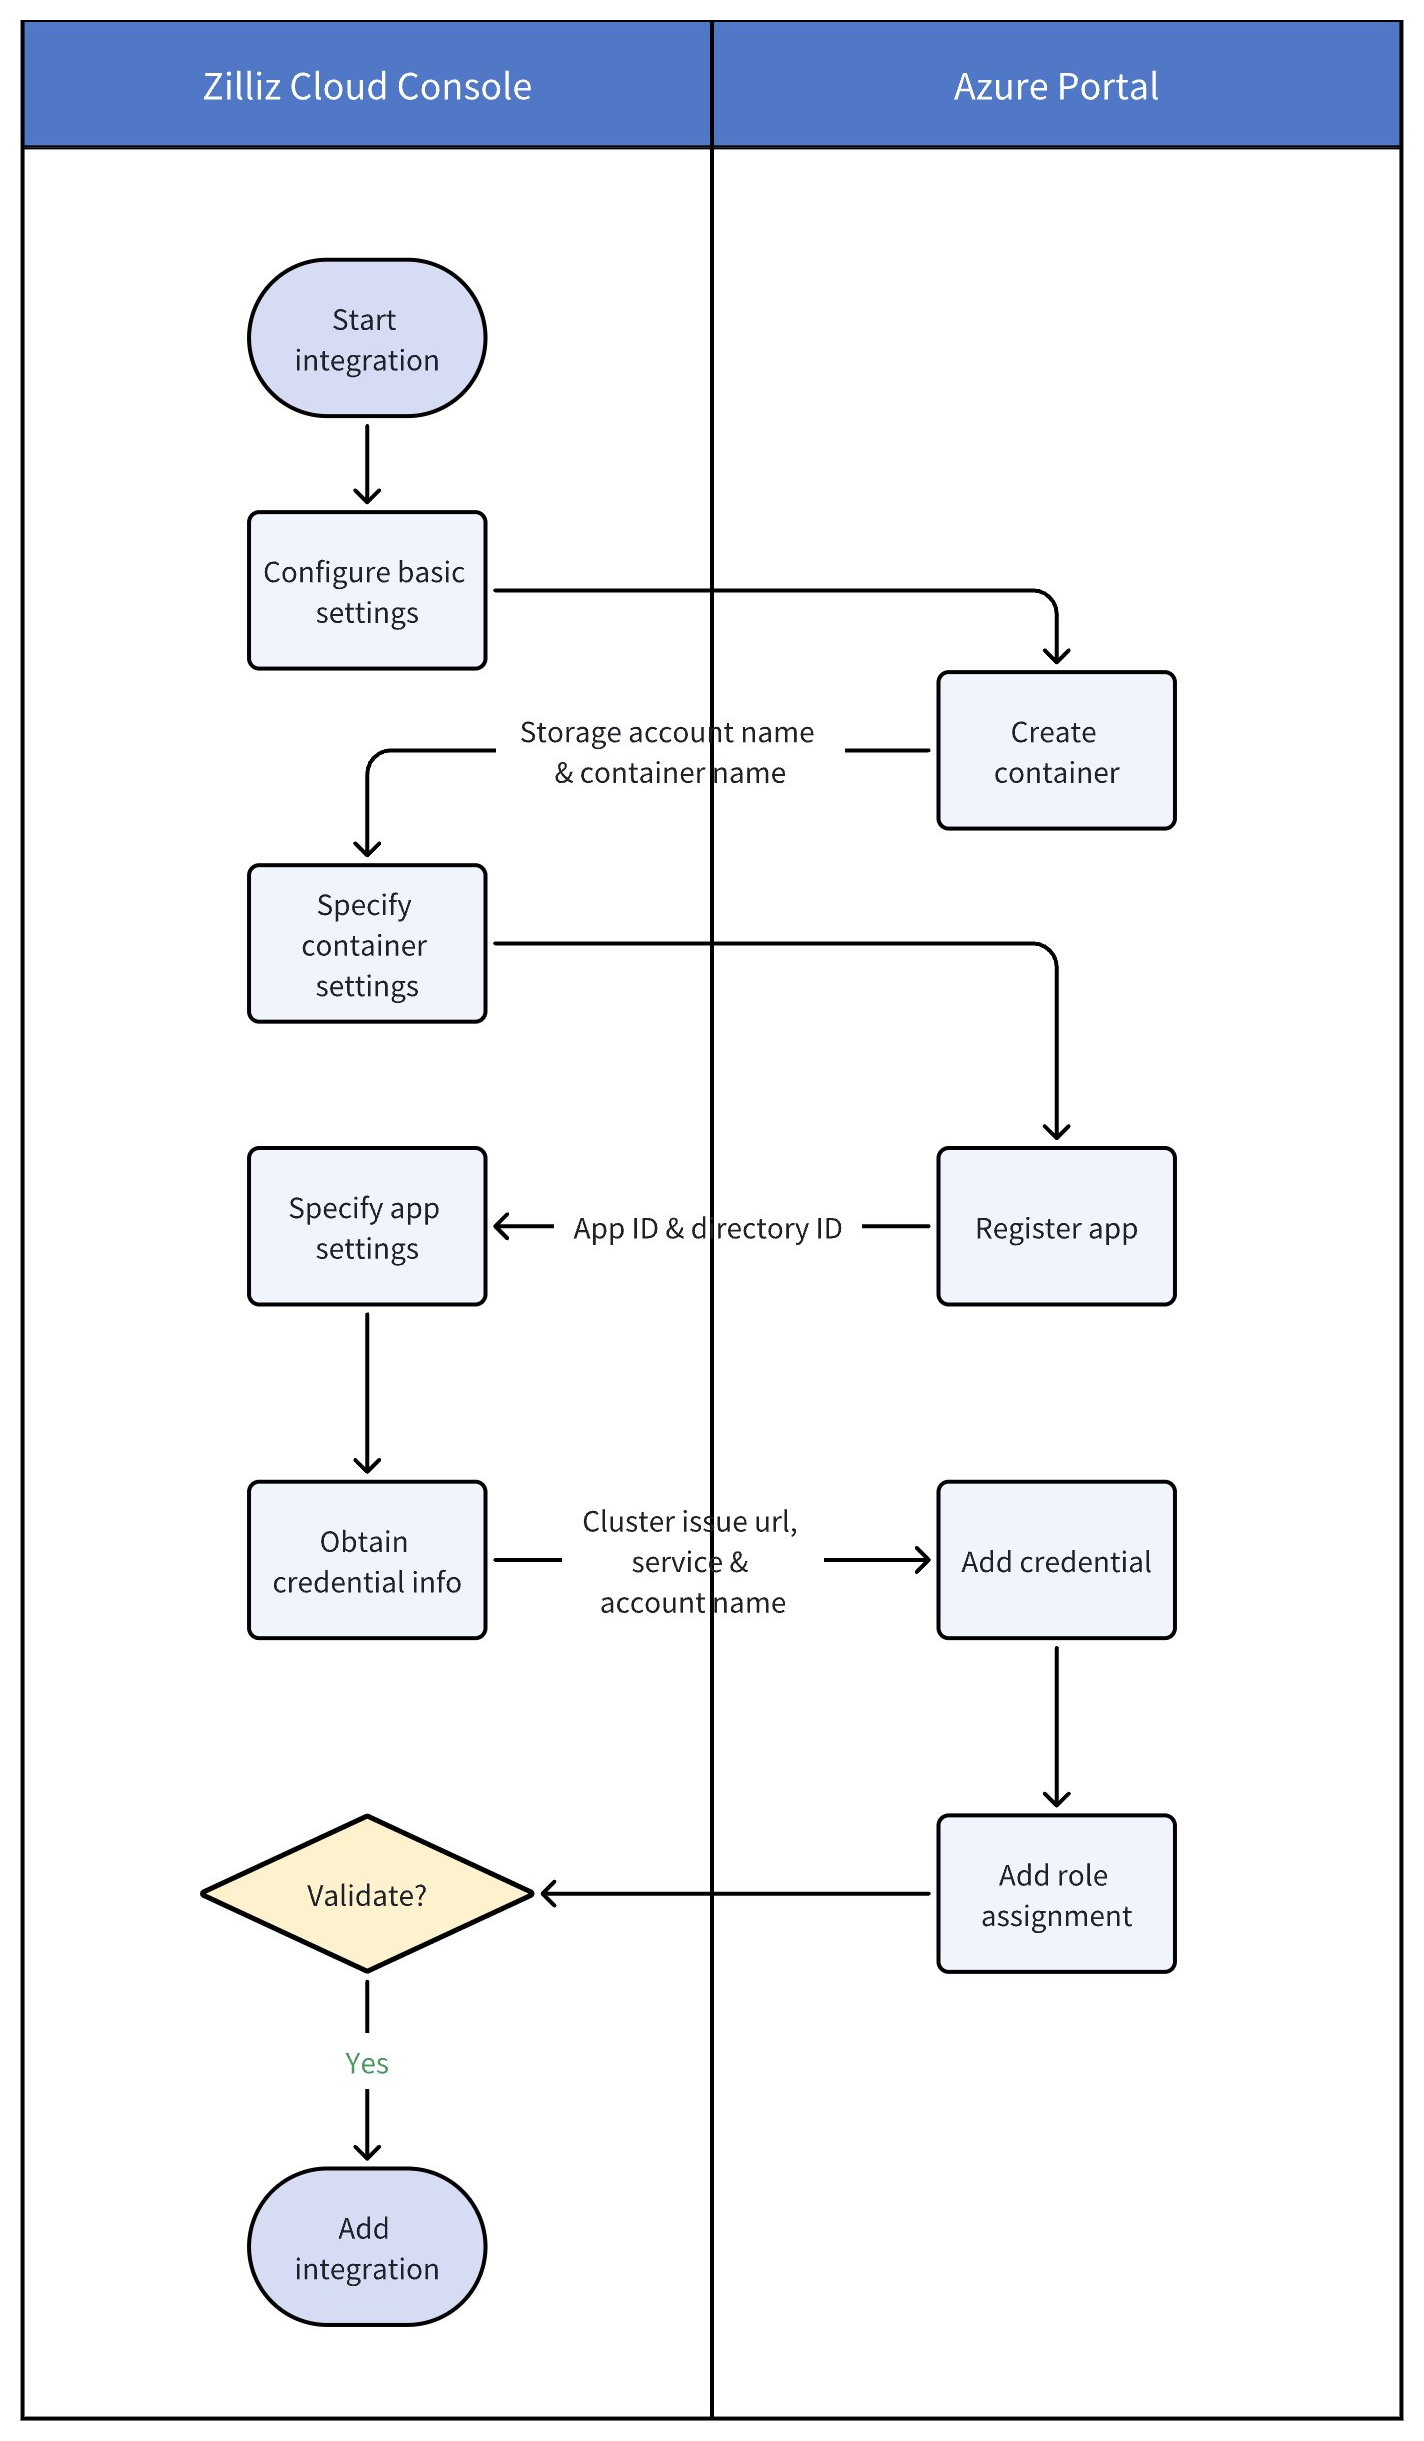
The following digram illustrates the necessary steps on Zilliz Cloud and Azure Portal.
Before you start
-
To integrate Zilliz Cloud with Azure Blob, you must have Organization Owner or Project Admin access to the project. If you do not have necessary permissions, contact your Zilliz Cloud administrator.
-
You have administrative access to the Azure Portal.
Step 1: Start integration on Zilliz Cloud
Log in to the Zilliz Cloud console.
On your project page, navigate to Integrations from the left-side navigation pane.
Under the Azure Blob Storage section, click + Integration.

In the dialog box that appears, complete Basic Settings:
-
Integration Name: A unique name for this integration (e.g.,
container_for_backup). -
Integration Description (optional): A description for this integration (e.g.,
for backupfile export).
Then, click Next to proceed.
Step 2: Create a container on Azure Portal
Log in to Azure Portal.
In the search bar, type Storage accounts and select the option.

On the Storage accounts page, choose an existing storage account or click + Create to set up a new one. Note: The storage account must be in the same region as your Zilliz Cloud cluster.

On the storage account details page, go to Data Storage > Containers and click + Container.

On the panel that appears, enter a container name. Make a note of this container name as this will be required in the Zilliz Cloud console.
Return to the Zilliz Cloud console and complete settings in the Create Azure Blob Storage Container step:
-
Zilliz Cloud Cluster Region: Select the cloud region where your Zilliz Cloud cluster resides.
-
Storage Account Name: Enter your Azure storage account name.
-
Container Name: Enter the name of the container you created.
Then, click Next to proceed.

Step 3: Register an application and add credential
Return to Azure Portal, search for App registrations, and select it.

On the Application registrations page, click + New registration.

In the Register an application panel, enter a name for the application, keep the default settings for other fields, then click Register.

On the Overview page of the application, copy Application (client) ID and Directory (tenant) ID. These values will be needed in the Zilliz Cloud console.

Return to the Zilliz Cloud console and input the copied Application (client) ID and Directory (tenant) ID in the Register a New Application step.
Also, make a note of the Cluster Issuer URL, Service Name, and Service Account Name provided by Zilliz Cloud. These values will be required in Azure Portal.
Navigate back to your application’s page in Azure Portal. Go to Manage > Certificates & secrets > Federated credentials, then click Add credential.

On the Add a credential panel, configure credential settings:
-
Federated credential scenario: Select Kubernetes accessing Azure resources.
-
Cluster issuer URL: Enter the value provided by Zilliz Cloud.
-
Namespace: Set to milvus-tool.
-
Service account name: Set to milvus-bucket.
-
Name: Enter a custom name (e.g., include zilliz for clarity).
-
Audience: Use the default value.
Then, click Add to save the credential.

Return to the Zilliz Cloud console, then click Next to proceed.
Step 4: Add role assignment
In the Azure Portal, go to Access Control (IAM) > + Add > Add role assignment.

On the Job function roles tab, choose the Storage Blob Data Contributor role.

On the Members tab, select your registered application to assign the role.

On the Review + assign tab, click Review + assign to confirm.
Step 5: Validate and create integration
In the Zilliz Cloud console, click Validate Integration to verify that the container and role assignment settings are valid.
Once validation is successful, click Create to finalize the integration.
Your Azure Blob Storage is now integrated with Zilliz Cloud for exporting backup files. For more information, refer to Export Backup Files.
Create storage integration programmatically
As an alternative to working on Zilliz Cloud console, you can also programmatically create the storage integration.
Create a container.
For details, refer to Create a container on Azure Portal above or the Create Container API doc.
Generate authentication materials.
export BASE_URL="https://api.cloud.zilliz.com"
export TOKEN="YOUR_API_KEY"

curl --request POST \
--url "${BASE_URL}/v2/storageIntegrations/authorizationMaterials" \
--header "Authorization: Bearer ${TOKEN}" \
--header "Request-Timeout: 5" \
--header "Content-Type: application/json" \
-d '{
    "projectId": "proj-xxxxxxxxxxxxxxxxxxxxxx",
    "regionId": "az-eastus",
    "bucketName": "my-container"
}'
The above request generates the necessary credentials for you to create permissions and roles on the GCP admin console.
A possible response is as follows:
{
    "code": 0,
    "data": {
        "credential": {
            "clusterIssuerUrl": "https://issuer.example.com/",
            "namespace": "milvus-tool",
            "serviceAccountName": "milvus-bucket"
        }
    }
}
For details on parameter descriptions, refer to Generate Storage Integration Authorization Materials.
Use the returned clusterIssuerUrl, namespace, and serviceAccountName to register an application and add credentials.
For details, refer to Register an application and add credentials.
Validate the obtained credentials.
In the request, set externalCred.accountName to your Azure storage account name displayed on the portal, and externalCred.clientId and externalCred.tenantId to those noted down when you register the application.
curl --request POST \
--url "${BASE_URL}/v2/storageIntegrations/validate" \
--header "Authorization: Bearer ${TOKEN}" \
--header "Request-Timeout: 5" \
--header "Content-Type: application/json" \
-d '{
    "projectId": "proj-xxxxxxxxxxxxxxxxxxxxxx",
    "regionId": "gcp-us-central1",
    "bucketName": "my-bucket",
    "externalCred": {
        "accountName": "mystorageaccount",
        "clientId": "00000000-0000-0000-0000-000000000000",
        "tenantId": "11111111-1111-1111-1111-111111111111"
    }
}'
A validation success response is as follows:
{
    "code": 0,
    "data": {
        "success": true,
        "message": ""
    }
}
For details on parameter descriptions, refer to Validate Storage Integration.
Create storage integration.
This request shares the most of the parameters as those of the validation request with an addition of description.
curl --request POST \
--url "${BASE_URL}/v2/storageIntegrations" \
--header "Authorization: Bearer ${TOKEN}" \
--header "Request-Timeout: 5" \
--header "Content-Type: application/json" \
-d '{
    "projectId": "proj-xxxxxxxxxxxxxxxxxxxxxx",
    "name": "analytics-azure",
    "description": "Azure container for external tables",
    "regionId": "az-eastus",
    "bucketName": "my-bucket",
    "externalCred": {
        "accountName": "mystorageaccount",
        "clientId": "00000000-0000-0000-0000-000000000000",
        "tenantId": "11111111-1111-1111-1111-111111111111"
    }
}'
The response is similar to the following:
{
    "code": 0,
    "data": {
        "integrationId": "integ-xxxxxxxxxxxxxxxxxxx",
        "name": "analytics-azure"
    }
}
For details on parameter descriptions, refer to Create Storage Integration.
Manage integrations
Once the integration is added, you can view its details or remove the integration as needed.

Obtain the integration ID
If you need to use the RESTful API to export backup files to one of your AWS S3 buckets integrated with Zilliz Cloud, click View Details to display the details of an integration and copy its integration ID.
Alternatively, you can obtain the integration ID by running the following command.
export TOKEN="YOUR_API_KEY"

curl --request GET \
--url "${BASE_URL}/v2/storageIntegrations?projectId=proj-xxxxxxxxxxxxxxxxxxxxxx" \
--header "Authorization: Bearer ${TOKEN}" \
--header "Request-Timeout: 5" \
--header "Content-Type: application/json"
The response is similar to the following:
{
    "code": 0,
    "data": {
        "storageIntegrations": [
            {
                "integrationId": "integ-xxxxxxxxxxxxxxxxxxx",
                "name": "analytics-azure",
                "status": "ACTIVE",
                "message": "",
                "regionId": "az-eastus",
                "bucketName": "my-bucket"
            }
        ],
        "count": 1,
        "currentPage": 1,
        "pageSize": 10
    }
}
For details on parameter descriptions, refer to List Storage Integrations.
View integration details
You can use the following command to view integration details
export integrationId="integ-xxxxxxxxxxxxxxxxxxx"

curl --request GET \
--url "${BASE_URL}/v2/storageIntegrations/${integrationId}" \
--header "Authorization: Bearer ${TOKEN}" \
--header "Request-Timeout: 5" \
--header "Content-Type: application/json"
The response is similar to the following:
{
    "code": 0,
    "data": {
        "integrationId": "integ-xxxxxxxxxxxxxxxxxxx",
        "name": "analytics-azure",
        "description": "Azure container for external tables",
        "status": "ACTIVE",
        "message": "",
        "regionId": "az-eastus",
        "bucketName": "my-bucket",
        "externalCred": {
            "roleArn": "arn:aws:iam::123456789012:role/zilliz-bucket-role",
            "externalId": "zilliz-external-AbCdEf12345678"
        },
        "createTime": "2024-07-30T16:49:50Z"
    }
}
For details on parameter descriptions, refer to Describe Storage Integration.
Delete storage integration
As an alternative method for clicking Remove on the Zilliz Cloud console. You can use the following command to delete unnecessary storage integration.
export integrationId="integ-xxxxxxxxxxxxxxxxxxx"

curl --request DELETE \
--url "${BASE_URL}/v2/storageIntegrations/${integrationId}" \
--header "Authorization: Bearer ${TOKEN}" \
--header "Request-Timeout: 5" \
--header "Content-Type: application/json"
The response is similar to the following:
{
    "code": 0,
    "data": {
        "integrationId": "integ-xxxxxxxxxxxxxxxxxxx",
        "name": "analytics-azure"
    }
}
For details on parameter descriptions, refer to Delete Storage Integration.
Troubleshooting
-
Validation Errors:
If integration validation fails, check that:
-
The Azure Storage account and Zilliz Cloud cluster regions match.
-
All Application IDs, tenant IDs, and credential details are correct.
-
-
Permission Issues:
Verify that you have the necessary permissions in both Zilliz Cloud and Azure Portal.