Manage Notification Channels
Alert notifications in Zilliz Cloud keep you informed about events occurring within your clusters. By default, these notifications are sent to specified user email addresses. However, you can also set up custom notification channels using webhooks for more integrated, event-driven notifications. This guide will walk you through the process of configuring alert notification channels.
Before you start
To manage notification channels, make sure you are an organization owner or project admin.
Set up notification channels
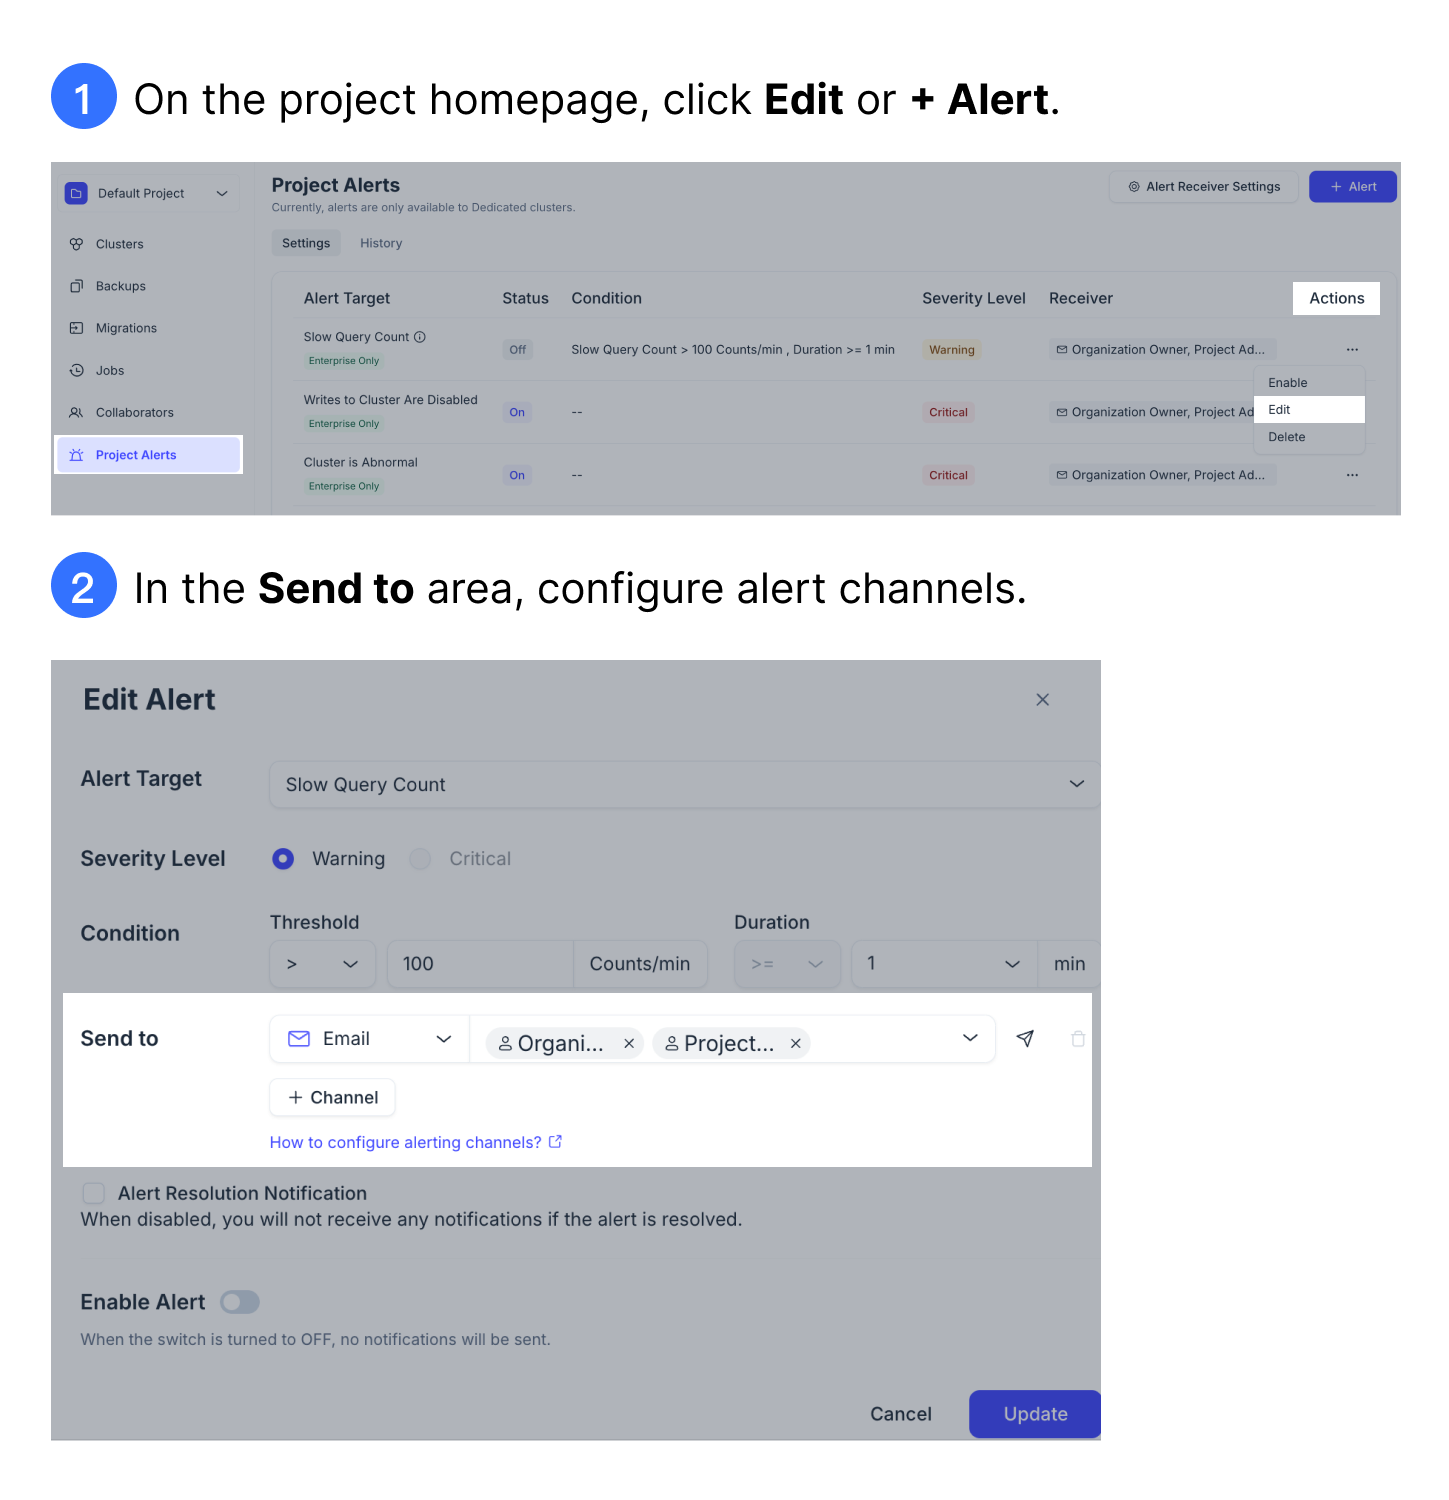
You can access the management page of notification channels in the Edit Alert or Create Alert dialog box in the Zilliz Cloud console.

Email
To set up email notifications,
In the Zilliz Cloud console, navigate to the Alert Settings tab on the organization or project alert page.
To modify an existing alert, select Edit from the Actions column next to the desired alert target. To create a new alert, click + Alert in the upper-right corner.
For organization alerts, you can only edit existing alert targets; creating new ones is not supported. For more information, refer to Manage Organization Alerts.
In the Send to field of the dialog box, select user roles or email addresses of individual users to receive alert notifications.
In Alert Resolution Notification and Enable Alert, configure the appropriate actions to be taken when an alert is resolved or triggered.
For more information, refer to Manage Organization Alerts or Manage Project Alerts.
PagerDuty
To integrate with a PagerDuty service,
Create a service in the PagerDuty UI.
Create an Events API v2 integration to obtain the integration key. The integration key will be in the format: c55ec4de243e440bd0e921750bdfxxxx.
In the Zilliz Cloud console, configure the PagerDuty notification channel.
-
Navigate to the Alert Settings tab on the organization or project alert page.
-
To modify an existing alert, select Edit from the Actions column next to the desired alert target. To create a new alert, click + Alert in the upper-right corner.
📘NotesFor organization alerts, you can only edit existing alert targets; creating new ones is not supported. For more information, refer to Manage Organization Alerts.
-
In the dialog box that appears, click + Channel in the Send to field and choose PagerDuty from the dropdown list.
-
Enter the PagerDuty integration key obtained and select the service region hosting your PagerDuty account. For more information on PagerDuty service regions, refer to Service Regions.
-
In Alert Resolution Notification and Enable Alert, configure the appropriate actions to be taken when an alert is resolved or triggered.
Slack
To set up Slack integration,
Create a webhook in the Slack UI.
In the Webhook URL section, obtain the webhook URL. The URL will be in the format: https://hooks.slack.com/services/xxxxxxxxxxxx/xxxxxxxxxxxx/xxxxxxxxxxxxxxxxxxxxxxxx.
In the Zilliz Cloud console, configure the Slack notification channel.
-
Navigate to the Alert Settings tab on the organization or project alert page.
-
To modify an existing alert, select Edit from the Actions column next to the desired alert target. To create a new alert, click + Alert in the upper-right corner.
📘NotesFor organization alerts, you can only edit existing alert targets; creating new ones is not supported. For more information, refer to Manage Organization Alerts.
-
In the dialog box that appears, click + Channel in the Send to field and choose Slack from the dropdown list.
-
Enter the webhook URL obtained.
-
In Alert Resolution Notification and Enable Alert, configure the appropriate actions to be taken when an alert is resolved or triggered.
Opsgenie
To set up Opsgenie integration,
Obtain your API key in Opsgenie. For details, refer to Create an API integration.
-
Go to the Opsgenie Integrations page by selecting Settings > Integrations and click Add integration.
-
Search for and select API. Provide a name for this API integration and click Continue.
-
On the API settings page, click Edit. By default, all permissions will be selected, and you will want to ensure that Allow Read Access, Allow Create and Update Access, and Allow Configuration Access are selected.
-
Copy the API key that is generated for you and press Save. Review the Incoming Rules and press Turn on integration to finalize API set up.
In the Zilliz Cloud console, configure the Opsgenie notification channel.
-
Navigate to the Alert Settings tab on the organization or project alert page.
-
To modify an existing alert, select Edit from the Actions column next to the desired alert target. To create a new alert, click + Alert in the upper-right corner.
📘NotesFor organization alerts, you can only edit existing alert targets; creating new ones is not supported. For more information, refer to Manage Organization Alerts.
-
In the dialog box that appears, click + Channel in the Send to field and choose Opsgenie from the dropdown list.
-
Enter the API key obtained in Opsgenie.
-
In Alert Resolution Notification and Enable Alert, configure the appropriate actions to be taken when an alert is resolved or triggered.
Lark
To set up Lark integration,
Enter the target Lark group, invite your custom bot to the group, and then obtain the webhook URL corresponding to the robot. For detailed steps, refer to Custom bot usage guide.
In the Zilliz Cloud console, configure the Lark notification channel.
-
Navigate to the Alert Settings tab on the organization or project alert page.
-
To modify an existing alert, select Edit from the Actions column next to the desired alert target. To create a new alert, click + Alert in the upper-right corner.
📘NotesFor organization alerts, you can only edit existing alert targets; creating new ones is not supported. For more information, refer to Manage Organization Alerts.
-
In the dialog box that appears, click + Channel in the Send to field and choose Lark from the dropdown list.
-
Enter the webhook URL obtained.
-
In Alert Resolution Notification and Enable Alert, configure the appropriate actions to be taken when an alert is resolved or triggered.
Webhook
The Webhook option offered by Zilliz Cloud allows you to set up a custom notification channel.
Obtain the webhook URL of your service.
In the Zilliz Cloud console, configure the Webhook notification channel.
-
Navigate to the Alert Settings tab on the organization or project alert page.
-
To modify an existing alert, select Edit from the Actions column next to the desired alert target. To create a new alert, click + Alert in the upper-right corner.
📘NotesFor organization alerts, you can only edit existing alert targets; creating new ones is not supported. For more information, refer to Manage Organization Alerts.
-
In the dialog box that appears, click + Channel in the Send to field and choose Webhook from the dropdown list.
-
Enter the webhook URL of your service.
-
In Alert Resolution Notification and Enable Alert, configure the appropriate actions to be taken when an alert is resolved or triggered.
Example webhook notification:
{
  "orgId": "org-elqqyqjnsdfvcxmpjugfmj",
  "projectId": "proj-a641f9272ca1c5005760e4",
  "summary": "New Zilliz Cloud Alert for your cluster Cluster-01 (in01-ffbab4a57bdd0bb). CU Computation >= 0 % for 10 minutes.",
  "level": "WARNING",
  "timestamp": "2024-03-22T07:11:00Z"
}
WeCom
To set up WeCom alert notifications, follow these steps:
Create a group bot in your WeCom group. For detailed instructions, refer to Group bot creation.
Due to WeCom settings, some groups may not be able to add group bots.
View the created bot information to obtain the corresponding bot's webhook URL. For detailed instructions, refer to Obtain the group bot's webhook address.
Log in to the Zilliz Cloud console to configure the WeCom alert channel.
-
Navigate to the Alert Settings tab on the organization or project alert page.
-
To modify an existing alert, select Edit from the Actions column next to the desired alert target. To create a new alert, click + Alert in the upper-right corner.
📘NotesFor organization alerts, you can only edit existing alert targets; creating new ones is not supported. For more information, refer to Manage Organization Alerts.
-
In the dialog box that appears, click + Channel in the Send to field and choose WeCom from the dropdown list.
-
Enter the webhook URL obtained.
-
In Alert Resolution Notification and Enable Alert, configure the appropriate actions to be taken when an alert is resolved or triggered.
DingTalk
To set up DingTalk alert notifications, follow these steps:
Create a custom bot in your DingTalk group. For detailed instructions, refer to Custom bot integration.
When configuring a custom bot, specify Custom Keywords in Security Setting:
Test: Receive alert notifications for connectivity tests.
Alert: Receive alert notifications for actual events.
View the created bot information to obtain the corresponding bot's webhook URL. For detailed instructions, refer to Obtain custom bot's webhook address.
Log in to the Zilliz Cloud console to configure the DingTalk alert channel.
-
Navigate to the Alert Settings tab on the organization or project alert page.
-
To modify an existing alert, select Edit from the Actions column next to the desired alert target. To create a new alert, click + Alert in the upper-right corner.
📘NotesFor organization alerts, you can only edit existing alert targets; creating new ones is not supported. For more information, refer to Manage Organization Alerts.
-
In the dialog box that appears, click + Channel in the Send to field and choose DingTalk from the dropdown list.
-
Enter the webhook URL obtained.
-
In Alert Resolution Notification and Enable Alert, configure the appropriate actions to be taken when an alert is resolved or triggered.
Test connectivity
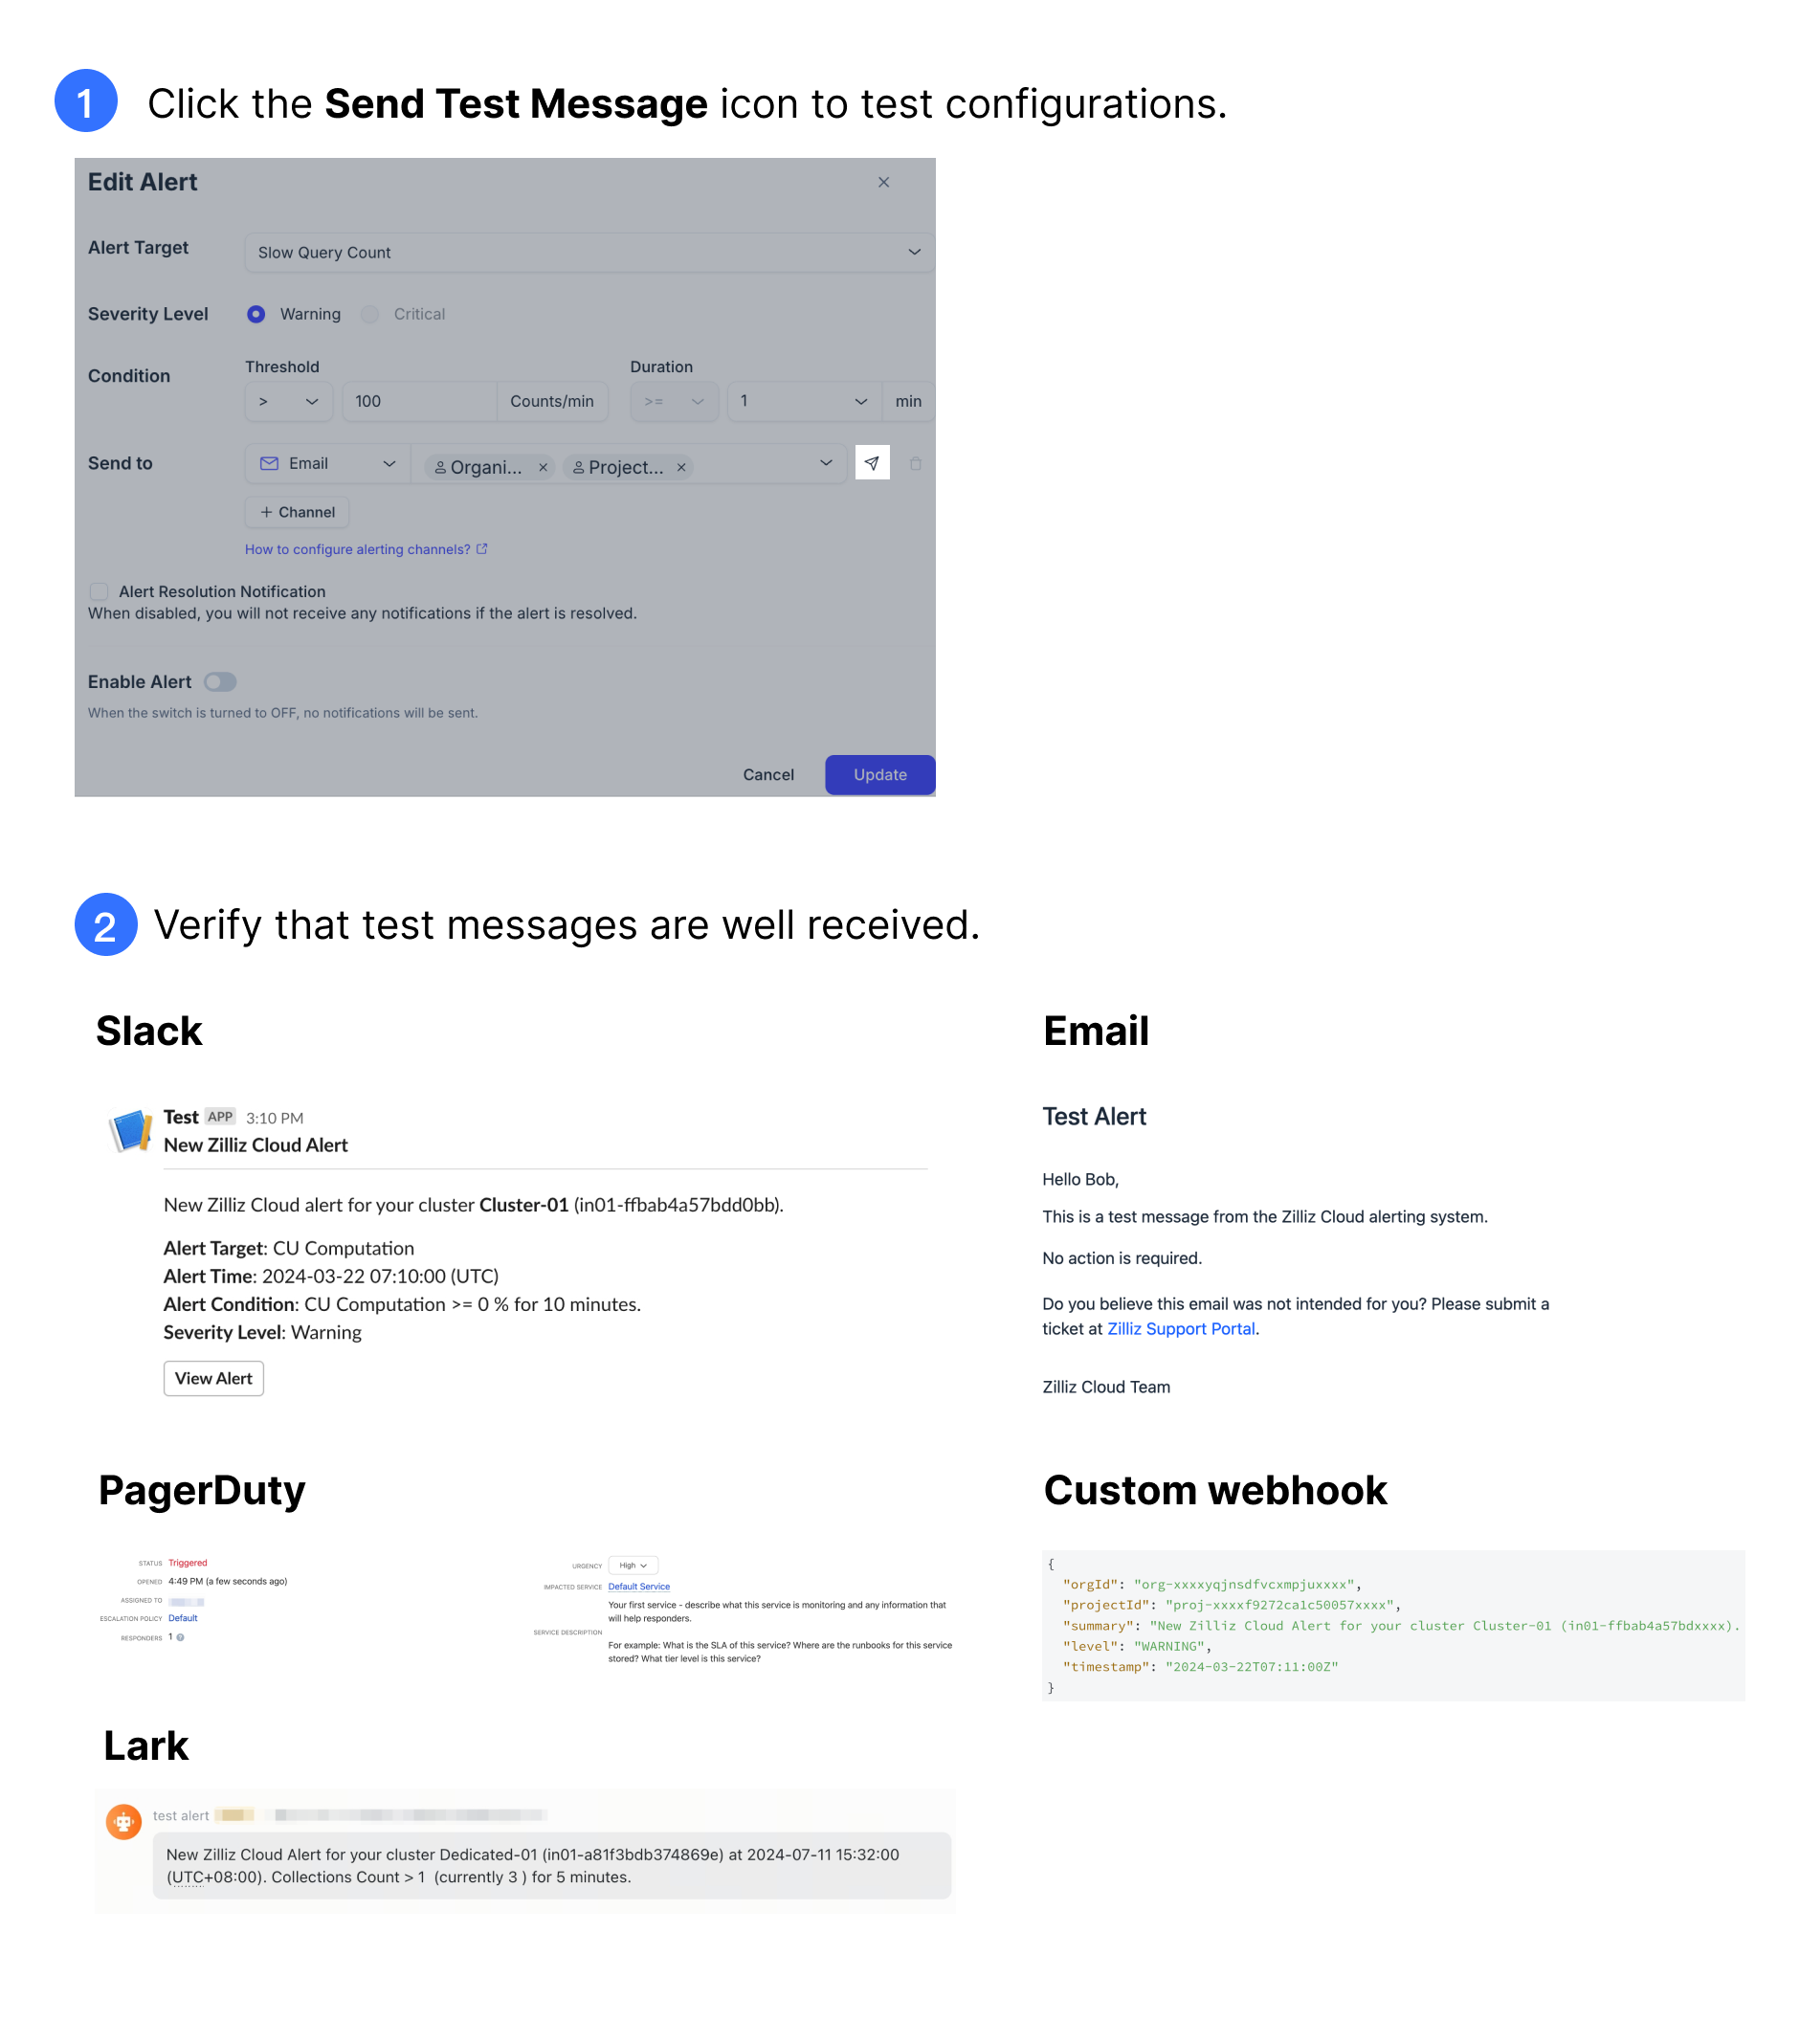
After setting up a notification channel, click the Send Test Message icon to verify that it is properly configured.
