Manage Projects
In Zilliz Cloud, a project serves as a logical container within an organization, grouping clusters, volumes, and related resources. All resources within a project share the same cloud provider and region.
You can create multiple projects tailored to different aspects of your business. For example, if your company offers multimedia recommendation services, you can create one project for video recommendations and another for music recommendations.
This guide will walk you through the steps of managing projects.
Create a project
Each organization comes with a default Enterprise project named Default Project. During onboarding, you select the cloud region where you want to deploy your workload, and the system automatically creates this default project in that region. The default project cannot be deleted. Based on your workload and business needs, you can create additional projects. When you create a project, you automatically become the Project Admin of the project.
Limits
-
To create a project, you must be an Organization Owner.
-
You can create a maximum of 100 projects in each organization.
Procedures
You can create a project via the Zilliz Cloud web console or RESTful API.
-
Via RESTful API
The following example shows how to create a project. For details, see Create Project.
curl --request POST \--url "${BASE_URL}/v2/projects" \--header "Authorization: Bearer ${TOKEN}" \--header "Request-Timeout: 5" \--header "Content-Type: application/json" \-d '{"projectName": "My Project","plan": "Enterprise","regionIds": ["aws-us-east-1"],"description": "A project for organizing clusters and resources."}'The following is an example output.
{"code": 0,"data": {"projectId": "proj-x"}} -
Via web console
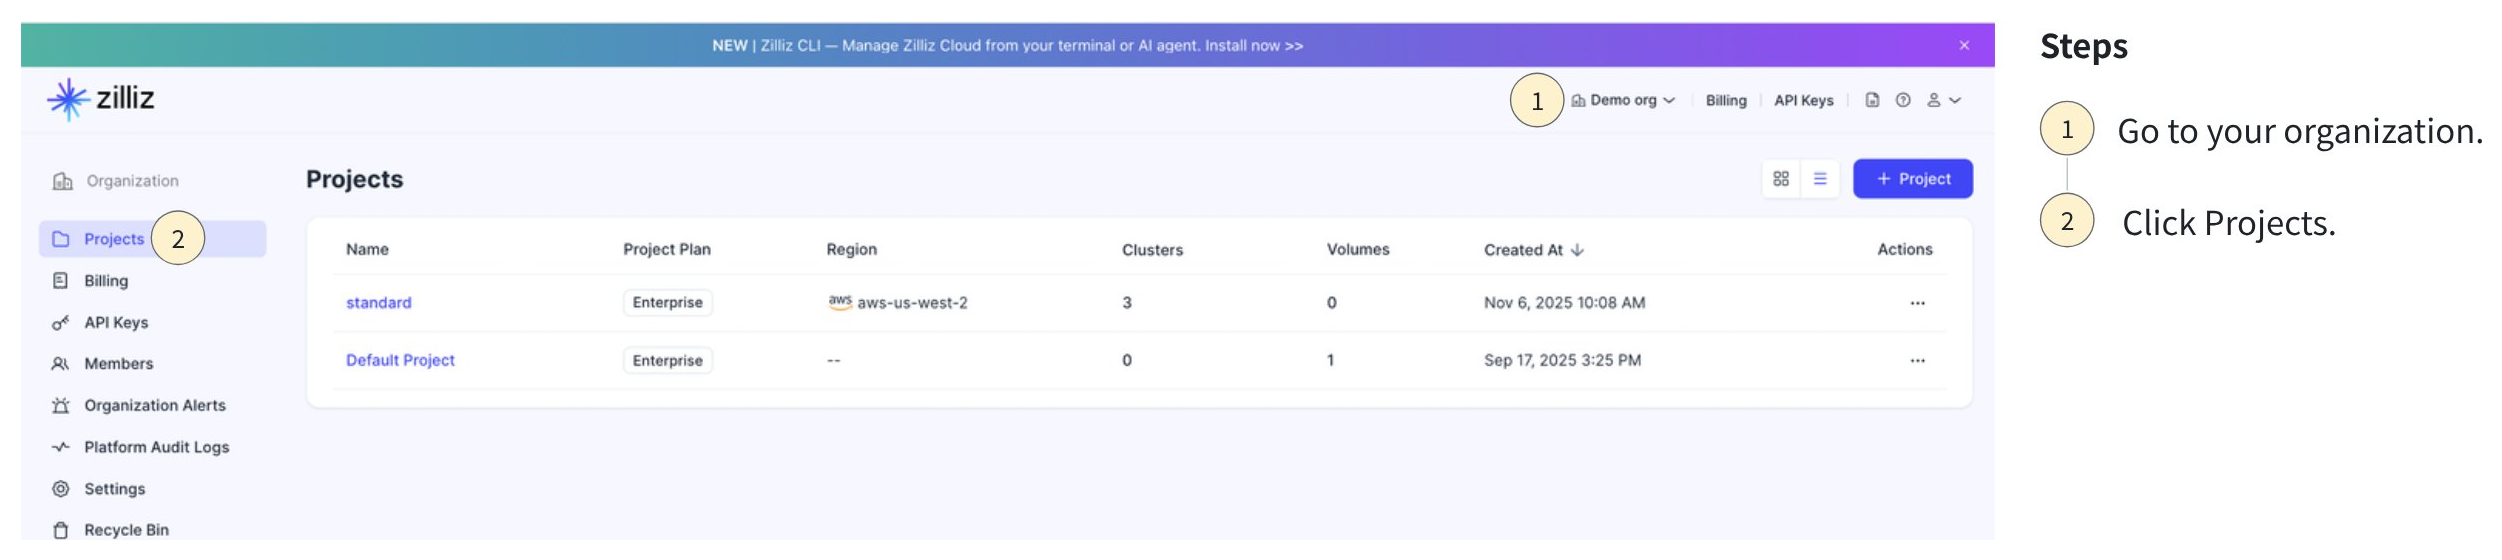
The following demo shows how to create a project on the Zilliz Cloud web console.
1Navigate to your target organization. Click on Projects in the left navigation.
2Click on + Project.
3Configure the project settings.
The following table describes each parameter used when creating a project.
Parameter
Description
Plan
Select a project plan that best suits your needs. The plan determines available features and the billing. For details about the pricing, plan differences, and how to select a right plan, see Detailed Plan Comparison.
Name
Enter the name of the project to create.
Description (optional)
Enter the description to the project to create, up to 255 characters.
Region
Choose a cloud region to deploy your workload. All resources within the project (eg. clusters, volumes, etc.) are deployed in this region. The region cannot be changed once the project is created. For available regions, see Cloud Providers & Regions.
Multi-region (optional)
Available only for Business Critical projects. When enabled, you can deploy resources across multiple cloud regions within the same project. This is required if you plan to use the Global Cluster Explained feature. Multi-region can be enabled later when the project is created.
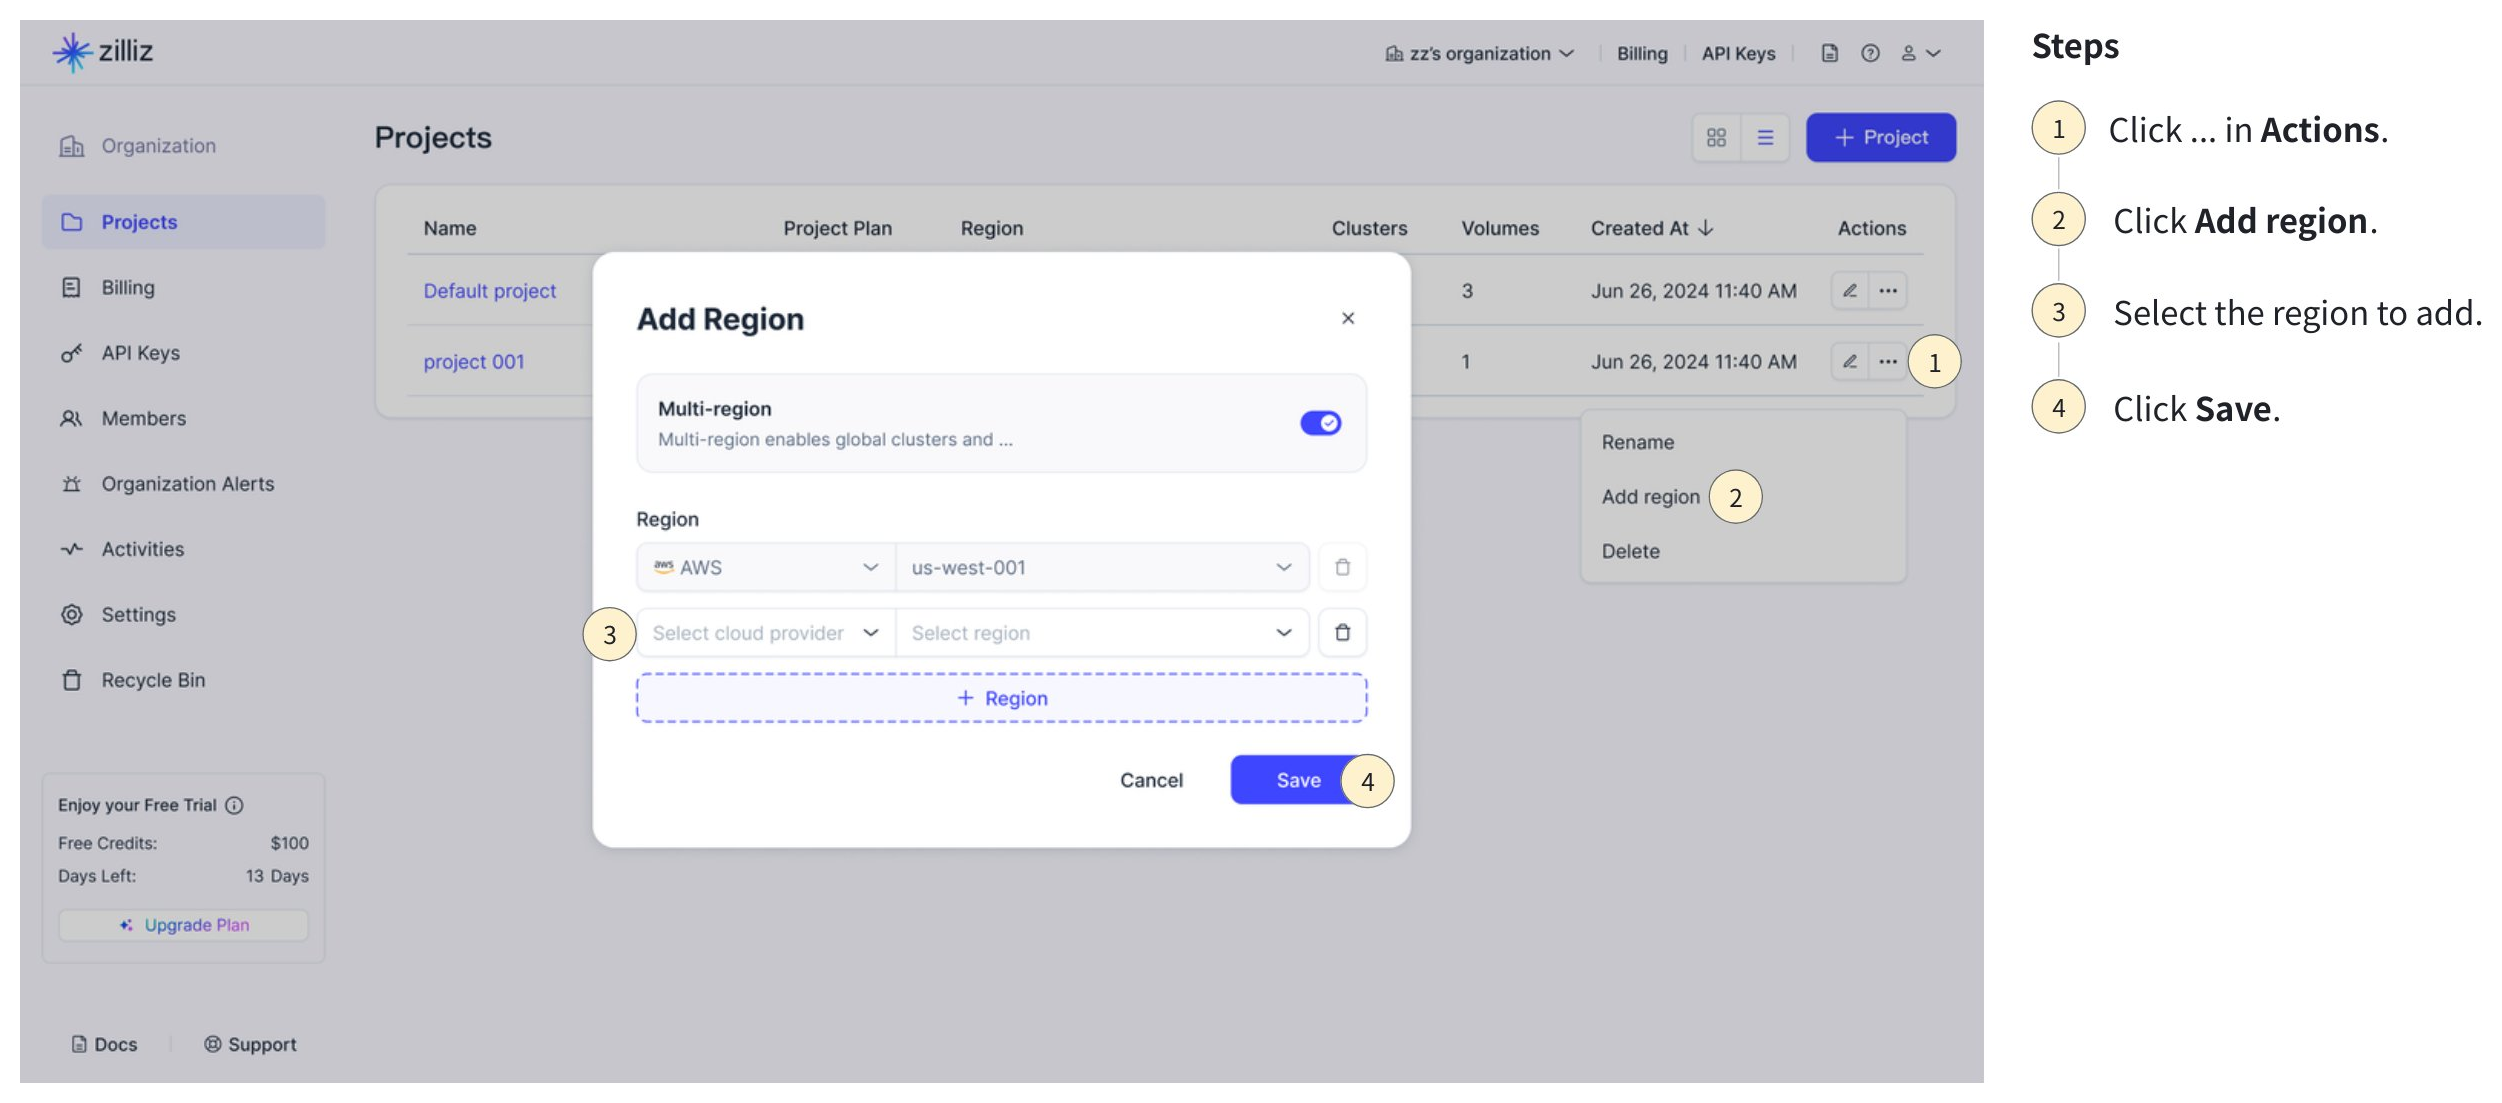
Add project regions
If your project is on the Business Critical plan, you can add more regions to your project. Your project must be a multi-regional one if you need to use the Global Cluster feature.
-
Via RESTful API
export BASE_URL="https://api.cloud.zilliz.com"export TOKEN="YOUR_API_KEY"curl --request POST \--url "https://${BASE_URL}/v2/projects/proj-a0195d6acacaf2bb985173/regions" \--header "Authorization: Bearer ${TOKEN}" \--header "Accept: application/json" \--header "Content-Type: application/json" \--data-raw '{"regions": ["gcp-us-west1"]}'The following is an example output.
{"code": 0,"data": {"projectId": "proj-a0195d6acacaf2bb985173","regions": ["aws-us-west-2", "gcp-us-west1"]}} -
Via web console
Upgrade a project
To unlock for advanced features, you can upgrade the plan of your existing projects.
Upgrading the project will also upgrade all clusters in the project.
If you need to upgrade a project to the Business Critical or BYOC plan, please contact sales.
-
Via RESTful API
The following demo shows how to upgrade the plan of a project from Standard to Enterprise. For details, see Upgrade Project.
export TOKEN="YOUR_API_KEY"export projectId="proj-xx"curl --request PATCH \--url "${BASE_URL}/v2/projects/${projectId}/plan" \--header "Authorization: Bearer ${TOKEN}" \--header "Content-Type: application/json" \-d '{"plan": "Enterprise"}'The following is an example output.
{"code": 0,"data": {"projectId": "proj-x"}} -
Via web console
The following demo shows how to upgrade the plan of a project from Standard to Enterprise.
View all projects
You can view the list of all projects in your permission scope in the organization.
-
Via RESTful API
The following example shows how to list all projects in the current organization. For details, see List Projects.
export TOKEN="YOUR_API_KEY"curl --request GET \--url "${BASE_URL}/v2/projects" \--header "Authorization: Bearer ${TOKEN}" \--header "Accept: application/json" \--header "Content-Type: application/json"The following is an example output.
{"code": 0,"data": [{"projectName": "Default Project","projectId": "proj-xxxxxxxxxxxxxxxxxxxxxxx","regionIds": ["aws-us-east-1"],"instanceCount": 2,"createTime": "2023-08-16T07:34:06Z","plan": "Enterprise","orgType": "SAAS","description": "A project for organizing clusters and resources."}]} -
Via web console
View project details
You can also check the details of a certain project.
-
Via RESTful API
The following example describes the project
proj-xxxxxxxxxxxxxxx. For details, see Describe Project.export TOKEN="YOUR_API_KEY"export projectId="proj-xx"curl --request GET \--url "${BASE_URL}/v2/projects/${projectId}" \--header "Authorization: Bearer ${TOKEN}" \--header "Content-Type: application/json"The following is an example output
{"code": 0,"data": {"projectId": "proj-x","projectName": "My Project","regionIds": ["aws-us-east-1"],"instanceCount": 2,"createTime": "2023-08-16T07:34:06Z","plan": "Enterprise","orgType": "SAAS","description": "A project for organizing clusters and resources."}} -
Via web console
You can check the project name, plan, creation time, and the number of clusters within the project on the Projects page. You can further click on a certain project to view its clusters.

Edit project details
To rename a project or edit the description of a project, you must be an Organization Owner. You can edit project details via the web console.
Delete a project
To delete a project, you must be an Organization Owner.
Before you delete a project, you must drop all clusters and volumes within the project.
Once a project is deleted, all its associated data and resources will be irreversibly cleaned as well.
The default project cannot be deleted.
You can delete a project via the web console.
FAQ
Can I downgrade my project plan?
Direct plan downgrades are not supported. To switch to a lower plan, create a new project on the desired plan and migrate your data to it.