Managed Volumes
A managed volume is a Zilliz Cloud-hosted object store for holding data files used in import and migration. This page explains how to create, manage, and delete managed volumes via the web console and SDKs.
Considerations
-
Volumes are available on AWS and Google Cloud only. For Azure, contact support.
-
A volume is restricted to your project’s cloud provider and region. For example, if your project is in AWS us-west-2, you can create volumes only in AWS us-west-2.
-
To use a volume with a cluster, the cluster must be in the same cloud provider and region as the volume.
-
To create and manage volumes, you need to be a Project Admin.
-
You cannot edit the configurations of a volume once it is created. If you want to change the volume settings, please create a new volume with the desired settings instead.
-
Each organization can create a maximum of 100 managed volumes.
Before you start
If you need to create and manage volumes via SDK, you need to initiate a volume manager first.
A volume manager maintains the connection to Zilliz Cloud's volume service. You need to initiate a volume manager before managing volumes.
- Python
- Java
- cURL
from pymilvus.bulk_writer.volume_manager import VolumeManager

volume_manager = VolumeManager(
    cloud_endpoint="https://api.cloud.zilliz.com",
    api_key="YOUR_API_KEY"
)
import io.milvus.bulkwriter.VolumeManager;
import io.milvus.bulkwriter.VolumeManagerParam;

VolumeManagerParam volumeManagerParam = VolumeManagerParam.newBuilder()
    .withCloudEndpoint("https://api.cloud.zilliz.com")
    .withApiKey("YOUR_API_KEY")
    .build();

VolumeManager volumeManager = new VolumeManager(volumeManagerParam);
export BASE_URL="https://api.cloud.zilliz.com"
export TOKEN="YOUR_API_KEY"
Create a managed volume
You can create a volume on the web console or via SDK.
-
Via SDKs
A volume is specific to a Zilliz Cloud project. When creating a volume, you need to provide the project ID, region ID, and the name of the volume, as follows:
- Python
- Java
- cURL
# Initiate a volume managerfrom pymilvus.bulk_writer.volume_manager import VolumeManagervolume_manager = VolumeManager(cloud_endpoint="https://api.cloud.zilliz.com",api_key="YOUR_API_KEY")# Create a managed volumevolume_manager.create_volume(project_id="proj-xxxxxxxxxxxxxxxxxxxxxxx",region_id="aws-us-west-2",volume_name="managed_volume")print(f"\nVolume managed_volume created")# Volume managed_volume created// Initiate a volume managerimport io.milvus.bulkwriter.VolumeManager;import io.milvus.bulkwriter.VolumeManagerParam;VolumeManagerParam volumeManagerParam = VolumeManagerParam.newBuilder().withCloudEndpoint("https://api.cloud.zilliz.com").withApiKey("YOUR_API_KEY").build();VolumeManager volumeManager = new VolumeManager(volumeManagerParam);// Create a managed volumeimport io.milvus.bulkwriter.request.volume.CreateVolumeRequest;CreateVolumeRequest request = CreateVolumeRequest.builder().projectId("proj-xxxxxxxxxxxxxxxxxxxxxxx").regionId("aws-us-west-2").volumeName("managed_volume").build();volumeManager.createVolume(request);System.out.printf("\nVolume %s created%n", "managed_volume");// Volume managed_volume createdcurl --request POST \--url "${BASE_URL}/v2/volumes/create" \--header "Authorization: Bearer ${TOKEN}" \--header "Request-Timeout: 5" \--header "Content-Type: application/json" \-d '{"projectId": "proj-xxxxxxxxxxxxxxxxxxxxxxx","regionId": "aws-us-west-2","volumeName": "my_volume","description": "A volume for storing collection data."}'# {# "code": 0,# "data": {# "volumeName": "managed_volume"# }# }The following table describes the parameters.
Parameter
Description
projectIdThe ID of the project in which you want to create the volume.
regionIdThe region of the volume to create must match the cloud provider and region of the target cluster you plan to import or migrate data into.
volumeNameThe name of the volume to create must be unique across the organization, no longer than 64 characters, start with a letter or underscore, and contain only letters, digits, hyphens, and underscores.
type(optional)Options:
MANAGED,EXTERNALIf this parameter is omitted, a managed cluster will be created by default.
description(optional)The description of the volume to create. Up to 255 characters.
-
Via web console
1In the left navigation, click on Volumes.
2On the volumes page, click on + Volume.
3Set the volume configurations.
The following table describes each parameter used when creating a managed volume.
Parameter
Description
Name
The volume name must be unique across the organization, no longer than 64 characters, start with a letter or underscore, and contain only letters, digits, hyphens, and underscores.
Description (optional)
This parameter is optional. Up to 255 characters.
Volume Type
Select "Managed" as the volume type.
Billing Type
If you only want to try out the manged volume feature, create a free trial volume. A free trial volume can be created once per organization and has limits on capacity and file uploads. For details, see the comparison table in the Billing section.
For production workloads, create a pay-as-you-go volume.
Cloud Provider & Region
The volume cloud provider and region must match the cloud provider and region of the target cluster you plan to import or migrate data into.
4Click on Create.
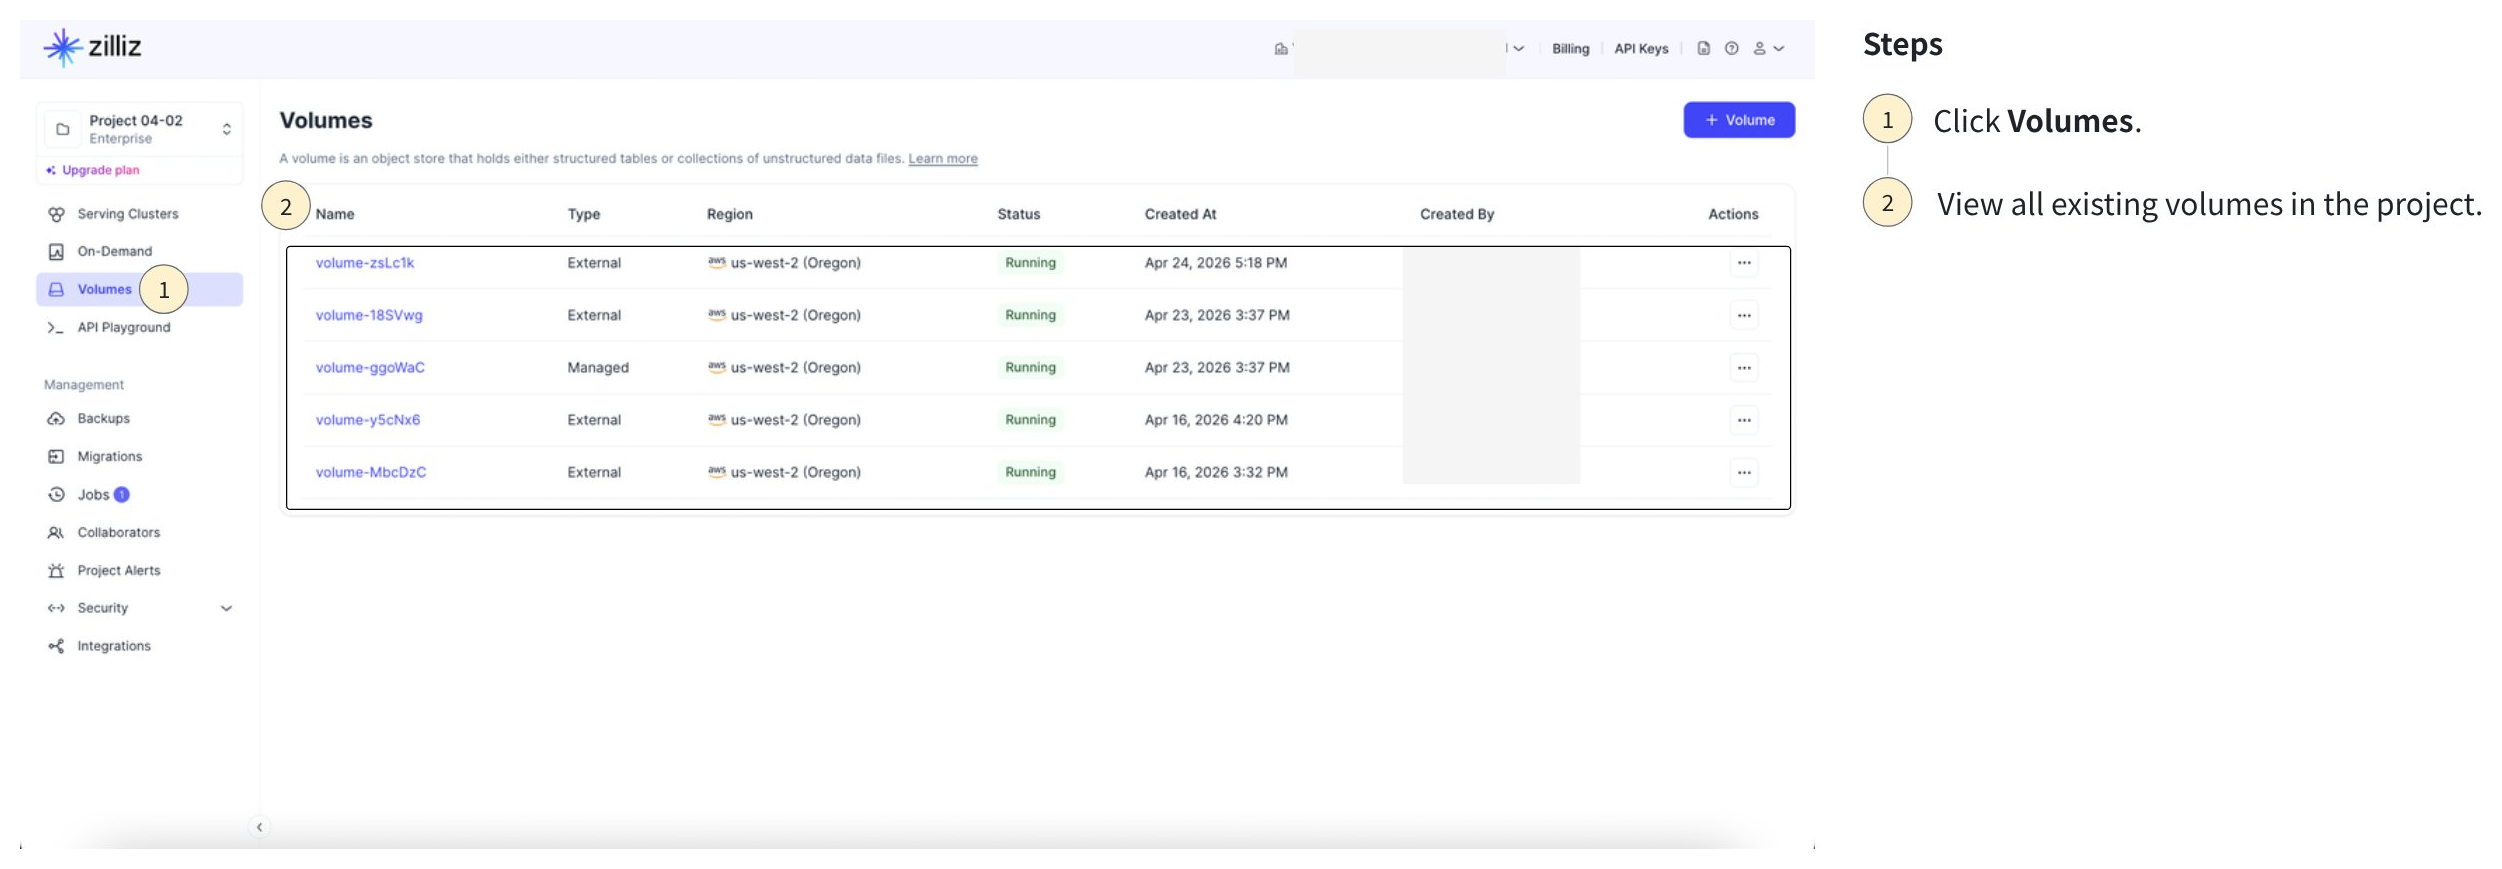
List managed volumes
You can view all existing volumes in a project.
-
Via SDKs
- Python
- Java
- cURL
# Initiate a volume managerfrom pymilvus.bulk_writer.volume_manager import VolumeManagervolume_manager = VolumeManager(cloud_endpoint="https://api.cloud.zilliz.com",api_key="YOUR_API_KEY")# View volumesvolume_list = volume_manager.list_volumes(project_id="proj-xxxxxxxxxxxxxxxxxxxxxxx",current_page=1,page_size=10)print(f"\nlistVolumes results: \n", volume_list.json()['data'])# listVolumes results:## {# "count": 1,# "currentPage": 1,# "pageSize": 10,# "volumes": [# {# "volumeName": "external_volume"# "type":"EXTERNAL"# }# ]# }// Initiate a volume managerimport io.milvus.bulkwriter.VolumeManager;import io.milvus.bulkwriter.VolumeManagerParam;VolumeManagerParam volumeManagerParam = VolumeManagerParam.newBuilder().withCloudEndpoint("https://api.cloud.zilliz.com").withApiKey("YOUR_API_KEY").build();VolumeManager volumeManager = new VolumeManager(volumeManagerParam);// View volumesimport com.google.gson.Gson;import io.milvus.bulkwriter.request.volume.ListVolumesRequest;import io.milvus.bulkwriter.response.volume.ListVolumesResponse;ListVolumesRequest request = ListVolumesRequest.builder().projectId("proj-xxxxxxxxxxxxxxxxxxxxxxx").currentPage(1).pageSize(10).build();ListVolumesResponse listVolumesResponse = volumeManager.listVolumes(request);System.out.println("\nlistVolumes results: " + new Gson().toJson(listVolumesResponse));// listVolumes results://// {// "count": 1,// "currentPage": 1,// "pageSize": 10,// "volumes": [// {// "volumeName": "external_volume",// "type":"EXTERNAL"// }// ]// }export BASE_URL="https://api.cloud.zilliz.com"export TOKEN="YOUR_API_KEY"curl --request GET \--url "${BASE_URL}/v2/volumes?projectId=proj-xxxxxxxxxxxxxxxxx" \--header "Authorization: Bearer ${TOKEN}" \--header "Content-Type: application/json"# {# "code": 200,# "data": {# "count": 3,# "currentPage": 1,# "pageSize": 10,# "volumes": [# {# "volumeName": "my_volume_1",# "type": "MANAGED",# "description": "A volume for storing collection data."# },# {# "volumeName": "my_volume_2",# "type": "EXTERNAL",# "description": "A volume for storing collection data."# },# {# "volumeName": "my_volume_3",# "type": "MANAGED",# "description": "A volume for storing collection data."# }# ]# }#} -
Via web console
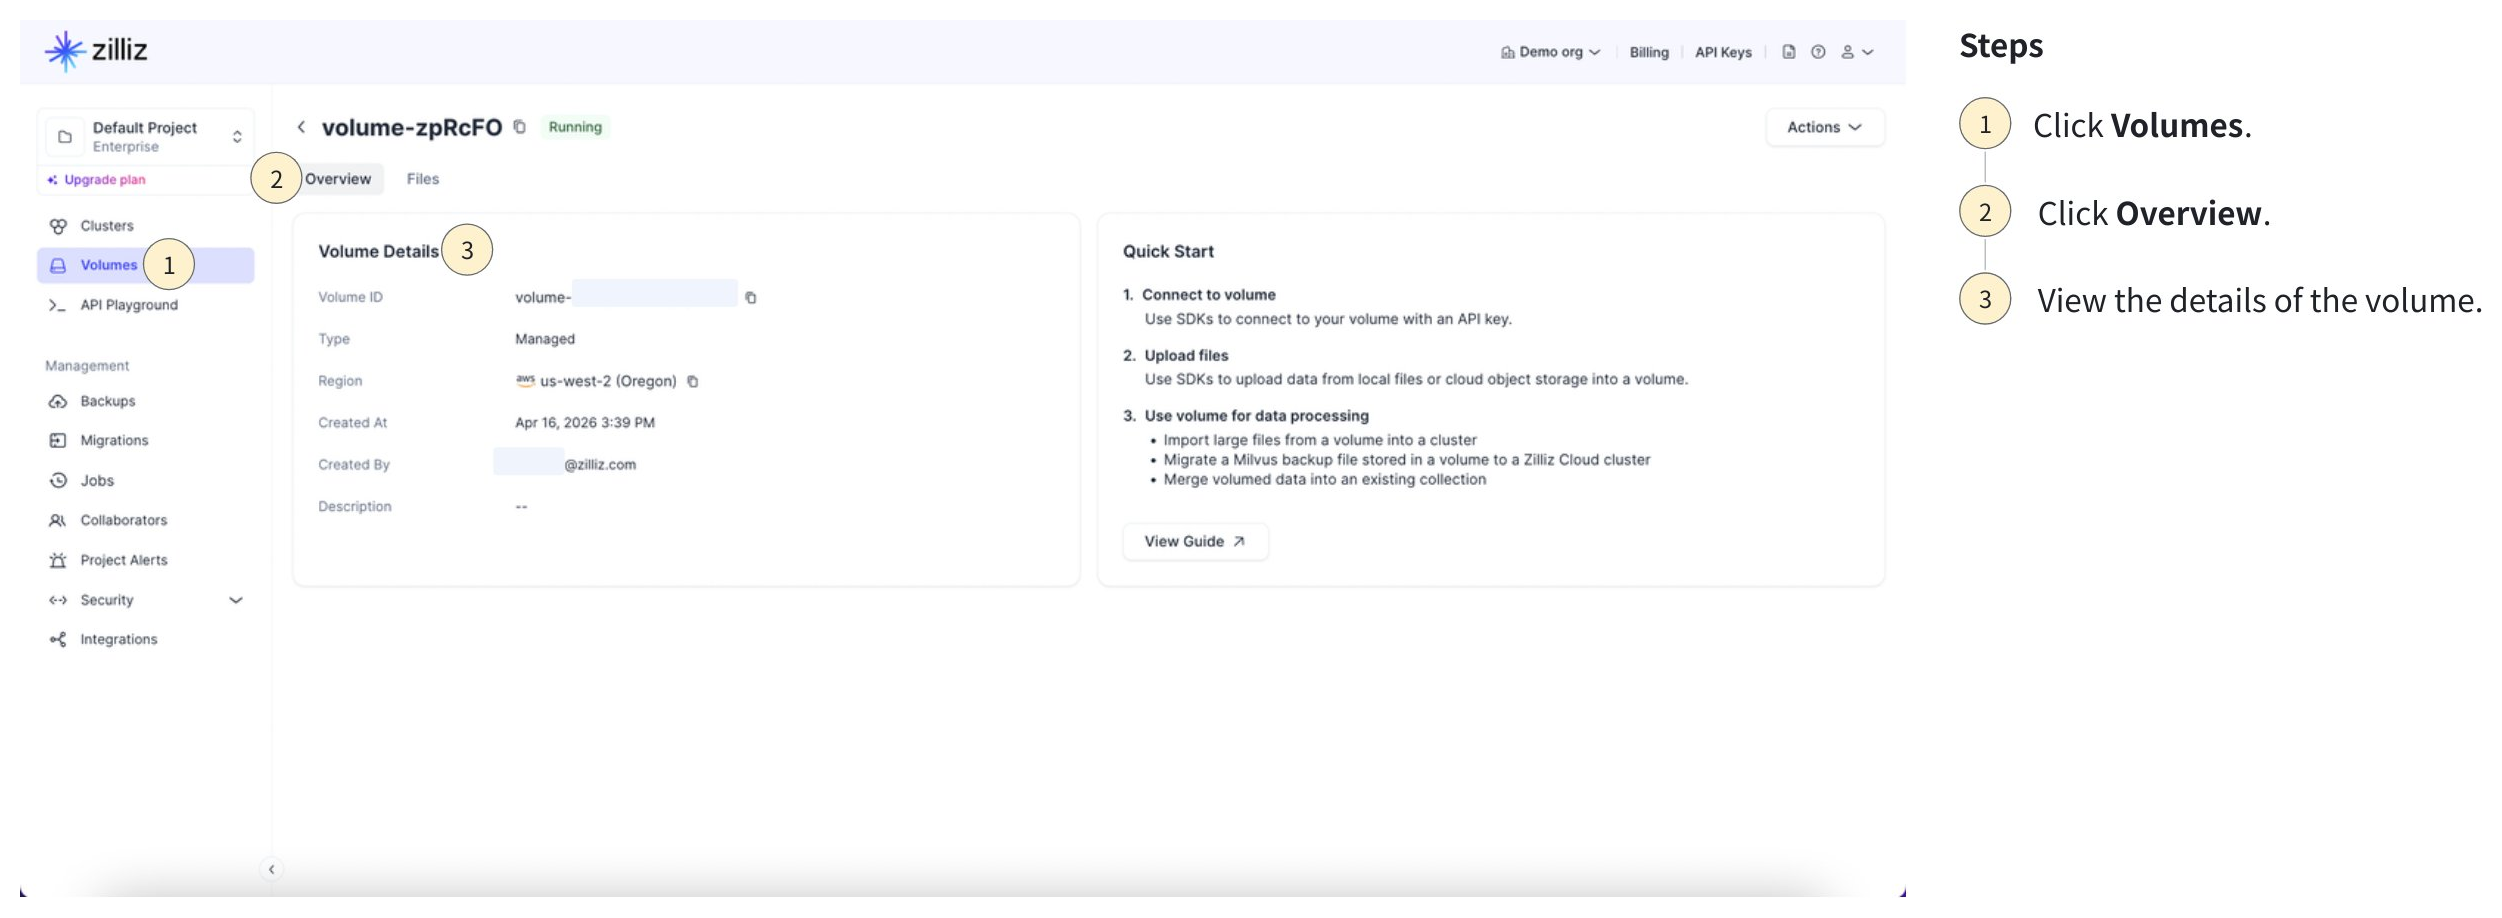
Describe managed volume
You can also check the details of a specific managed volume.
-
Via SDKs
- Python
- Java
- cURL
# Initiate a volume managerfrom pymilvus.bulk_writer.volume_manager import VolumeManagervolume_manager = VolumeManager(cloud_endpoint="https://api.cloud.zilliz.com",api_key="YOUR_API_KEY")# View volumesvolume_list = volume_manager.describe_volume(volume_name="managed_volume",)print(f"\ndescVolume result: \n", volume_list.json()['data'])# describeVolume result:# {# "volumeName": "managed_volume",# "type": "MANAGED",# "regionId": "aws-us-west-2",# "status": "RUNNING",# "createTime": "2026-05-06T02:24:26Z"# }// Initiate a volume managerimport io.milvus.bulkwriter.VolumeManager;import io.milvus.bulkwriter.VolumeManagerParam;VolumeManagerParam volumeManagerParam = VolumeManagerParam.newBuilder().withCloudEndpoint("https://api.cloud.zilliz.com").withApiKey("YOUR_API_KEY").build();VolumeManager volumeManager = new VolumeManager(volumeManagerParam);// View volumesimport com.google.gson.Gson;import io.milvus.bulkwriter.request.volume.ListVolumesRequest;import io.milvus.bulkwriter.response.volume.ListVolumesResponse;DescribeVolumeRequest request = DescribeVolumeRequest.builder().volumeName("managed_volume").build();VolumeInfo volumeInfo = volumeManager.describeVolume(request);System.out.println("\ndescribeVolume result: " + new Gson().toJson(volumeInfo));;// describeVolume results://{// "volumeName": "managed_volume",// "type": "MANAGED",// "regionId": "aws-us-west-2",// "status": "RUNNING",// "createTime": "2026-05-06T02:24:26Z"//}export BASE_URL="https://api.cloud.zilliz.com"export TOKEN="YOUR_API_KEY"curl --request GET \--url "${BASE_URL}/v2/volumes/${VOLUME_NAME}" \--header "Authorization: Bearer ${TOKEN}" \--header "Content-Type: application/json"# {# "code": 0,# "data": {# "volumeName": "ext-volume",# "type": "MANAGED",# "regionId": "aws-us-west-2",# "status": "RUNNING",# "createTime": "2024-04-15T12:00:00Z"# }#} -
Via web console
You can view the list of volumes in a project and inspect the details of a specific volume by clicking on the volume name.
Upload data into a managed volume
Currently, you can only upload your data file or folder into a managed volume via SDKs.
-
Initiate a volume file manager
A volume file manager maintains the connection to a specific volume on Zilliz Cloud's volume service. You need to initiate a volume file manager before uploading files to the volume.
- Python
- Java
from pymilvus.bulk_writer.volume_file_manager import VolumeFileManagervolume_file_manager = VolumeFileManager(cloud_endpoint='https://api.cloud.zilliz.com',api_key='YOUR_API_KEY',volume_name='managed_volume',)import io.milvus.bulkwriter.VolumeFileManager;import io.milvus.bulkwriter.VolumeFileManagerParam;VolumeFileManagerParam volumeFileManagerParam = VolumeFileManagerParam.newBuilder().withCloudEndpoint("https://api.cloud.zilliz.com").withApiKey("YOUR_API_KEY").withVolumeName("managed_volume").build();VolumeFileManager volumeFileManager = new VolumeFileManager(volumeFileManagerParam); -
Upload file or folder
Once the volume file manager is ready, use it to upload file or folder to the specified managed volume.
-
Upload a file
The following example uploads the local file at the source file path to the target file path within the volume.
- Python
- Java
result = volume_file_manager.upload_file_to_volume(source_file_path="/path/to/your/local/data/file",target_volume_path="data/")print(f"\nuploadFileToVolume results: {result}")# uploadFileToVolume results:## {# "volumeName": "managed_volume",# "path": "data/"# }import com.google.gson.Gson;import io.milvus.bulkwriter.model.UploadFilesResult;import io.milvus.bulkwriter.request.volume.UploadFilesRequest;UploadFilesRequest request = UploadFilesRequest.builder().sourceFilePath("/path/to/your/local/data/file").targetVolumePath("data/").build();UploadFilesResult result = volumeFileManager.uploadFilesAsync(request).get();System.out.println("\nuploadFiles results: " + new Gson().toJson(result));// uploadFileToVolume results://// {// "volumeName": "managed_volume",// "path": "data/"// } -
Upload a folder
The following example uploads the local file at the source file path to the target file path within the volume.
- Python
- Java
result = volume_file_manager.upload_file_to_volume(source_file_path="/path/to/your/local/data/folder/",target_volume_path="data/")print(f"\nuploadFileToVolume results: {result}")# uploadFileToVolume results:## {# "volumeName": "managed_volume",# "path": "data/"# }import com.google.gson.Gson;import io.milvus.bulkwriter.model.UploadFilesResult;import io.milvus.bulkwriter.request.volume.UploadFilesRequest;UploadFilesRequest request = UploadFilesRequest.builder().sourceFilePath("/path/to/your/local/data/folder/").targetVolumePath("data/").build();UploadFilesResult result = volumeFileManager.uploadFilesAsync(request).get();System.out.println("\nuploadFiles results: " + new Gson().toJson(result));// uploadFileToVolume results://// {// "volumeName": "managed_volume",// "path": "data/"// }
-
Delete data from a managed volume
Deleting data from a managed volume may take several minutes, depending on the size of the file or folder.
Deleted files and folders cannot be recovered. Proceed with caution.
Currently, you can only delete data from a managed volume via the web console.
In the left navigation, click on Volumes.
Switch to the Files tab.
In the Actions column, click on ..., and then click on Delete.
Delete a managed volume
You can delete a managed volume at any time if it is no longer needed. Note that the free trial volume can only be created once per organization. Once deleted, you can no longer create any free trial volume.
Deleting a managed volume removes all its files and folders as well.
Deleted volumes cannot be recovered. Proceed with caution.
-
Via SDKs
You can delete a managed volume as follows:
- Python
- Java
- cURL
# Initiate a volume managerfrom pymilvus.bulk_writer.volume_manager import VolumeManagervolume_manager = VolumeManager(cloud_endpoint="https://api.cloud.zilliz.com",api_key="YOUR_API_KEY")# Delete a volumevolume_manager.delete_volume(volume_name="managed_volume")print(f"\nVolume managed_volume deleted")# Volume managed_volume deleted// Initiate a volume managerimport io.milvus.bulkwriter.VolumeManager;import io.milvus.bulkwriter.VolumeManagerParam;VolumeManagerParam volumeManagerParam = VolumeManagerParam.newBuilder().withCloudEndpoint("https://api.cloud.zilliz.com").withApiKey("YOUR_API_KEY").build();VolumeManager volumeManager = new VolumeManager(volumeManagerParam);// Delete a volumeimport io.milvus.bulkwriter.request.volume.DeleteVolumeRequest;DeleteVolumeRequest request = DeleteVolumeRequest.builder().volumeName("managed_volume").build();volumeManager.deleteVolume(request);System.out.printf("\nVolume %s deleted%n", "managed_volume");// Volume managed_volume deletedexport BASE_URL="https://api.cloud.zilliz.com"export TOKEN="YOUR_API_KEY"export VOLUME_NAME="managed_volume"curl --request DELETE \--url "${BASE_URL}/v2/volumes/${VOLUME_NAME}" \--header "Authorization: Bearer ${TOKEN}" \--header "Content-Type: application/json"# {# "code": 0,# "data": {# "volumeName": "managed_volume"# }# } -
Via web console
1In the left navigation, click on Volumes.
2Click on ... in the Actions column, and then select Delete.
3Enter the volume name and click on Delete.
Billing
When you create a managed volume, you can choose either a free trial or pay-as-you-go plan. The table below compares their typical use cases and limits.
Free Trial | Pay-as-you-go | |
|---|---|---|
Use case | For testing environments only. | For production usage. |
Capacity | 5 GB | Unlimited |
File size & amount per upload | Up to 1 GB of data and no more than 1,000 files in each upload | Up to 100 GB of data and unlimited number of files in each upload |
Max. numbers volumes | 1 | 100 |
Free trial volume
-
No payment method is required.
-
Each organization can have only one free trial volume.
-
The free trial volume is retained for 30 days and is then deleted automatically.
Pay-as-you-go volume
-
A valid payment method is required.
-
Using a pay-as-you-go volume incurs charges.
-
You will only be charged when the managed volume is available.
-
For list prices, see Pricing Guide.
-
To understand how volume charges are calculated, see Storage Cost.
-
FAQs
What happens to my volumes if my organization is frozen due to overdue invoices?
If an organization is frozen, all managed Volumes — both free trial and pay-as-you-go — and all files stored in them are deleted and cannot be restored. External volumes are also frozen and cannot be used for new operations, but your data in your own bucket is not affected.
To continue using volumes, first settle all outstanding invoices.
Why can't I see the free trial volume option on the web console?
The free trial volume option is hidden once a free trial volume has been created for your organization. Each organization can create only one free trial volume.
What do the volume statuses mean?
The following table lists the possible volume statuses.
Status | Description |
|---|---|
Available | The volume is active and usable. |
Frozen | The organization is frozen due to overdue invoices. The volume cannot be used for new operations. Please pay your bill to continue using volumes. |