Okta (OIDC)
This topic describes how to configure single sign-on (SSO) with Okta using the OpenID Connect (OIDC) protocol.
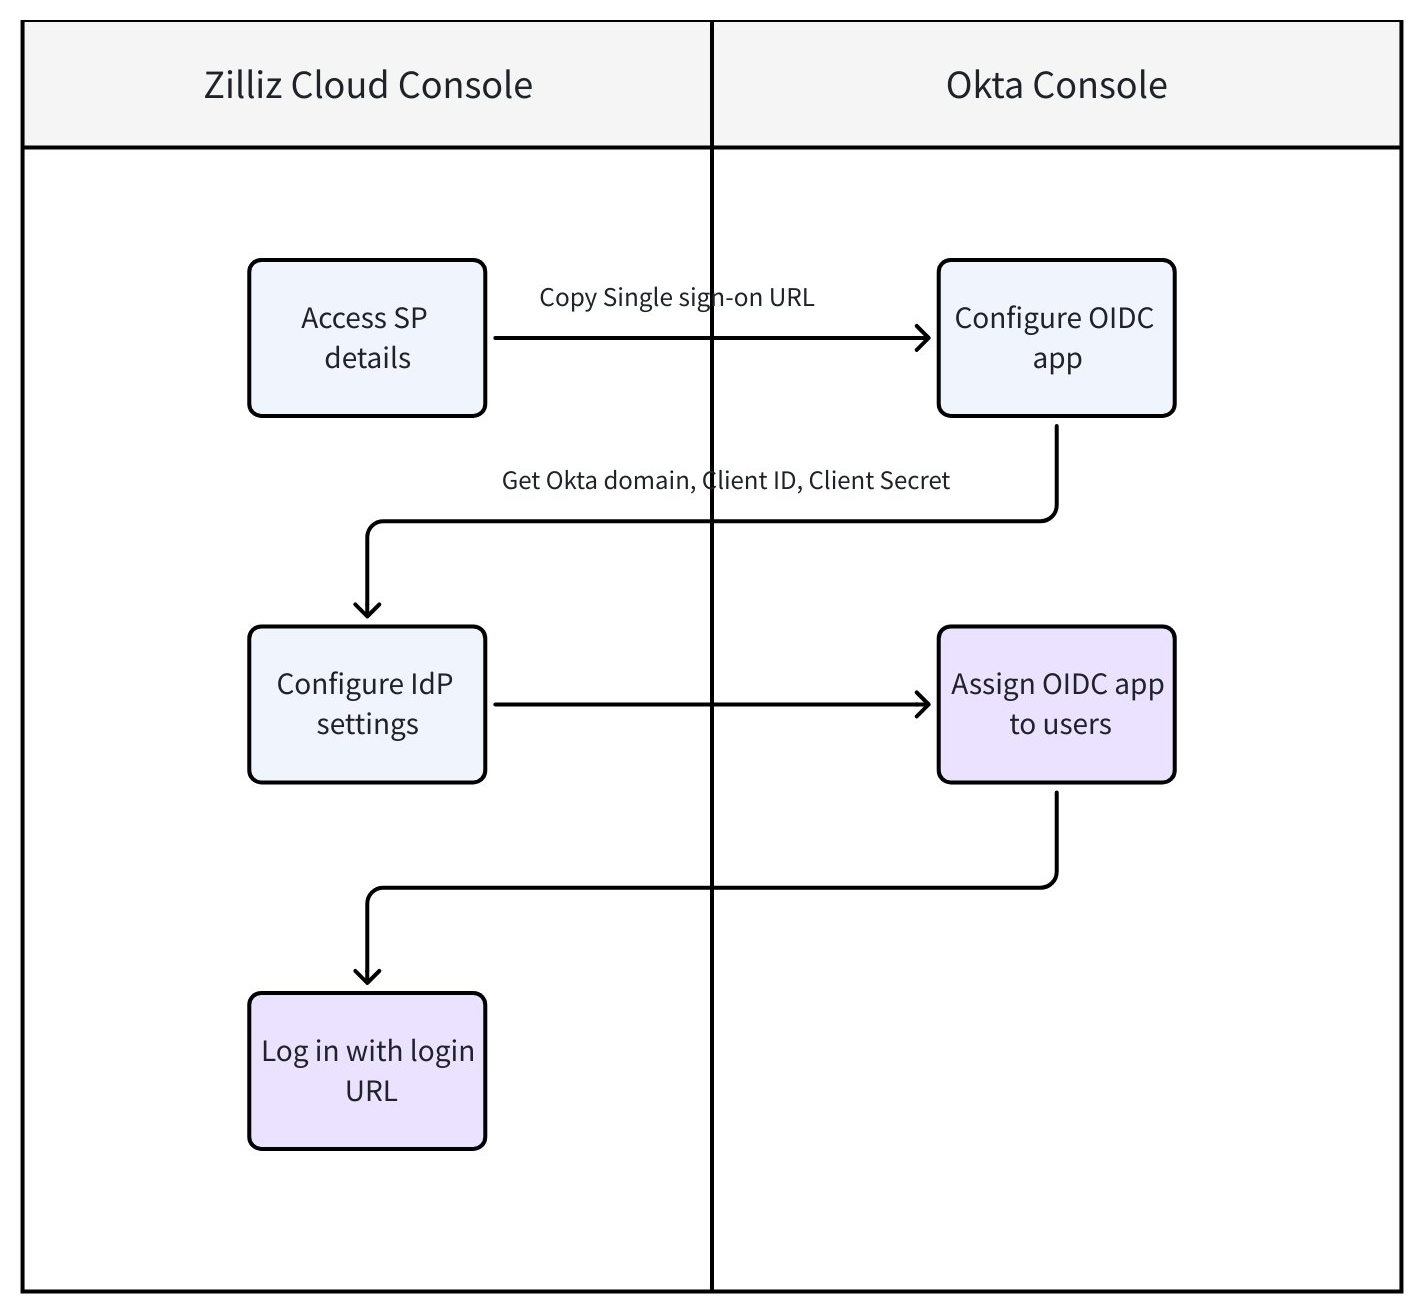
In this guide, Zilliz Cloud acts as the Service Provider (SP) and Okta acts as the Identity Provider (IdP). The following diagram illustrates the necessary steps in Zilliz Cloud and the Okta console.
Before you start
-
Your Zilliz Cloud organization has at least one Dedicated (Enterprise) cluster.
-
You have Admin access to the Okta console. For more information, refer to Okta official documentation.
-
You are the Organization Owner in the Zilliz Cloud organization where SSO is to be configured.
Configuration steps
Step 1: Access SP details in Zilliz Cloud console
As the SP, Zilliz Cloud provides the Single sign-on URL required when setting up your OIDC app in Okta.
Log in to the Zilliz Cloud console and go to the organization for which you want to configure SSO.
In the left-side navigation pane, click Settings.
On the Settings page, find the Single Sign-On (SSO) section and click Configure.
In the dialog box that appears, choose Okta (OIDC) as your IdP and protocol.
In the Service Provider Details card, copy your Single sign-on URL. It will be required in Step 2 when creating an OIDC app in Okta console.
Once that's done, proceed to Step 2.
Step 2: Set up an OIDC app in Okta console
In this step, you configure Okta (the IdP) with the SP details obtained from Zilliz Cloud.
Log in to the Okta Admin console.
In the left-side navigation pane, choose Applications > Applications.
Click Create App Integration.
In the Create a new app integration dialog box, select OIDC - OpenID Connect as the sign-in method, then select Web Application as the application type. Click Next.
Set up the new Web App integration with the following settings:
-
App integration name: Customize your app integration name (e.g. zilliz).
-
Sign-in redirect URIs: Paste the Single sign-on URL you copied from Zilliz Cloud console in Step 1 here.
-
Controlled access: Choose Skip group assignment for now unless you want to set up specific group access.
Click Save. Then, you'll be redirected to the app details page.
On the app details page, get the following information:
-
Client ID
-
Client Secret
-
Okta domain
These values will be required in Zilliz Cloud console in Step 3.
Step 3: Configure IdP settings in Zilliz Cloud console
In this step, you provide Okta’s IdP details back to Zilliz Cloud to complete the OIDC trust relationship.
Go back to the Zilliz Cloud console.
In the Identity Provider Details card of the Configure Single Sign-On (SSO) dialog box, configure the following:
Once that's done, click Save. Then, click OK.
Post-configuration tasks
Task 1: Assign OIDC app to users
Before users can access Zilliz Cloud through SSO, you need to assign the OIDC app to them:
On the app details page of the Okta Admin console, click Assignments.
Choose Assign > Assign to People.
Assign the OIDC app to the user and save the changes.
Click Save and Go Back. Then, click Done.
Repeat for all users as needed. See Okta documentation for more.
Task 2: Invite users to your project
When users log in to Zilliz Cloud via SSO for the first time, they are registered as an Organization Member but have no access to any project by default.
-
The Organization Owner must invite them into the appropriate projects.
-
For step-by-step instructions on how to invite users to a project, refer to Manage Project Users.
After being invited to a project, the Organization Owner can share the Zilliz Cloud login URL with enterprise users so they can sign in through SSO.
If SSO enforcement is enabled for the organization, direct member invitation at the organization level is disabled. You should provision users through your IdP instead. When inviting members at the project level, only existing organization members can be invited.
If you encounter any issues during the setup or testing process, contact Zilliz support.
Task 3: (Optional) Enable SSO enforcement
After your SSO connection is fully configured and tested, you can optionally enable SSO enforcement to require all organization members to log in exclusively through SSO. When enabled, members can no longer sign in using email/password or third-party accounts (Google, GitHub).
Enabling this feature will immediately log out all members who are currently signed in with a password and block non-SSO login methods.
For more information, refer to Enforce SSO in Your Organization.
FAQ
What role is assigned to users who log in via SSO for the first time?
New users who do not already have a Zilliz Cloud account will be automatically created upon their first SSO login. These users are assigned the Organization Member role by default. You can modify their roles later in the Zilliz Cloud console. For detailed steps, refer to Manage Project Users.
How do users access projects after SSO login?
After logging in via SSO, users will have Organization Member role by default. To access specific projects, an Organization Owner or Project Admin must invite them to projects. For detailed steps, see Manage Project Users.
What happens if a user already has a Zilliz Cloud account before logging in with SSO?
If the user already exists in your Zilliz Cloud organization (based on their email), they will retain their original role and permissions when logging in via SSO. The system matches users by email address and does not overwrite existing accounts.
Can I configure multiple SSO providers for the same organization?
Currently, each Zilliz Cloud organization supports only one active SAML SSO configuration at a time.