外部コレクションの作成
外部コレクションは、Zilliz Cloud におけるデータコレクションの一種であり、AWS S3 や Iceberg などの外部ストレージシステムやデータベーステーブルのデータを、Zilliz Cloud にコピーすることなく参照できます。データレイクに対するクエリレイヤーとして機能し、Zilliz Cloud のクエリインターフェイスとの互換性を維持します。
外部コレクションを作成できるのは、オンデマンドコンピューティング用データベースに限られます。サービング Dedicated クラスターでの外部コレクション作成サポートは、近日公開予定です。
概要
一般的な AI データパイプラインでは、AWS S3 などのストレージシステムに Parquet 形式などでデータがすでに保存されているケースが多く見られます。Zilliz Cloud でこれらの外部データを利用するには、通常、Extract-Transform-Load(ETL)パイプラインを用いて Zilliz Cloud 独自のストレージにデータをインポートする必要があります。
このようにデータを Zilliz Cloud に取り込むワークフローでは、同期が困難な冗長なデータが生じ、データの一貫性を保つためのエンジニアリング上の保守負担も増大します。
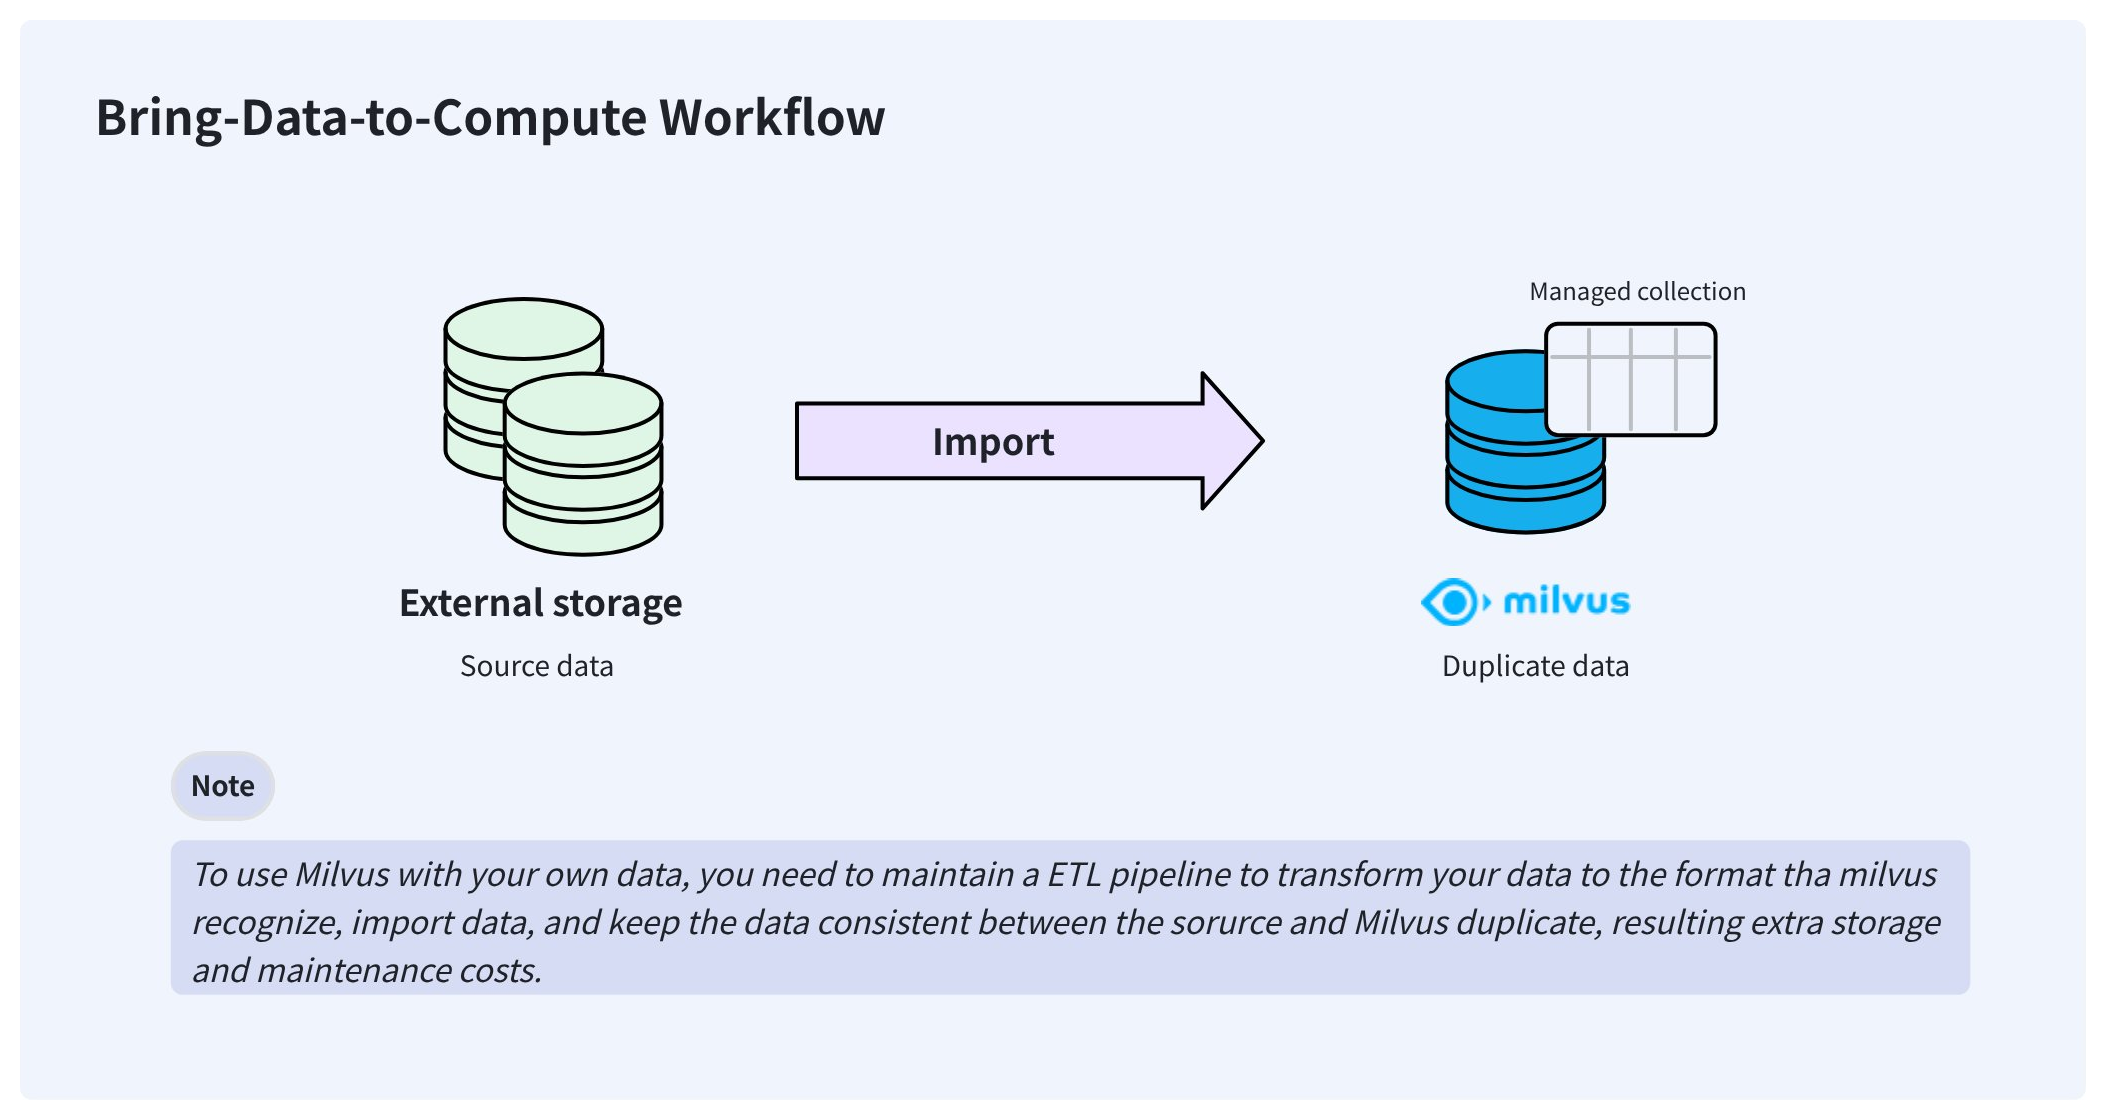
こうした課題を解決するため、Zilliz Cloud は外部コレクションを提供しています。これにより、データの同期や ETL パイプラインを意識することなく、Zilliz Cloud から外部ストレージ上のデータにアクセスできます。
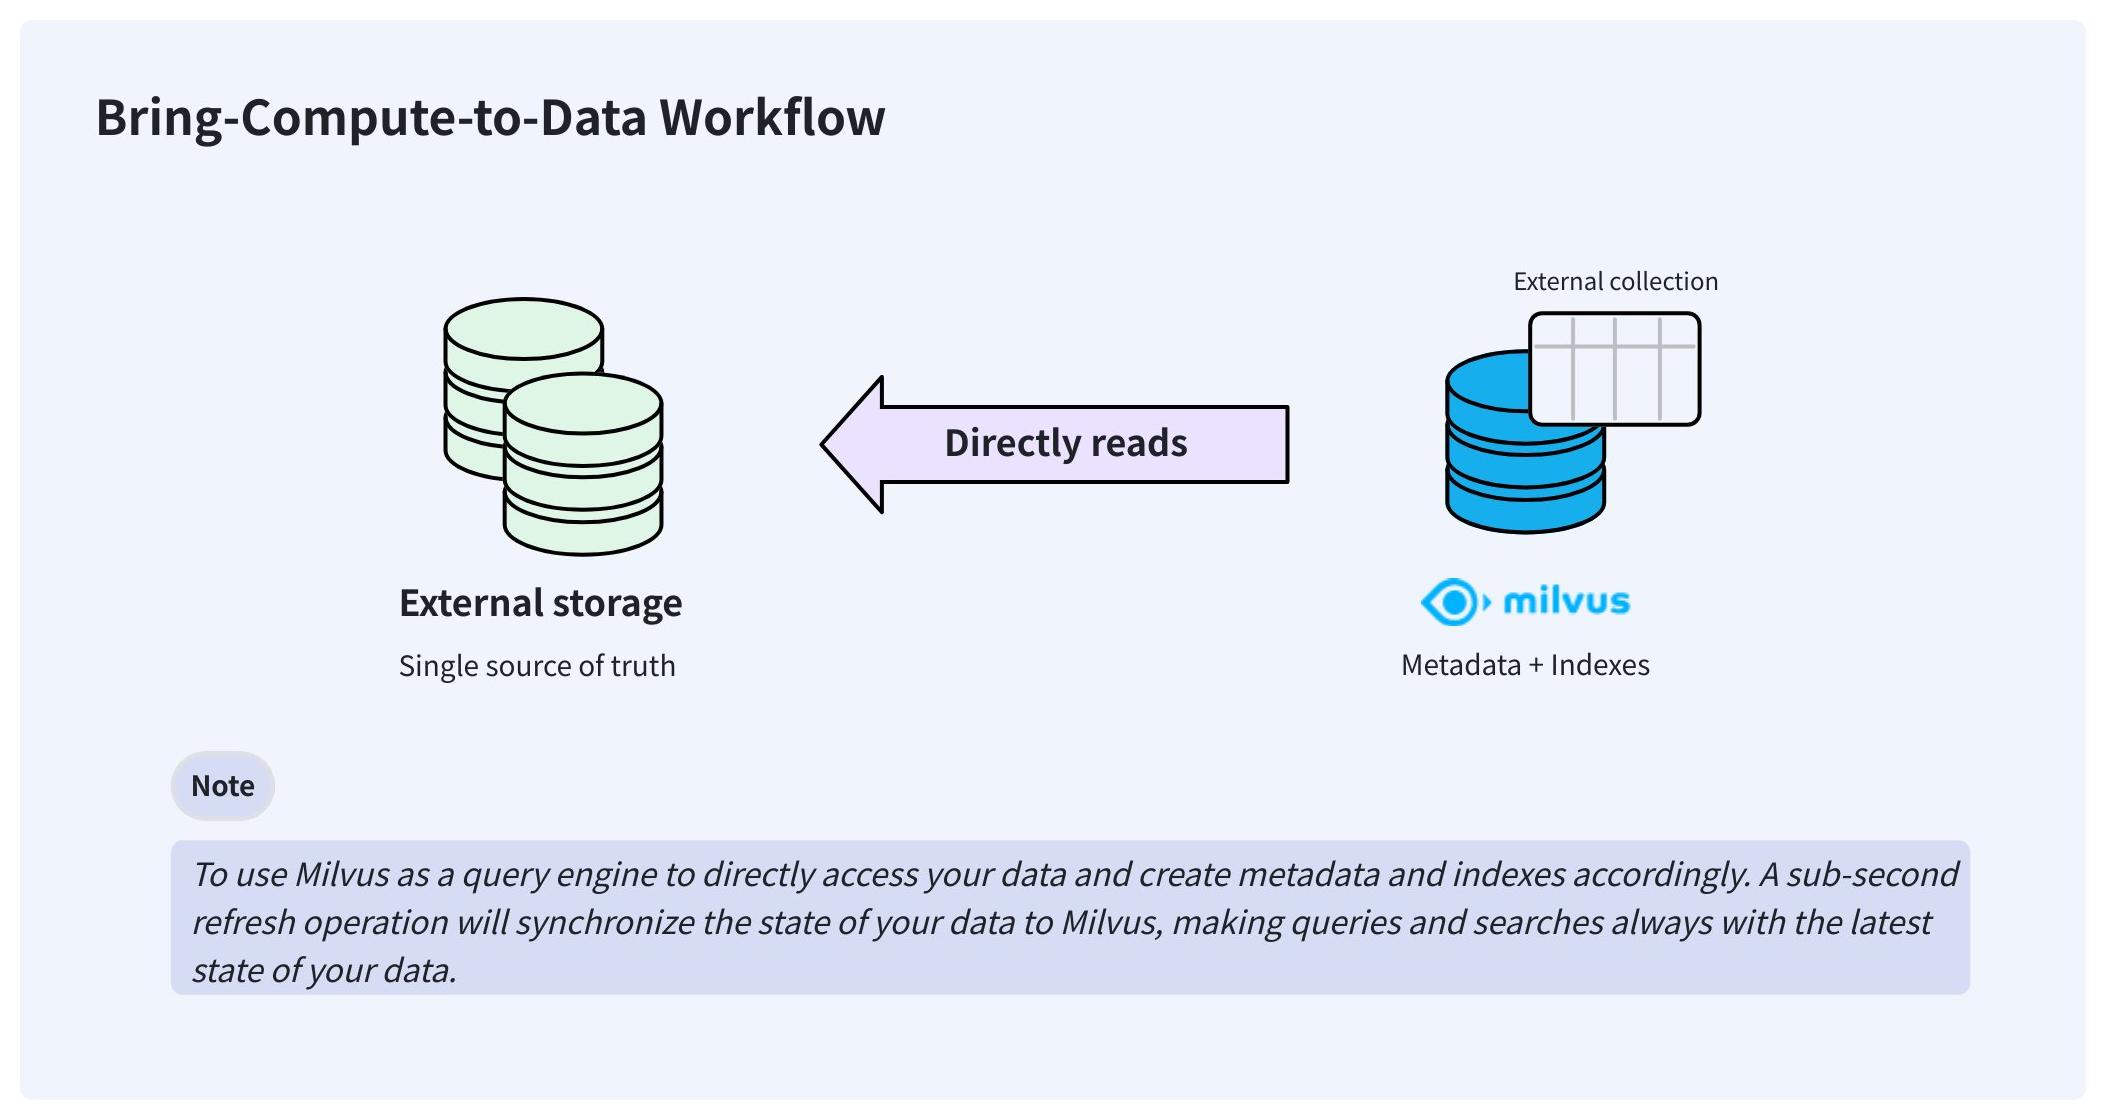
外部コレクションを作成すると、データは元の保存場所に保持されたまま直接アクセスできるようになります。バックグラウンドでは、Zilliz Cloud がマニフェストファイルを作成し、Zilliz Cloud のメタデータと外部データファイル内の行の対応関係を記録します。マニフェストファイルの準備が整えば、通常のマネージドコレクションと同様に、外部コレクションにもインデックスを作成できます。
データに変更があった場合は、手動でサブ秒級のリフレッシュを実行することでメタデータが更新され、Zilliz Cloud を常に最新の状態に保てます。
外部コレクションは、オンデマンドコンピューティング用データベースで利用可能です。
ステップ 1: スキーマの作成
マネージドコレクションの場合と同様に、外部コレクションの作成前にもスキーマを定義する必要があります。ただし、その内容はマネージドコレクションのスキーマとは一部異なります。
事前準備
-
オンデマンドコンピューティング用データベースに外部コレクションを作成できる十分な権限を持つ API キーを取得していること。
詳細については、API キー を参照してください。
-
オブジェクトストレージバケットが Zilliz Cloud と連携済みであること。
-
バケット連携に基づき外部ボリュームを作成済みであること。また、当該ボリュームに対象のデータファイルが含まれていることを確認してください。
詳細については、外部ボリューム を参照してください。
サポートされるデータソース
Zilliz Cloud は以下のデータソースに対応しています。選択した形式に応じて、対応する外部ソースを指定してください。
-
parquetexternal_sourceには、対象の Parquet ファイルが格納されたフォルダーを指定します。 -
vortex,external_sourceには、バージョン 0.56 の Vortex カラムナーファイルが格納されたフォルダーを指定します。 -
lance-tableexternal_sourceには、_transactions、_versions、data といったサブフォルダーを含むフォルダーパスを指定します。 -
iceberg-tableexternal_sourceには Iceberg テーブルのmetadata.jsonファイルを指定し、以下のようにスナップショット ID を渡します。pythonexternal_spec={"format": "iceberg-table","snapshot_id": "473984310232959286"} -
milvus-tableexternal_sourceには、具体的な Milvus スナップショットメタデータ JSON ファイルを指定します。詳細については、スナップショットをデータソースとして使用する を参照してください。
スキーマの設定
対象データファイルを含む外部ボリュームを用意したら、コレクションのカラムを Parquet ファイル(parquet)、Lance テーブル(lance-table)、Iceberg テーブル(iceberg-table)、または 0.56.0 形式の Vortex ファイル(vortex)にマッピングするためのスキーマを作成します。
外部ソースの末尾には、フォルダーであることを示すスラッシュ (/) を付ける必要があります。
- Python
- Java
- Go
- Rust
- C++
- NodeJS
- cURL
from pymilvus import MilvusClient, DataType

schema = MilvusClient.create_schema(
    external_source='volume://my_volume/path/to/a/folder/',
    external_spec='{"format": "parquet"}'
)
import com.google.gson.JsonObject;
import io.milvus.v2.service.collection.request.CreateCollectionReq;

JsonObject externalSpec = new JsonObject();
externalSpec.addProperty("format", "parquet");
CreateCollectionReq.CollectionSchema schema = CreateCollectionReq.CollectionSchema.builder()
        .externalSource("volume://my_volume/path/to/a/folder/")
        .externalSpec(externalSpec)
        .build();
import (
    "github.com/milvus-io/milvus/client/v3/entity"
    "github.com/milvus-io/milvus/client/v3/milvusclient"
)

schema := entity.NewSchema().
    WithName("product_embeddings").
    WithExternalSource("volume://my_volume/path/to/a/folder/").
    WithExternalSpec(\`{"format": "parquet"}\`)
use serde_json::json;

let schema = CollectionSchema::new()
    .external_source("volume://my_volume/path/to/a/folder/")
    .external_spec(json!({"format": "parquet"}));
milvus::CollectionSchema schema;
schema.SetExternalSource("volume://my_volume/path/to/a/folder/");
schema.SetExternalSpec(nlohmann::json{{"format", "parquet"}});
const schema = {
    external_source: 'volume://my_volume/path/to/a/folder/',
    external_spec: '{"format": "parquet"}'
};
export fields='[
    {
        "fieldName": "product_id",
        "dataType": "Int64",
        "isPrimary": true
    },
    {
        "fieldName": "embedding",
        "dataType": "FloatVector",
        "elementTypeParams": {
            "dim": "768"
        }
    },
    {
        "fieldName": "product_name",
        "dataType": "VarChar",
        "elementTypeParams": {
            "max_length": 512
        }
    }
]'
ステップ 2: フィールドの追加
スキーマの準備ができたら、以下のようにフィールドを追加できます。
- Python
- Java
- Go
- Rust
- C++
- NodeJS
- cURL
schema.add_field(
    field_name="product_id",
    datatype=DataType.INT64,
    # highlight-next
    external_field="id" # field name in the external data file
)
schema.add_field(
    field_name="product_name",
    datatype=DataType.VARCHAR,
    max_length=512,
    # highlight-next
    external_field="name"
)
schema.add_field(
    field_name="embedding",
    datatype=DataType.FLOAT_VECTOR,
    dim=768,
    # highlight-next
    external_field="vector"
)
import io.milvus.v2.common.DataType;
import io.milvus.v2.service.collection.request.AddFieldReq;

schema.addField(AddFieldReq.builder()
        .fieldName("product_id")
        .dataType(DataType.Int64)
        .externalField("id")
        .build());
schema.addField(AddFieldReq.builder()
        .fieldName("product_name")
        .dataType(DataType.VarChar)
        .maxLength(512)
        .externalField("name")
        .build());
schema.addField(AddFieldReq.builder()
        .fieldName("embedding")
        .dataType(DataType.FloatVector)
        .dimension(768)
        .externalField("vector")
        .build());
import (
    "github.com/milvus-io/milvus/client/v3/entity"
    "github.com/milvus-io/milvus/client/v3/milvusclient"
)

schema = schema.
    WithField(
        entity.NewField().
            WithName("product_id").
            WithDataType(entity.FieldTypeInt64).
            WithExternalField("id"),
    ).
    WithField(
        entity.NewField().
            WithName("product_name").
            WithDataType(entity.FieldTypeVarChar).
            WithMaxLength(512).
            WithExternalField("name"),
    ).
    WithField(
        entity.NewField().
            WithName("embedding").
            WithDataType(entity.FieldTypeFloatVector).
            WithDim(768).
            WithExternalField("vector"),
    )
let schema = CollectionSchema::new()
    .add_field(
        FieldSchema::new()
            .name("product_id")
            .data_type(DataType::Int64)
            .external_field("id"),
    )
    .add_field(
        FieldSchema::new()
            .name("product_name")
            .data_type(DataType::VarChar)
            .max_length(512)
            .external_field("name"),
    )
    .add_field(
        FieldSchema::new()
            .name("embedding")
            .data_type(DataType::FloatVector)
            .dimension(768)
            .external_field("vector"),
    );
schema.AddField(milvus::FieldSchema("product_id", milvus::DataType::INT64, "").WithExternalField("id"));
schema.AddField(milvus::FieldSchema("product_name", milvus::DataType::VARCHAR, "").WithExternalField("name"));
schema.AddField(milvus::FieldSchema("embedding", milvus::DataType::FLOAT_VECTOR, "").WithExternalField("vector"));
const schema = [
    { field_name: 'product_id', data_type: 'Int64', external_field: 'id' },
    { field_name: 'product_name', data_type: 'VarChar', max_length: 512, external_field: 'name' },
    { field_name: 'embedding', data_type: 'FloatVector', dim: 768, external_field: 'vector' },
];
export schema="{
    \"externalSource\": \"volume://my_volume/path/to/a/folder\",
    \"externalSpec\": \"{\\\"format\\\": \\\"parquet\\\"}\",
    \"fields\": $fields
}"
ステップ 3: コレクションの作成
スキーマにすべてのフィールドを追加したら、外部コレクションを作成できます。
外部コレクションは、通常オンデマンドクラスターに関連付けられているプロジェクトレベルのデータベースに作成できます。
- Python
- Java
- Go
- Rust
- C++
- NodeJS
- cURL
# connect the database
client = MilvusClient(
    uri="https://{project-id}.{region}.vectordb.zillizcloud.com",
    token="YOUR_API_KEY"
)

client.use_database(
    db_name="my_database"
)
# create the collection
client.create_collection(
    collection_name="test_collection",
    schema=schema
)
import io.milvus.v2.client.ConnectConfig;
import io.milvus.v2.client.MilvusClientV2;

ConnectConfig connectConfig = ConnectConfig.builder()
        .uri("https://{project-id}.{region}.vectordb.zillizcloud.com")
        .token("YOUR_API_KEY")
        .build();
MilvusClientV2 client = new MilvusClientV2(connectConfig);
CreateCollectionReq createReq = CreateCollectionReq.builder()
        .dbName("my_database")
        .collectionName("test_collection")
        .collectionSchema(schema)
        .build();
client.createCollection(createReq);
import (
    "context"
    "fmt"

    "github.com/milvus-io/milvus/client/v3/entity"
    "github.com/milvus-io/milvus/client/v3/milvusclient"
)

ctx, cancel := context.WithCancel(context.Background())
defer cancel()
milvusAddr := "https://{project-id}.{region}.vectordb.zillizcloud.com"
token := "YOUR_API_KEY"
client, err := milvusclient.New(ctx, &milvusclient.ClientConfig{
    Address: milvusAddr,
    APIKey: token
})
if err != nil {
    fmt.Println(err.Error())
    // handle error
}
err = client.CreateCollection(ctx, milvusclient.NewCreateCollectionOption("test_collection", schema).
    WithDBName("my_database").
    WithIndexOptions(indexOptions...))
if err != nil {
    fmt.Println(err.Error())
    // handle error
}
use milvus::v2::prelude::*;

#[tokio::main]
async fn main() -> Result<()> {
    let client = ClientV2::new(
        &ConnectConfig::new()
            .uri("https://{project-id}.{region}.vectordb.zillizcloud.com")
            .token("YOUR_API_KEY"),
    )
    .await?;

    client.use_database("my_database").await?;

    client
        .create_collection(
            CreateCollectionRequest::builder()
                .collection_name("test_collection")
                .schema(schema)
                .build()?,
        )
        .await?;

    Ok(())
}
auto client = milvus::MilvusClientV2::Create();
auto status = client->Connect(milvus::ConnectParam("https://{project-id}.{region}.vectordb.zillizcloud.com", "YOUR_API_KEY"));

status = client->UseDatabase("my_database");
status = client->CreateCollection(milvus::CreateCollectionRequest()
    .WithDatabaseName("my_database")
    .WithCollectionName("test_collection")
    .WithSchema(schema));
import { MilvusClient } from "@zilliz/milvus2-sdk-node";

const client = new MilvusClient({
    address: "https://{project-id}.{region}.vectordb.zillizcloud.com",
    token: "YOUR_API_KEY",
});

await client.useDatabase({ db_name: "my_database" });

await client.createCollection({
    collection_name: "test_collection",
    schema,
});
export PROJECT_ENDPOINT='https://{project-id}.{region}.vectordb.zillizcloud.com'
curl --request POST \
--url "${PROJECT_ENDPOINT}/v2/vectordb/collections/create" \
--header "Authorization: Bearer ${TOKEN}" \
--header "Content-Type: application/json" \
-d "{
    \"dbName\": \"my_database\",
    \"collectionName\": \"test_collection\",
    \"schema\": $schema
}"
ステップ 4: インデックスの作成
マネージドコレクションと同様に、外部コレクションのカラムに対してもインデックスを作成できます。
- Python
- Java
- Go
- Rust
- C++
- NodeJS
- cURL
index_params = client.prepare_index_params()
# Add indexes
index_params.add_index(
    field_name="embedding",
    index_type="AUTOINDEX",
    metric_type="COSINE"
)
index_params.add_index(
    field_name="product_name",
    index_type="AUTOINDEX"
)
client.create_index(
    db_name="my_database",
    collection_name="test_collection",
    index_params=index_params
)
import io.milvus.v2.common.IndexParam;
import io.milvus.v2.service.index.request.CreateIndexReq;
import java.util.*;

IndexParam indexParamForIdField = IndexParam.builder()
        .fieldName("product_name")
        .indexType(IndexParam.IndexType.AUTOINDEX)
        .build();
IndexParam indexParamForVectorField = IndexParam.builder()
        .fieldName("embedding")
        .indexType(IndexParam.IndexType.AUTOINDEX)
        .metricType(IndexParam.MetricType.COSINE)
        .build();
List<IndexParam> indexParams = new ArrayList<>();
indexParams.add(indexParamForIdField);
indexParams.add(indexParamForVectorField);
CreateIndexReq createIndexReq = CreateIndexReq.builder()
        .dbName("my_database")
        .collectionName("test_collection")
        .indexParams(indexParams)
        .build();
client.createIndex(createIndexReq);
import (
    "context"
    "fmt"

    "github.com/milvus-io/milvus/client/v3/entity"
    "github.com/milvus-io/milvus/client/v3/index"
    "github.com/milvus-io/milvus/client/v3/milvusclient"
)

collectionName := "test_collection"

indexTask, err := client.CreateIndex(ctx,
    milvusclient.NewCreateIndexOption(collectionName, "embedding", index.NewAutoIndex(entity.COSINE)))
if err != nil {
    fmt.Println(err.Error())
    // handle err
}
err = indexTask.Await(ctx)
if err != nil {
    fmt.Println(err.Error())
    // handle err
}

_, err = client.CreateIndex(ctx,
    milvusclient.NewCreateIndexOption(collectionName, "product_name", index.NewAutoIndex(entity.L2)))
if err != nil {
    fmt.Println(err.Error())
    // handle err
}
client
    .create_index(
        CreateIndexRequest::builder()
            .collection_name("test_collection")
            .index_param(
                IndexParam::new()
                    .field_name("embedding")
                    .index_type(IndexType::AutoIndex)
                    .metric_type(MetricType::Cosine),
            )
            .index_param(
                IndexParam::new()
                    .field_name("product_name")
                    .index_type(IndexType::AutoIndex),
            )
            .build()?,
    )
    .await?;
milvus::CreateIndexRequest indexRequest;
indexRequest.WithCollectionName("test_collection");
indexRequest.AddIndex(milvus::IndexSchema("embedding", milvus::IndexType::AUTOINDEX, milvus::MetricType::COSINE));
indexRequest.AddIndex(milvus::IndexSchema("product_name", milvus::IndexType::AUTOINDEX));
status = client->CreateIndex(indexRequest);
client.createIndex({
    db_name: "my_database",
    collection_name: "test_collection",
    field_name: "product_name",
    index_type: "AUTOINDEX"
})
client.createIndex({
    db_name: "my_database",
    collection_name: "test_collection",
    field_name: "embedding",
    index_type: "AUTOINDEX",
    metric_type: "COSINE"
})
export indexParams='[
        {
            "fieldName": "embedding",
            "indexName": "my_vector",
            "indexType": "AUTOINDEX"
        },
        {
            "fieldName": "product_name",
            "indexName": "my_id",
            "indexType": "AUTOINDEX"
        }
    ]'

curl --request POST \
--url "${PROJECT_ENDPOINT}/v2/vectordb/indexes/create" \
--header "Authorization: Bearer ${TOKEN}" \
--header "Content-Type: application/json" \
-d "{
    \"dbName\": \"my_database\",
    \"collectionName\": \"test_collection\",
    \"indexParams\": $indexParams
}"
ステップ 5: データのリフレッシュ
コレクションの準備ができたら、データのメタデータとインデックスを作成するためにリフレッシュを実行します。
- Python
- Java
- Go
- Rust
- C++
- NodeJS
- cURL
job_id = client.refresh_external_collection(
    db_name="my_database",
    collection_name="test_collection"
)
while True:
    progress = client.get_refresh_external_collection_progress(job_id=job_id)
    print(f"  {progress.state}: {progress.progress}%")
    if progress.state == "RefreshCompleted":
        elapsed = progress.end_time - progress.start_time
        print(f"  Completed in {elapsed}ms")
        break
    elif progress.state == "RefreshFailed":
        print(f"  Failed: {progress.reason}")
        break
    time.sleep(2)
import io.milvus.v2.service.utility.request.GetRefreshExternalCollectionProgressReq;
import io.milvus.v2.service.utility.request.RefreshExternalCollectionReq;
import io.milvus.v2.service.utility.response.GetRefreshExternalCollectionProgressResp;
import io.milvus.v2.service.utility.response.RefreshExternalCollectionJobInfo;
import io.milvus.v2.service.utility.response.RefreshExternalCollectionResp;
import java.util.concurrent.TimeUnit;

RefreshExternalCollectionResp refreshResp = client.refreshExternalCollection(
        RefreshExternalCollectionReq.builder()
                .collectionName("test_collection")
                .build());

long jobId = refreshResp.getJobId();

while (true) {
    GetRefreshExternalCollectionProgressResp resp = client.getRefreshExternalCollectionProgress(
            GetRefreshExternalCollectionProgressReq.builder()
                    .jobId(jobId)
                    .build());
    RefreshExternalCollectionJobInfo jobInfo = resp.getJobInfo();
    if ("RefreshCompleted".equals(jobInfo.getState())) {
        long elapsed = jobInfo.getEndTime() - jobInfo.getStartTime();
        System.out.printf("  Refresh completed in %dms%n", elapsed);
        break;
    } else if ("RefreshFailed".equals(jobInfo.getState())) {
        System.out.printf("  Refresh failed: %s%n", jobInfo.getReason());
    }
    TimeUnit.SECONDS.sleep(2);
}
refreshResult, err := milvusclient.RefreshExternalCollection(ctx,
    milvusclient.NewRefreshExternalCollectionOption("test_collection"))
jobID := refreshResult.JobID
for {
    progress, _ := milvusclient.GetRefreshExternalCollectionProgress(ctx,
        milvusclient.NewGetRefreshExternalCollectionProgressOption(jobID))
    fmt.Printf("State: %s\n", progress.State)
    if progress.State == entity.RefreshStateCompleted {
        fmt.Println("Refresh completed!")
        break
    }
    if progress.State == entity.RefreshStateFailed {
        fmt.Printf("Refresh failed: %s\n", progress.Reason)
        break
    }
    time.Sleep(2 * time.Second)
}
let refresh = client
    .refresh_external_collection(
        RefreshExternalCollectionRequest::builder()
            .collection_name("test_collection")
            .build()?,
    )
    .await?;

loop {
    let progress = client
        .get_refresh_external_collection_progress(
            GetRefreshExternalCollectionProgressRequest::builder()
                .job_id(refresh.job_id())
                .build()?,
        )
        .await?;
    let job_info = progress.job_info();
    println!("  {}: {}%", job_info.get_state().as_str(), job_info.get_progress());
    match job_info.get_state() {
        RefreshExternalCollectionStateCode::Completed => {
            println!("  Completed in {}ms", job_info.get_end_time() - job_info.get_start_time());
            break;
        }
        RefreshExternalCollectionStateCode::Failed => {
            println!("  Failed: {}", job_info.get_reason());
            break;
        }
        _ => tokio::time::sleep(std::time::Duration::from_secs(2)).await,
    }
}
milvus::RefreshExternalCollectionRequest refreshRequest;
refreshRequest.WithCollectionName("test_collection");
milvus::RefreshExternalCollectionResponse refreshResponse;
status = client->RefreshExternalCollection(refreshRequest, refreshResponse);

while (true) {
    milvus::GetRefreshExternalCollectionProgressRequest progressRequest;
    progressRequest.WithJobID(refreshResponse.JobID());
    milvus::GetRefreshExternalCollectionProgressResponse progressResponse;
    status = client->GetRefreshExternalCollectionProgress(progressRequest, progressResponse);
    const auto& jobInfo = progressResponse.JobInfo();
    std::cout << "  progress: " << jobInfo.Progress() << "%" << std::endl;
    if (jobInfo.State() == milvus::RefreshExternalCollectionStateCode::COMPLETED) {
        std::cout << "  Completed in " << (jobInfo.EndTime() - jobInfo.StartTime()) << "ms" << std::endl;
        break;
    } else if (jobInfo.State() == milvus::RefreshExternalCollectionStateCode::FAILED) {
        std::cout << "  Failed: " << jobInfo.Reason() << std::endl;
        break;
    }
    std::this_thread::sleep_for(std::chrono::seconds(2));
}
const job = await client.refreshExternalCollection({
    collection_name: "test_collection",
});
while (true) {
    const progress = await client.getRefreshExternalCollectionProgress({ job_id: job.job_id });
    console.log(`${progress.state}: ${progress.progress}%`);
    if (progress.state === "RefreshCompleted" || progress.state === "RefreshFailed") break;
    await new Promise((resolve) => setTimeout(resolve, 2000));
}
curl --request POST \
--url "${PROJECT_ENDPOINT}/v2/vectordb/jobs/external_collection/refresh" \
--header "Authorization: Bearer ${TOKEN}" \
--header "Content-Type: application/json" \
-d "{
    \"dbName\": \"my_database\",
    \"collectionName\": \"test_collection\",
    \"externalSource\": \"volume://my_volume/path/to/a/folder\",
    \"externalSpec\": \"{\\\"format\\\": \\\"parquet\\\"}\"
}"
リフレッシュ操作は非同期で実行されるため、進行状況を監視する反復処理を設定する必要があります。
-
リフレッシュ操作ではデータファイルのメタデータをスキャンし、それに基づいてマニフェストファイルを生成します。通常、150〜250 ms かかります。
-
マニフェストファイルには、Milvus 内のメタデータと外部ファイル内の行とのマッピングが記録されます。
-
ソースデータが更新された場合は、手動でリフレッシュを再実行して Zilliz Cloud を最新の状態に保つ必要があります。
-
挿入を伴わずにすべてのアクティブなメタデータを削除するリフレッシュは拒否されます。
-
オンデマンドコンピューティング用データベース内の外部コレクションは、手動でロードおよびリリースする必要はありません。
次のステップ
外部コレクションをリフレッシュすると、オンデマンドコンピューティング用のデータベース内のコレクションは、検索とクエリのためにオンデマンドクラスターにアタッチする必要がある点を除き、任意のマネージドコレクションと同様に、外部コレクションで類似検索とクエリを実行できます。詳細については、オンデマンドクラスターの作成とその関連ページを参照してください。
search、query、get、ハイブリッド検索などの DQL 操作を実行する前に、オンデマンドクラスターのコンピューティングリソースをアタッチするためのセッションを作成する必要があります。詳細については、オンデマンド DQL 操作を参照してください。
Snapshot as Source
スナップショットのメタデータ JSON パスを `externalsource` として使用し、`externalspec.format` を `"milvus-table"` に設定することで、Milvus スナップショットから外部コレクションを作成できます。 | BYOC