クイックスタート:Serving Cluster
Serving Cluster は、リアルタイムの本番環境でのサービングのために、コンピューティングとストレージの両方を統合した自己完結型のサーバーです。Extract-Transform-Load (ETL) パイプラインでデータをクリーニングした後、それを Serving Cluster にインポートして、大幅なパフォーマンス向上を実現できます。
開始前に
Zilliz Cloud は、Bring-Your-Own-Cloud (BYOC) ソリューションを提供しており、組織がアプリケーションとデータを Zilliz Cloud のインフラストラクチャではなく、独自のクラウドアカウントでホストできるようにします。BYOC ソリューションの詳細については、BYOC 概要 をお読みください。
次の図は、BYOC ソリューションを開始するための手順を示しています。
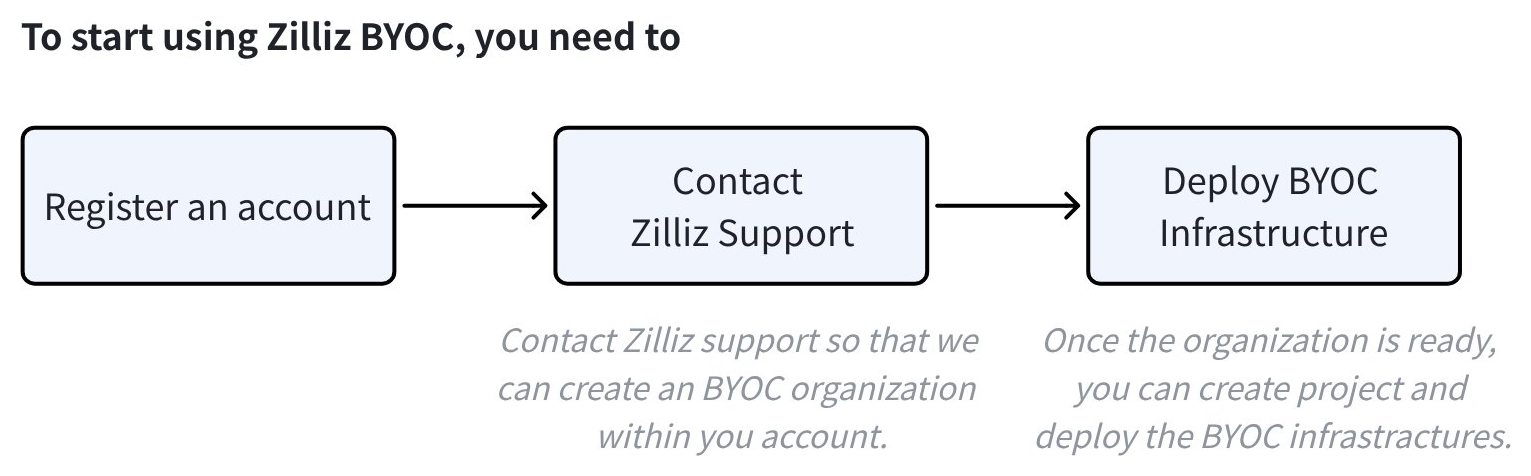
このクイックスタートを進める前に、以下を確認してください。
-
Zilliz Cloud でアカウントを登録していること。
手順については、Zilliz Cloud への登録 を参照してください。
-
Zilliz Cloud の営業担当に連絡し、アカウントを提供していること。
📘NotesZilliz BYOC は現在一般提供されています。アクセスおよび実装の詳細については、Zilliz Cloud 営業担当までお問い合わせください。
-
BYOC 組織でプロジェクトを作成し、そのプロジェクトのデータプレーンインフラストラクチャをデプロイしていること。
Zilliz BYOC は、お客様の Virtual プライベート Cloud (VPC) 内で動作するため、データプレーンコンポーネントのデプロイを開始する必要があります。データプレーンは、以下のクラウドプロバイダーでホストされる VPC にデプロイできます。
お客様のクラウドプロバイダーが上記にない場合は、Zilliz Cloud サポート にお問い合わせください。
-
BYOC クラスターへの接続方法を決定していること。詳細については、クラスター接続の準備 を参照してください。
以下の手順では、Serving Cluster を既に作成し、そのエンドポイントとアクセス認証情報を取得していることを前提としています。
ステップ 1: 接続の設定
クラスターの認証情報を取得したら、それを使用してクラスターに接続できます。
- Python
- cURL
from pymilvus import MilvusClient, DataType

SERVING_CLUSTER_ENDPOINT = "https://{cluster-id}.{region}.vectordb.zillizcloud.com:19530"
TOKEN = "YOUR_CLUSTER_TOKEN"
# A valid token could be
#
# - A colon-joined cluster username and password, as in \`user:pass\`

# 1. Set up a Milvus client
client = MilvusClient(
    uri=SERVING_CLUSTER_ENDPOINT,
    token=TOKEN
)
export CLOUD_PLATFORM_ENDPOINT="https://api.cloud.zilliz.com"
export SERVING_CLUSTER_ENDPOINT="https://{cluster-id}.{region}.vectordb.zillizcloud.com:19530"
export TOKEN="YOUR_CLUSTER_TOKEN"
# A valid token could be
#
# - A colon-joined cluster username and password, as in \`user:pass\`
Step 2: (Optional) データベースを作成する。
serving cluster にはデフォルトのデータベースが付属しています。デフォルトのデータベースを使用する場合は、この手順をスキップしてください。以下のようにデータベースを作成することもできます:
- Python
- cURL
# connect to the serving cluster
client = MilvusClient(
    # a cluster-specific endpoint
    uri=SERVING_CLUSTER_ENDPOINT,
    token=TOKEN
)

client.create_database(
    db_name="my_database"
)
curl --request POST \
--url "${SERVING_CLUSTER_ENDPOINT}/v2/vectordb/databases/create" \
--header "Authorization: Bearer ${TOKEN}" \
--header "Content-Type: application/json" \
-d '{
    "dbName": "my_database"
}'
Step 3: コレクションを作成する。
データベースの準備ができたら、管理対象コレクションを作成できます。外部データファイルにコレクションのカラムをマッピングする外部コレクションとは異なり、管理対象コレクションでは、大幅なパフォーマンス向上のためにデータのインポートが必要です。
以下の例では、コレクションスキーマの設定方法とコレクションの作成方法を示しています。
- Python
- cURL
from pymilvus import MilvusClient, DataType

schema = MilvusClient.create_schema()

schema.add_field(
    field_name="product_id",
    datatype=DataType.INT64,
    is_primary=True
)

schema.add_field(
    field_name="product_name",
    datatype=DataType.VARCHAR,
    max_length=512
)

schema.add_field(
    field_name="embedding",
    datatype=DataType.FLOAT_VECTOR,
    dim=768
)
export schema='{
    "fields": [
        {
            "fieldName": "product_id",
            "dataType": "Int64",
            "isPrimary": true
        },
        {
            "fieldName": "embedding",
            "dataType": "FloatVector",
            "elementTypeParams": {
                "dim": "768"
            }
        },
        {
            "fieldName": "product_name",
            "dataType": "VarChar",
            "elementTypeParams": {
                "max_length": 512
            }
        }
    ]
}'
次に、上記のスキーマを使用してコレクションを作成できます。デフォルトのデータベースを使用する場合は、db_name パラメータを安全に省略できます。
- Python
- cURL
client.use_database(
    db_name="my_database"
)

# create the collection
client.create_collection(
    collection_name="prod_collection",
    schema=schema
)
curl --request POST \
--url "${SERVING_CLUSTER_ENDPOINT}/v2/vectordb/collections/create" \
--header "Authorization: Bearer ${TOKEN}" \
--header "Content-Type: application/json" \
-d "{
    \"dbName\": \"my_database\",
    \"collectionName\": \"prod_collection\",
    \"schema\": $schema
}"
ステップ 4: インデックスを作成する。
すべてのベクトルフィールドと、必要に応じて選択したスカラーフィールドのインデックスを作成する必要があります。
- Python
- cURL
index_params = client.prepare_index_params()

# Add indexes
index_params.add_index(
    field_name="embedding",
    index_type="AUTOINDEX",
    metric_type="COSINE"
)

index_params.add_index(
    field_name="product_name",
    index_type="AUTOINDEX"
)

client.create_index(
    db_name="my_database",
    collection_name="prod_collection",
    index_params=index_params
)
export indexParams='[
    {
        "fieldName": "embedding",
        "metricType": "COSINE",
        "indexName": "embedding",
        "indexType": "AUTOINDEX"
    },
    {
        "fieldName": "product_name",
        "indexName": "product_name",
        "indexType": "AUTOINDEX"
    }
]'

curl --request POST \
--url "${SERVING_CLUSTER_ENDPOINT}/v2/vectordb/indexes/create" \
--header "Authorization: Bearer ${TOKEN}" \
--header "Content-Type: application/json" \
-d "{
    \"dbName\": \"my_database\",
    \"collectionName\": \"prod_collection\",
    \"indexParams\": $indexParams
}"
ステップ 5: コレクションをロードする。
インデックスの準備ができたら、コレクションをメモリにロードします。
- Python
- cURL
client.load_collection(
    db_name="my_database",
    collection_name="prod_collection"
)
curl --request POST \
--url "${SERVING_CLUSTER_ENDPOINT}/v2/vectordb/collections/load" \
--header "Authorization: Bearer ${TOKEN}" \
--header "Content-Type: application/json" \
-d '{
    "dbName": "my_database",
    "collectionName": "prod_collection"
}'
Step 6: データをインポートする。
すべての設定が完了したら、処理済みデータをインポートできます。以下の例では、処理済みデータを外部ストレージバケットに保存していることを前提としています。
バケットまたはストレージ統合のデータ形式については、形式オプション を参照してください。
- Python
- cURL
from pymilvus.bulk_writer import bulk_import

# The path should be relative to the root
# of a zilliz cloud volume or an external storage
STORAGE_PATH = "s3://your/data/path/in/external/storage"
ACCESS_KEY = "YOUR_STORAGE_ACCESS_KEY"
SECRET_KEY = "YOUR_STORAGE_SECRET_KEY"

res = bulk_import(
    api_key="YOUR_ZILLIZ_API_KEY",
    url="https://api.cloud.zilliz.com",
    cluster_id="inxx-xxxxxxxxxxxxxxxxxxx",
    collection_name="prod_collection",
    object_url="s3://your/data/path/in/external/storage.json",
    access_key="YOUR_STORAGE_ACCESS_KEY",
    secret_key="YOUR_STORAGE_SECRET_KEY"
)

# job-xxxxxxxxxxxxxxxxxxxxx
export CLOUD_PLATFORM_ENDPOINT="https://api.cloud.zilliz.com"

# replace url and token with your own
curl --request POST \
     --url "${CLOUD_PLATFORM_ENDPOINT}/v2/vectordb/jobs/import/create" \
     --header "Authorization: Bearer ${TOKEN}" \
     --header "Accept: application/json" \
     --header "Content-Type: application/json" \
     -d '{
        "clusterId": "inxx-xxxxxxxxxxxxxxx",
        "collectionName": "prod_collection",
        "objectUrl": "s3://your/data/path/in/external/storage.json",
        "accessKey": "YOUR_STORAGE_ACCESS_KEY",
        "secretKey": "YOUR_STORAGE_SECRET_KEY"
    }'

 # job-xxxxxxxxxxxxxxxxxxxxx
返されたジョブ ID を使用して、進行状況を監視できます。
- Python
- cURL
import json
from pymilvus.bulk_writer import get_import_progress

# Get bulk-insert job progress
resp = get_import_progress(
    api_key="YOUR_ZILLIZ_API_KEY",
    url="https://api.cloud.zilliz.com",
    cluster_id="inxx-xxxxxxxxxxxxxxxxxxx",
    job_id="job-xxxxxxxxxxxxxxxxxxxxx",
)

print(json.dumps(resp.json(), indent=4))
curl --request POST \
     --url "${CLOUD_PLATFORM_ENDPOINT}/v2/vectordb/jobs/import/getProgress" \
     --header "Authorization: Bearer ${TOKEN}" \
     --header "Accept: application/json" \
     --header "Content-Type: application/json" \
     -d '{
        "clusterId": "inxx-xxxxxxxxxxxxxxx",
        "jobId": "job-xxxxxxxxxxxxxxxxxxxxx"
    }'
Step 7: データを提供する。
インポートが完了したら、ユーザーに検索、クエリ、ハイブリッド検索を通じてデータを利用してもらうことができます。
- Python
- cURL
query_vector = [0.3580376395471989, -0.6023495712049978, 0.18414012509913835, -0.26286205330961354, ..., 0.9029438446296592]
res = client.search(
    db_name="my_database",
    collection_name="prod_collection",
    anns_field="embedding",
    data=[query_vector],
    limit=3,
    output_fields=["product_name"],
    search_params={"metric_type": "COSINE"}
)
curl --request POST \
--url "${SERVING_CLUSTER_ENDPOINT}/v2/vectordb/entities/search" \
--header "Authorization: Bearer ${TOKEN}" \
--header "Content-Type: application/json" \
-d '{
    "dbName": "my_database",
    "collectionName": "prod_collection",
    "data": [
        [
            0.3580376395471989,
            -0.6023495712049978,
            0.18414012509913835,
            -0.26286205330961354,
            0.9029438446296592
        ]
    ],
    "annsField": "embedding",
    "limit": 3,
    "outputFields": [
        "product_name"
    ]
}'