オンデマンド検索のクイックスタート
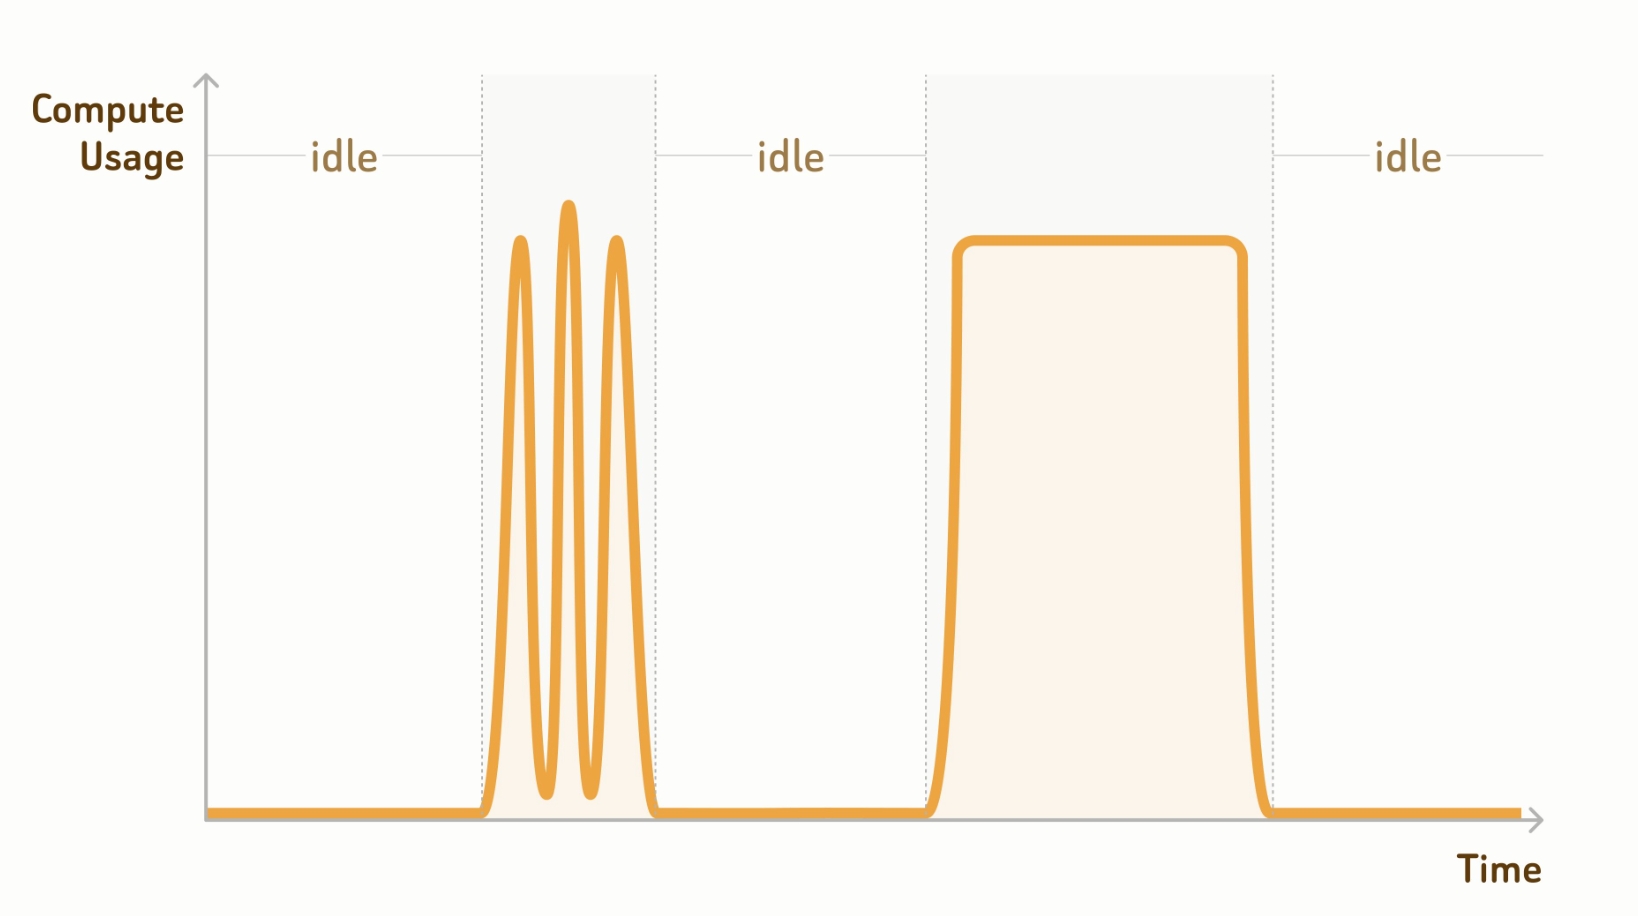
Zilliz Cloud はオンデマンドのコンピューティングリソースを提供し、類似検索やクエリをオンデマンドで実行できます。以下の図に示すように、リクエストが到着しない場合、コンピューティングリソースは自動的に中断され、中断されたコンピューティングリソースには課金されません。
ステップ 1: プロジェクトのエンドポイントに接続する
データベースを操作する前に、プロジェクトのエンドポイントに接続します。プロジェクトのエンドポイントは、Zilliz Cloud コンソールでオンデマンドコンピューティングを有効にした後、クイックスタートページで取得できます。
-
マネージドコレクションの操作には、認証用の API キーが必要です。このフローは
username:password認証をサポートしていません。 -
オンデマンドコンピューティング用データベース内のマネージドコレクションには、ロード操作は必要ありません。
- Python
- Java
- Go
- Rust
- C++
- NodeJS
- cURL
from pymilvus import MilvusClient

# connect to database
client = MilvusClient(
    # a project-specific on-demand compute endpoint
    uri="https://{project-id}.{region}.api.zillizcloud.com",
    token="YOUR_API_KEY"
)
import io.milvus.v2.client.ConnectConfig;
import io.milvus.v2.client.MilvusClientV2;

MilvusClientV2 client = new MilvusClientV2(ConnectConfig.builder()
    .uri("https://{project-id}.{region}.api.zillizcloud.com")
    .token("YOUR_API_KEY")
    .build());
ctx := context.Background()

client, err := milvusclient.New(ctx, &milvusclient.ClientConfig{
    Address: "https://{project-id}.{region}.api.zillizcloud.com",
    APIKey:  "YOUR_API_KEY",
})
if err != nil {
    log.Fatal(err)
}
use milvus::v2::prelude::*;

// connect to database
let config = ConnectConfig::new()
    .uri("https://{project-id}.{region}.api.zillizcloud.com")
    .token("YOUR_API_KEY");
let client = ClientV2::new(&config).await?;
#include "milvus/MilvusClientV2.h"

auto client = milvus::MilvusClientV2::Create();
milvus::ConnectParam connect_param(
    "https://{project-id}.{region}.api.zillizcloud.com",
    "YOUR_API_KEY"
);

auto status = client->Connect(connect_param);
if (!status.IsOk()) {
    std::cout << status.Message() << std::endl;
}
import { MilvusClient } from '@zilliz/milvus2-sdk-node';

const client = new MilvusClient({
  address: 'https://{project-id}.{region}.api.zillizcloud.com',
  token: 'YOUR_API_KEY',
});

await client.connectPromise;
export PROJECT_ENDPOINT="https://{project-id}.{region}.api.zillizcloud.com"
export TOKEN="YOUR_API_KEY"
ステップ 2: (任意)データベースを作成する
Zilliz Cloud にはデフォルトのデータベースが付属しています。これを使用する場合は、このステップをスキップしてください。次のようにデータベースを作成することもできます。
- Python
- Java
- Go
- Rust
- C++
- NodeJS
- cURL
- Zilliz CLI
client.create_database(
    db_name="my_database"
)
import io.milvus.v2.service.database.request.CreateDatabaseReq;

client.createDatabase(CreateDatabaseReq.builder()
    .databaseName("my_database")
    .build());
err = client.CreateDatabase(ctx, milvusclient.NewCreateDatabaseOption("my_database"))
if err != nil {
    log.Fatal(err)
}
client
    .create_database(
        CreateDatabaseRequest::builder()
            .database_name("my_database")
            .build()?,
    )
    .await?;
milvus::CreateDatabaseRequest request;
request.WithDatabaseName("my_database");

auto status = client->CreateDatabase(request);
if (!status.IsOk()) {
    std::cout << status.Message() << std::endl;
}
await client.createDatabase({
  db_name: 'my_database',
});
curl --request POST \
--url "${PROJECT_ENDPOINT}/v2/vectordb/databases/create" \
--header "Authorization: Bearer ${TOKEN}" \
--header "Content-Type: application/json" \
-d '{
    "dbName": "my_database"
}'
zilliz database create --name my_database
ステップ 3: マネージドコレクションを作成する
データベースの準備ができたら、その中にマネージドコレクションを作成できます。コレクションの列を外部データファイルにマッピングする外部コレクションとは異なり、マネージドコレクションでは、大幅なパフォーマンス向上のためにデータをインポートする必要があります。
次の例では、コレクションスキーマを設定してコレクションを作成する方法を示します。
- Python
- Java
- Go
- Rust
- C++
- NodeJS
- cURL
- Zilliz CLI
from pymilvus import MilvusClient, DataType

schema = MilvusClient.create_schema()

schema.add_field(
    field_name="product_id",
    datatype=DataType.INT64,
    is_primary=True
)

schema.add_field(
    field_name="product_name",
    datatype=DataType.VARCHAR,
    max_length=512
)

schema.add_field(
    field_name="embedding",
    datatype=DataType.FLOAT_VECTOR,
    dim=768
)
import io.milvus.v2.common.DataType;
import io.milvus.v2.service.collection.request.AddFieldReq;
import io.milvus.v2.service.collection.request.CreateCollectionReq;

CreateCollectionReq.CollectionSchema schema = client.createSchema();

schema.addField(AddFieldReq.builder()
    .fieldName("product_id")
    .dataType(DataType.Int64)
    .isPrimaryKey(true)
    .build());

schema.addField(AddFieldReq.builder()
    .fieldName("product_name")
    .dataType(DataType.VarChar)
    .maxLength(512)
    .build());

schema.addField(AddFieldReq.builder()
    .fieldName("embedding")
    .dataType(DataType.FloatVector)
    .dimension(768)
    .build());
import "github.com/milvus-io/milvus/client/v3/entity"

schema := entity.NewSchema().
    WithField(entity.NewField().
        WithName("product_id").
        WithDataType(entity.FieldTypeInt64).
        WithIsPrimaryKey(true)).
    WithField(entity.NewField().
        WithName("product_name").
        WithDataType(entity.FieldTypeVarChar).
        WithMaxLength(512)).
    WithField(entity.NewField().
        WithName("embedding").
        WithDataType(entity.FieldTypeFloatVector).
        WithDim(768))
let schema = CollectionSchema::new()
    .add_field(
        FieldSchema::new()
            .name("product_id")
            .data_type(DataType::Int64)
            .primary_key(true),
    )
    .add_field(
        FieldSchema::new()
            .name("product_name")
            .data_type(DataType::VarChar)
            .max_length(512),
    )
    .add_field(
        FieldSchema::new()
            .name("embedding")
            .data_type(DataType::FloatVector)
            .dimension(768),
    );
auto schema = std::make_shared<milvus::CollectionSchema>();

schema->AddField(milvus::FieldSchema("product_id", milvus::DataType::INT64)
    .WithPrimaryKey(true));
schema->AddField(milvus::FieldSchema("product_name", milvus::DataType::VARCHAR)
    .WithMaxLength(512));
schema->AddField(milvus::FieldSchema("embedding", milvus::DataType::FLOAT_VECTOR)
    .WithDimension(768));
import { DataType } from '@zilliz/milvus2-sdk-node';

const schema = [
  {
    name: 'product_id',
    data_type: DataType.Int64,
    is_primary_key: true,
  },
  {
    name: 'product_name',
    data_type: DataType.VarChar,
    max_length: 512,
  },
  {
    name: 'embedding',
    data_type: DataType.FloatVector,
    dim: 768,
  },
];
export schema='{
    "fields": [
        {
            "fieldName": "product_id",
            "dataType": "Int64",
            "isPrimary": true
        },
        {
            "fieldName": "embedding",
            "dataType": "FloatVector",
            "elementTypeParams": {
                "dim": "768"
            }
        },
        {
            "fieldName": "product_name",
            "dataType": "VarChar",
            "elementTypeParams": {
                "max_length": 512
            }
        }
    ]
}'
cat > schema.json <<'JSON'
{
  "fields": [
    {
      "fieldName": "product_id",
      "dataType": "Int64",
      "isPrimary": true
    },
    {
      "fieldName": "product_name",
      "dataType": "VarChar",
      "elementTypeParams": {
        "max_length": 512
      }
    },
    {
      "fieldName": "embedding",
      "dataType": "FloatVector",
      "elementTypeParams": {
        "dim": "768"
      }
    }
  ]
}
JSON
その後、上記のスキーマでコレクションを作成できます。デフォルトのデータベースを使用する場合は、db_name パラメーターを省略しても問題ありません。
- Python
- Java
- Go
- Rust
- C++
- NodeJS
- cURL
- Zilliz CLI
client.use_database(
    db_name="my_database"
)

# create the collection
client.create_collection(
    collection_name="prod_collection",
    schema=schema
)
client.useDatabase("my_database");

client.createCollection(CreateCollectionReq.builder()
    .collectionName("prod_collection")
    .collectionSchema(schema)
    .build());
err = client.UseDatabase(ctx, milvusclient.NewUseDatabaseOption("my_database"))
if err != nil {
    log.Fatal(err)
}

err = client.CreateCollection(ctx,
    milvusclient.NewCreateCollectionOption("prod_collection", schema))
if err != nil {
    log.Fatal(err)
}
client
    .use_database("my_database")
    .await?;

client
    .create_collection(
        CreateCollectionRequest::builder()
            .collection_name("prod_collection")
            .schema(schema)
            .build()?,
    )
    .await?;
auto status = client->UseDatabase("my_database");
if (!status.IsOk()) {
    std::cout << status.Message() << std::endl;
}

milvus::CreateCollectionRequest request;
request.WithCollectionName("prod_collection")
       .WithCollectionSchema(schema);

status = client->CreateCollection(request);
if (!status.IsOk()) {
    std::cout << status.Message() << std::endl;
}
await client.useDatabase({
  db_name: 'my_database',
});

await client.createCollection({
  collection_name: 'prod_collection',
  fields: schema,
});
curl --request POST \
--url "${PROJECT_ENDPOINT}/v2/vectordb/collections/create" \
--header "Authorization: Bearer ${TOKEN}" \
--header "Content-Type: application/json" \
-d "{
    \"dbName\": \"my_database\",
    \"collectionName\": \"prod_collection\",
    \"schema\": $schema
}"
zilliz collection create \
  --database my_database \
  --name prod_collection \
  --body file://schema.json
ステップ 4: インデックスを作成する
すべてのベクトルフィールドにインデックスを作成する必要があります。また、必要に応じて、選択したスカラーフィールドにもインデックスを作成します。
- Python
- Java
- Go
- Rust
- C++
- NodeJS
- cURL
- Zilliz CLI
index_params = client.prepare_index_params()

# Add indexes
index_params.add_index(
    field_name="embedding",
    index_type="AUTOINDEX",
    metric_type="COSINE"
)

index_params.add_index(
    field_name="product_name",
    index_type="AUTOINDEX"
)

client.create_index(
    db_name="my_database",
    collection_name="prod_collection",
    index_params=index_params
)
import io.milvus.v2.common.IndexParam;
import io.milvus.v2.service.index.request.CreateIndexReq;

import java.util.Arrays;
import java.util.List;

List<IndexParam> indexParams = Arrays.asList(
    IndexParam.builder()
        .fieldName("embedding")
        .indexName("embedding")
        .indexType(IndexParam.IndexType.AUTOINDEX)
        .metricType(IndexParam.MetricType.COSINE)
        .build(),
    IndexParam.builder()
        .fieldName("product_name")
        .indexName("product_name")
        .indexType(IndexParam.IndexType.AUTOINDEX)
        .build()
);

client.createIndex(CreateIndexReq.builder()
    .databaseName("my_database")
    .collectionName("prod_collection")
    .indexParams(indexParams)
    .build());
import (
    "github.com/milvus-io/milvus/client/v3/entity"
    "github.com/milvus-io/milvus/client/v3/index"
)

vectorIndex := index.NewAutoIndex(entity.COSINE)
vectorIndexTask, err := client.CreateIndex(ctx,
    milvusclient.NewCreateIndexOption("prod_collection", "embedding", vectorIndex).
        WithIndexName("embedding"))
if err != nil {
    log.Fatal(err)
}
if err := vectorIndexTask.Await(ctx); err != nil {
    log.Fatal(err)
}

scalarIndexTask, err := client.CreateIndex(ctx,
    milvusclient.NewCreateIndexOption("prod_collection", "product_name", index.NewInvertedIndex()).
        WithIndexName("product_name"))
if err != nil {
    log.Fatal(err)
}
if err := scalarIndexTask.Await(ctx); err != nil {
    log.Fatal(err)
}
client
    .create_index(
        CreateIndexRequest::builder()
            .collection_name("prod_collection")
            .index_params(vec![
                IndexParam::new()
                    .field_name("embedding")
                    .index_type(IndexType::AutoIndex)
                    .metric_type(MetricType::Cosine),
                IndexParam::new()
                    .field_name("product_name")
                    .index_type(IndexType::AutoIndex),
            ])
            .build()?,
    )
    .await?;
milvus::CreateIndexRequest request;
request.WithDatabaseName("my_database")
       .WithCollectionName("prod_collection")
       .AddIndex(milvus::IndexDesc(
           "embedding",
           "embedding",
           milvus::IndexType::AUTOINDEX,
           milvus::MetricType::COSINE))
       .AddIndex(milvus::IndexDesc(
           "product_name",
           "product_name",
           milvus::IndexType::AUTOINDEX));

auto status = client->CreateIndex(request);
await client.createIndex([
  {
    collection_name: 'prod_collection',
    field_name: 'embedding',
    index_name: 'embedding',
    index_type: 'AUTOINDEX',
    metric_type: 'COSINE',
  },
  {
    collection_name: 'prod_collection',
    field_name: 'product_name',
    index_name: 'product_name',
    index_type: 'AUTOINDEX',
  },
]);
export indexParams='[
    {
        "fieldName": "embedding",
        "metricType": "COSINE",
        "indexName": "embedding",
        "indexType": "AUTOINDEX"
    },
    {
        "fieldName": "product_name",
        "indexName": "product_name",
        "indexType": "AUTOINDEX"
    }
]'

curl --request POST \
--url "${PROJECT_ENDPOINT}/v2/vectordb/indexes/create" \
--header "Authorization: Bearer ${TOKEN}" \
--header "Content-Type: application/json" \
-d "{
    \"dbName\": \"my_database\",
    \"collectionName\": \"prod_collection\",
    \"indexParams\": $indexParams
}"
zilliz index create \
  --database my_database \
  --collection prod_collection \
  --body '{"indexParams":[{"fieldName":"embedding","metricType":"COSINE","indexName":"embedding","indexType":"AUTOINDEX"},{"fieldName":"product_name","indexName":"product_name","indexType":"AUTOINDEX"}]}'
ステップ 5: データをインポートする
すべての設定が完了したら、処理済みのデータをインポートできます。次の例では、処理済みのデータを外部ストレージバケットに保存していることを前提としています。
バケットまたはストレージ統合におけるデータ形式については、Format Options を参照してください。
- Python
- Java
- Go
- Rust
- C++
- NodeJS
- cURL
- Zilliz CLI
from pymilvus.bulk_writer import bulk_import

# The path should be relative to the root
# of a zilliz cloud volume or an external storage
OBJECT_URLS = [[
    "https://s3.us-west-2.amazonaws.com/your-bucket/path/in/external/storage.json"
]]
ACCESS_KEY = "YOUR_STORAGE_ACCESS_KEY"
SECRET_KEY = "YOUR_STORAGE_SECRET_KEY"

res = bulk_import(
    api_key="YOUR_ZILLIZ_API_KEY",
    url="https://api.cloud.zilliz.com",
    project_id="proj-xxxxxxxxxxxxxxxxxxx",
    region_id="aws-us-west-2",
    db_name="my_database",
    collection_name="prod_collection",
    object_urls=OBJECT_URLS,
    access_key=ACCESS_KEY,
    secret_key=SECRET_KEY
)

# job-xxxxxxxxxxxxxxxxxxxxx
import io.milvus.bulkwriter.request.import_.CloudImportRequest;
import io.milvus.bulkwriter.restful.BulkImportUtils;

import java.util.Collections;
import java.util.List;

String cloudEndpoint = "https://api.cloud.zilliz.com";

List<List<String>> objectUrls = Collections.singletonList(
    Collections.singletonList("https://s3.us-west-2.amazonaws.com/your-bucket/path/in/external/storage.json")
);

CloudImportRequest request = CloudImportRequest.builder()
    .apiKey("YOUR_ZILLIZ_API_KEY")
    .projectId("proj-xxxxxxxxxxxxxxxxxxx")
    .regionId("aws-us-west-2")
    .dbName("my_database")
    .collectionName("prod_collection")
    .objectUrls(objectUrls)
    .accessKey("YOUR_STORAGE_ACCESS_KEY")
    .secretKey("YOUR_STORAGE_SECRET_KEY")
    .build();

String res = BulkImportUtils.bulkImport(cloudEndpoint, request);
System.out.println(res);

// job-xxxxxxxxxxxxxxxxxxxxx
// Note: milvus-sdk-go (client/v3) exposes cloud bulk import via
// "github.com/milvus-io/milvus/client/v3/bulkwriter" for cluster-based
// (clusterId) imports as of v3.0.0, but project-database (on-demand) imports
// with projectId/regionId are not supported. Use the REST API (bash) instead.
use milvus::v2::bulk_import::{BulkImport, BulkImportConfig, BulkImportRequest};

let import_client = BulkImport::new(
    &BulkImportConfig::new()
        .url("https://api.cloud.zilliz.com")
        .api_key("YOUR_ZILLIZ_API_KEY"),
)?;

let request = BulkImportRequest::builder()
    .database_name("my_database")
    .collection_name("prod_collection")
    .project_id("proj-xxxxxxxxxxxxxxxxxxx")
    .region_id("aws-us-west-2")
    .object_url("https://s3.us-west-2.amazonaws.com/your-bucket/path/in/external/storage.json")
    .access_key("YOUR_STORAGE_ACCESS_KEY")
    .secret_key("YOUR_STORAGE_SECRET_KEY")
    .build()?;

let resp = import_client.bulk_import(request).await?;
// job-xxxxxxxxxxxxxxxxxxxxx
#include "milvus/BulkImport.h"

nlohmann::json res = milvus::BulkImport::CreateImportJobs(
    "https://api.cloud.zilliz.com",             // url
    "prod_collection",                          // collection_name
    {"https://s3.us-west-2.amazonaws.com/your-bucket/path/in/external/storage.json"},  // files
    "my_database",                              // db_name
    "YOUR_ZILLIZ_API_KEY",                      // api_key
    "",                                         // partition_name
    {{"projectId", "proj-xxxxxxxxxxxxxxxxxxx"},
     {"regionId", "aws-us-west-2"},
     {"accessKey", "YOUR_STORAGE_ACCESS_KEY"},
     {"secretKey", "YOUR_STORAGE_SECRET_KEY"}});

// job-xxxxxxxxxxxxxxxxxxxxx
import { HttpClient } from '@zilliz/milvus2-sdk-node';

const client = new HttpClient({
  endpoint: 'https://api.cloud.zilliz.com',
  token: 'YOUR_ZILLIZ_API_KEY',
});

const res = await client.createImportJobs({
  projectId: 'proj-xxxxxxxxxxxxxxxxxxx',
  regionId: 'aws-us-west-2',
  dbName: 'my_database',
  collectionName: 'prod_collection',
  // The node SDK exposes object URLs via `files` (accessKey/secretKey are not
  // part of HttpImportCreateReq as of v3.0.6).
  files: [[
    'https://s3.us-west-2.amazonaws.com/your-bucket/path/in/external/storage.json',
  ]],
});

// job-xxxxxxxxxxxxxxxxxxxxx
export CLOUD_PLATFORM_ENDPOINT="https://api.cloud.zilliz.com"

curl --request POST \
  --url "${CLOUD_PLATFORM_ENDPOINT}/v2/vectordb/jobs/import/create" \
  --header "Authorization: Bearer ${TOKEN}" \
  --header "Accept: application/json" \
  --header "Content-Type: application/json" \
  -d '{
    "projectId": "proj-xxxxxxxxxxxxxxxxxx",
    "regionId": "aws-us-west-2",
    "dbName": "my_database",
    "collectionName": "prod_collection",
    "objectUrls": [["https://s3.us-west-2.amazonaws.com/your-bucket/path/in/external/storage.json"]],
    "accessKey": "YOUR_STORAGE_ACCESS_KEY",
    "secretKey": "YOUR_STORAGE_SECRET_KEY"
  }'

# job-xxxxxxxxxxxxxxxxxxxxx
zilliz import start \
  --cluster-id inxx-xxxxxxxxxxxxxxxxxxx \
  --collection prod_collection \
  --body '{"projectId":"proj-xxxxxxxxxxxxxxxxxxx","regionId":"aws-us-west-2","dbName":"my_database","objectUrls":[["https://s3.us-west-2.amazonaws.com/your-bucket/path/in/external/storage.json"]],"accessKey":"YOUR_STORAGE_ACCESS_KEY","secretKey":"YOUR_STORAGE_SECRET_KEY"}'

# job-xxxxxxxxxxxxxxxxxxxxx
返されたジョブ ID を使用して、その進行状況を監視できます。
- Python
- Java
- Go
- Rust
- C++
- NodeJS
- cURL
- Zilliz CLI
import json
from pymilvus.bulk_writer import get_import_progress

# Get bulk-insert job progress
resp = get_import_progress(
    api_key="YOUR_ZILLIZ_API_KEY",
    url="https://api.cloud.zilliz.com",
    project_id="proj-xxxxxxxxxxxxxxxxxxx",
    region_id="aws-us-west-2",
    job_id="job-xxxxxxxxxxxxxxxxxxxxx",
)

print(json.dumps(resp.json(), indent=4))
import io.milvus.bulkwriter.request.describe.CloudDescribeImportRequest;
import io.milvus.bulkwriter.restful.BulkImportUtils;

String cloudEndpoint = "https://api.cloud.zilliz.com";

CloudDescribeImportRequest request = CloudDescribeImportRequest.builder()
    .apiKey("YOUR_ZILLIZ_API_KEY")
    .projectId("proj-xxxxxxxxxxxxxxxxxxx")
    .regionId("aws-us-west-2")
    .jobId("job-xxxxxxxxxxxxxxxxxxxxx")
    .build();

String resp = BulkImportUtils.getImportProgress(cloudEndpoint, request);
System.out.println(resp);
// Note: bulk-import progress (get_import_progress) for project databases is
// not supported in milvus-sdk-go as of client/v3.0.0. Use the REST API (bash) instead.
use milvus::v2::bulk_import::GetImportProgressRequest;

let request = GetImportProgressRequest::builder()
    .database_name("my_database")
    .project_id("proj-xxxxxxxxxxxxxxxxxxx")
    .region_id("aws-us-west-2")
    .job_id("job-xxxxxxxxxxxxxxxxxxxxx")
    .build()?;

let progress = import_client.get_import_progress(request).await?;
nlohmann::json progress = milvus::BulkImport::GetImportJobProgress(
    "https://api.cloud.zilliz.com",             // url
    "job-xxxxxxxxxxxxxxxxxxxxx",                // job_id
    "my_database",                              // db_name
    "YOUR_ZILLIZ_API_KEY");                     // api_key
import { HttpClient } from '@zilliz/milvus2-sdk-node';

const client = new HttpClient({
  endpoint: 'https://api.cloud.zilliz.com',
  token: 'YOUR_ZILLIZ_API_KEY',
});

const resp = await client.getImportJobProgress({
  projectId: 'proj-xxxxxxxxxxxxxxxxxxx',
  regionId: 'aws-us-west-2',
  jobId: 'job-xxxxxxxxxxxxxxxxxxxxx',
});

console.log(JSON.stringify(resp, null, 2));
  # Use jobId returned from create API
  curl --request POST \
    --url "${CLOUD_PLATFORM_ENDPOINT}/v2/vectordb/jobs/import/get_progress" \
    --header "Authorization: Bearer ${TOKEN}" \
    --header "Accept: application/json" \
    --header "Content-Type: application/json" \
    -d '{
      "projectId": "proj-xxxxxxxxxxxxxxxxxxx",
      "regionId": "aws-us-west-2",
      "jobId": "job-xxxxxxxxxxxxxxxxxxxxx"
    }'
zilliz import status \
  --cluster-id inxx-xxxxxxxxxxxxxxxxxxx \
  --job-id job-xxxxxxxxxxxxxxxxxxxxx
ステップ 6: オンデマンドクラスターを作成する
コレクションの準備ができたら、オンデマンド検索のためにコレクションをオンデマンドクラスターにアタッチする必要があります。次のコマンドはクラスターを作成し、その ID を返します。
export CONTROL_PLANE_ENDPOINT="https://api.cloud.zilliz.com"

curl --request POST \
--url "${CONTROL_PLANE_ENDPOINT}/v2/clusters/createOnDemandCluster" \
--header "Authorization: Bearer ${TOKEN}" \
--header "Content-Type: application/json" \
-d '{
    "projectId": "proj-xxxxxxxxxxxxxxxxxxx",
    "regionId": "aws-us-west-2",
    "clusterName": "my-on-demand",
    "cuSize": 8,
    "autoSuspend": 60
}'

# inxx-xxxxxxxxxxxxx
デフォルトでは、クラスターは最後のリクエストから 60 秒後に自動的に中断されます。ユースケースに適した値に設定できます。
ステップ 7: 検索を実行する
検索、クエリ、またはハイブリッド検索を実行する必要がある場合は、セッションを通じて前のステップで作成したオンデマンドクラスターにアタッチできます。
- Python
- Java
- Go
- Rust
- C++
- NodeJS
- cURL
- Zilliz CLI
from pymilvus import MilvusClient

client = MilvusClient(
    uri="https://{project-id}.{region}.api.zillizcloud.com",
    token="YOUR_API_KEY"
)

session = client.session(cluster_id="inxx-xxxxxxxxxxxxxxx")

# Must match collection vector dimension (example: 768)
query_vector = [0.3580376395471989, -0.6023495712049978, 0.18414012509913835, -0.26286205330961354, ..., 0.9029438446296592]

res = session.search(
    db_name="my_database",
    collection_name="prod_collection",
    anns_field="embedding",
    data=[query_vector],
    limit=3,
    output_fields=["product_id", "product_name"]
)
import io.milvus.v2.client.MilvusClientV2Session;
import io.milvus.v2.service.vector.request.SearchReq;
import io.milvus.v2.service.vector.request.data.FloatVec;
import io.milvus.v2.service.vector.response.SearchResp;

import java.util.Arrays;
import java.util.Collections;

MilvusClientV2Session session = client.session("inxx-xxxxxxxxxxxxxxx");

// Must match collection vector dimension (example: 768)
float[] queryVector = new float[] {
    0.35803764f, -0.6023496f, 0.18414013f, -0.26286206f, /* ... */ 0.90294385f
};

SearchResp res = session.search(SearchReq.builder()
    .databaseName("my_database")
    .collectionName("prod_collection")
    .annsField("embedding")
    .data(Collections.singletonList(new FloatVec(queryVector)))
    .limit(3)
    .outputFields(Arrays.asList("product_id", "product_name"))
    .build());
// Note: on-demand sessions (client.session) are not supported in
// milvus-sdk-go as of client/v3.0.0; the search below runs on the
// default connection of the client.
queryVector := []float32{0.35803764, -0.6023496, 0.18414013, -0.26286206, 0.90294385 /* ...remaining dims */}

resultSets, err := client.Search(ctx, milvusclient.NewSearchOption(
    "prod_collection",
    3,
    []entity.Vector{entity.FloatVector(queryVector)},
).WithANNSField("embedding").WithOutputFields("product_id", "product_name"))
if err != nil {
    log.Fatal(err)
}
_ = resultSets
let session = client.session("inxx-xxxxxxxxxxxxxxx")?;

let query_vector = vec![0.3580376395471989f32, -0.6023495712049978, 0.18414012509913835, -0.26286205330961354, 0.9029438446296592 /* ...remaining dims */];

let search = session
    .search(
        SearchRequest::builder()
            .collection_name("prod_collection")
            .vector_field("embedding")
            .vectors(SearchVectors::Float(vec![query_vector]))
            .output_fields(["product_id", "product_name"])
            .limit(3)
            .build()?,
    )
    .await?;
milvus::MilvusClientV2SessionPtr session;
auto status = client->Session("inxx-xxxxxxxxxxxxxxx", session);
if (!status.IsOk()) {
    std::cout << status.Message() << std::endl;
}

std::vector<std::vector<float>> query_vectors = {
    {0.3580376395471989f, -0.6023495712049978f, 0.18414012509913835f, -0.26286205330961354f, 0.9029438446296592f /* ...remaining dims */}};

milvus::SearchResponse response;
status = session->Search(
    milvus::SearchRequest()
        .WithDatabaseName("my_database")
        .WithCollectionName("prod_collection")
        .WithAnnsField("embedding")
        .WithLimit(3)
        .WithFloatVectors(std::move(query_vectors))
        .AddOutputField("product_id")
        .AddOutputField("product_name"),
    response);
if (!status.IsOk()) {
    std::cout << status.Message() << std::endl;
}
import { MilvusClient } from '@zilliz/milvus2-sdk-node';

const session = client.session('inxx-xxxxxxxxxxxxxxx');

// Must match collection vector dimension (example: 768)
const queryVector = [
  0.3580376395471989,
  -0.6023495712049978,
  0.18414012509913835,
  -0.26286205330961354,
  // ...
  0.9029438446296592,
];

const res = await session.search({
  db_name: 'my_database',
  collection_name: 'prod_collection',
  anns_field: 'embedding',
  data: [queryVector],
  limit: 3,
  output_fields: ['product_id', 'product_name'],
});
curl --request POST \
  --url "${PROJECT_ENDPOINT}/v2/vectordb/entities/search?cluster_id=inxx-xxxxxxxxxxxxxxx" \
  --header "Authorization: Bearer ${TOKEN}" \
  --header "Content-Type: application/json" \
  -d '{
    "dbName": "my_database",
    "collectionName": "prod_collection",
    "data": [
        [
            0.3580376395471989,
            -0.6023495712049978,
            0.18414012509913835,
            -0.26286205330961354,
            ...,
            0.9029438446296592
        ]
    ],
    "annsField": "embedding",
    "limit": 3,
    "outputFields": ["product_id", "product_name"]
  }'
zilliz context set --cluster-id inxx-xxxxxxxxxxxxxxx

QUERY_VECTOR=$(python3 - <<'PY'
import json

query_vector = [
    0.3580376395471989,
    -0.6023495712049978,
    0.18414012509913835,
    -0.26286205330961354,
] + [0.0] * 763 + [0.9029438446296592]

print(json.dumps([query_vector]))
PY
)

zilliz vector search \
  --database my_database \
  --collection prod_collection \
  --anns-field embedding \
  --data "$QUERY_VECTOR" \
  --limit 3 \
  --output-fields '["product_id","product_name"]'
その後、データを探索して最も価値のあるサブセットを見つけることができます。さらに、サービングクラスターに接続し、データをインポートして、本番環境で提供できます。