Azure Blob Storage と統合する
Zilliz Cloud では、Azure Blob Storage と統合して、バックアップファイルや監査ログを指定したコンテナにエクスポートできます。
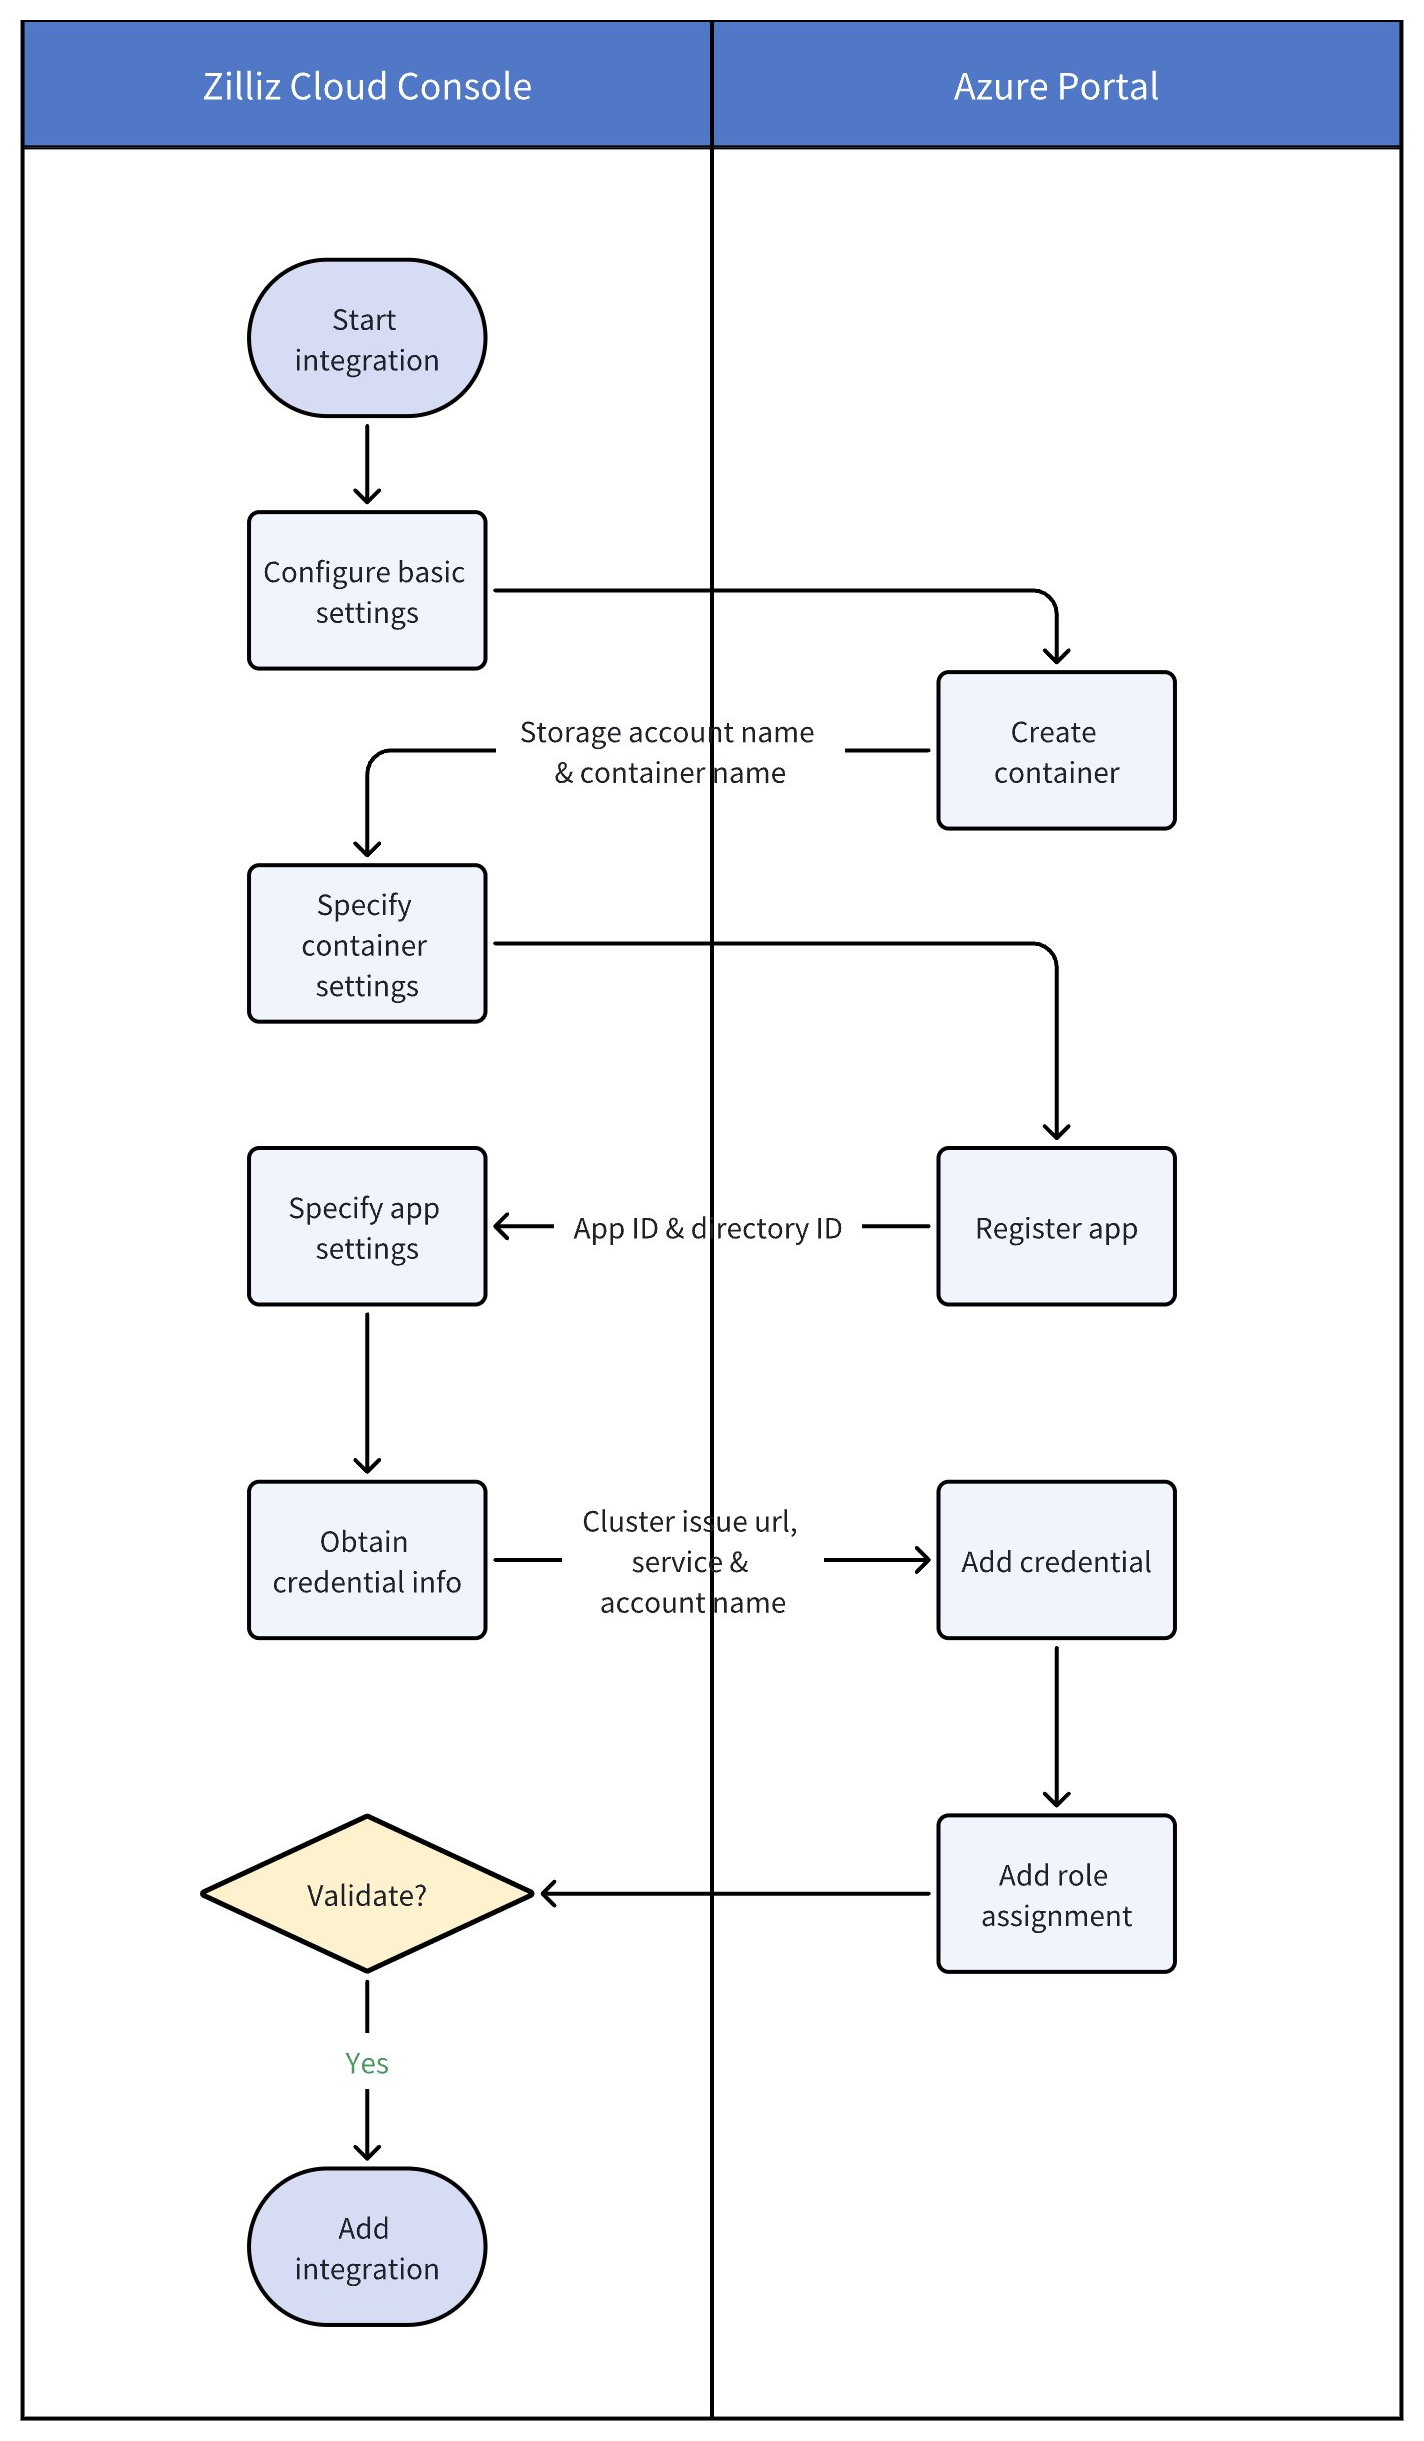
次の図は、Zilliz Cloud と Azure Portal で必要な手順を示しています。
事前準備
-
Zilliz Cloud を Azure Blob と統合するには、プロジェクトに対する Organization Owner または Project Admin のアクセス権が必要です。必要な権限がない場合は、Zilliz Cloud の管理者にお問い合わせください。
-
Azure Portal への管理者アクセス権を持っていること。
ステップ 1: Zilliz Cloud で統合を開始する
Zilliz Cloud コンソール にログインします。
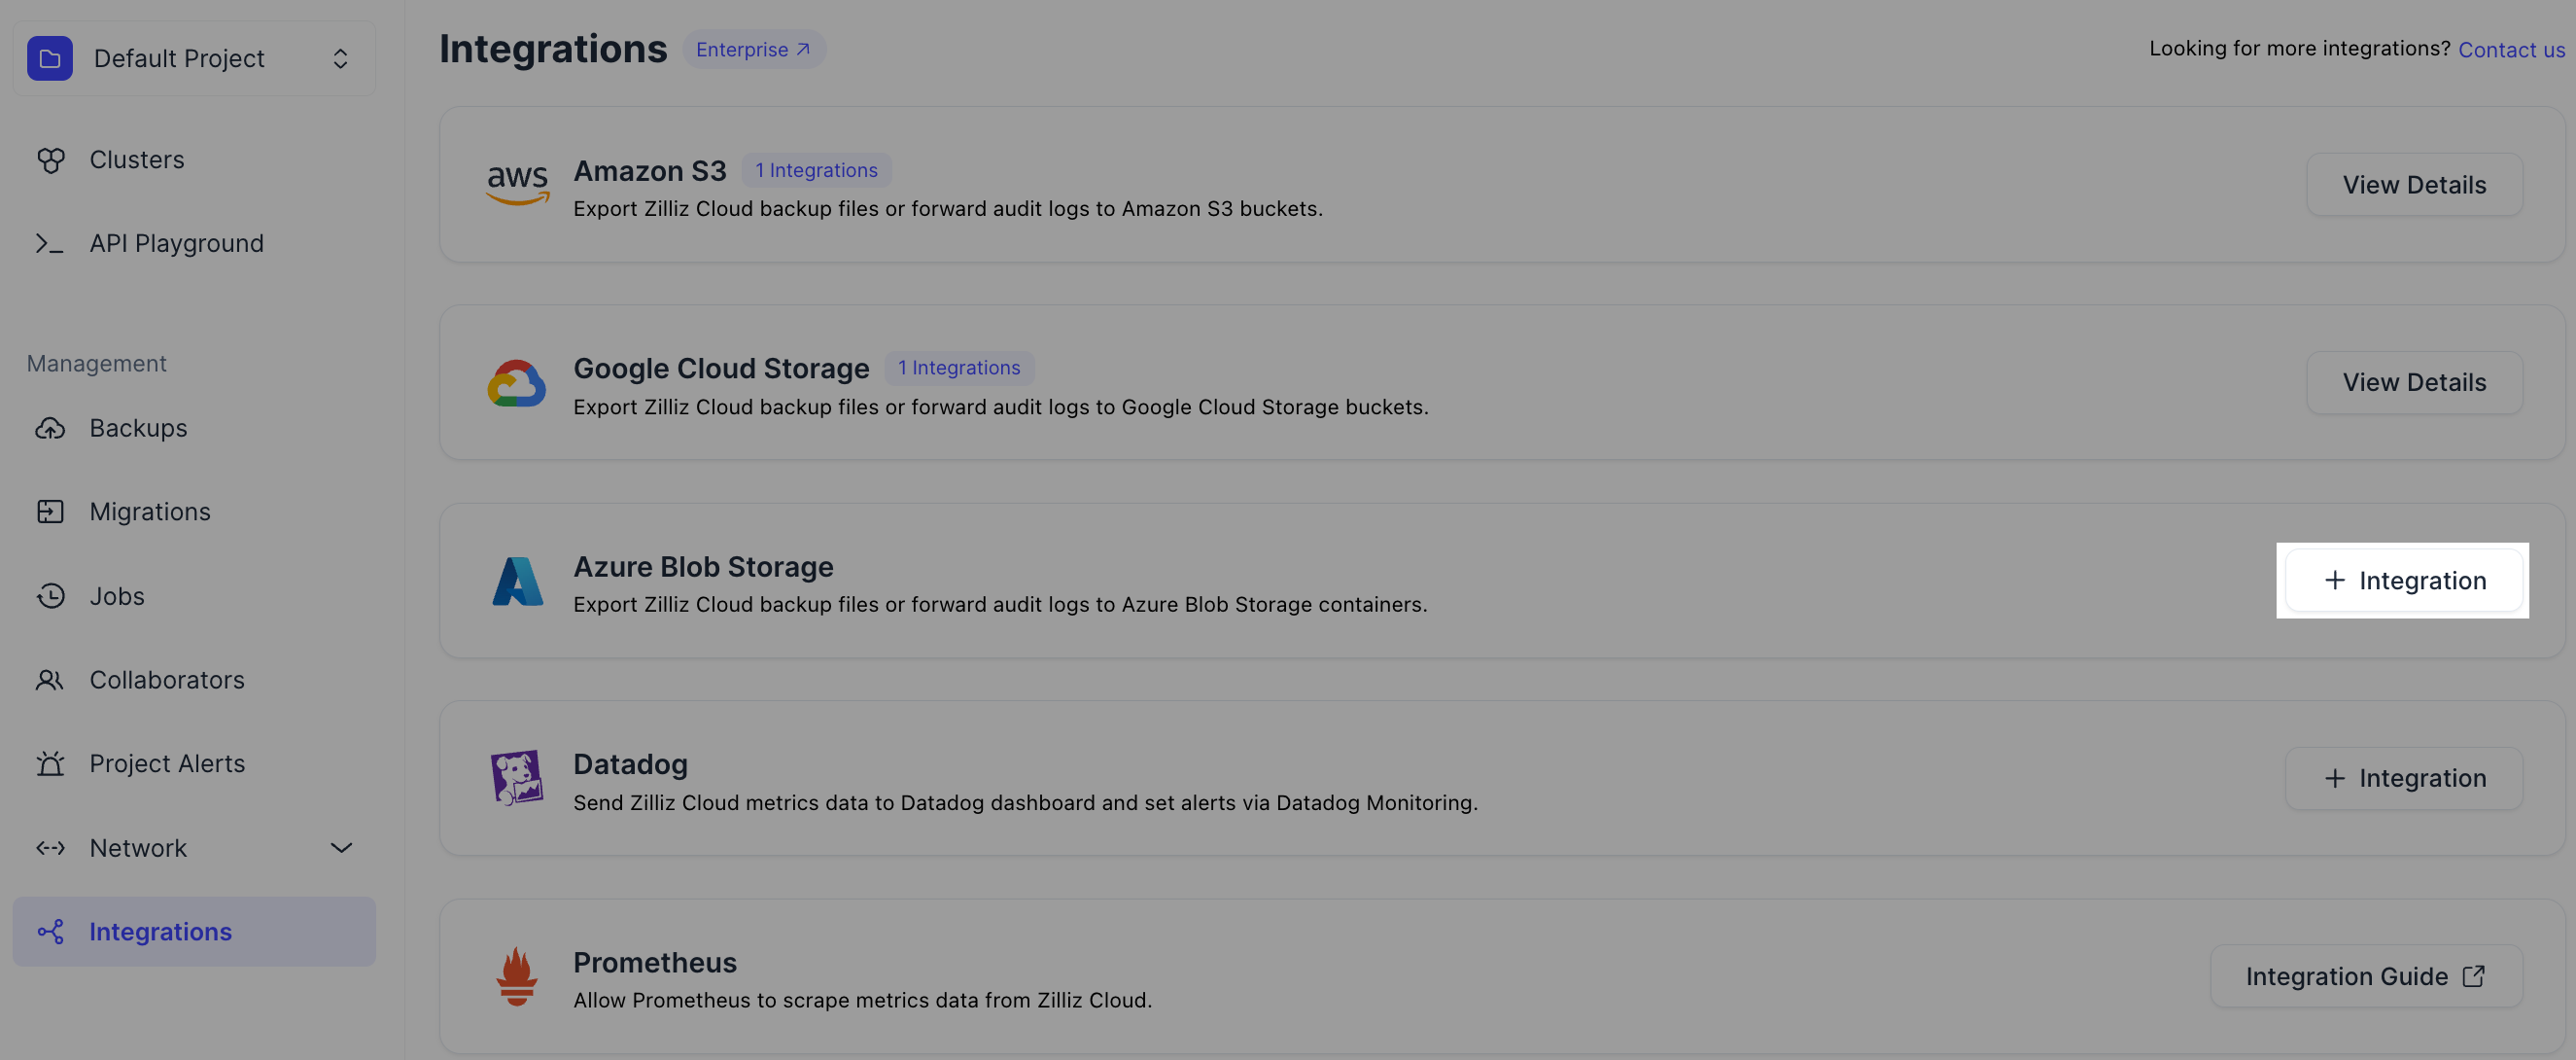
プロジェクトページで、左側のナビゲーションペインから Integrations に移動します。
Azure Blob Storage セクションで、+ Integration をクリックします。
表示されるダイアログボックスで、Basic Settings を入力します。
-
Integration Name: この統合の一意の名前(例:
container_for_backup)。 -
Integration Description (任意): この統合の説明(例:
for backupfile export)。 -
Bucket Permission: この統合に必要なアクセスモードを選択します。
-
Read only: Zilliz Cloud がコンテナからデータを読み取ることのみを許可します。統合を外部テーブルやその他の読み取り専用のシナリオで使用する場合は、このモードを選択します。
-
Read write: Zilliz Cloud がコンテナの読み取りと書き込みを行うことを許可します。バックアップをエクスポートしたり、監査ログをコンテナに書き込んだりする場合は、このモードを選択します。
-
次に、Next をクリックして続行します。
ステップ 2: Azure Portal でコンテナを作成する
Azure Portal にログインします。
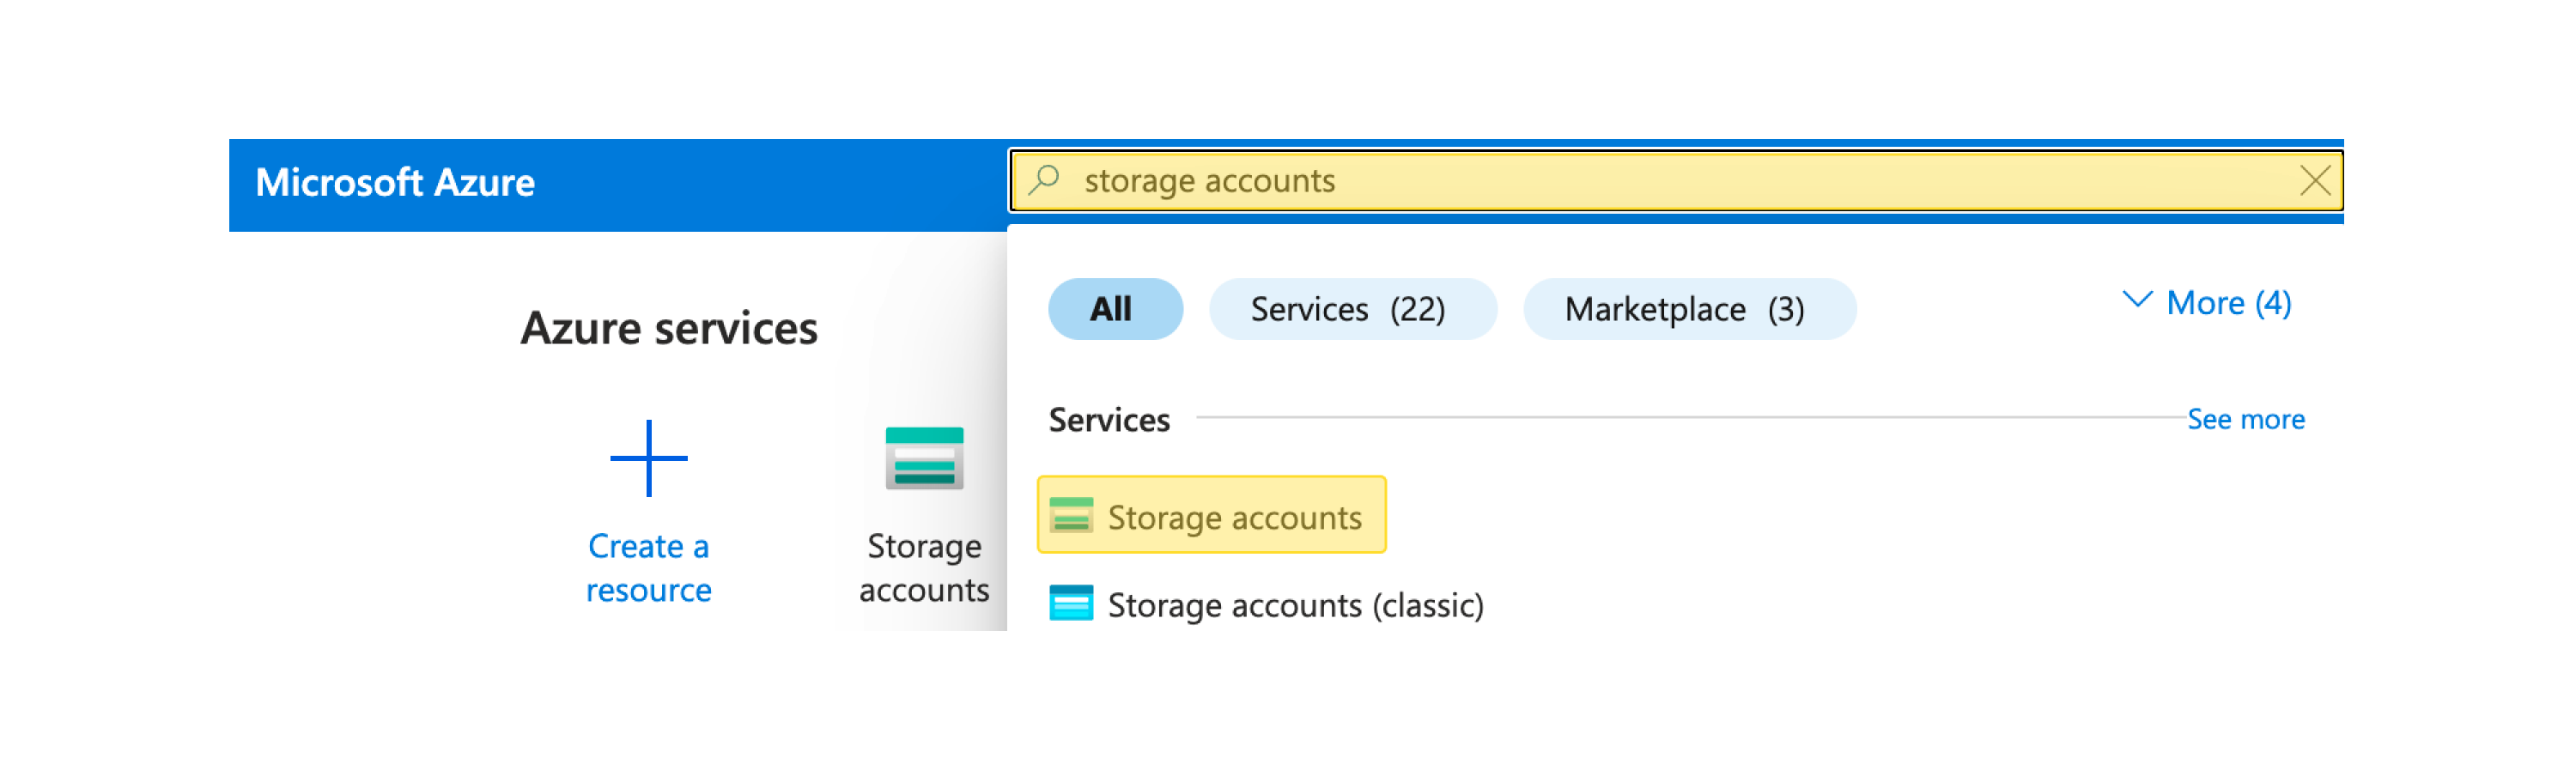
検索バーに Storage accounts と入力し、そのオプションを選択します。
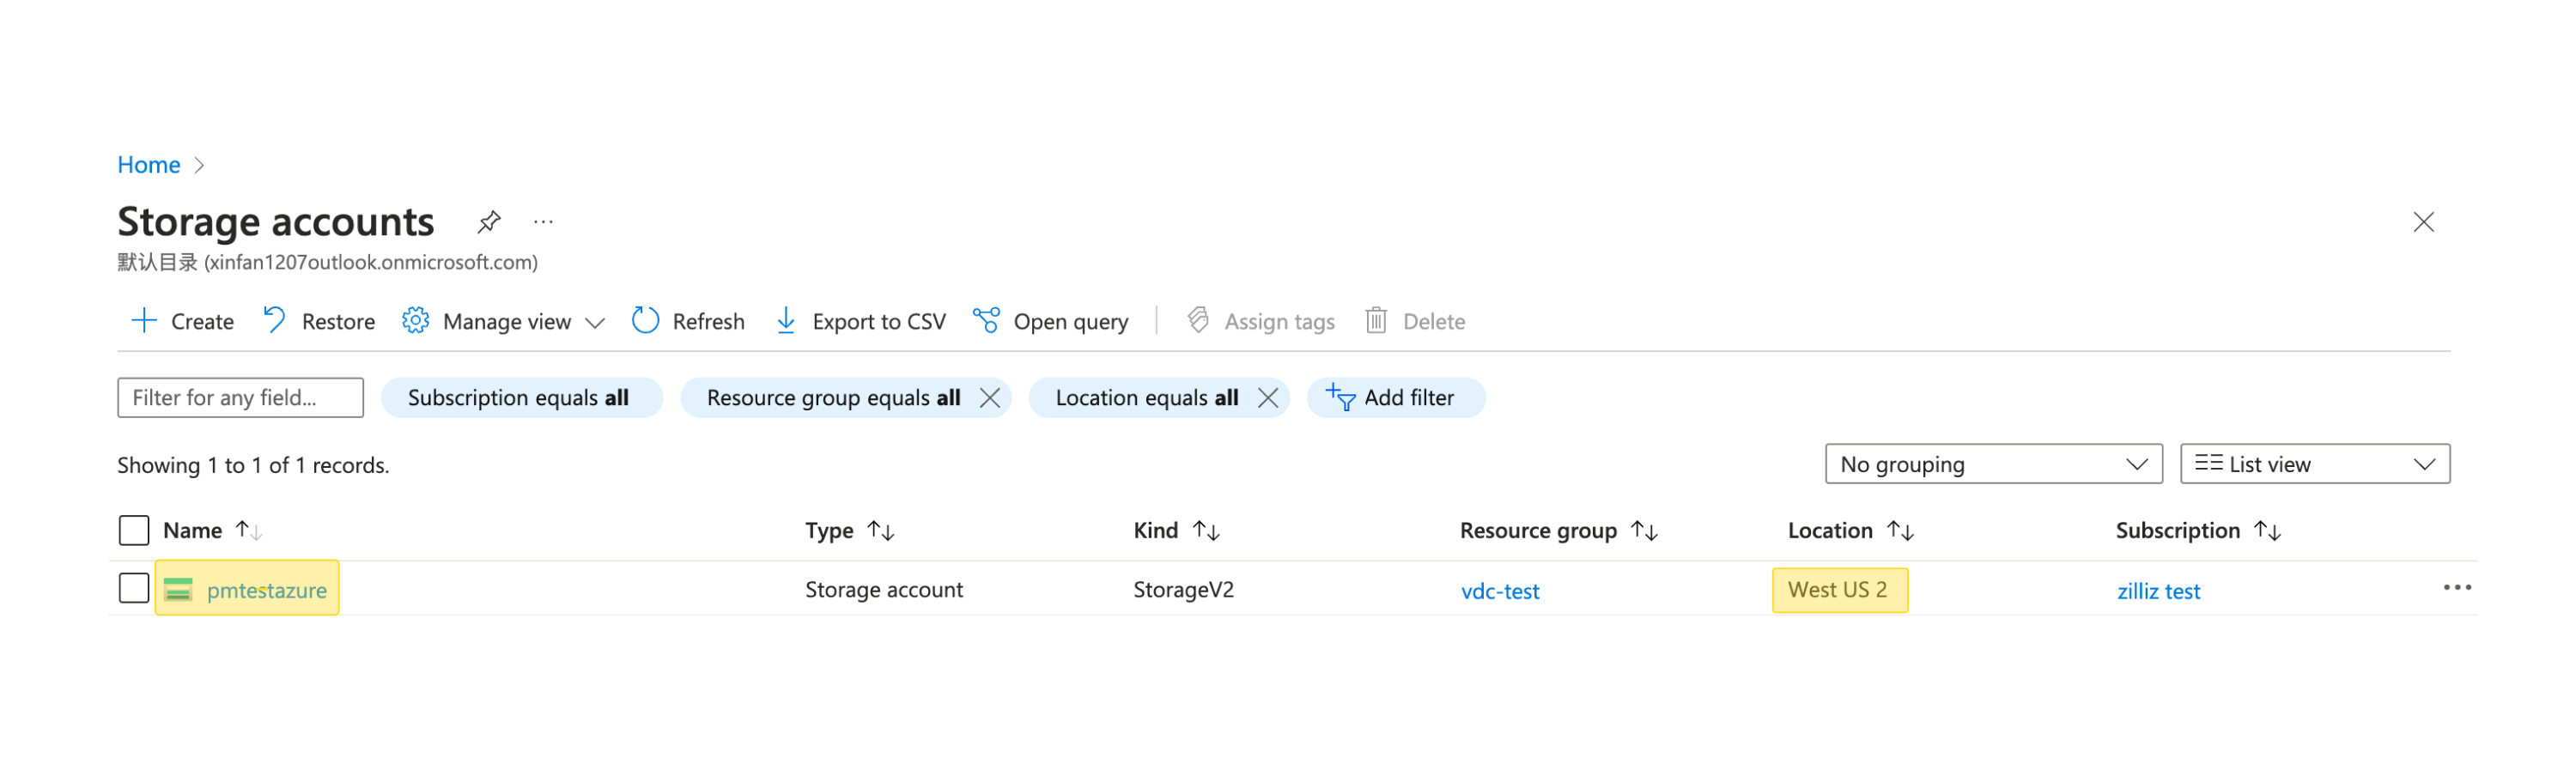
Storage accounts ページで、既存のストレージアカウントを選択するか、+ Create をクリックして新しいアカウントを作成します。Note: ストレージアカウントは、Zilliz Cloud クラスターと同じリージョンに存在する必要があります。
ストレージアカウントの詳細ページで、Data Storage > Containers に移動し、+ Container をクリックします。
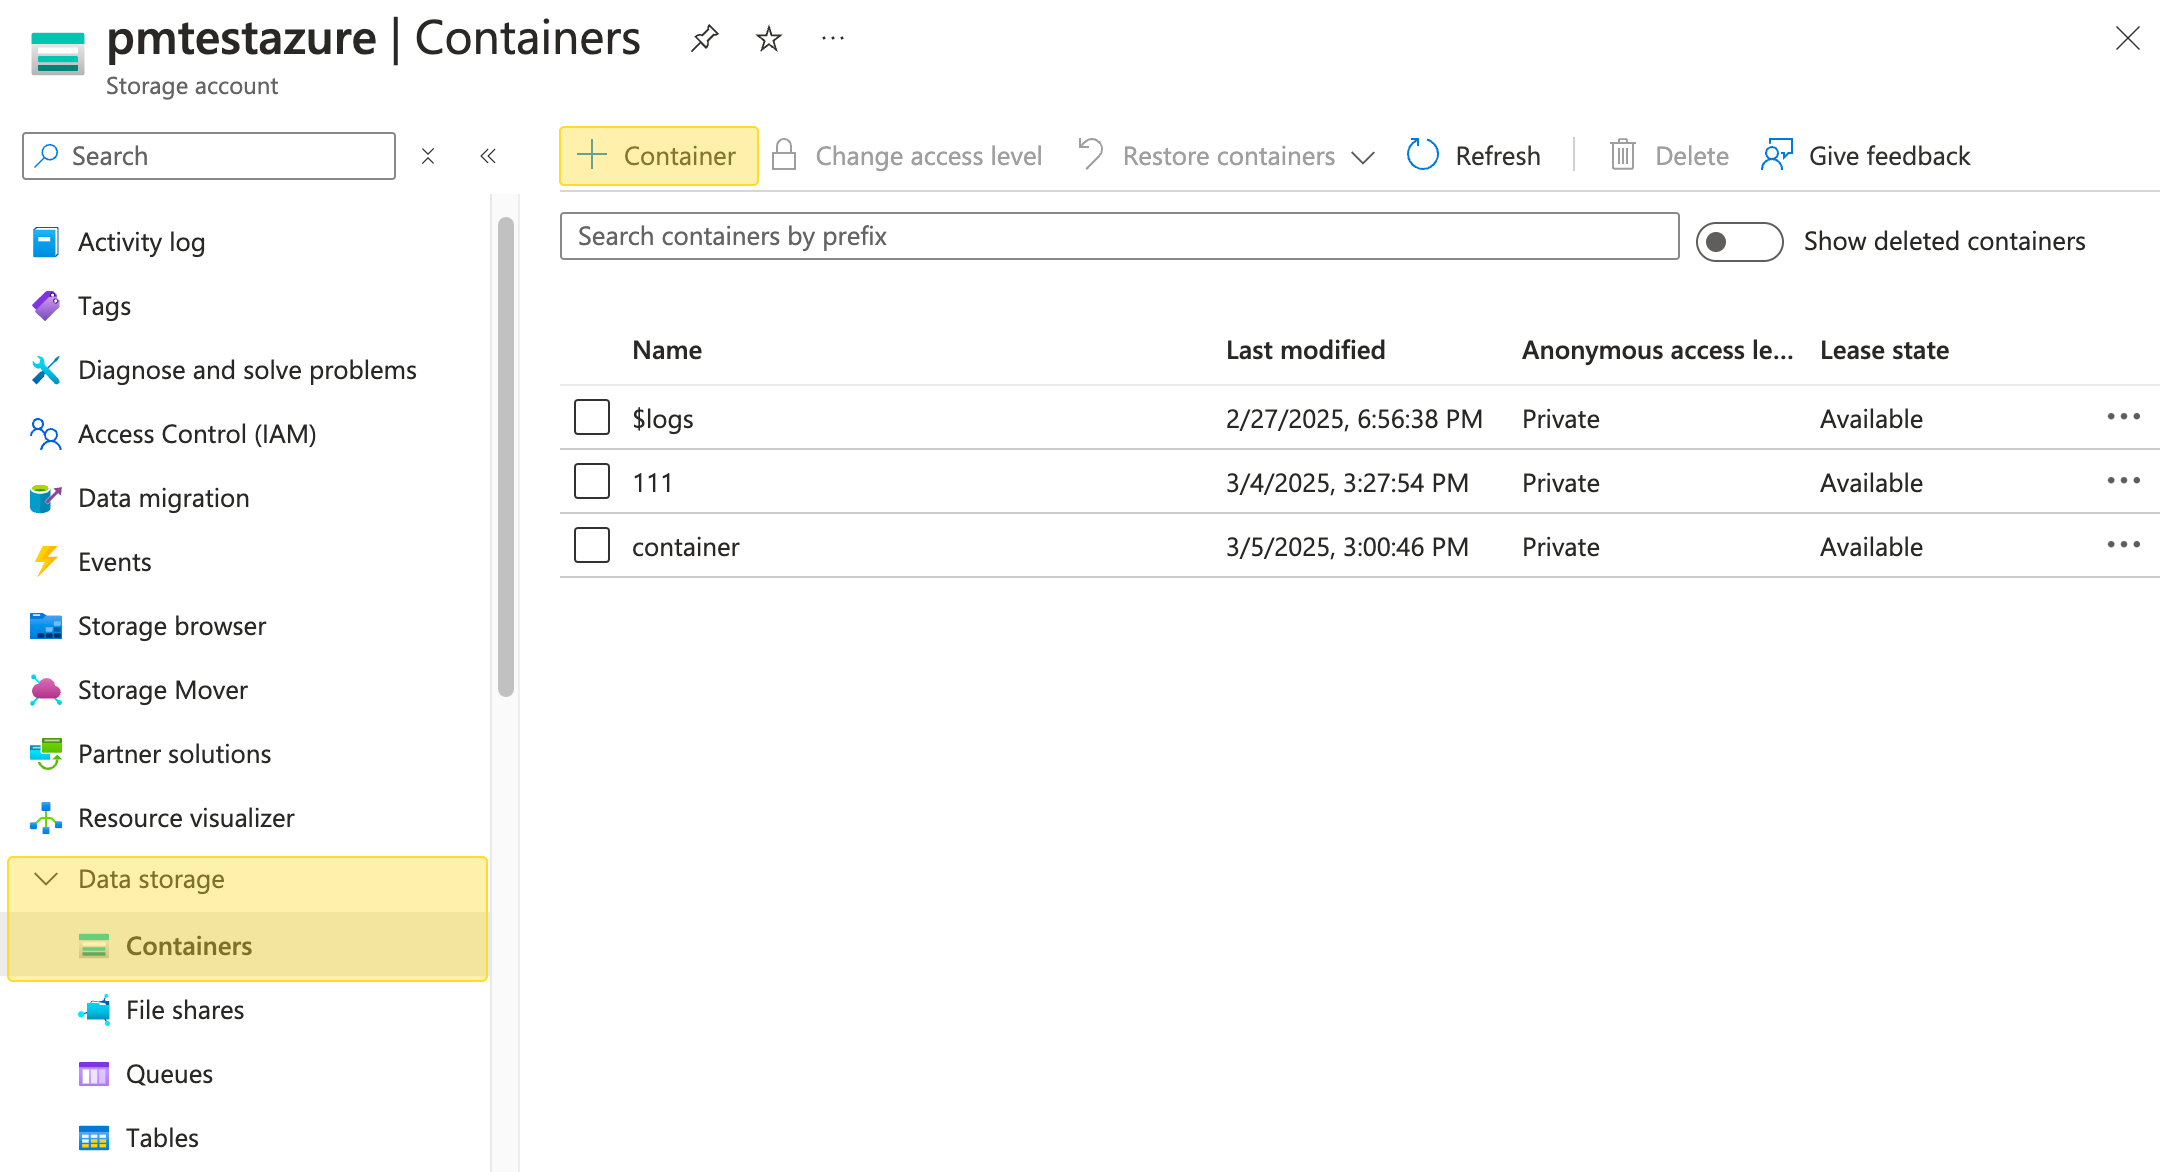
表示されるパネルで、コンテナ名を入力します。このコンテナ名は Zilliz Cloud コンソールで必要になるため、控えておいてください。
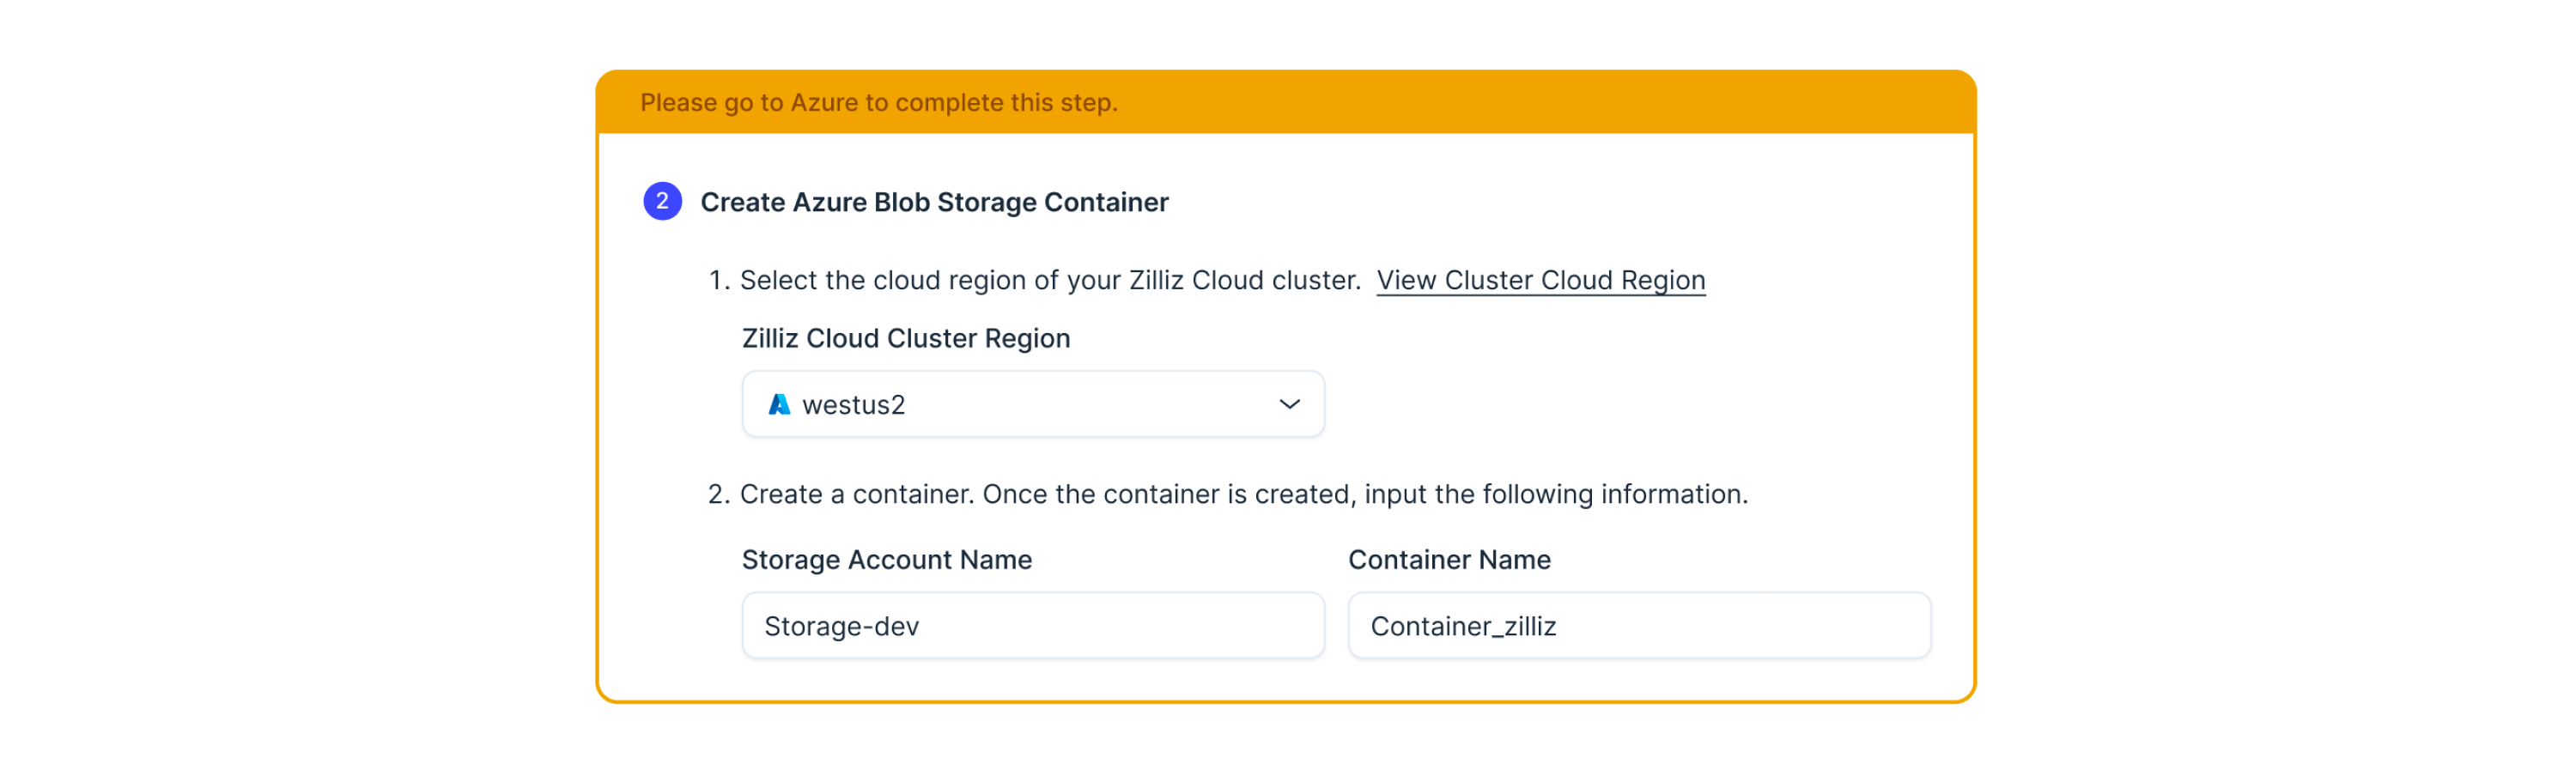
Zilliz Cloud コンソール に戻り、Create Azure Blob Storage Container ステップで設定を完了します。
-
Zilliz Cloud クラスター Region: Zilliz Cloud クラスターが存在するクラウドリージョンを選択します。
-
Storage Account Name: Azure ストレージアカウント名を入力します。
-
Container Name: 作成したコンテナの名前を入力します。
次に、Next をクリックして続行します。
ステップ 3: アプリケーションを登録して認証情報を追加する
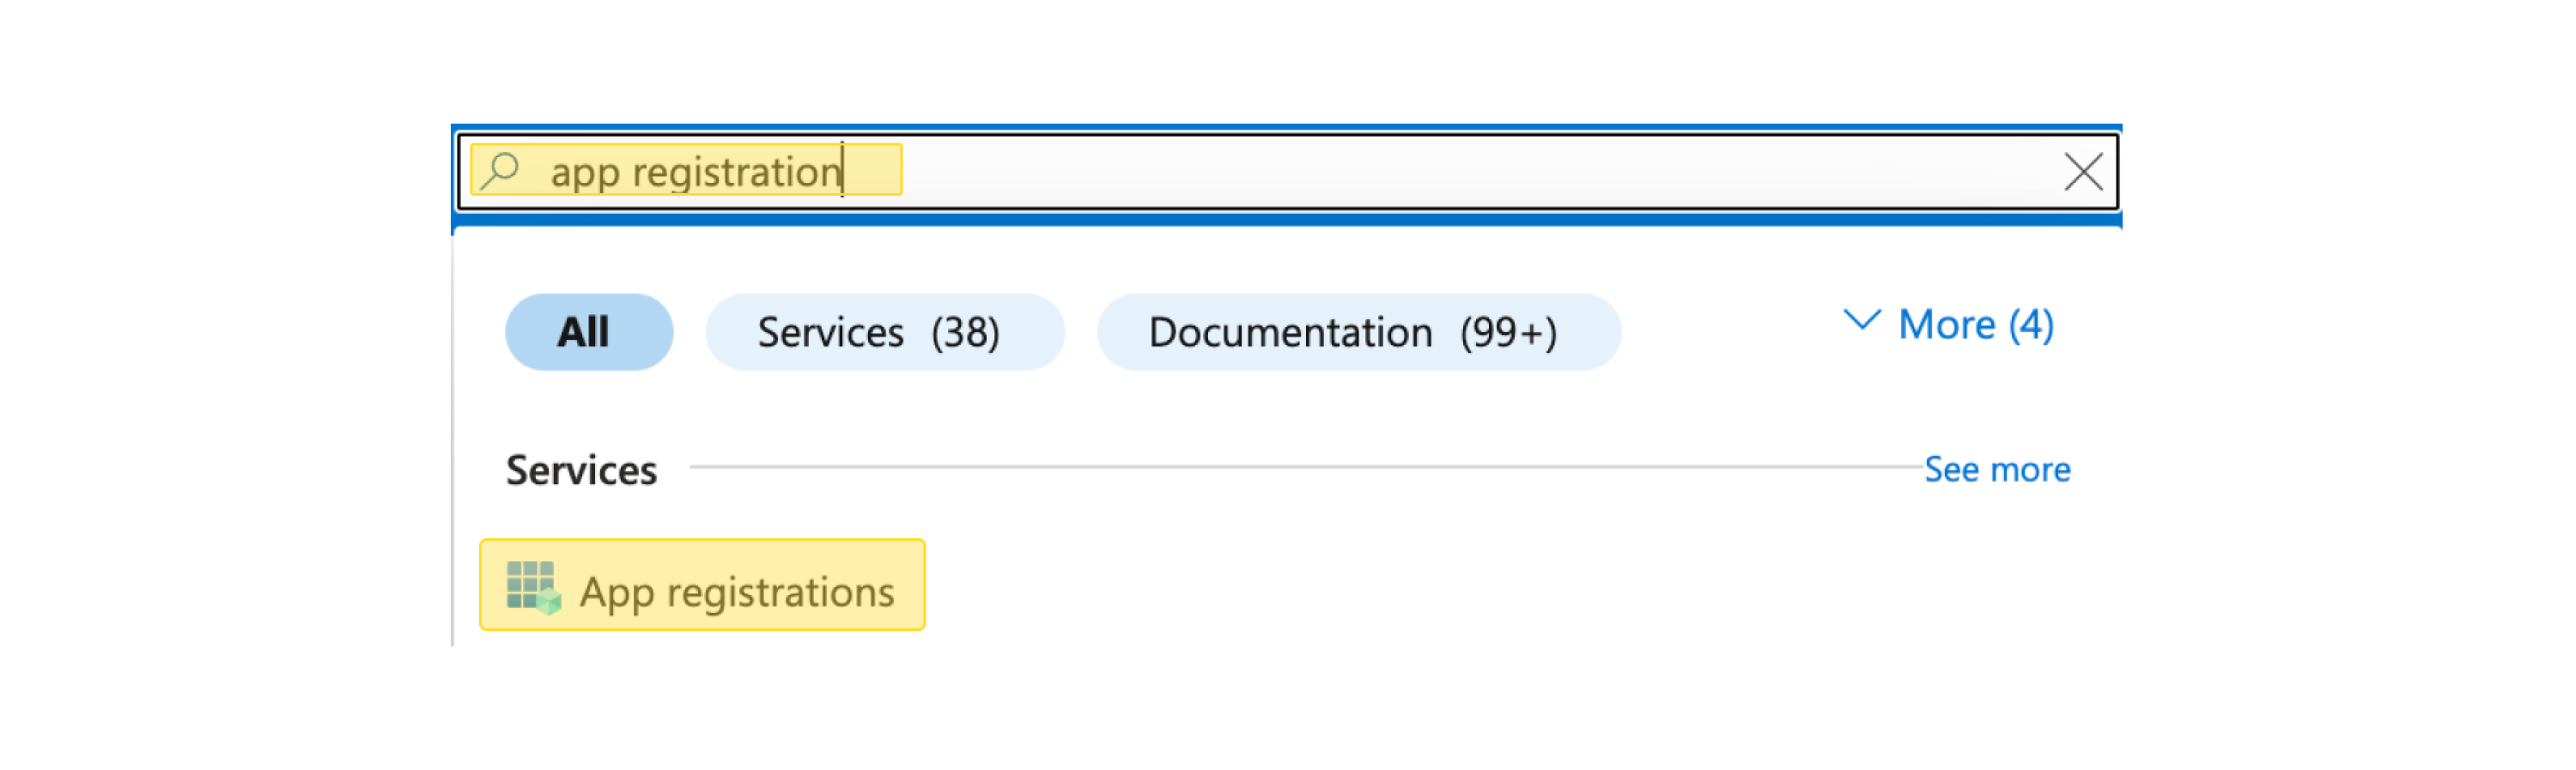
Azure Portal に戻り、App registrations を検索して選択します。
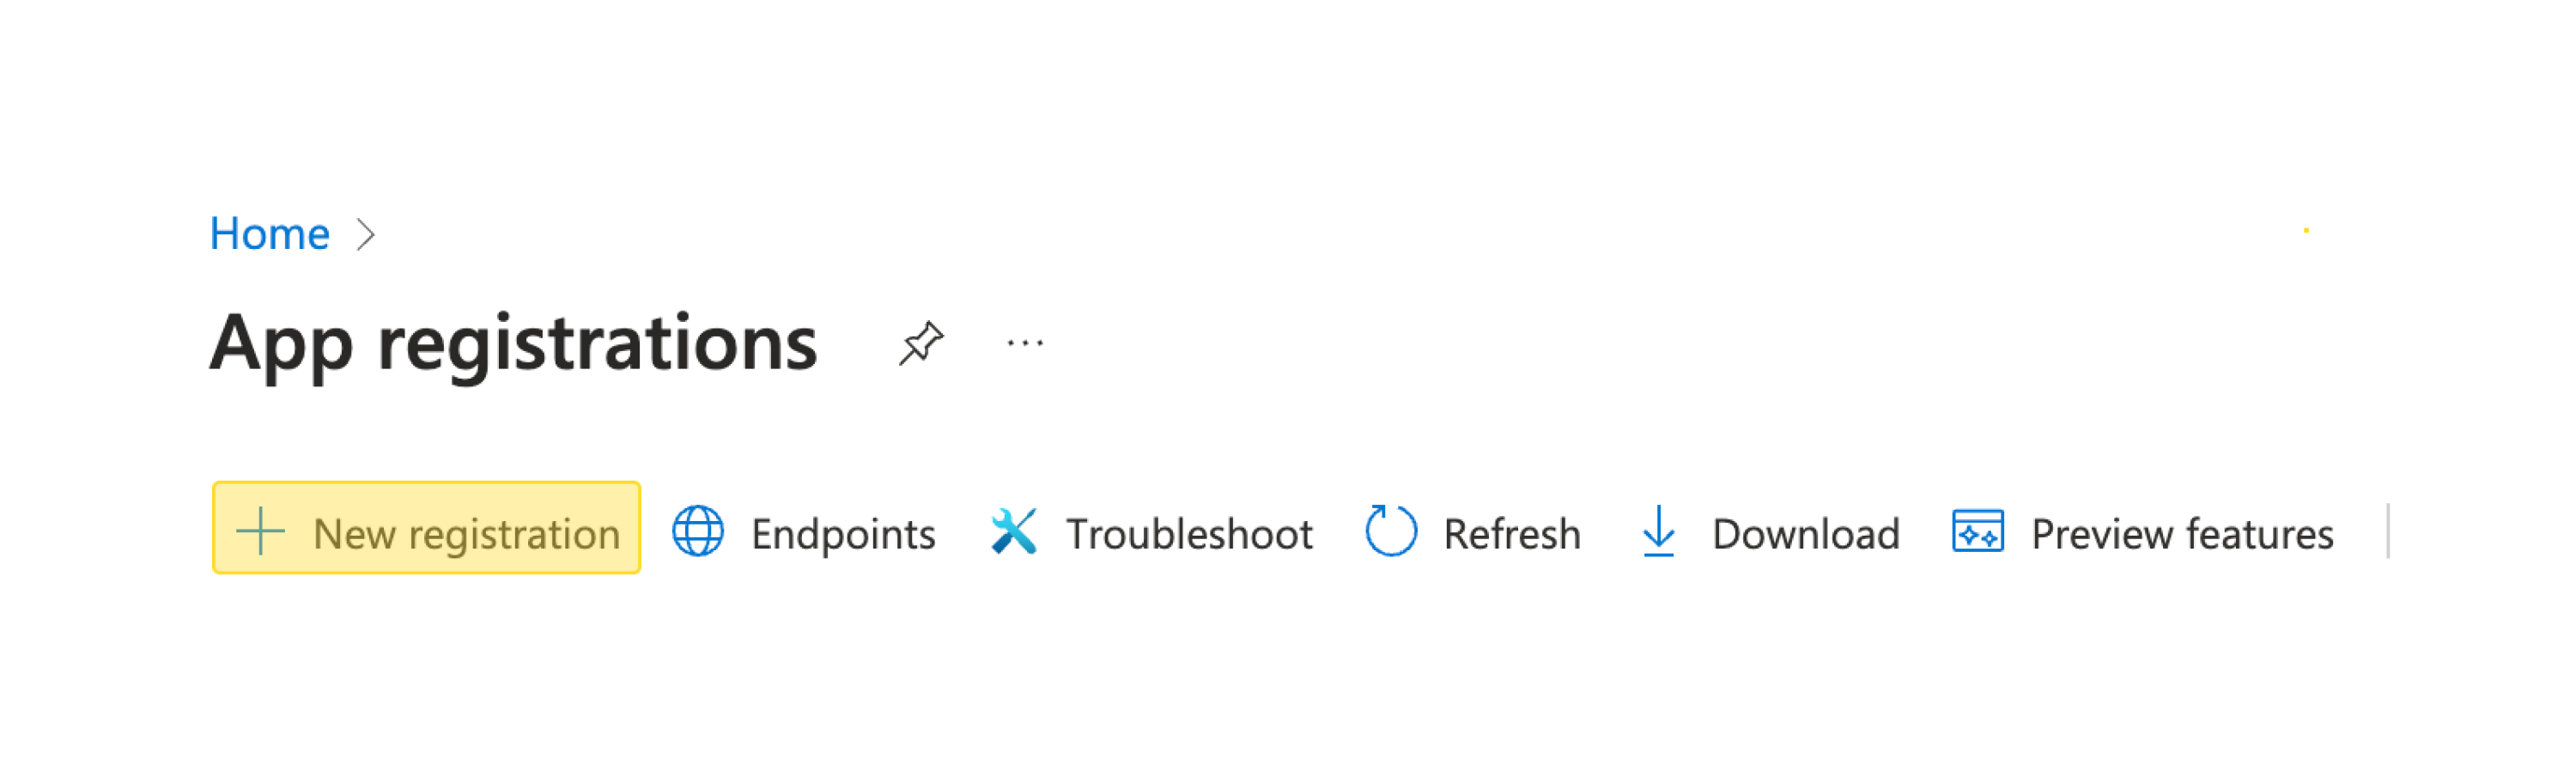
Application registrations ページで、+ New registration をクリックします。
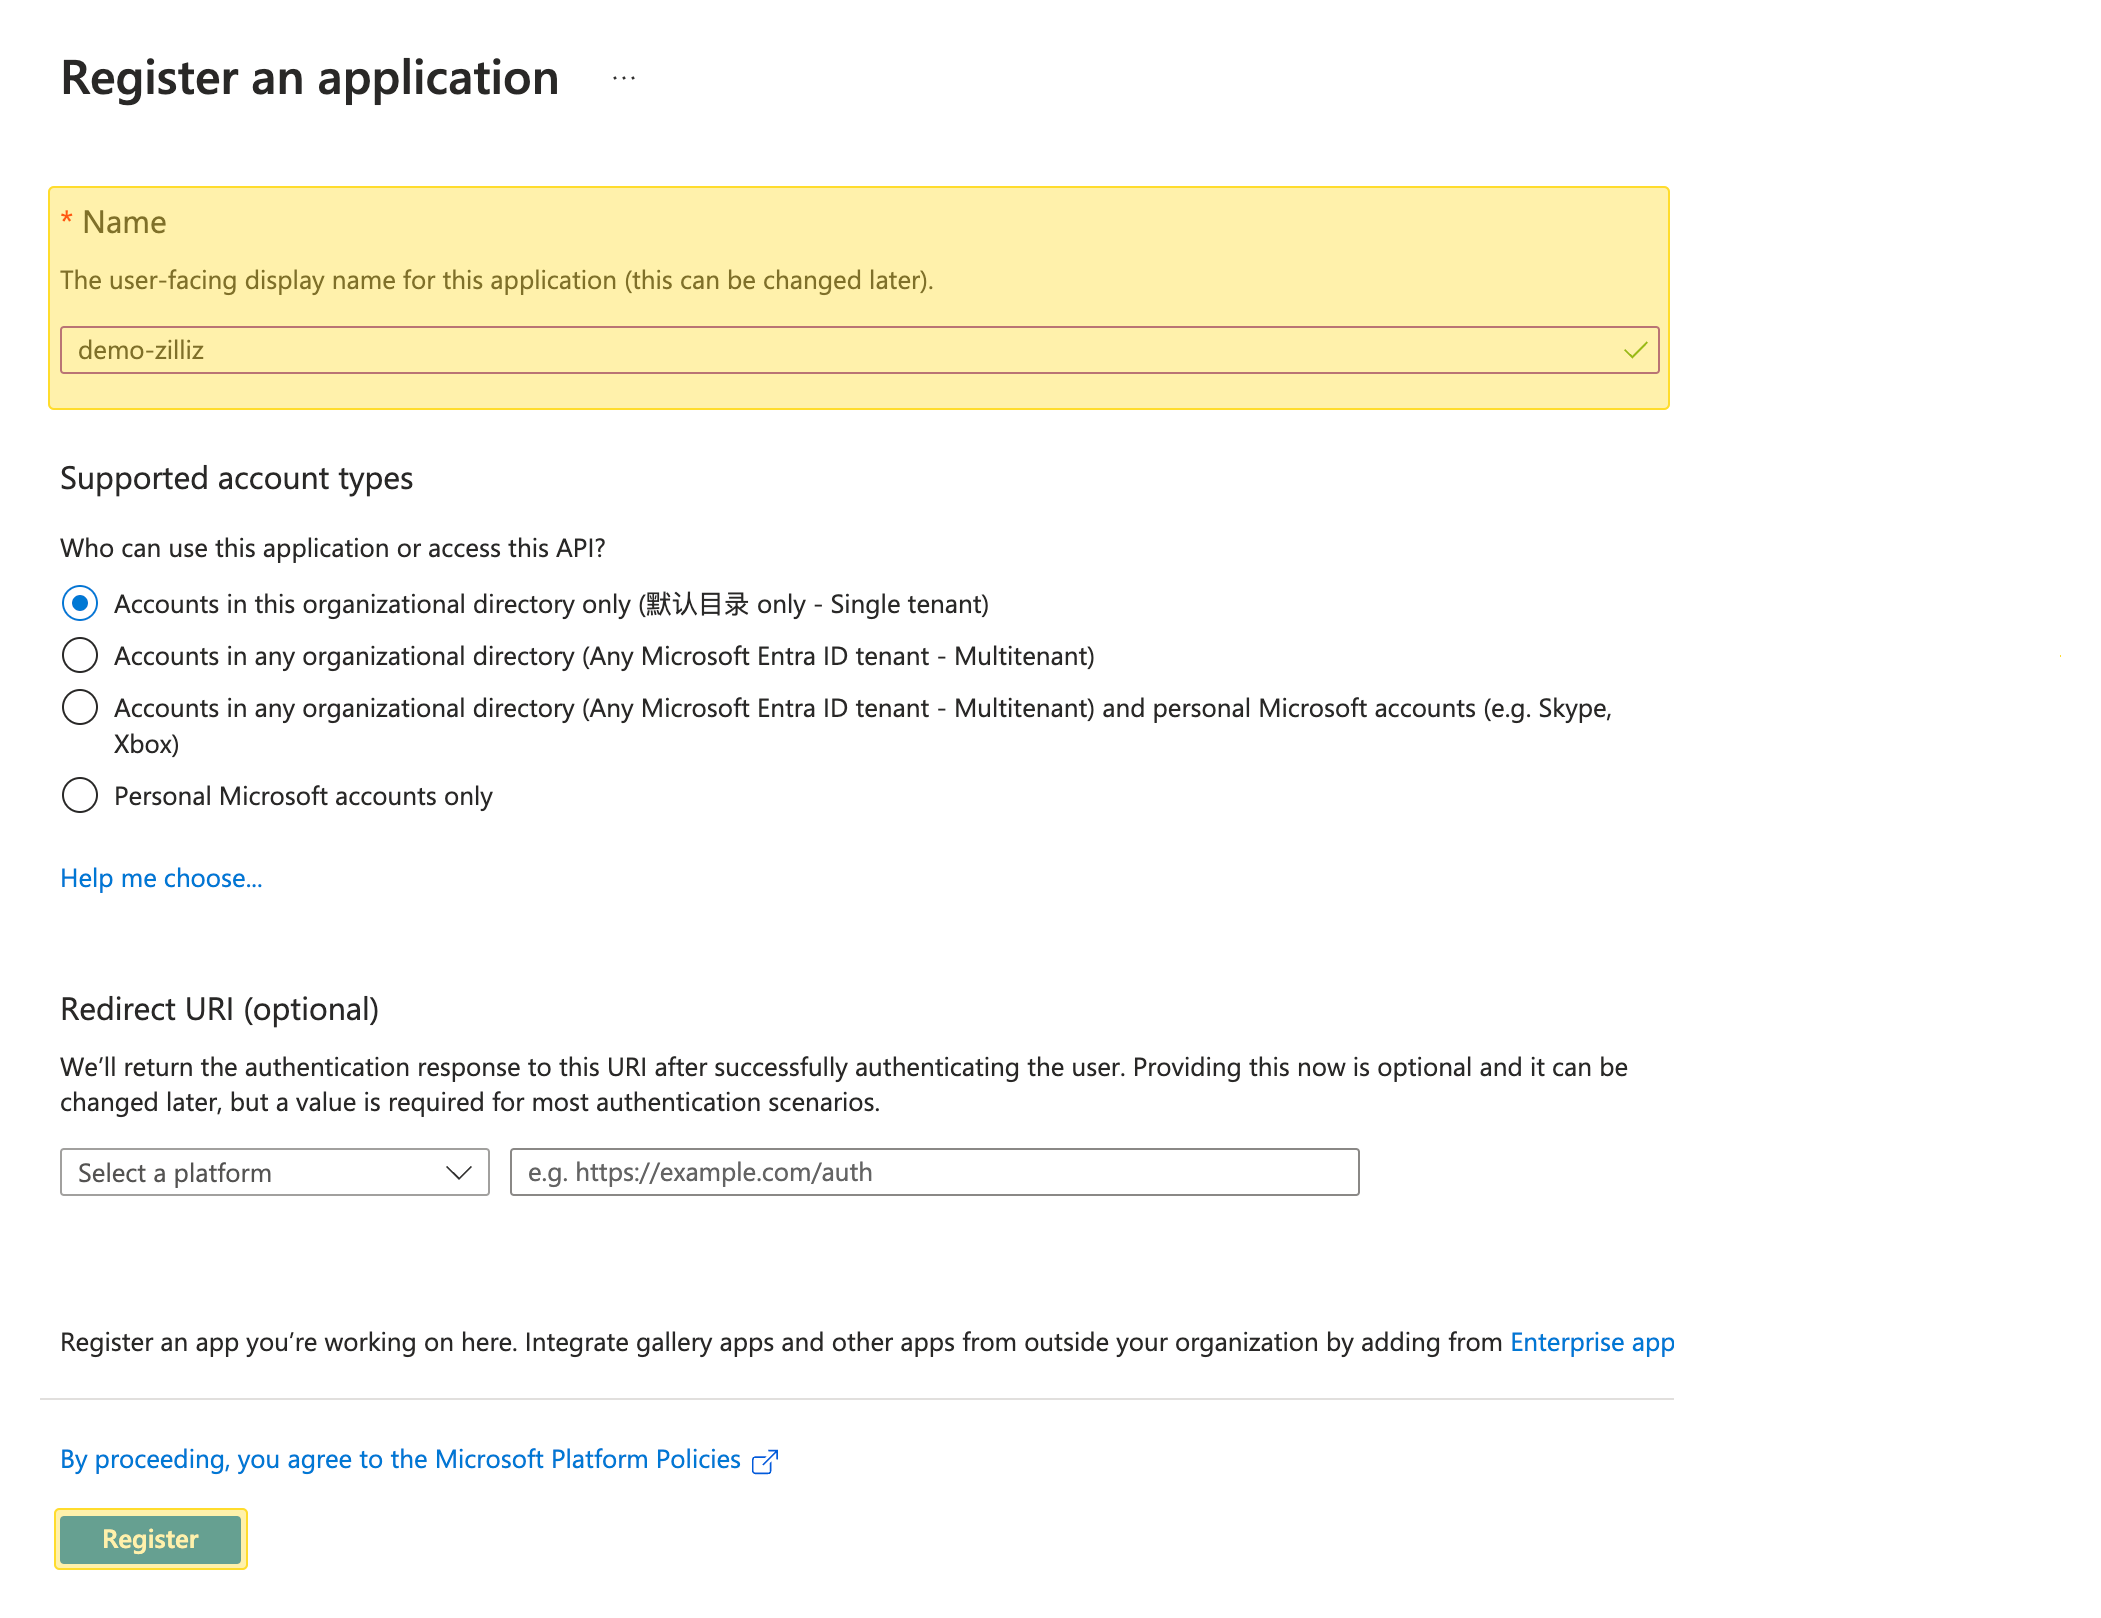
Register an application パネルで、アプリケーションの名前を入力し、他のフィールドはデフォルト設定のままにして、Register をクリックします。
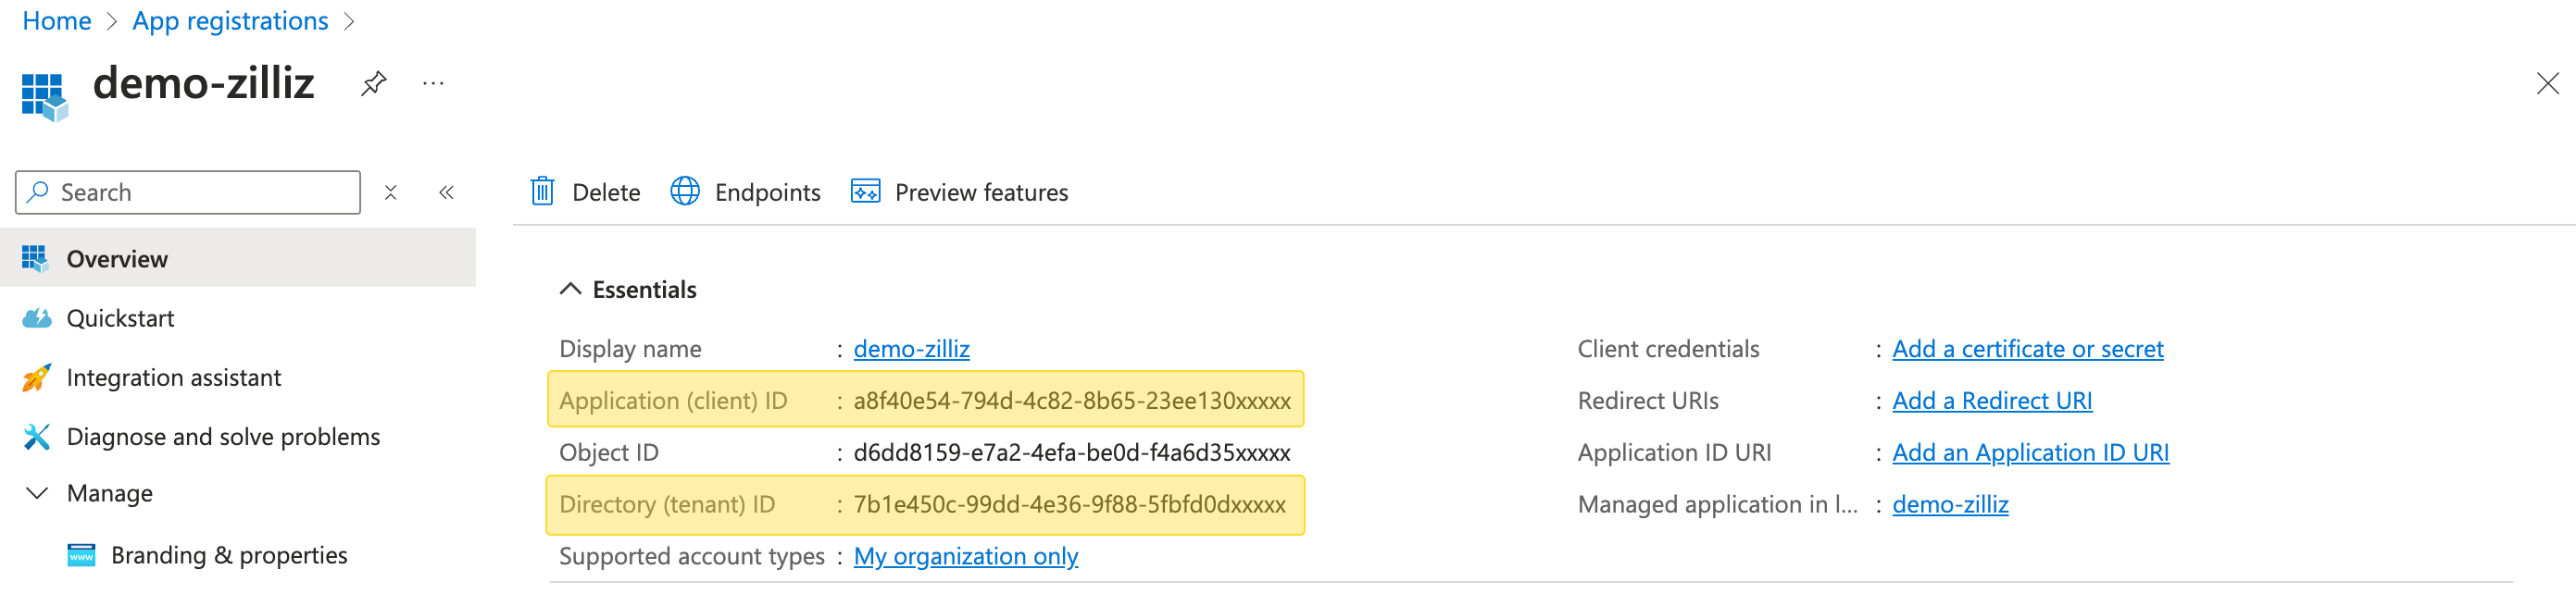
アプリケーションの Overview ページで、Application (client) ID と Directory (tenant) ID をコピーします。これらの値は Zilliz Cloud コンソールで必要になります。
Zilliz Cloud コンソール に戻り、Register a New Application ステップで、コピーした Application (client) ID と Directory (tenant) ID を入力します。
また、Zilliz Cloud から提供される Cluster Issuer URL(クラスターの発行元 URL)、Service Name、Service Account Name も控えておいてください。これらの値は Azure Portal で必要になります。
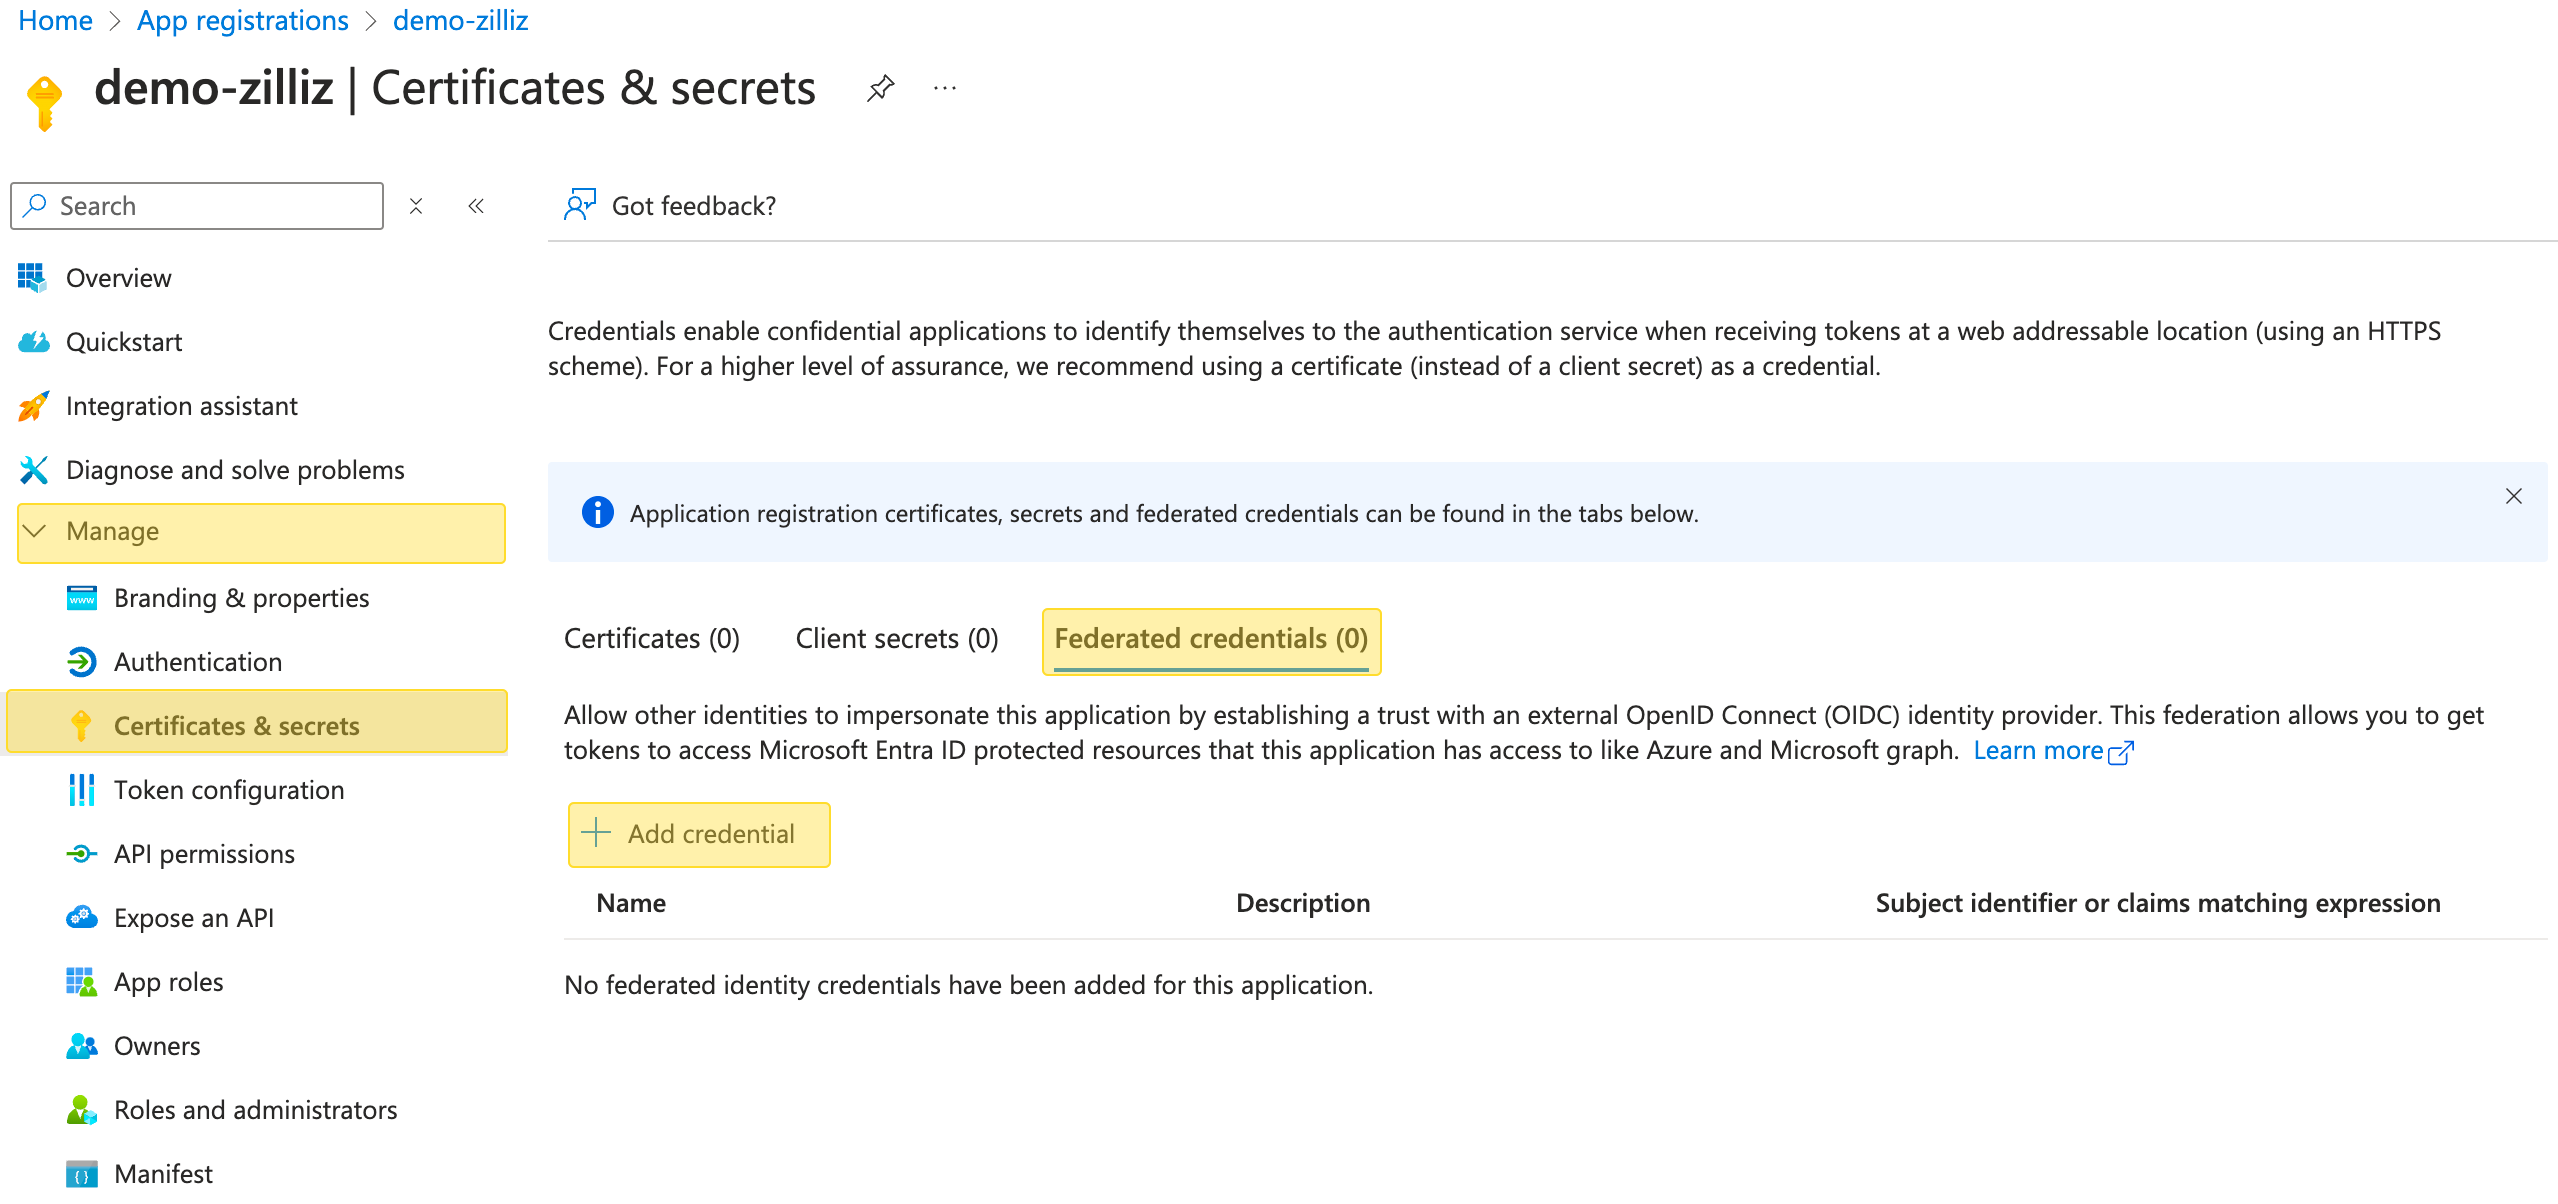
Azure Portal のアプリケーションページに戻ります。Manage > Certificates & secrets > Federated credentials に移動し、Add credential をクリックします。
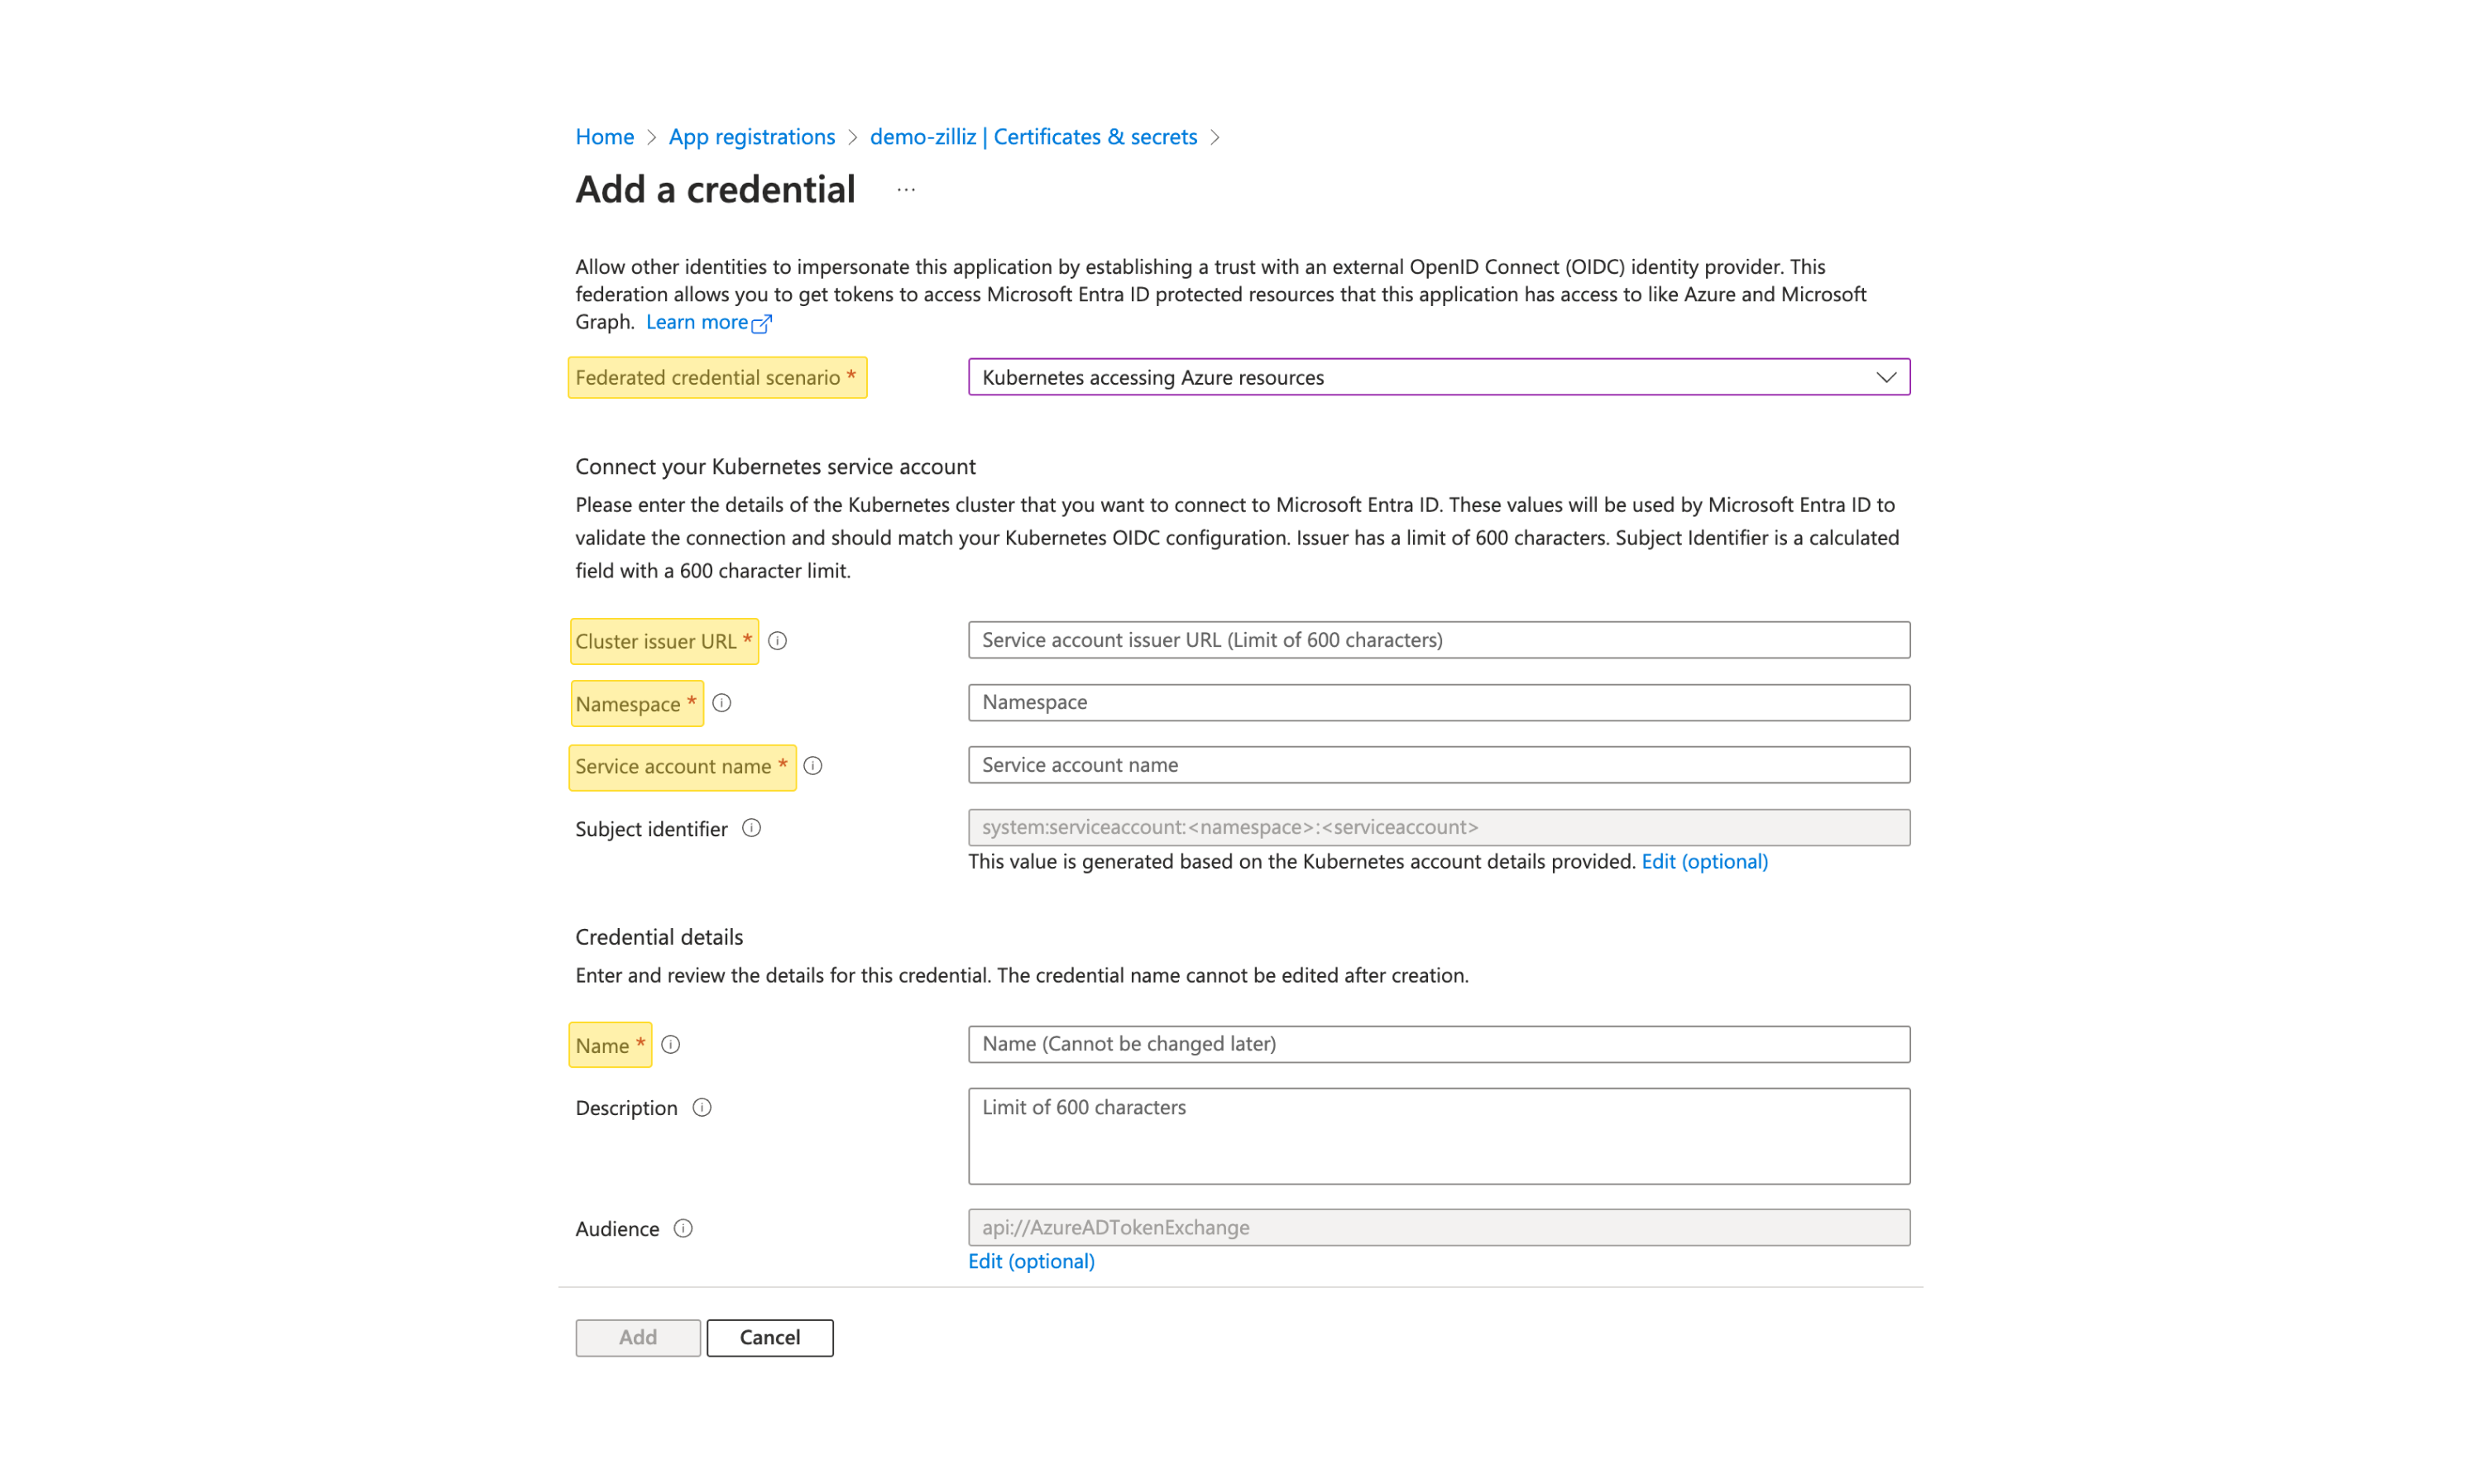
Add a credential パネルで、認証情報の設定を行います。
-
Federated credential scenario: Kubernetes accessing Azure resources を選択します。
-
Cluster issuer URL: Zilliz Cloud から提供されたクラスターの発行元 URL を入力します。
-
Namespace: milvus-tool に設定します。
-
Service account name: milvus-bucket に設定します。
-
Name: 任意の名前を入力します(例: わかりやすくするために zilliz を含めます)。
-
Audience: デフォルト値を使用します。
次に、Add をクリックして認証情報を保存します。
Zilliz Cloud コンソール に戻り、Next をクリックして続行します。
ステップ 4: ストレージアカウントのロール割り当てを追加する
Azure Portal で、Access Control (IAM) > + Add > Add role assignment に移動します。
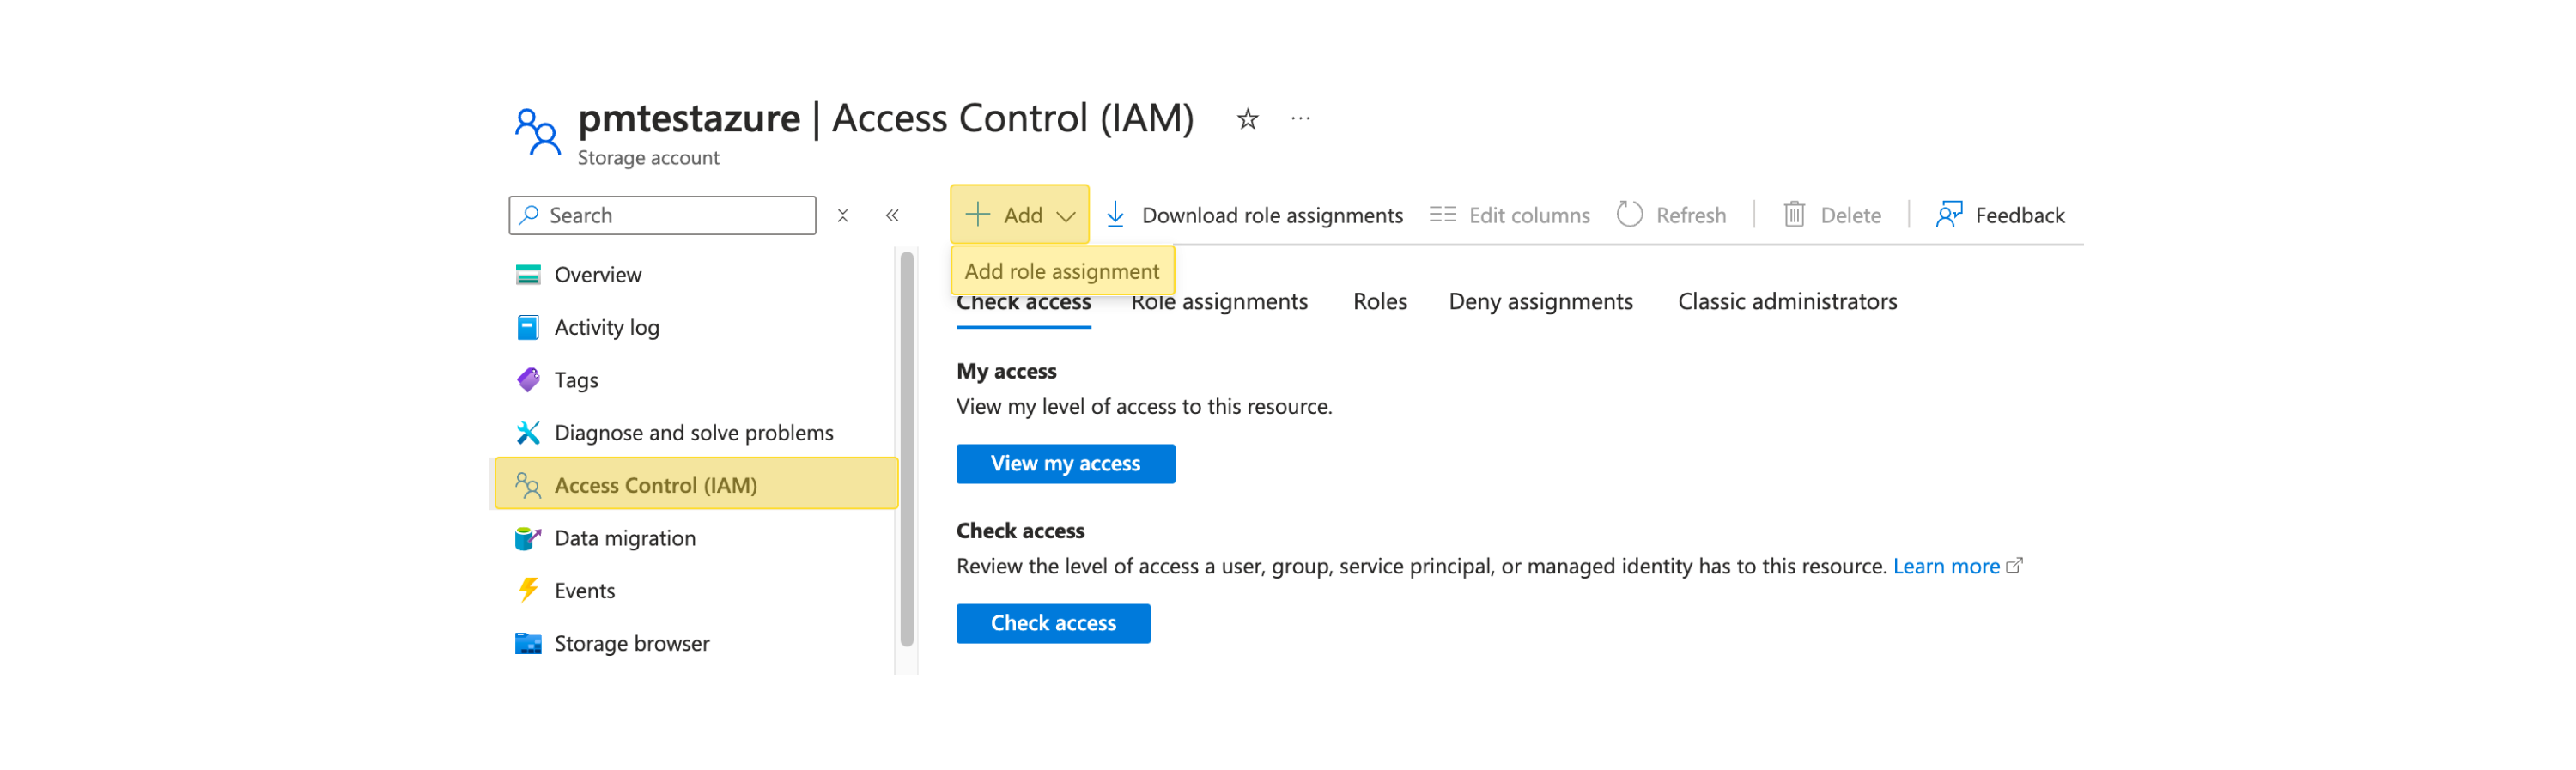
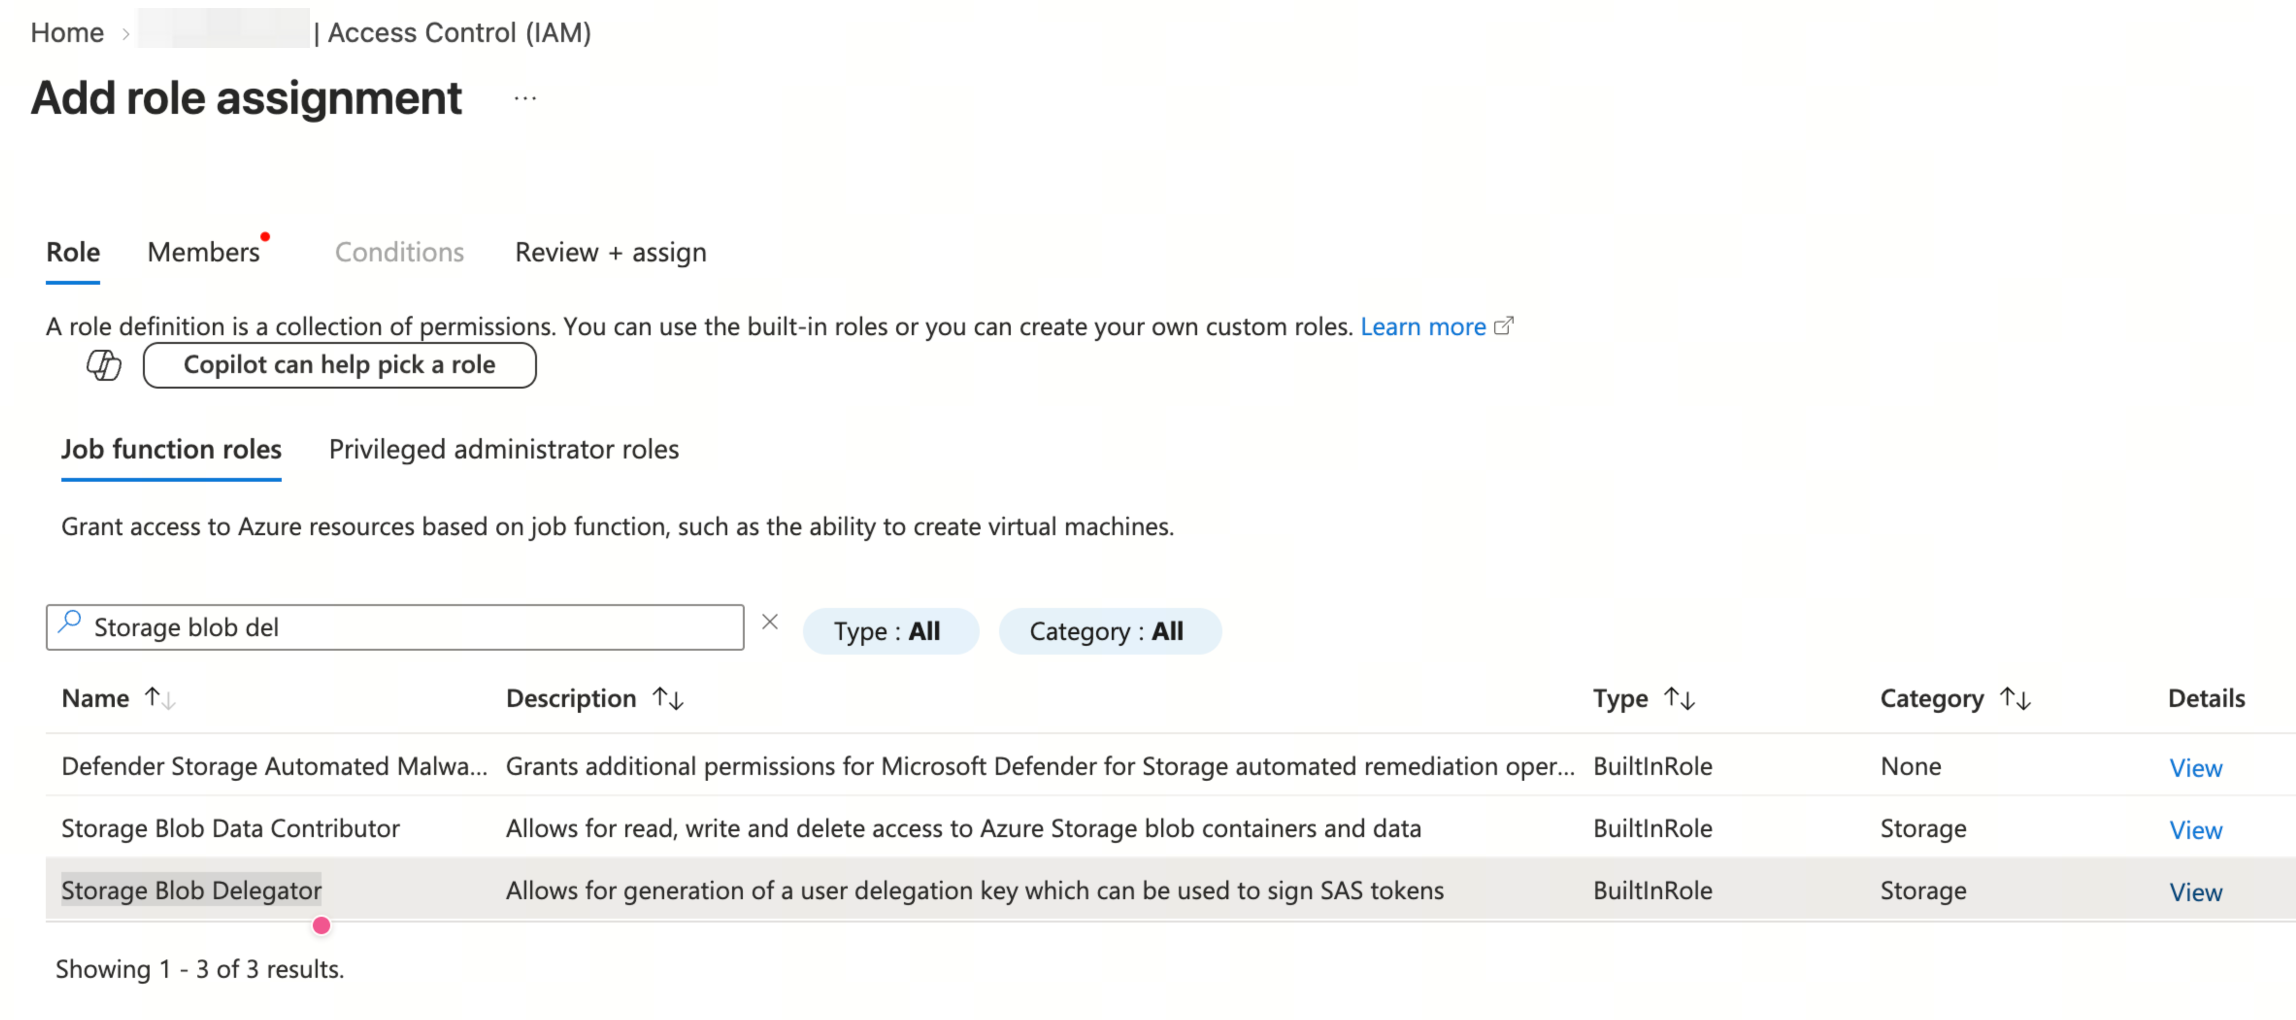
Job function roles タブで、Storage Blob Delegator ロールを選択します。
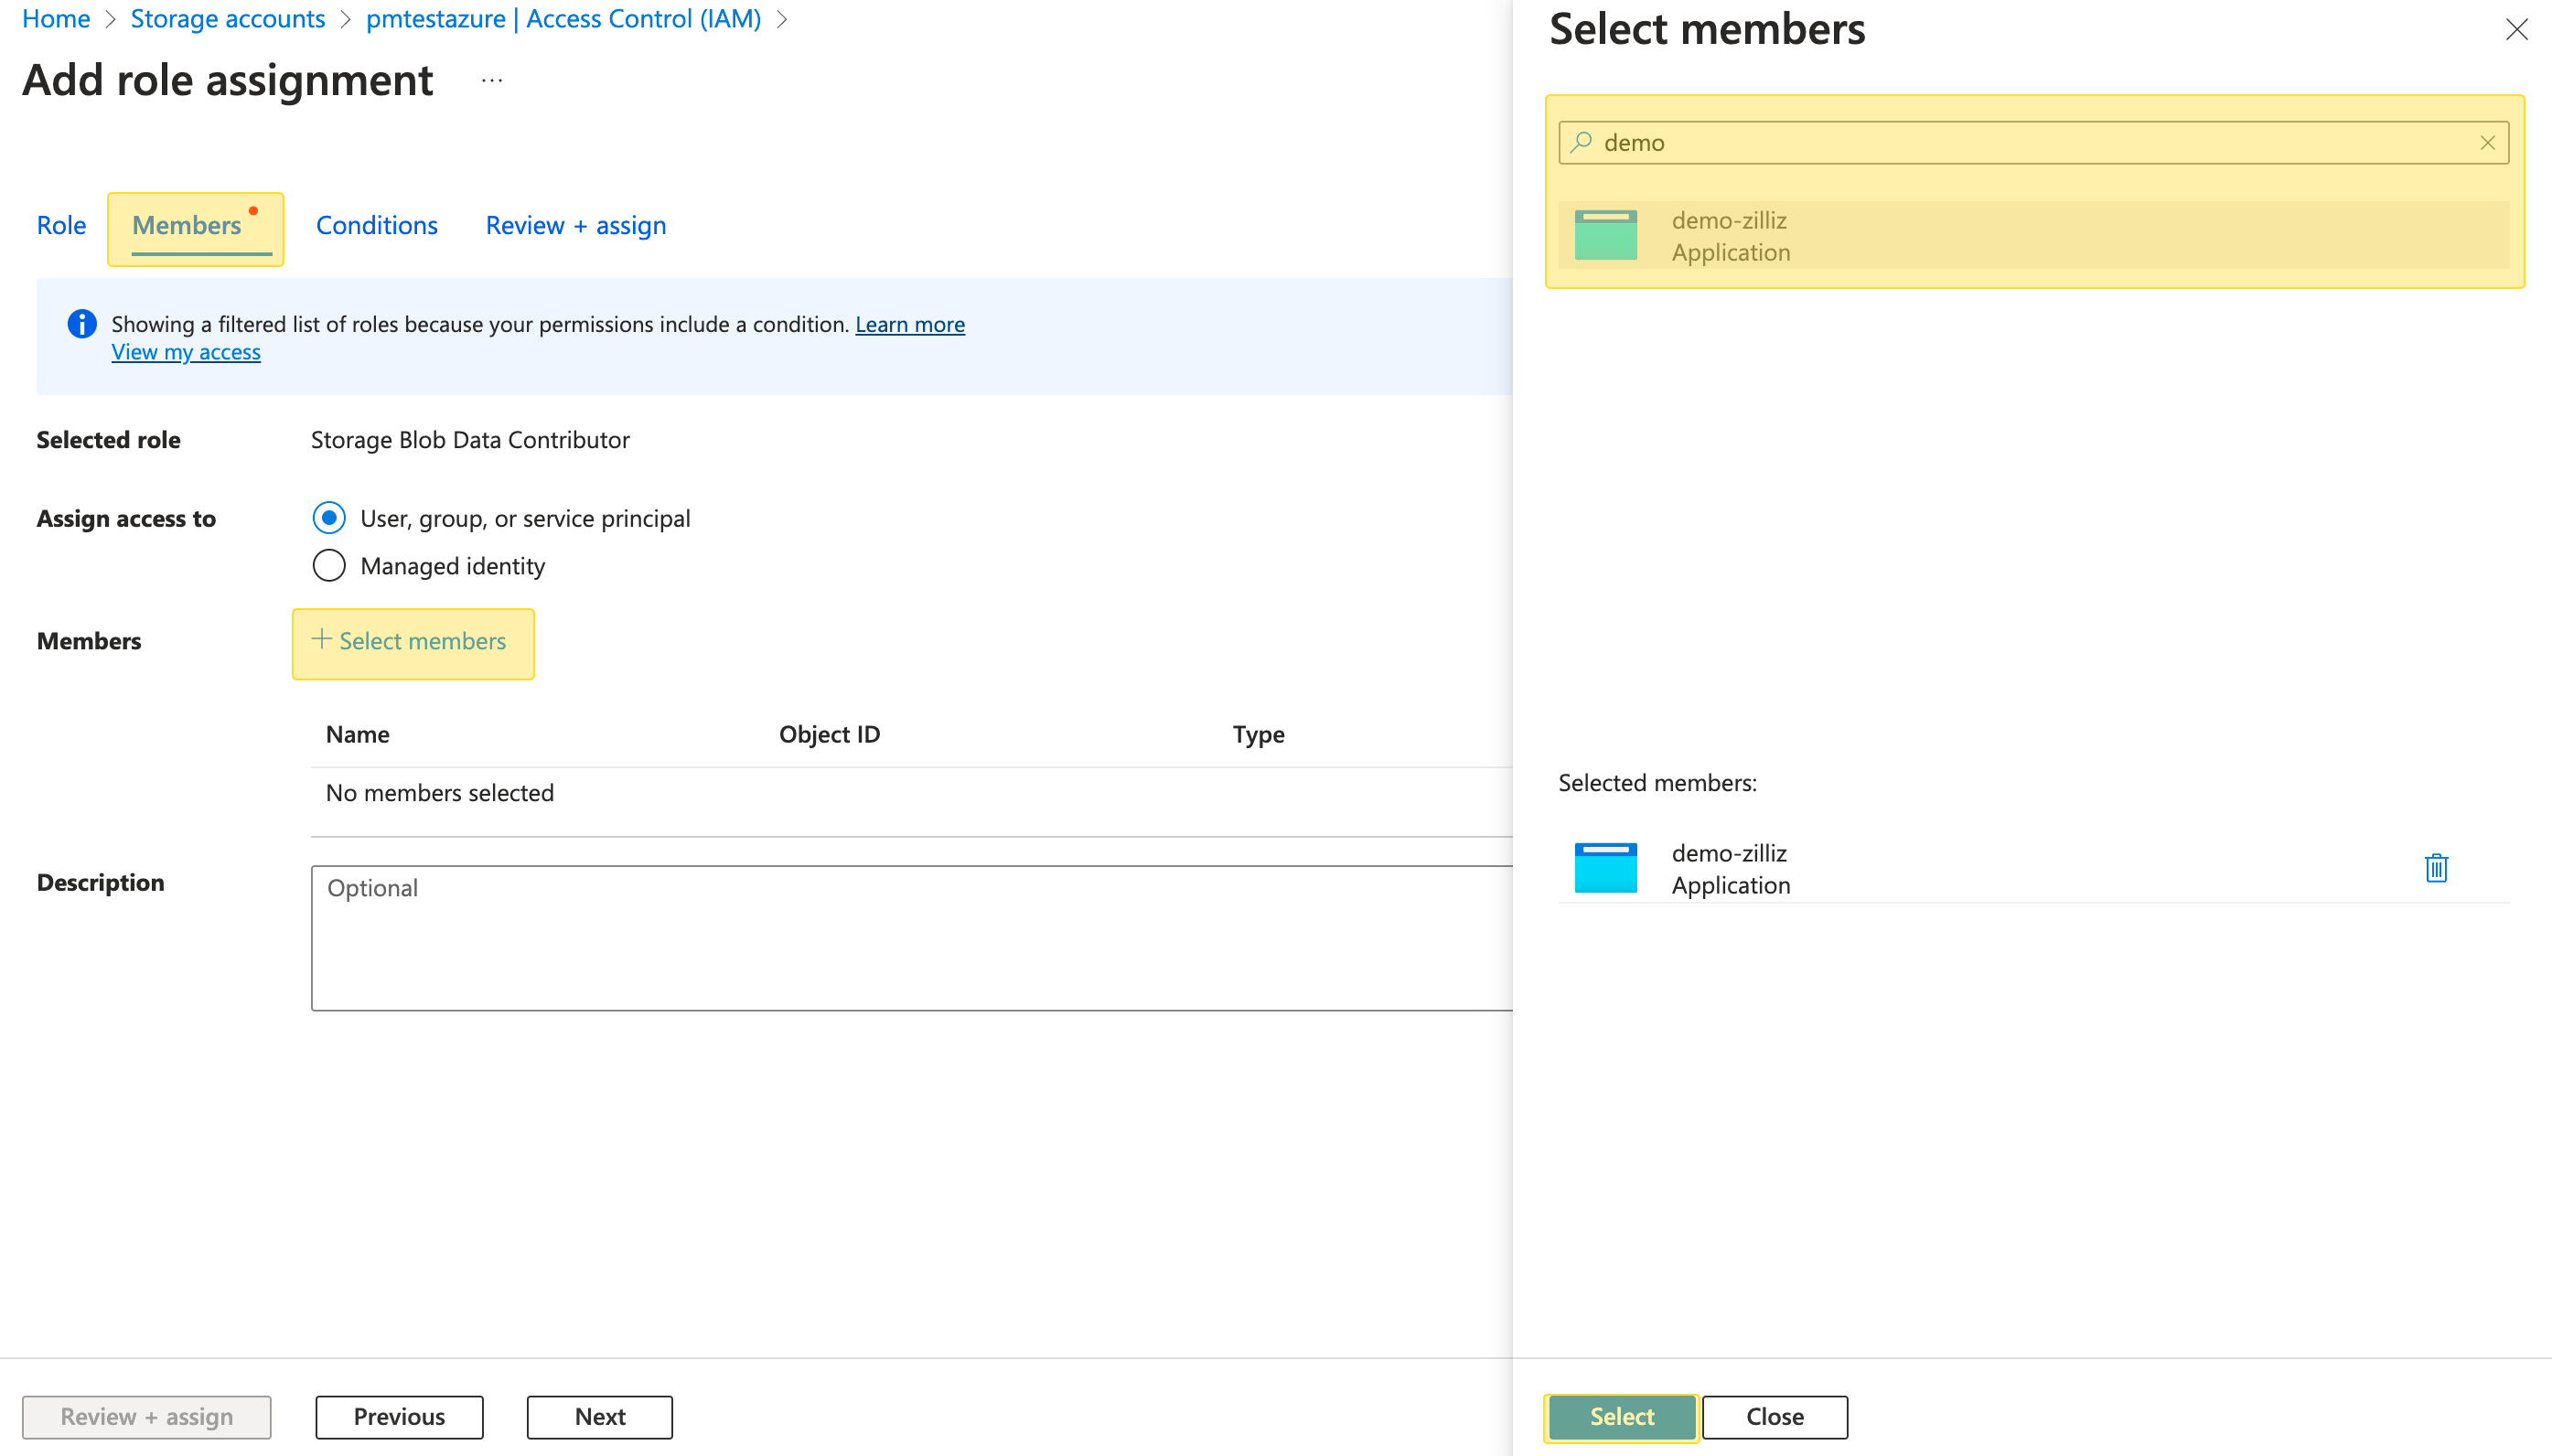
Members タブで、ロールを割り当てる登録済みのアプリケーションを選択します。
Review + assign タブで、Review + assign をクリックして確認します。
ステップ 5: コンテナのロール割り当てを追加する
ステップ 1 で選択した Bucket Permission に基づいて、登録済みのアプリケーションに、対応するコンテナスコープのロールを割り当てます。
Azure Portal で、ステップ 2 で作成したコンテナを含むストレージアカウントに移動します。
Data storage の下の Containers に移動し、対象のコンテナを選択します。
左側のナビゲーションペインから Access Control (IAM) を選択し、+ Add > Add role assignment をクリックします。
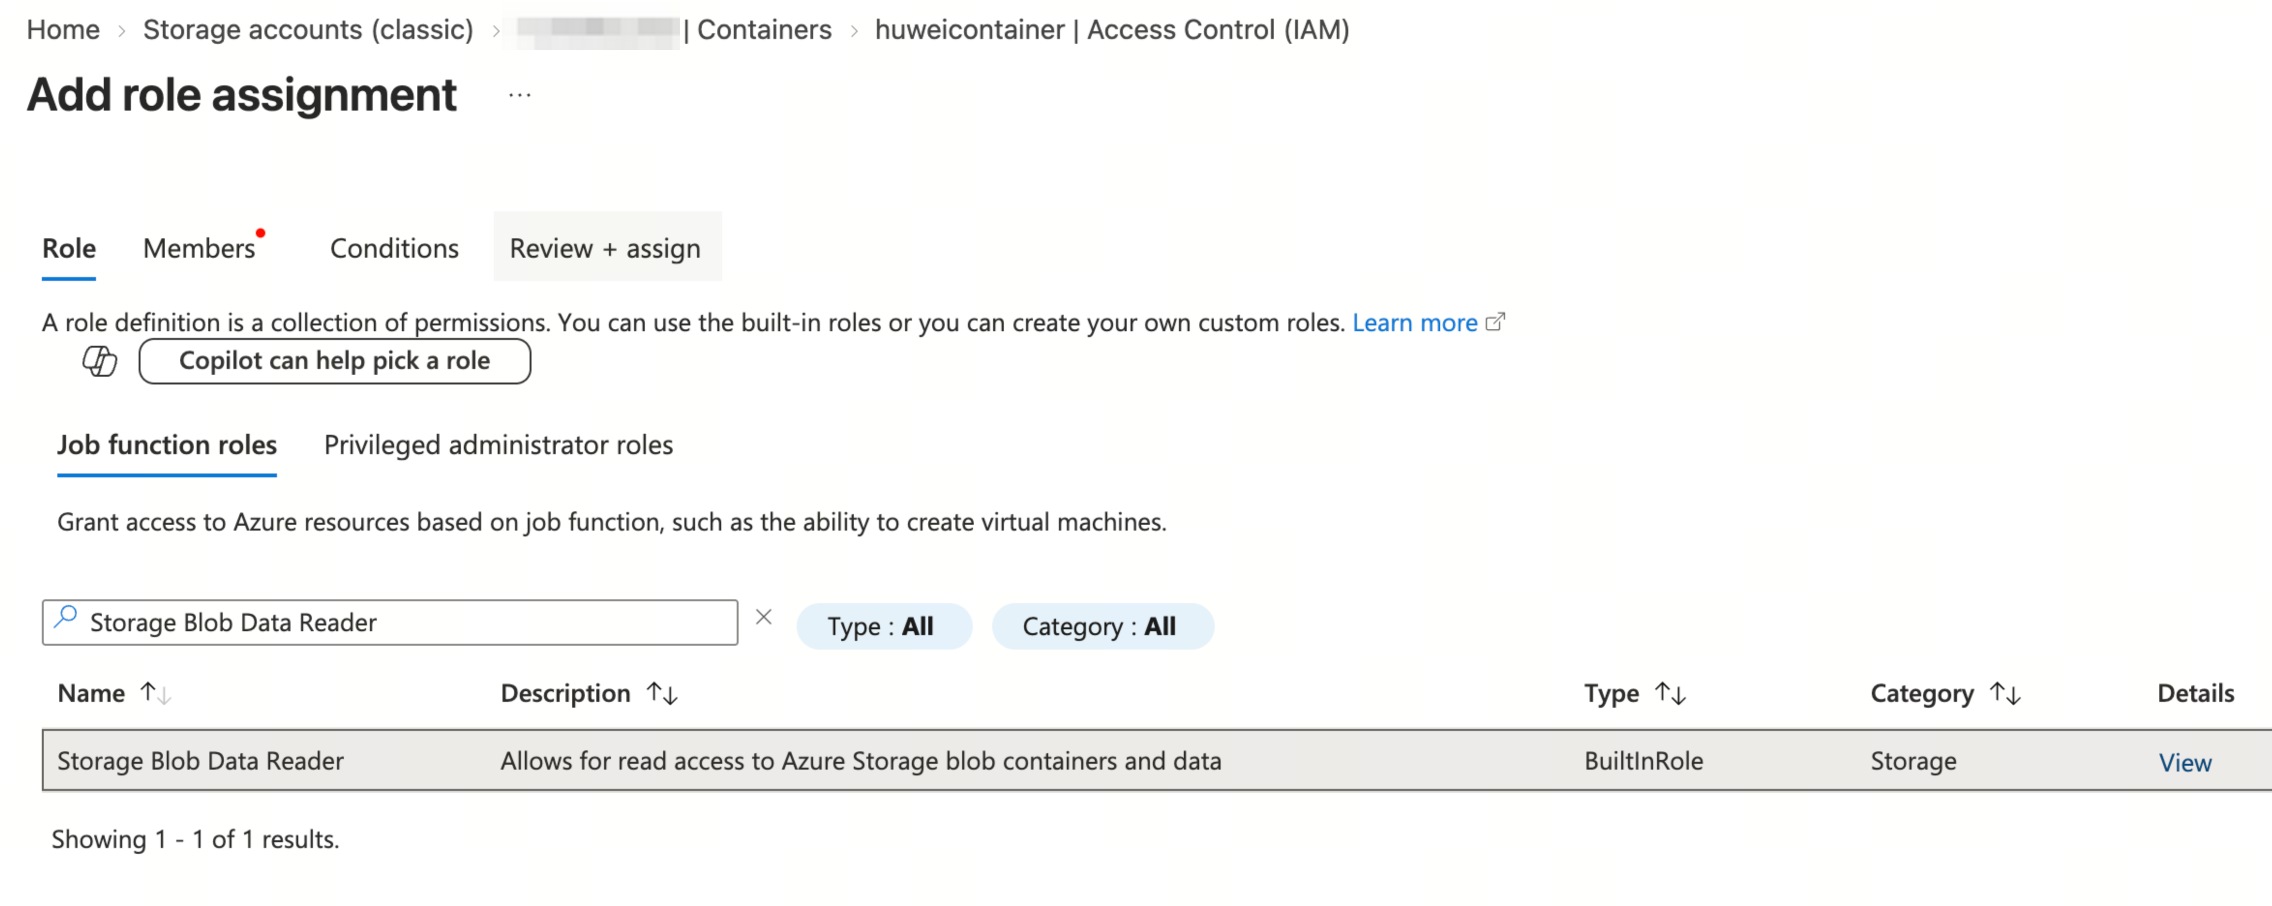
Members タブで、ロールを割り当てる登録済みのアプリケーションを選択します。
Review + assign タブで、Review + assign をクリックして確認します。
ステップ 6: 統合を検証して作成する
Zilliz Cloud コンソール で、Validate Integration をクリックし、コンテナとロール割り当ての設定が有効であることを確認します。
検証は、Azure のロール割り当ての反映に時間がかかるため、完了するまでに最大で約 10 分かかる場合があります。
検証が成功したら、Create をクリックして統合を確定します。
これで Azure Blob Storage が Zilliz Cloud と統合され、バックアップファイルをエクスポートできるようになりました。詳細については、Export Backup Files を参照してください。
プログラムでストレージ統合を作成する
Zilliz Cloud コンソールでの操作に代えて、プログラムからストレージ統合を作成することもできます。
コンテナを作成します。
詳細については、上記の Azure Portal でコンテナを作成する または Create Container API ドキュメントを参照してください。
認証マテリアルを生成します。
export BASE_URL="https://api.cloud.zilliz.com"
export TOKEN="YOUR_API_KEY"

curl --request POST \
--url "${BASE_URL}/v2/storageIntegrations/authorizationMaterials" \
--header "Authorization: Bearer ${TOKEN}" \
--header "Request-Timeout: 5" \
--header "Content-Type: application/json" \
-d '{
    "projectId": "proj-xxxxxxxxxxxxxxxxxxxxxx",
    "regionId": "az-eastus",
    "bucketName": "my-container"
}'
上記のリクエストは、GCP 管理コンソールで権限とロールを作成するために必要な認証情報を生成します。
レスポンスの例は以下の通りです。
{
    "code": 0,
    "data": {
        "credential": {
            "clusterIssuerUrl": "https://issuer.example.com/",
            "namespace": "milvus-tool",
            "serviceAccountName": "milvus-bucket"
        }
    }
}
パラメーターの説明の詳細については、Generate Storage Integration Authorization Materials を参照してください。
返された clusterIssuerUrl、namespace、serviceAccountName を使用して、アプリケーションを登録し、認証情報を追加します。
詳細については、アプリケーションを登録して認証情報を追加する を参照してください。
取得した認証情報を検証します。
リクエストでは、externalCred.accountName にポータルに表示される Azure ストレージアカウント名を設定し、externalCred.clientId と externalCred.tenantId には、アプリケーションの登録時に控えた値を設定します。
curl --request POST \
--url "${BASE_URL}/v2/storageIntegrations/validate" \
--header "Authorization: Bearer ${TOKEN}" \
--header "Request-Timeout: 5" \
--header "Content-Type: application/json" \
-d '{
    "projectId": "proj-xxxxxxxxxxxxxxxxxxxxxx",
    "regionId": "gcp-us-central1",
    "bucketName": "my-bucket",
    "externalCred": {
        "accountName": "mystorageaccount",
        "clientId": "00000000-0000-0000-0000-000000000000",
        "tenantId": "11111111-1111-1111-1111-111111111111"
    }
}'
検証が成功した場合のレスポンスは以下の通りです。
{
    "code": 0,
    "data": {
        "success": true,
        "message": ""
    }
}
パラメーターの説明の詳細については、Validate Storage Integration を参照してください。
ストレージ統合を作成します。
このリクエストは、description が追加されている点を除き、検証リクエストとほとんどのパラメーターを共有します。
curl --request POST \
--url "${BASE_URL}/v2/storageIntegrations" \
--header "Authorization: Bearer ${TOKEN}" \
--header "Request-Timeout: 5" \
--header "Content-Type: application/json" \
-d '{
    "projectId": "proj-xxxxxxxxxxxxxxxxxxxxxx",
    "name": "analytics-azure",
    "description": "Azure container for external tables",
    "regionId": "az-eastus",
    "bucketName": "my-bucket",
    "externalCred": {
        "accountName": "mystorageaccount",
        "clientId": "00000000-0000-0000-0000-000000000000",
        "tenantId": "11111111-1111-1111-1111-111111111111"
    }
}'
レスポンスは以下の通りです。
{
    "code": 0,
    "data": {
        "integrationId": "integ-xxxxxxxxxxxxxxxxxxx",
        "name": "analytics-azure"
    }
}
パラメーターの説明の詳細については、Create Storage Integration を参照してください。
統合を管理する
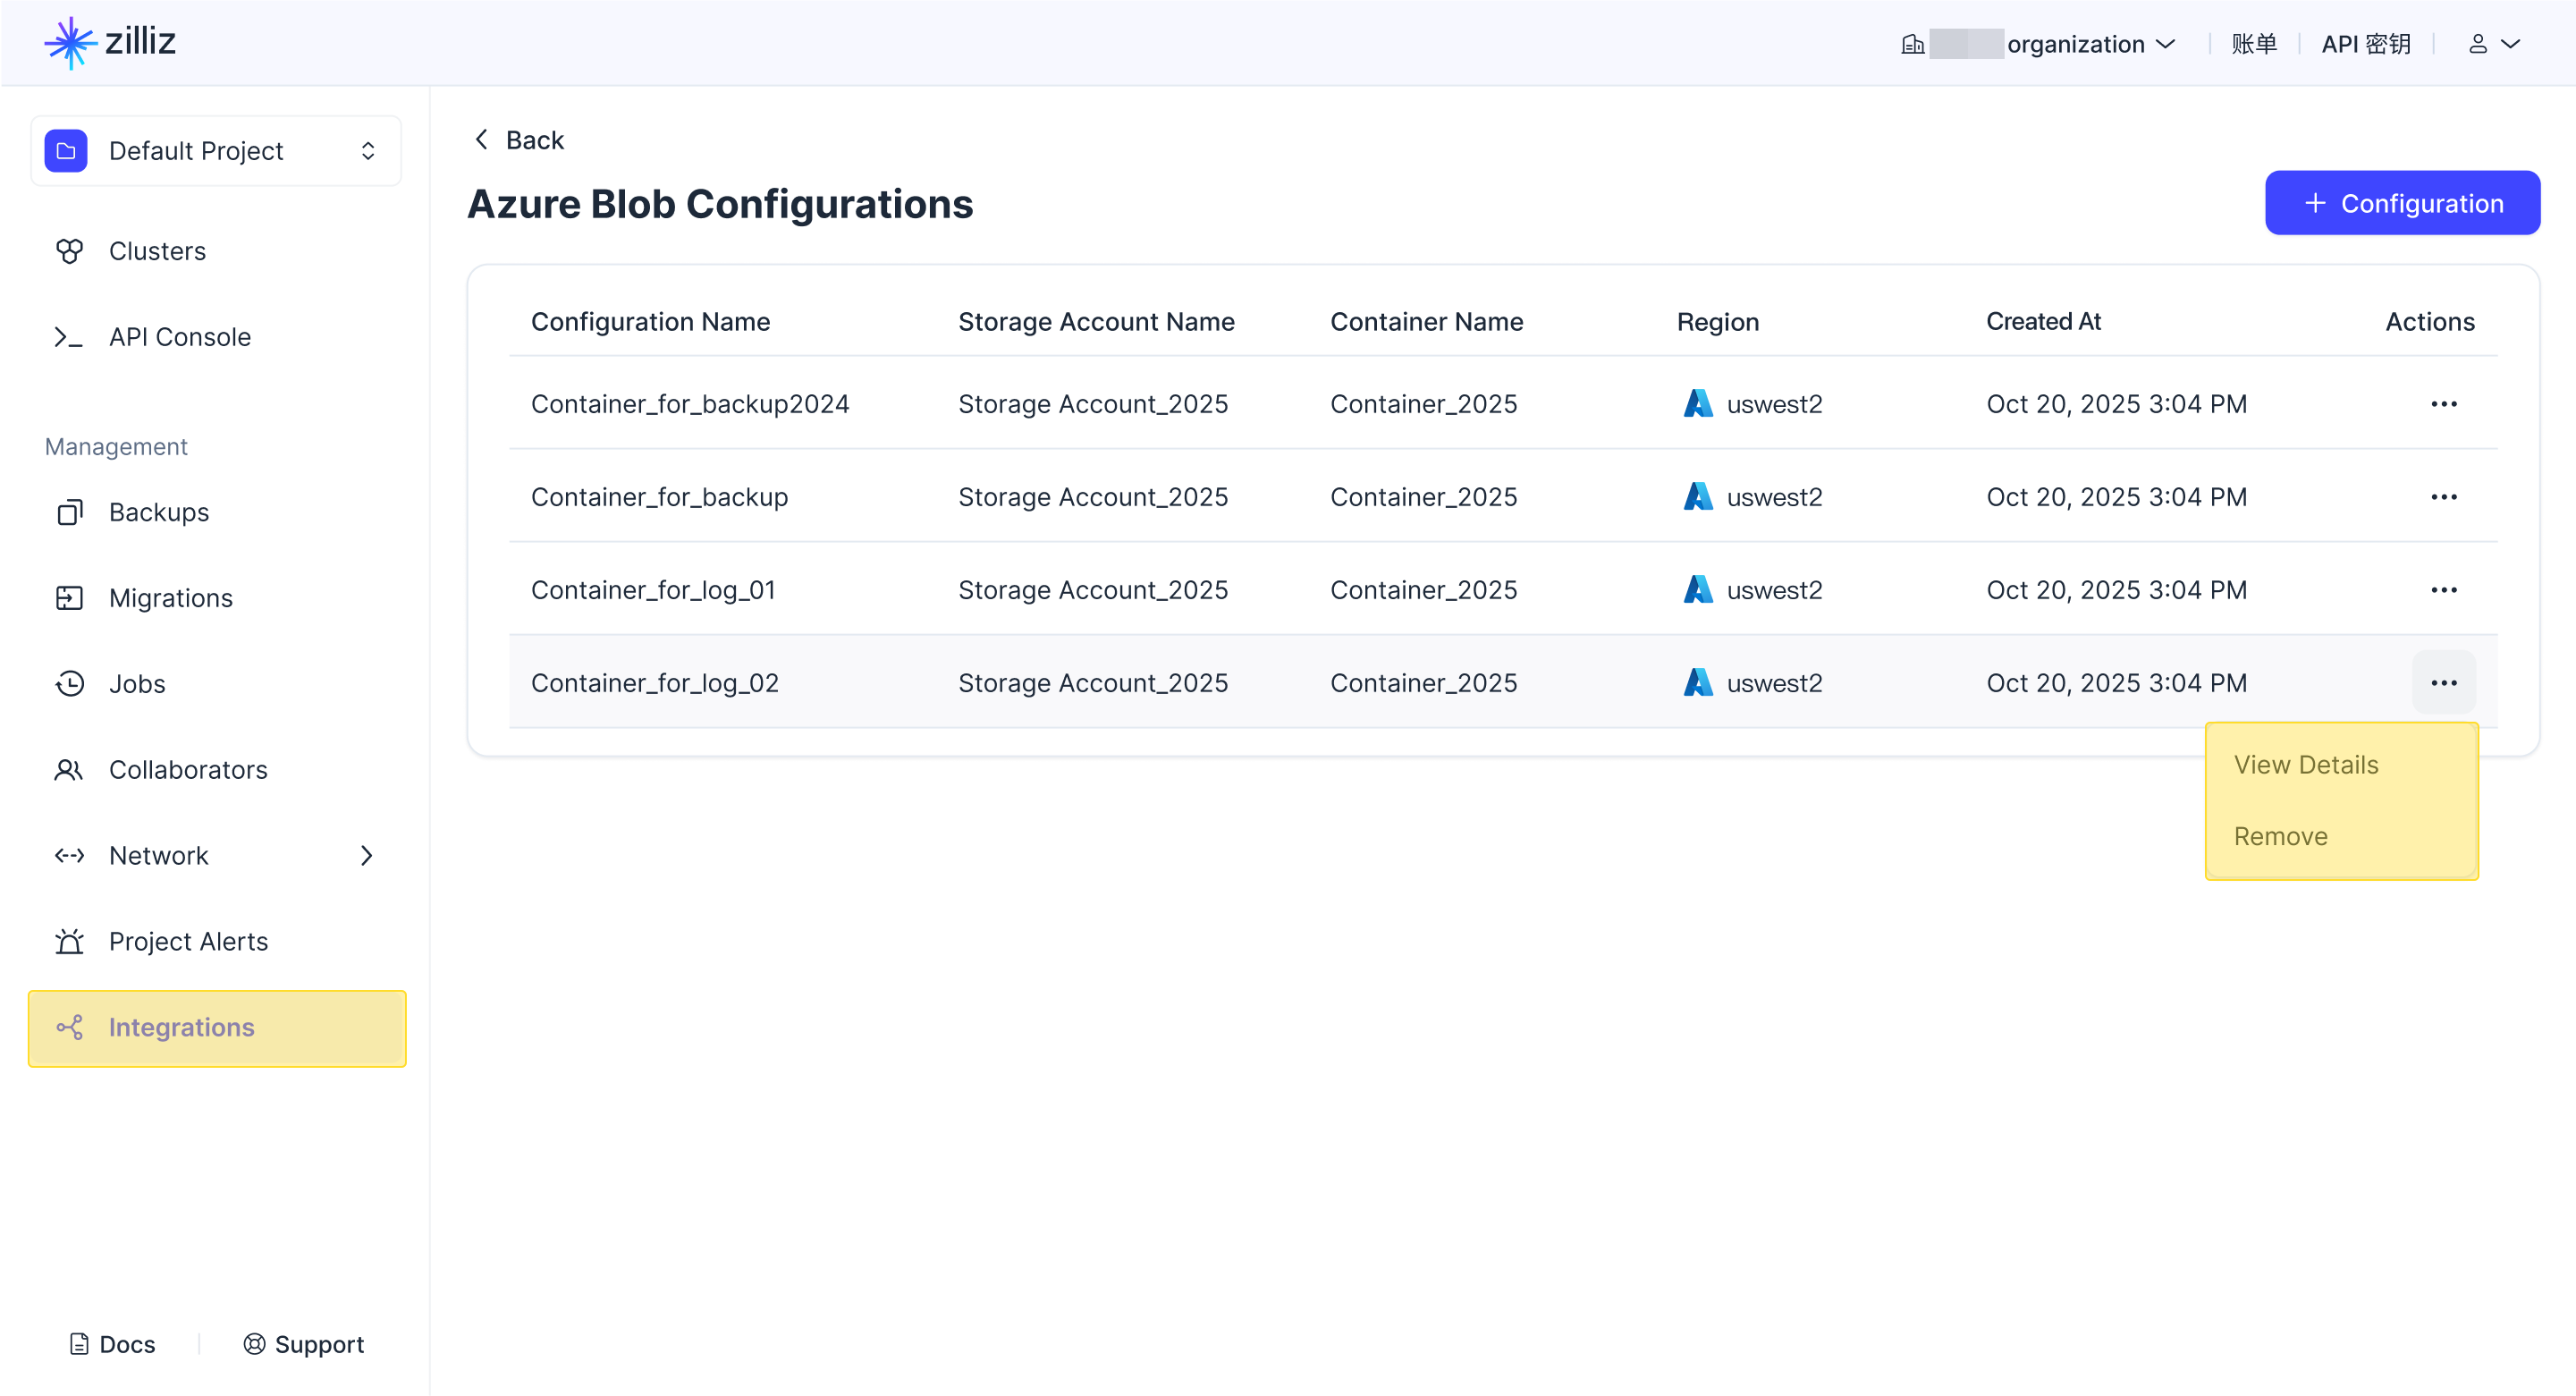
統合を追加すると、必要に応じてその詳細を表示したり、統合を削除したりできます。
統合 ID を取得する
RESTful API を使用して、Zilliz Cloud と統合された AWS S3 バケットのいずれかにバックアップファイルをエクスポートする必要がある場合は、View Details をクリックして統合の詳細を表示し、その統合 ID をコピーします。
または、次のコマンドを実行して統合 ID を取得することもできます。
export TOKEN="YOUR_API_KEY"

curl --request GET \
--url "${BASE_URL}/v2/storageIntegrations?projectId=proj-xxxxxxxxxxxxxxxxxxxxxx" \
--header "Authorization: Bearer ${TOKEN}" \
--header "Request-Timeout: 5" \
--header "Content-Type: application/json"
レスポンスは以下の通りです。
{
    "code": 0,
    "data": {
        "storageIntegrations": [
            {
                "integrationId": "integ-xxxxxxxxxxxxxxxxxxx",
                "name": "analytics-azure",
                "status": "ACTIVE",
                "message": "",
                "regionId": "az-eastus",
                "bucketName": "my-bucket"
            }
        ],
        "count": 1,
        "currentPage": 1,
        "pageSize": 10
    }
}
パラメーターの説明の詳細については、List Storage Integrations を参照してください。
統合の詳細を表示する
次のコマンドを使用して、統合の詳細を表示できます。
export integrationId="integ-xxxxxxxxxxxxxxxxxxx"

curl --request GET \
--url "${BASE_URL}/v2/storageIntegrations/${integrationId}" \
--header "Authorization: Bearer ${TOKEN}" \
--header "Request-Timeout: 5" \
--header "Content-Type: application/json"
レスポンスは以下の通りです。
{
    "code": 0,
    "data": {
        "integrationId": "integ-xxxxxxxxxxxxxxxxxxx",
        "name": "analytics-azure",
        "description": "Azure container for external tables",
        "status": "ACTIVE",
        "message": "",
        "regionId": "az-eastus",
        "bucketName": "my-bucket",
        "externalCred": {
            "roleArn": "arn:aws:iam::123456789012:role/zilliz-bucket-role",
            "externalId": "zilliz-external-AbCdEf12345678"
        },
        "createTime": "2024-07-30T16:49:50Z"
    }
}
パラメーターの説明の詳細については、Describe Storage Integration を参照してください。
ストレージ統合を削除する
Zilliz Cloud コンソールで Remove をクリックする代わりに、次のコマンドを使用して不要なストレージ統合を削除できます。
export integrationId="integ-xxxxxxxxxxxxxxxxxxx"

curl --request DELETE \
--url "${BASE_URL}/v2/storageIntegrations/${integrationId}" \
--header "Authorization: Bearer ${TOKEN}" \
--header "Request-Timeout: 5" \
--header "Content-Type: application/json"
レスポンスは以下の通りです。
{
    "code": 0,
    "data": {
        "integrationId": "integ-xxxxxxxxxxxxxxxxxxx",
        "name": "analytics-azure"
    }
}
パラメーターの説明の詳細については、Delete Storage Integration を参照してください。
トラブルシューティング
-
検証エラー:
統合の検証に失敗した場合は、次の点を確認してください。
-
Azure ストレージアカウントと Zilliz Cloud クラスターのリージョンが一致していること。
-
すべてのアプリケーション ID、テナント ID、および認証情報の詳細が正しいこと。
-
-
権限の問題:
-
Zilliz Cloud と Azure Portal の両方で、必要な権限があることを確認してください。
-
ロールを構成した直後に AuthorizationPermissionMismatch または同様の権限エラーが発生した場合は、待機して再試行してください。Azure のロール割り当ての反映には最大 10 分かかることがあり、管理グループのスコープが関与するまれなケースでは、反映に最大 12 時間かかることがあります。
-