Google Cloud Storage と統合する
Zilliz Cloud では、Google Cloud Storage と統合して、監査ログまたはバックアップファイルを指定したバケットにエクスポートできます。
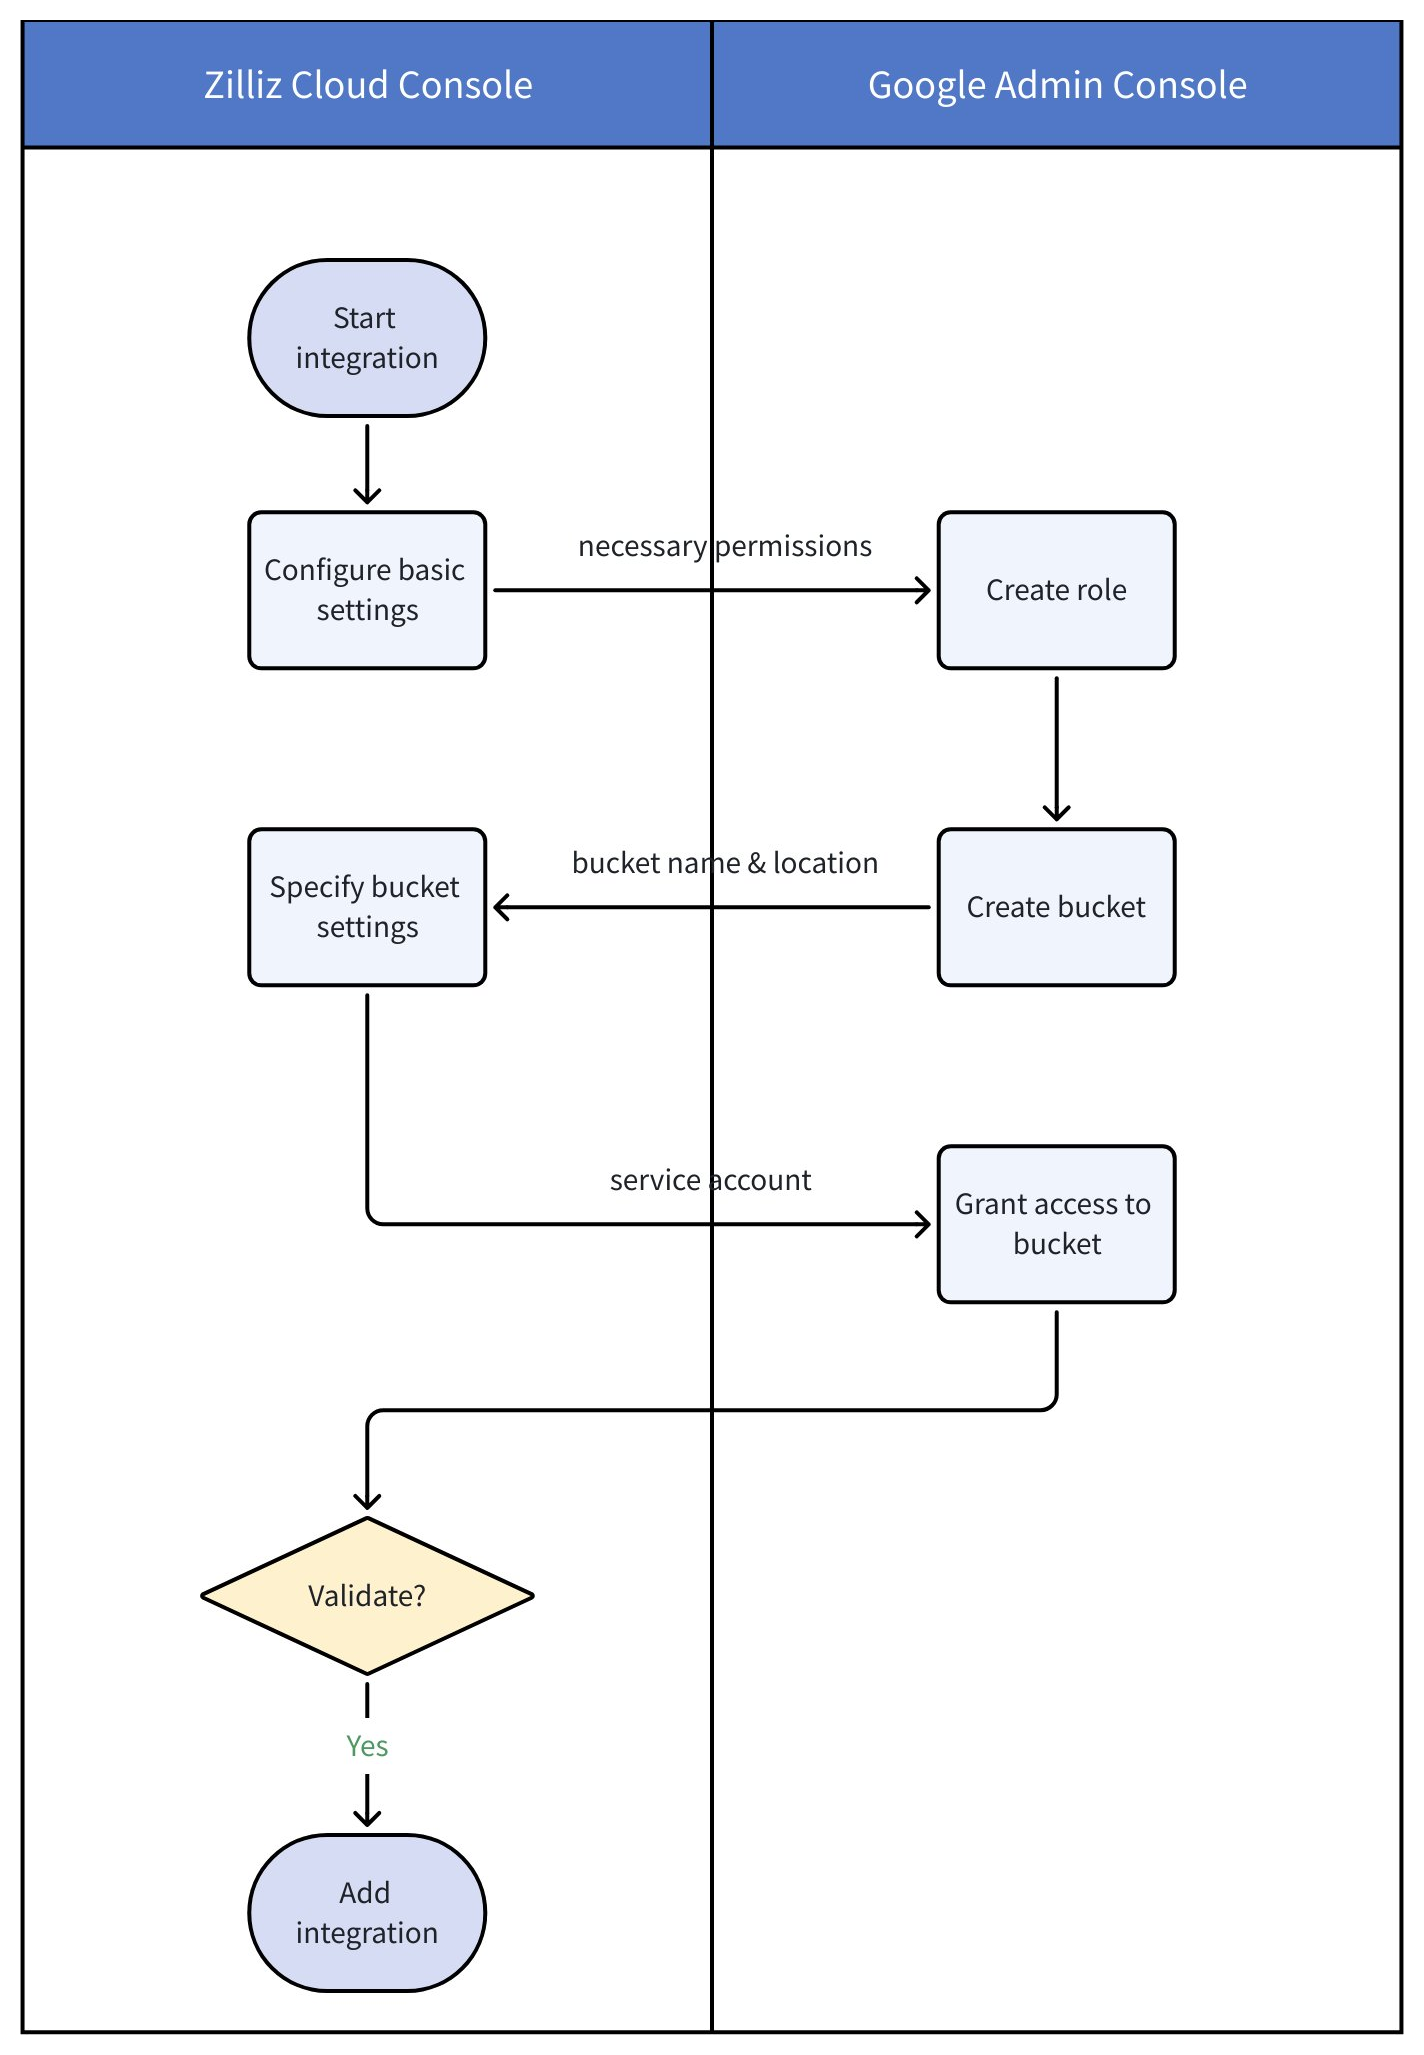
以下の図は、Zilliz Cloud と Google Admin console で必要な手順を示しています。
事前準備
-
Zilliz Cloud を GCP と統合するには、対象プロジェクトに対する Organization Owner または Project Admin のアクセス権を持っていること。必要な権限がない場合は、Zilliz Cloud の管理者にお問い合わせください。
-
Google Admin console への管理者アクセス権を持っていること。
ステップ 1: Zilliz Cloud コンソールで統合を開始する
Zilliz Cloud コンソール にログインします。
プロジェクトページで、左側のナビゲーションペインから Integrations に移動します。
Google Cloud Storage Bucket セクションで、+ Integration をクリックします。
表示されるダイアログボックスで、Basic Settings を入力します。
-
Integration Name: この統合の一意の名前(例:
bucket_for_auditlog)。 -
Integration Description (任意): この統合の説明(例:
for auditlog export)。
入力後、Next をクリックして ステップ 2 に進みます。
ステップ 2: Google Admin console でロールを作成する
Google Admin console にログインします。
IAM & Admin / Roles ページに移動し、+ Create role をクリックします。
表示されるページで、ロールの設定を構成し、ロールに権限を追加します。
-
ロールの Title と ID をカスタマイズし(例:
ZillizBucketRole)、必要に応じて Description を追加します。 -
+ Add permissions をクリックし、以下の最小権限をロールに割り当てます。
-
storage.buckets.get -
storage.objects.create -
storage.objects.list -
storage.objects.get
-
Create をクリックします。
ステップ 3: Google Admin console でバケットを作成する
Google Cloud Storage の Buckets ページに移動します。
+ Create をクリックします。
Create a bucket ページで、バケット情報を入力します。以下の各ステップの後に、Continue をクリックして次のステップに進みます。
-
Get started セクションで、bucket name requirements を満たすグローバルに一意な名前を入力します。後で Zilliz Cloud コンソールにこの名前を入力する必要があるため、バケット名を控えておいてください。
-
Choose where to store your data セクションで次を行います。
-
Location type として Region を選択します。Multi-region または Dual-region は選択しないでください。
-
次に、バケットを作成するリージョンを選択します。選択する場所は、Zilliz Cloud クラスターが存在するクラウドリージョンと同じである必要があります。
-
Create をクリックします。
バケットが作成されたら、Zilliz Cloud コンソール に戻り、次の操作を行います。
Add Google Cloud Storage Integration ダイアログボックスで、Step 3 - Create Google Cloud Storage Bucket に進みます。
-
Zilliz Cloud クラスター Region で、Zilliz Cloud クラスターのクラウドリージョンを選択します。このリージョンは、バケットを作成したリージョンと同じである必要があります。
-
Bucket Name に、作成したバケットの名前を入力します。
次に、Next をクリックします。
その後、Zilliz Cloud コンソールから Google Cloud Service Account をコピーします。これは ステップ 4 でバケットへのアクセス権を付与する際に必要になります。
ステップ 4: Google Admin console でバケットへのアクセス権を付与する
Google Admin console で、ステップ 3 で作成したバケットの詳細ページに移動します。
Permissions タブで、Grant access をクリックします。
Add principals 領域に、Zilliz Cloud コンソールから取得した Google Service Account を貼り付けます。
Assign roles 領域で、ステップ 2 で作成したロールを選択します。
Save をクリックします。
ステップ 5: 統合を検証して追加する
バケットへのアクセス権を付与したら、Zilliz Cloud コンソールに戻って次の操作を行います。
Validate Integration をクリックして、コンテナとロール割り当ての設定が有効であることを確認します。
通常、検証には 2 分ほどかかりますが、場合によっては 7 分以上かかることがあります。
検証が成功したら、Add をクリックして統合を完了します。
これで、Google Cloud Storage が Zilliz Cloud と統合され、監査ログまたはバックアップファイルをエクスポートできるようになりました。詳細については、監査ログ または バックアップファイルのエクスポート を参照してください。
プログラムでストレージ統合を作成する
Zilliz Cloud コンソールでの操作の代わりに、プログラムでストレージ統合を作成することもできます。
バケットを作成します。
詳細については、上記の Google Admin console でバケットを作成する または Create a bucket API ドキュメントを参照してください。
認証情報を生成します。
export BASE_URL="https://api.cloud.zilliz.com"
export TOKEN="YOUR_API_KEY"

curl --request POST \
--url "${BASE_URL}/v2/storageIntegrations/authorizationMaterials" \
--header "Authorization: Bearer ${TOKEN}" \
--header "Request-Timeout: 5" \
--header "Content-Type: application/json" \
-d '{
    "projectId": "proj-xxxxxxxxxxxxxxxxxxxxxx",
    "regionId": "gcp-us-central1",
    "bucketName": "my-bucket"
}'
上記のリクエストにより、GCP コンソールで権限とロールを作成するために必要な認証情報が生成されます。
レスポンスの例は次のとおりです。
{
    "code": 0,
    "data": {
        "permission": [
            "storage.objects.get",
            "storage.objects.create",
            "storage.objects.list",
            "storage.buckets.get"
        ],
        "googleCloudServiceAccount": "zilliz-xxxx@vdc-dev-test.iam.gserviceaccount.com"
    }
}
パラメータの説明については、Generate Storage Integration Authorization Materials を参照してください。
返された permission と googleCloudServiceAccount を使用して、バケットを操作するための十分な権限を持つロールを作成します。
次のステップで使用するため、作成したロールのサービスアカウントのメールアドレスを控えておいてください。ロールの作成方法の詳細については、上記の Google Admin console でロールを作成する を参照してください。
取得した認証情報を検証します。
リクエストでは、externalCred.gcpProjectId に GCP プロジェクト ID を、externalCred.serviceAccountEmail に前のステップで作成したロールのサービスアカウントのメールアドレスを設定します。
curl --request POST \
--url "${BASE_URL}/v2/storageIntegrations/validate" \
--header "Authorization: Bearer ${TOKEN}" \
--header "Request-Timeout: 5" \
--header "Content-Type: application/json" \
-d '{
    "projectId": "proj-xxxxxxxxxxxxxxxxxxxxxx",
    "regionId": "gcp-us-central1",
    "bucketName": "my-bucket",
    "externalCred": {
        "gcpProjectId": "my-gcp-project",
        "serviceAccountEmail": "bucket-access@my-gcp-project.iam.gserviceaccount.com"
    }
}'
検証が成功した場合のレスポンスは次のとおりです。
{
    "code": 0,
    "data": {
        "success": true,
        "message": ""
    }
}
パラメータの説明については、Validate Storage Integration を参照してください。
ストレージ統合を作成します。
このリクエストは、検証リクエストとほとんどのパラメータを共有し、それに description が追加されます。
curl --request POST \
--url "${BASE_URL}/v2/storageIntegrations" \
--header "Authorization: Bearer ${TOKEN}" \
--header "Request-Timeout: 5" \
--header "Content-Type: application/json" \
-d '{
    "projectId": "proj-xxxxxxxxxxxxxxxxxxxxxx",
    "name": "analytics-gcp",
    "description": "GCP bucket for external tables",
    "regionId": "gcp-us-central1",
    "bucketName": "my-bucket",
    "externalCred": {
        "gcpProjectId": "my-gcp-project",
        "serviceAccountEmail": "bucket-access@my-gcp-project.iam.gserviceaccount.com"
    }
}'
レスポンスは次のようになります。
{
    "code": 0,
    "data": {
        "integrationId": "integ-xxxxxxxxxxxxxxxxxxx",
        "name": "analytics-gcp"
    }
}
パラメータの説明については、Create Storage Integration を参照してください。
統合を管理する
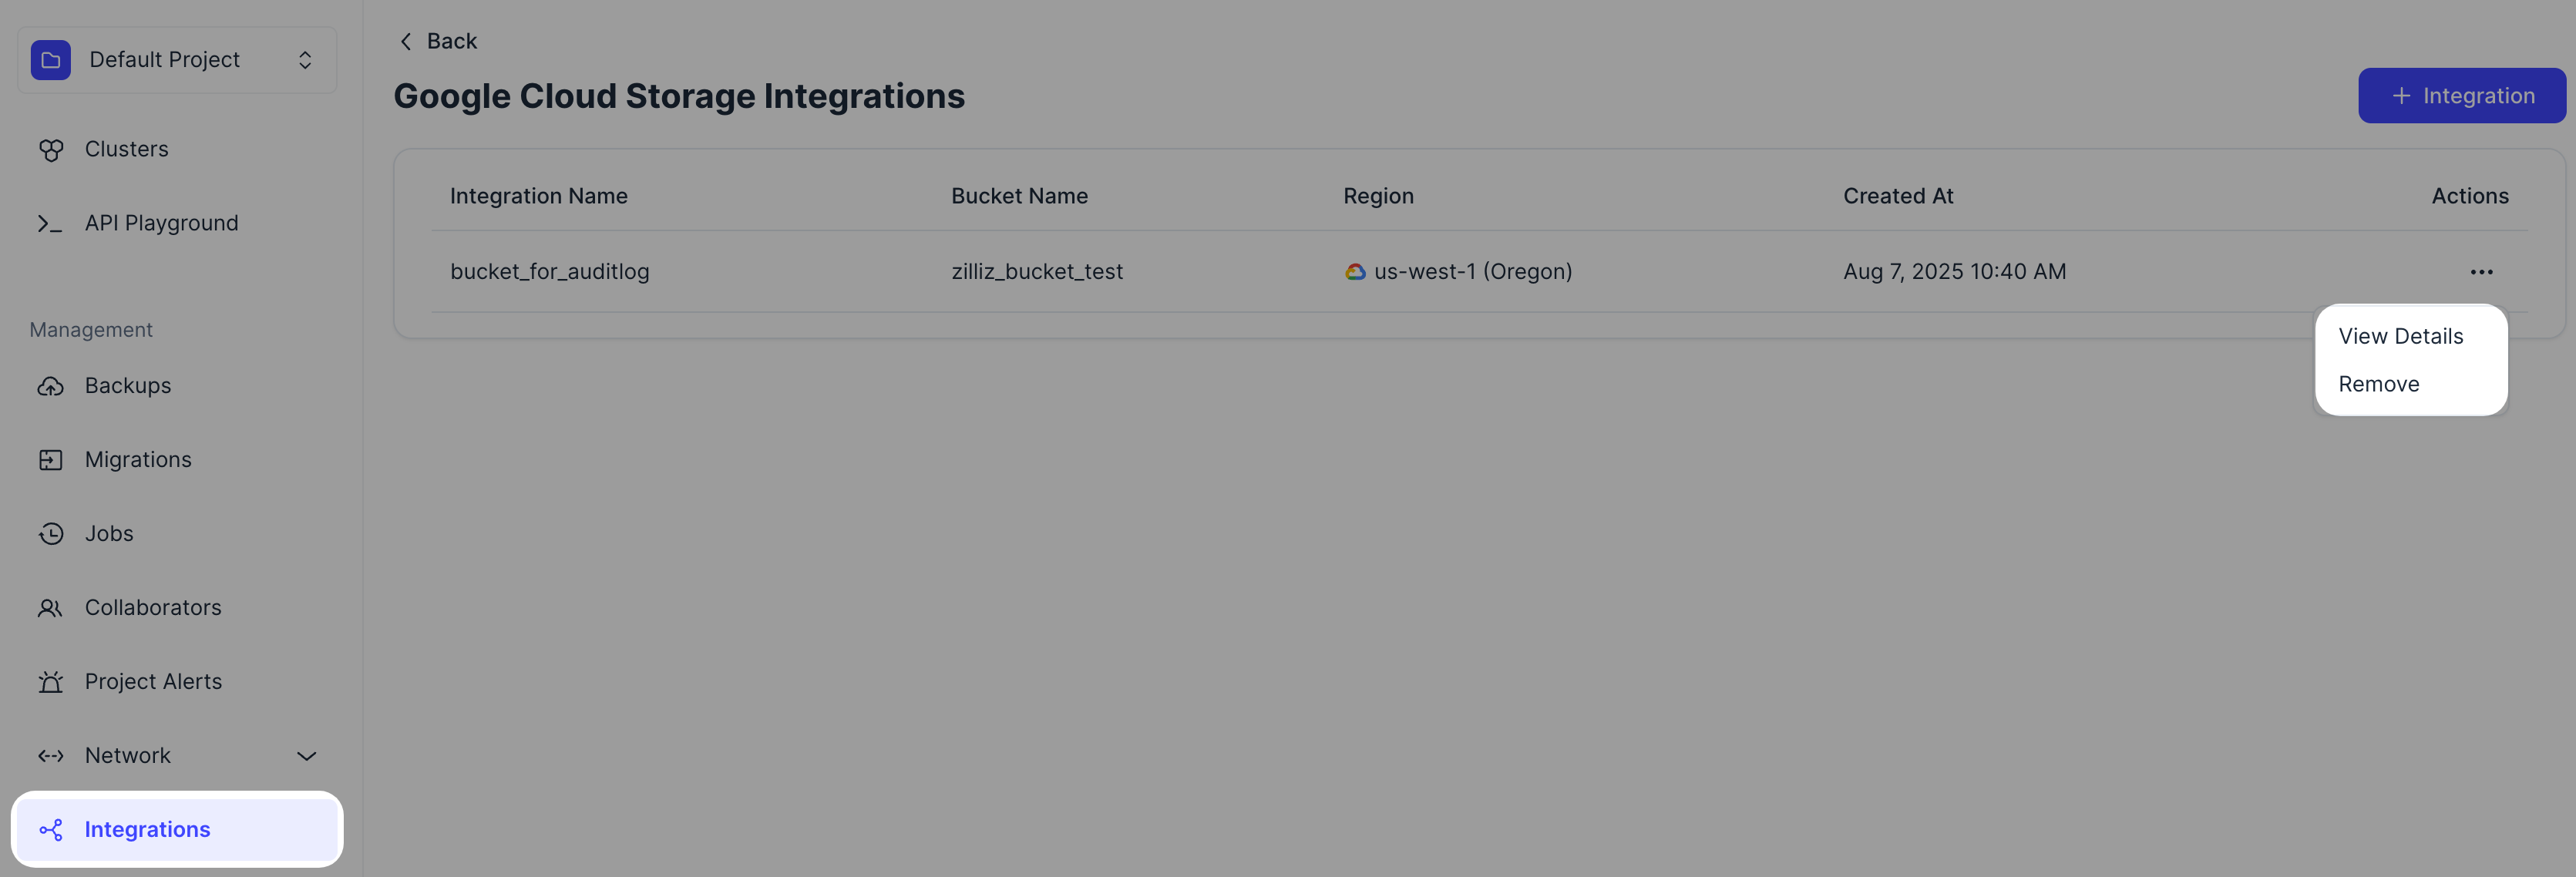
統合を追加すると、必要に応じてその詳細を表示したり、統合を削除したりできます。
統合 ID を取得する
Zilliz Cloud と統合された AWS S3 バケットのいずれかにバックアップファイルをエクスポートするために RESTful API を使用する必要がある場合は、View Details をクリックして統合の詳細を表示し、その統合 ID をコピーします。
または、次のコマンドを実行して統合 ID を取得することもできます。
export TOKEN="YOUR_API_KEY"

curl --request GET \
--url "${BASE_URL}/v2/storageIntegrations?projectId=proj-xxxxxxxxxxxxxxxxxxxxxx" \
--header "Authorization: Bearer ${TOKEN}" \
--header "Request-Timeout: 5" \
--header "Content-Type: application/json"
レスポンスは次のようになります。
{
    "code": 0,
    "data": {
        "storageIntegrations": [
            {
                "integrationId": "integ-xxxxxxxxxxxxxxxxxxx",
                "name": "analytics-gcp",
                "status": "ACTIVE",
                "message": "",
                "regionId": "gcp-us-central1",
                "bucketName": "my-bucket"
            }
        ],
        "count": 1,
        "currentPage": 1,
        "pageSize": 10
    }
}
パラメータの説明については、List Storage Integrations を参照してください。
統合の詳細を表示する
次のコマンドを使用して、統合の詳細を表示できます。
export integrationId="integ-xxxxxxxxxxxxxxxxxxx"

curl --request GET \
--url "${BASE_URL}/v2/storageIntegrations/${integrationId}" \
--header "Authorization: Bearer ${TOKEN}" \
--header "Request-Timeout: 5" \
--header "Content-Type: application/json"
レスポンスは次のようになります。
{
    "code": 0,
    "data": {
        "integrationId": "integ-xxxxxxxxxxxxxxxxxxx",
        "name": "analytics-s3",
        "description": "GCP bucket for external tables",
        "status": "ACTIVE",
        "message": "",
        "regionId": "gcp-us-central1",
        "bucketName": "my-bucket",
        "externalCred": {
            "roleArn": "arn:aws:iam::123456789012:role/zilliz-bucket-role",
            "externalId": "zilliz-external-AbCdEf12345678"
        },
        "createTime": "2024-07-30T16:49:50Z"
    }
}
パラメータの説明については、Describe Storage Integration を参照してください。
ストレージ統合を削除する
Zilliz Cloud コンソールで Remove をクリックする代わりに、次のコマンドを使用して不要なストレージ統合を削除できます。
export integrationId="integ-xxxxxxxxxxxxxxxxxxx"

curl --request DELETE \
--url "${BASE_URL}/v2/storageIntegrations/${integrationId}" \
--header "Authorization: Bearer ${TOKEN}" \
--header "Request-Timeout: 5" \
--header "Content-Type: application/json"
レスポンスは次のようになります。
{
    "code": 0,
    "data": {
        "integrationId": "integ-xxxxxxxxxxxxxxxxxxx",
        "name": "analytics-gcp"
    }
}
パラメータの説明については、Delete Storage Integration を参照してください。
FAQ
検証時に「bucket region not match」エラーが発生するのはなぜですか?
このエラーは、次の 2 つの理由で発生する可能性があります。
-
バケットの Location type として Multi-region または Dual-region を選択した場合。Zilliz Cloud は単一の Region バケットのみをサポートしています。
-
Location type として Region を選択したものの、選択したリージョンが Zilliz Cloud クラスターのリージョンと完全に一致していない場合。
たとえば、Zilliz Cloud クラスターが us-east1 にある場合、バケットは us-east1 リージョンに作成する必要があります。Multi-region の「United States」や、us-west1 のような別の Region に作成しないでください。
バケットを誤った Location type またはリージョンで作成した場合は、削除して、正しい単一の Region 設定で再作成してください。
「403 PermissionDenied」エラーが発生するのはなぜですか?
アクセス権を付与した直後に 403 PermissionDenied エラーが表示される場合は、しばらく待ってから再試行してください。GCP の権限の変更は通常 2 分ほどで反映されますが、7 分以上かかることもあります。