オンデマンドクラスターの管理
この機能は Enterprise プラン以上でのみ利用できます。
現在、この機能は AWS us-west-2 および Azure East US リージョンでのみ利用可能です。他のリージョンでオンデマンドクラスターを使用するには、お問い合わせください。
このガイドでは、Zilliz Cloud でオンデマンドクラスターを表示、確認、削除する方法について説明します。
オンデマンドクラスターは、オンデマンド検索ワークロード向けにコンピューティングリソースを提供します。リクエストが到着すると起動し、アイドル状態になると、クラスター作成時に設定された自動サスペンドタイムアウトに基づいてゼロまでスケールバックします。
オンデマンドクラスターを管理するには、対象プロジェクトの Project Admin である必要があります。ロールと権限の詳細については、プラットフォームユーザーの管理 を参照してください。
すべてのオンデマンドクラスターを表示する
この操作を使用して、プロジェクトおよびリージョン内のオンデマンドクラスターを一覧表示します。
RESTful API を使用する場合
curl --request GET \
--url "${BASE_URL}/v2/clusters/onDemandClusters?projectId=proj-xxxxxxxxxxxxxxx®ionId=aws-us-west-2" \
--header "Authorization: Bearer ${TOKEN}" \
--header "Accept: application/json"
レスポンス例:
{
    "code": 0,
    "data": {
        "count": 2,
        "onDemandClusters": [
            {
                "projectId": "proj-xxxxxxxxxxxxxxx",
                "clusterId": "inxx-xxxxxxxxxxxxxxx",
                "clusterName": "Cluster-01",
                "regionId": "aws-us-west-2",
                "cuSize": 8,
                "status": "RUNNING",
                "endpoint": "https://proj-xxxxxxxxxxxxxxx.aws-us-west-2.api.zillizcloud.com",
                "privateLink": "",
                "createdBy": "john.doe@zilliz.com",
                "createTime": "2024-04-21T10:15:15Z",
                "autoSuspend": 60,
                "description": "An on-demand cluster for vector search workloads."
            },
            {
                "projectId": "proj-xxxxxxxxxxxxxxx",
                "clusterId": "inxx-xxxxxxxxxxxxxxx",
                "clusterName": "Cluster-02",
                "regionId": "aws-us-west-2",
                "status": "RUNNING",
                "cuSize": 8,
                "endpoint": "https://proj-xxxxxxxxxxxxxxx.aws-us-west-2.api.zillizcloud.com",
                "privateLink": "",
                "createdBy": "john.doe@zilliz.com",
                "createTime": "2024-04-21T10:15:16Z",
                "autoSuspend": 60,
                "description": "An on-demand cluster for vector search workloads."
            }
        ]
    }
}
Web コンソールを使用する場合
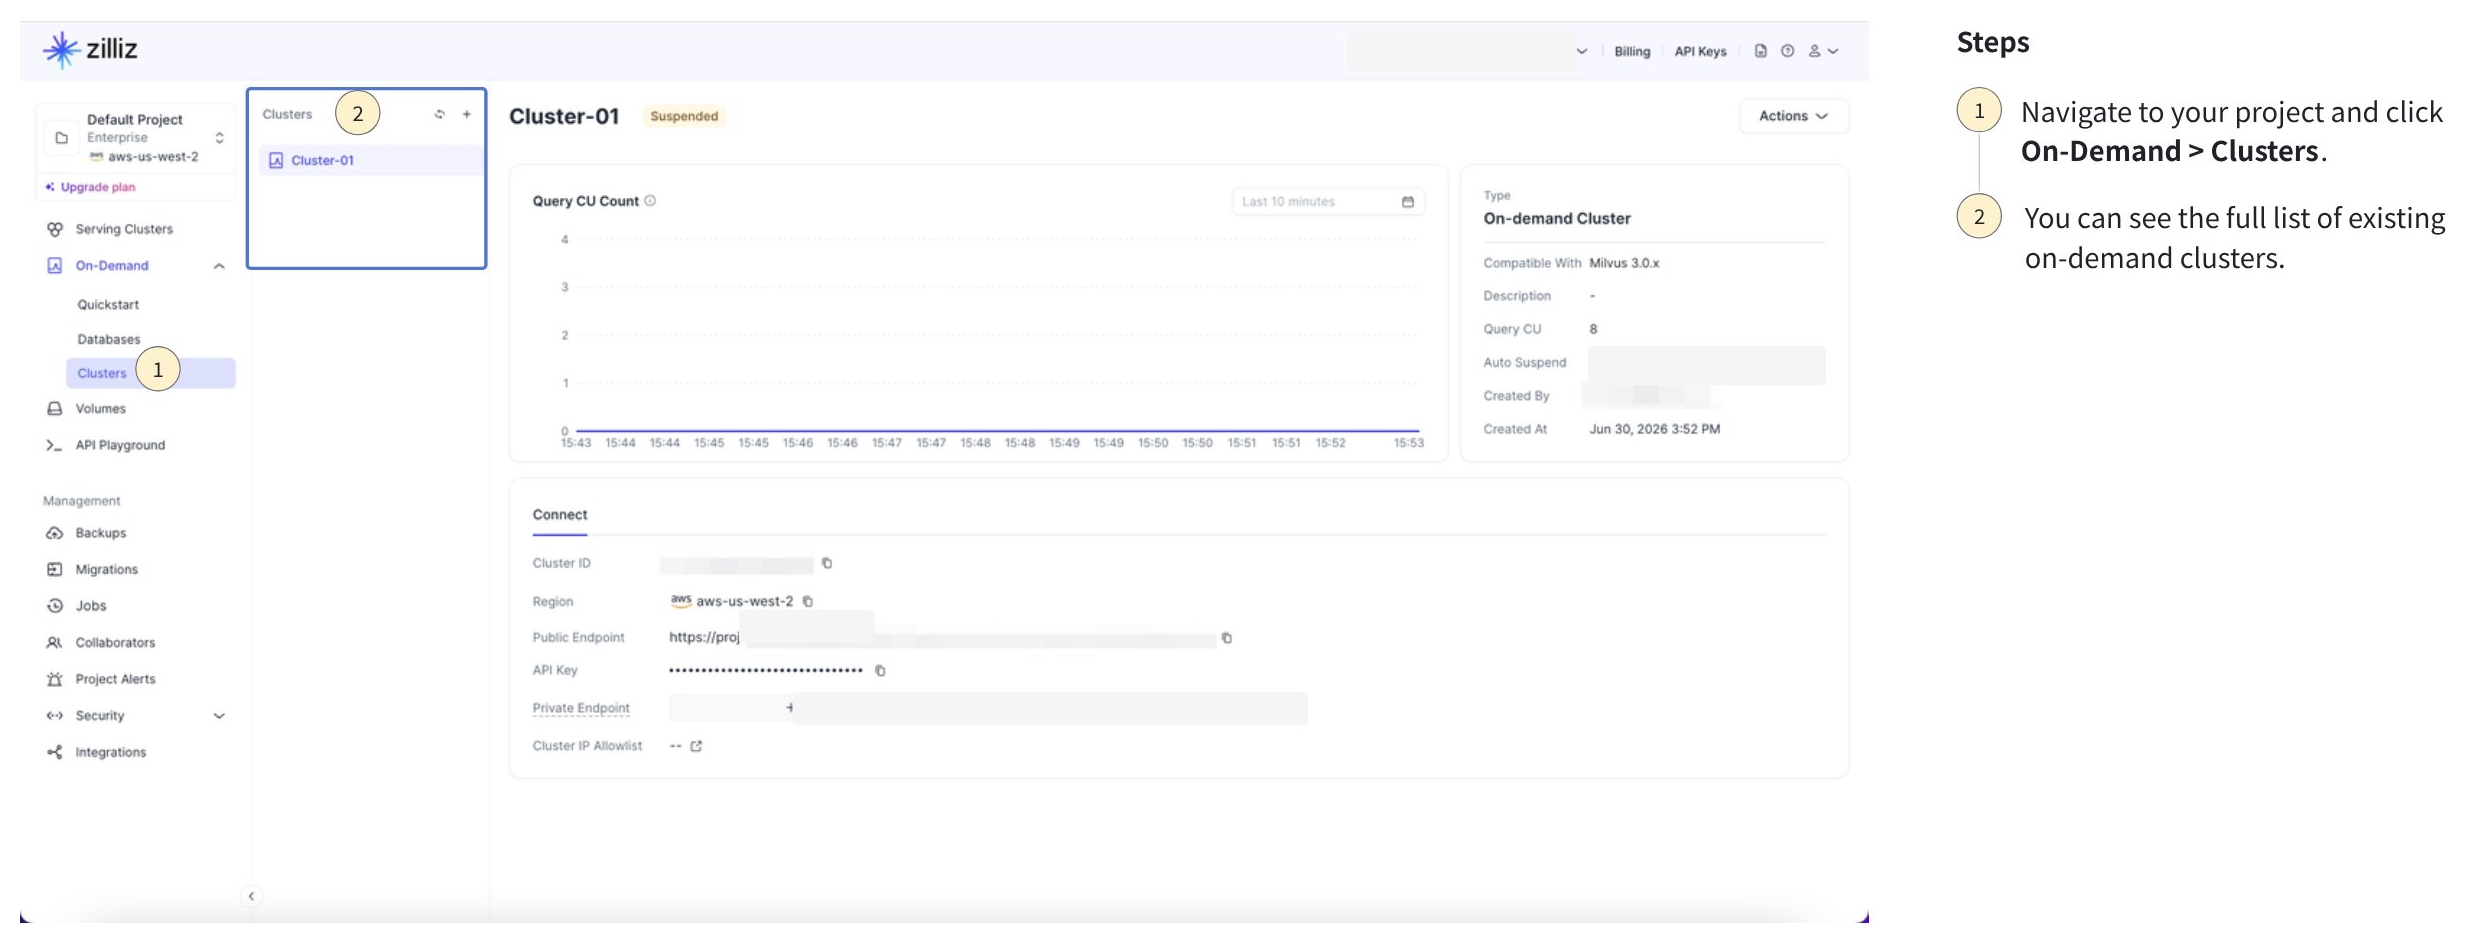
Zilliz Cloud コンソールで、対象プロジェクトを開きます。
On-Demand Compute > クラスター に移動します。
オンデマンドクラスターの一覧を確認します。ここにはクラスター名、クラスター ID、ステータス、CU サイズ、エンドポイント、作成者、作成日時が含まれます。
オンデマンドクラスターの詳細を確認する
この操作を使用して、クラスター ID を指定して 1 つのオンデマンドクラスターを確認します。
RESTful API を使用する場合
curl --request GET \
--url "https://${BASE_URL}/v2/on-demand-compute?projectId=proj-09ee1f4b1151d5dd1edbc5®ionId=aws-us-west-2" \
--header "Authorization: Bearer ${API_KEY}" \
--header "Accept: application/json"
レスポンス例:
{
  "code": 0,
  "data": {
    "projectId": "proj-09ee1f4b1151d5dd1edbc5",
    "regionId": "aws-us-west-2",
    "status": "enabled"
  }
}
Web コンソールを使用する場合
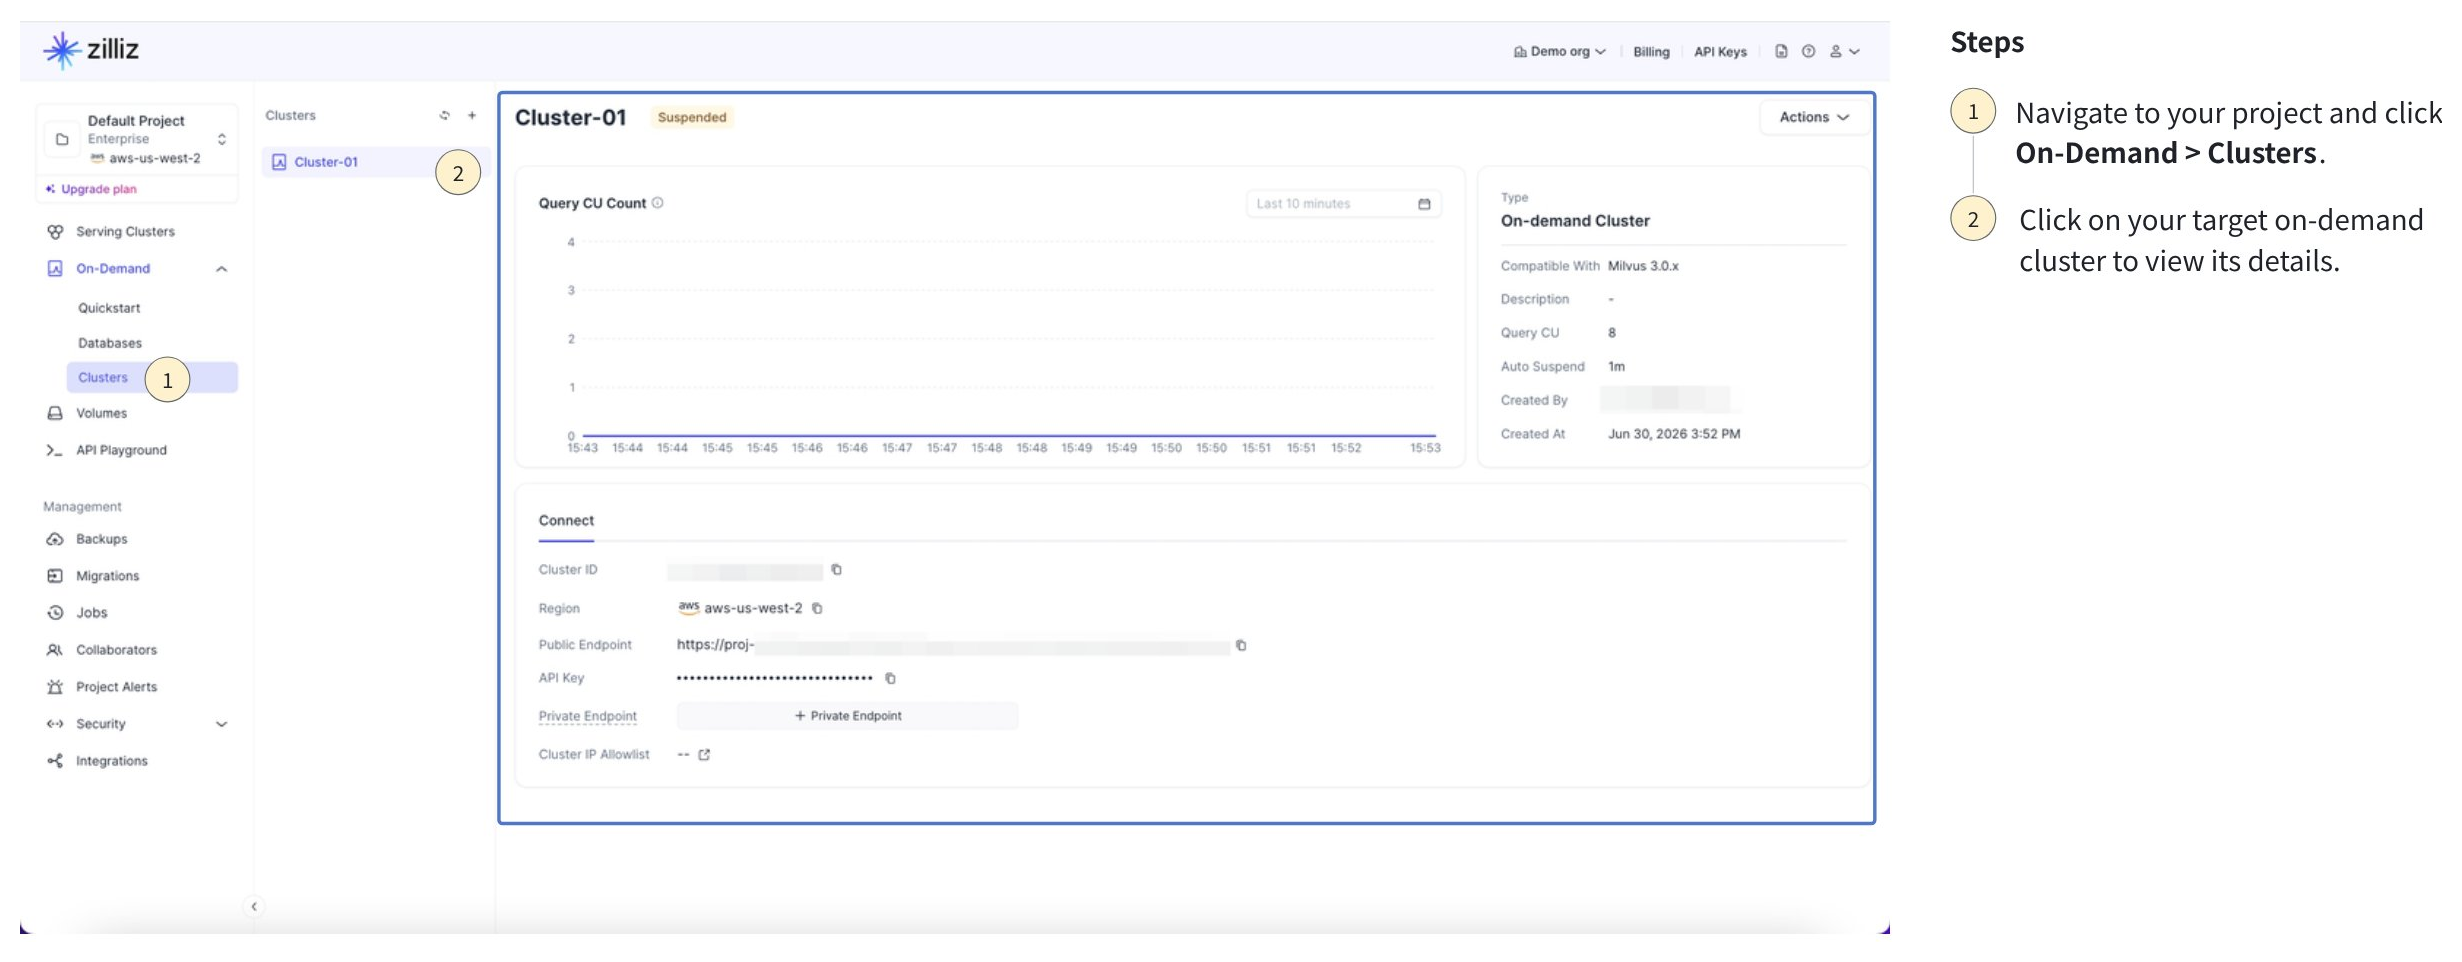
Zilliz Cloud コンソールで、対象プロジェクトを開きます。
On-Demand Compute > クラスター に移動します。
対象のクラスターをクリックして詳細を表示します。
クラスターのステータスを理解する
オンデマンドクラスターは、リクエストのアクティビティに基づいてステータスを自動的に変更します。
| ステータス | 説明 |
|---|---|
RUNNING | クラスターにアクティブなコンピューティングリソースがあり、検索またはクエリのリクエストを処理できます。 |
SUSPENDED | 設定されたアイドルタイムアウトの経過後にゼロまでスケールダウンした状態です。サスペンド中はコンピューティングコストが発生しません。 |
DELETING | クラスターは削除中であり、使用できません。 |
サスペンド状態のオンデマンドクラスターにリクエストが到着すると、Zilliz Cloud はそのワークロード用のコンピューティングリソースを起動します。設定された autoSuspend 期間内にリクエストを受信しないと、クラスターはゼロまでスケールバックします。
オンデマンドクラスターの名前を変更する
-
RESTful API を使用する場合
以下の例では、クラスター名を変更します。詳細については、Update On-Demand クラスター を参照してください。
bashcurl --request PATCH \--url "${BASE_URL}/v2/clusters/onDemandClusters/${CLUSTER_ID}" \--header "Authorization: Bearer ${TOKEN}" \--header "OrgId: org-xxxxxxxxxxxxxxxxxxx" \--header "Content-Type: application/json" \-d '{"clusterName": "New Cluster Name"}'以下は出力例です。
json{"code": 0,"data": {"clusterId": "inxx-xxxxxxxxxxxxxxx","prompt": "successfully submitted. Cluster is being upgraded, which is expected to take several minutes. You can access data about the creation progress and status of your cluster by DescribeCluster API. Once the cluster status is RUNNING, you may access your vector database using the SDK."}} -
Web コンソールを使用する場合
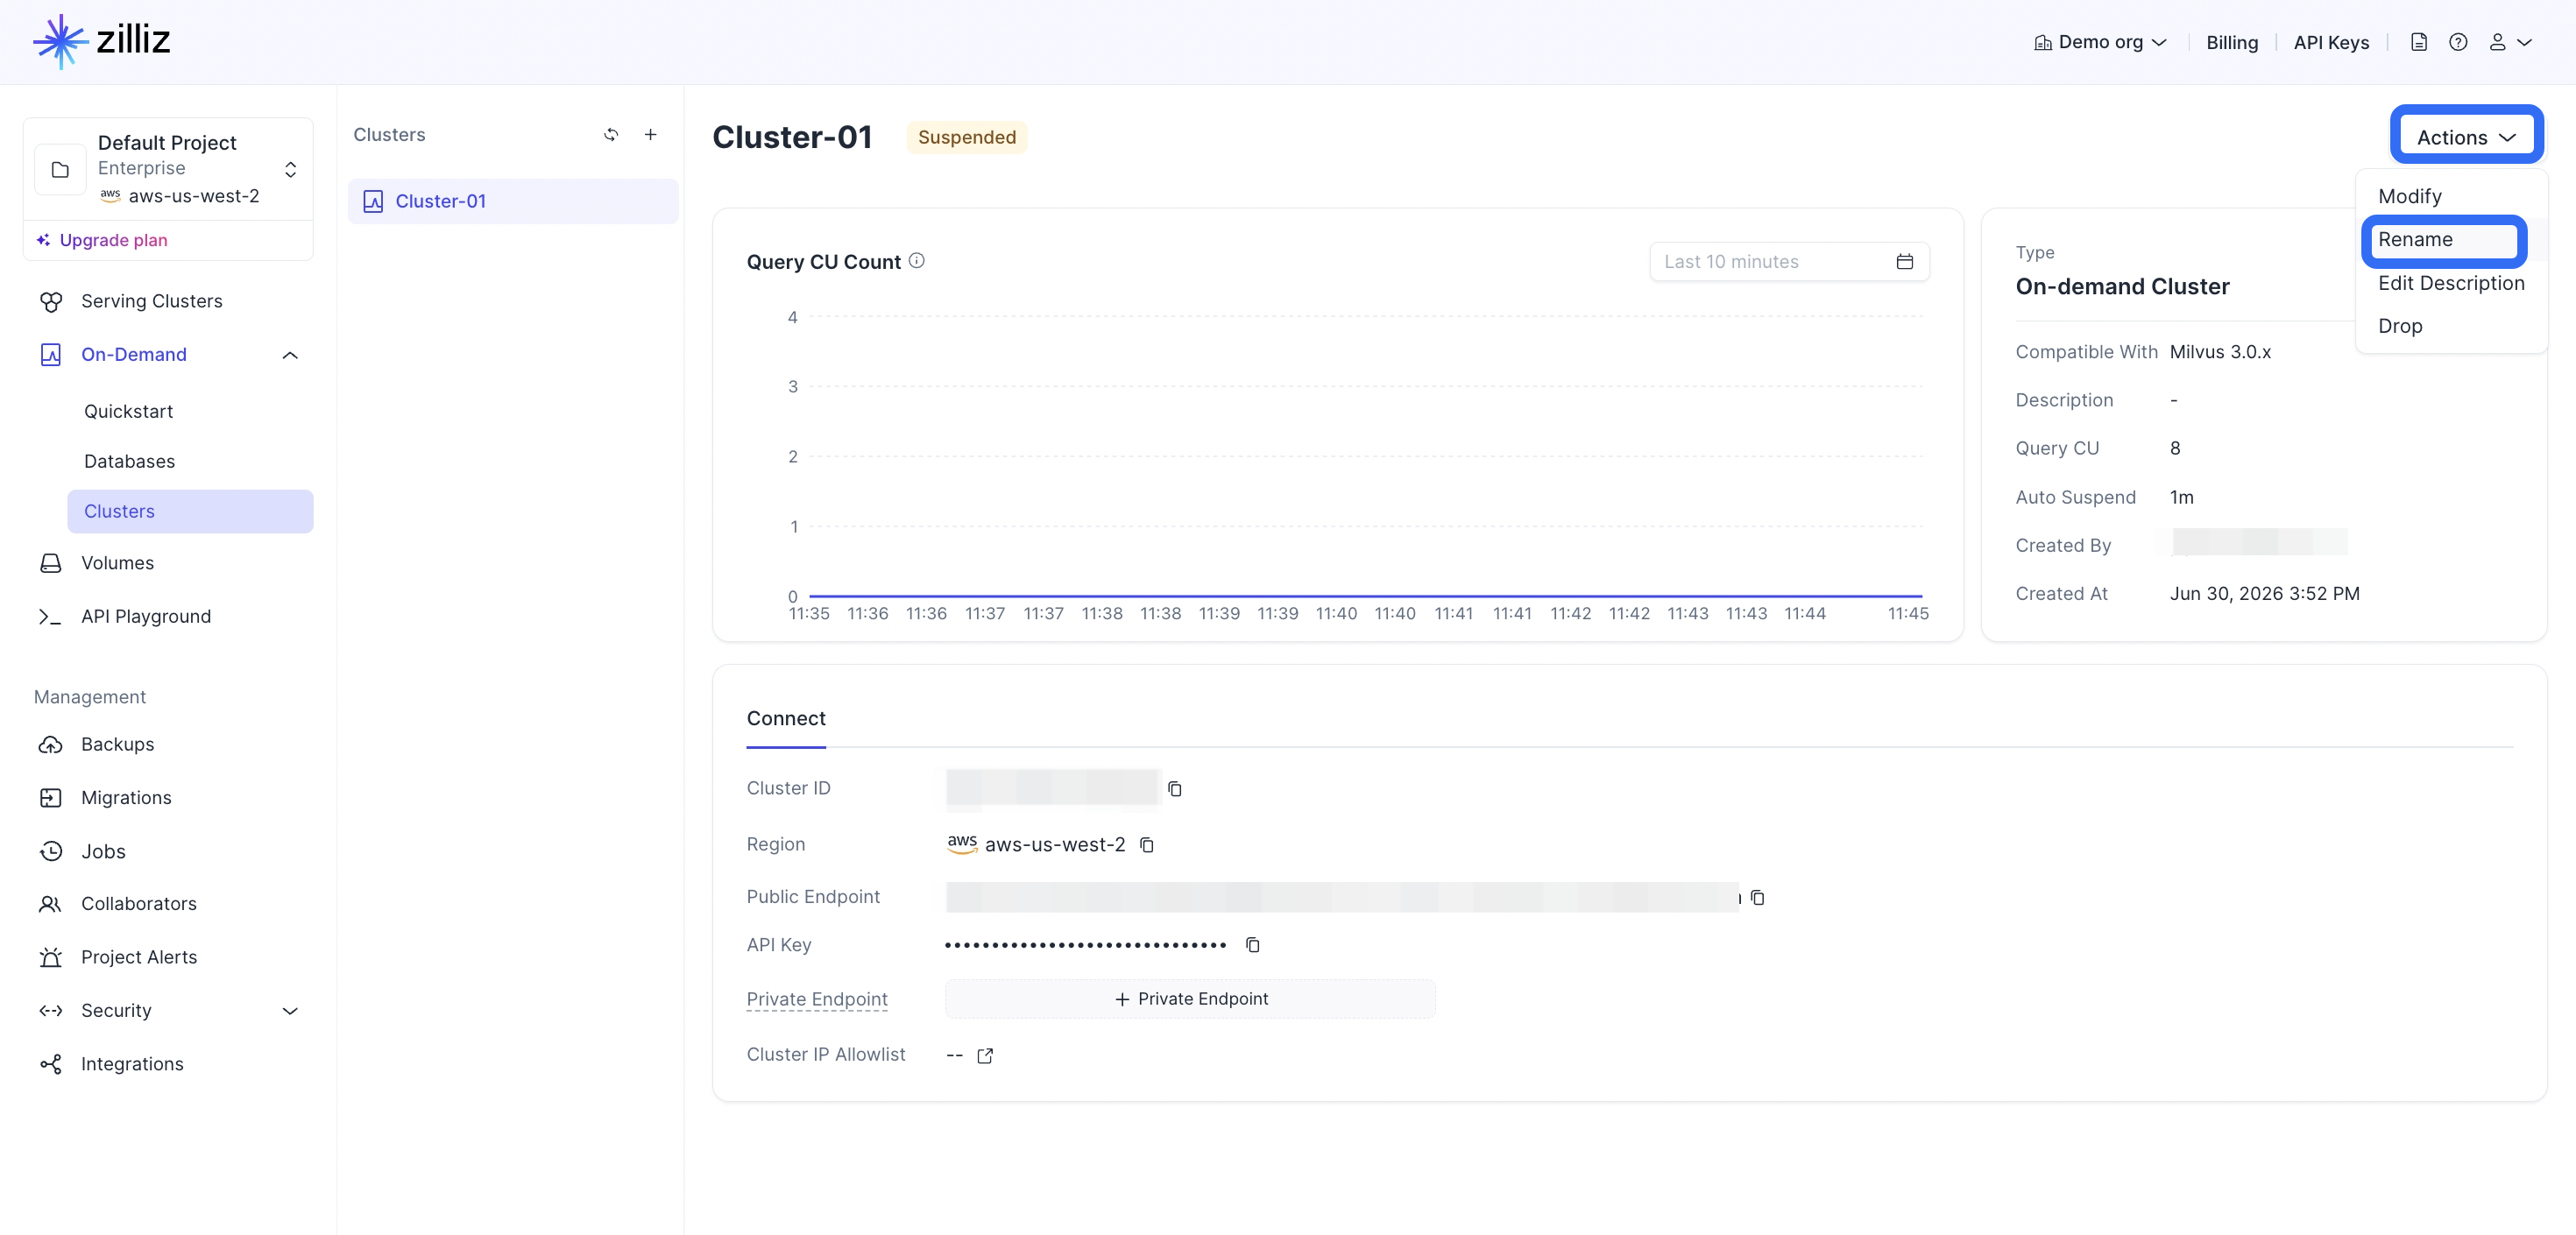
1対象のオンデマンドクラスターに移動します。
2Actions をクリックし、Rename を選択します。
 3
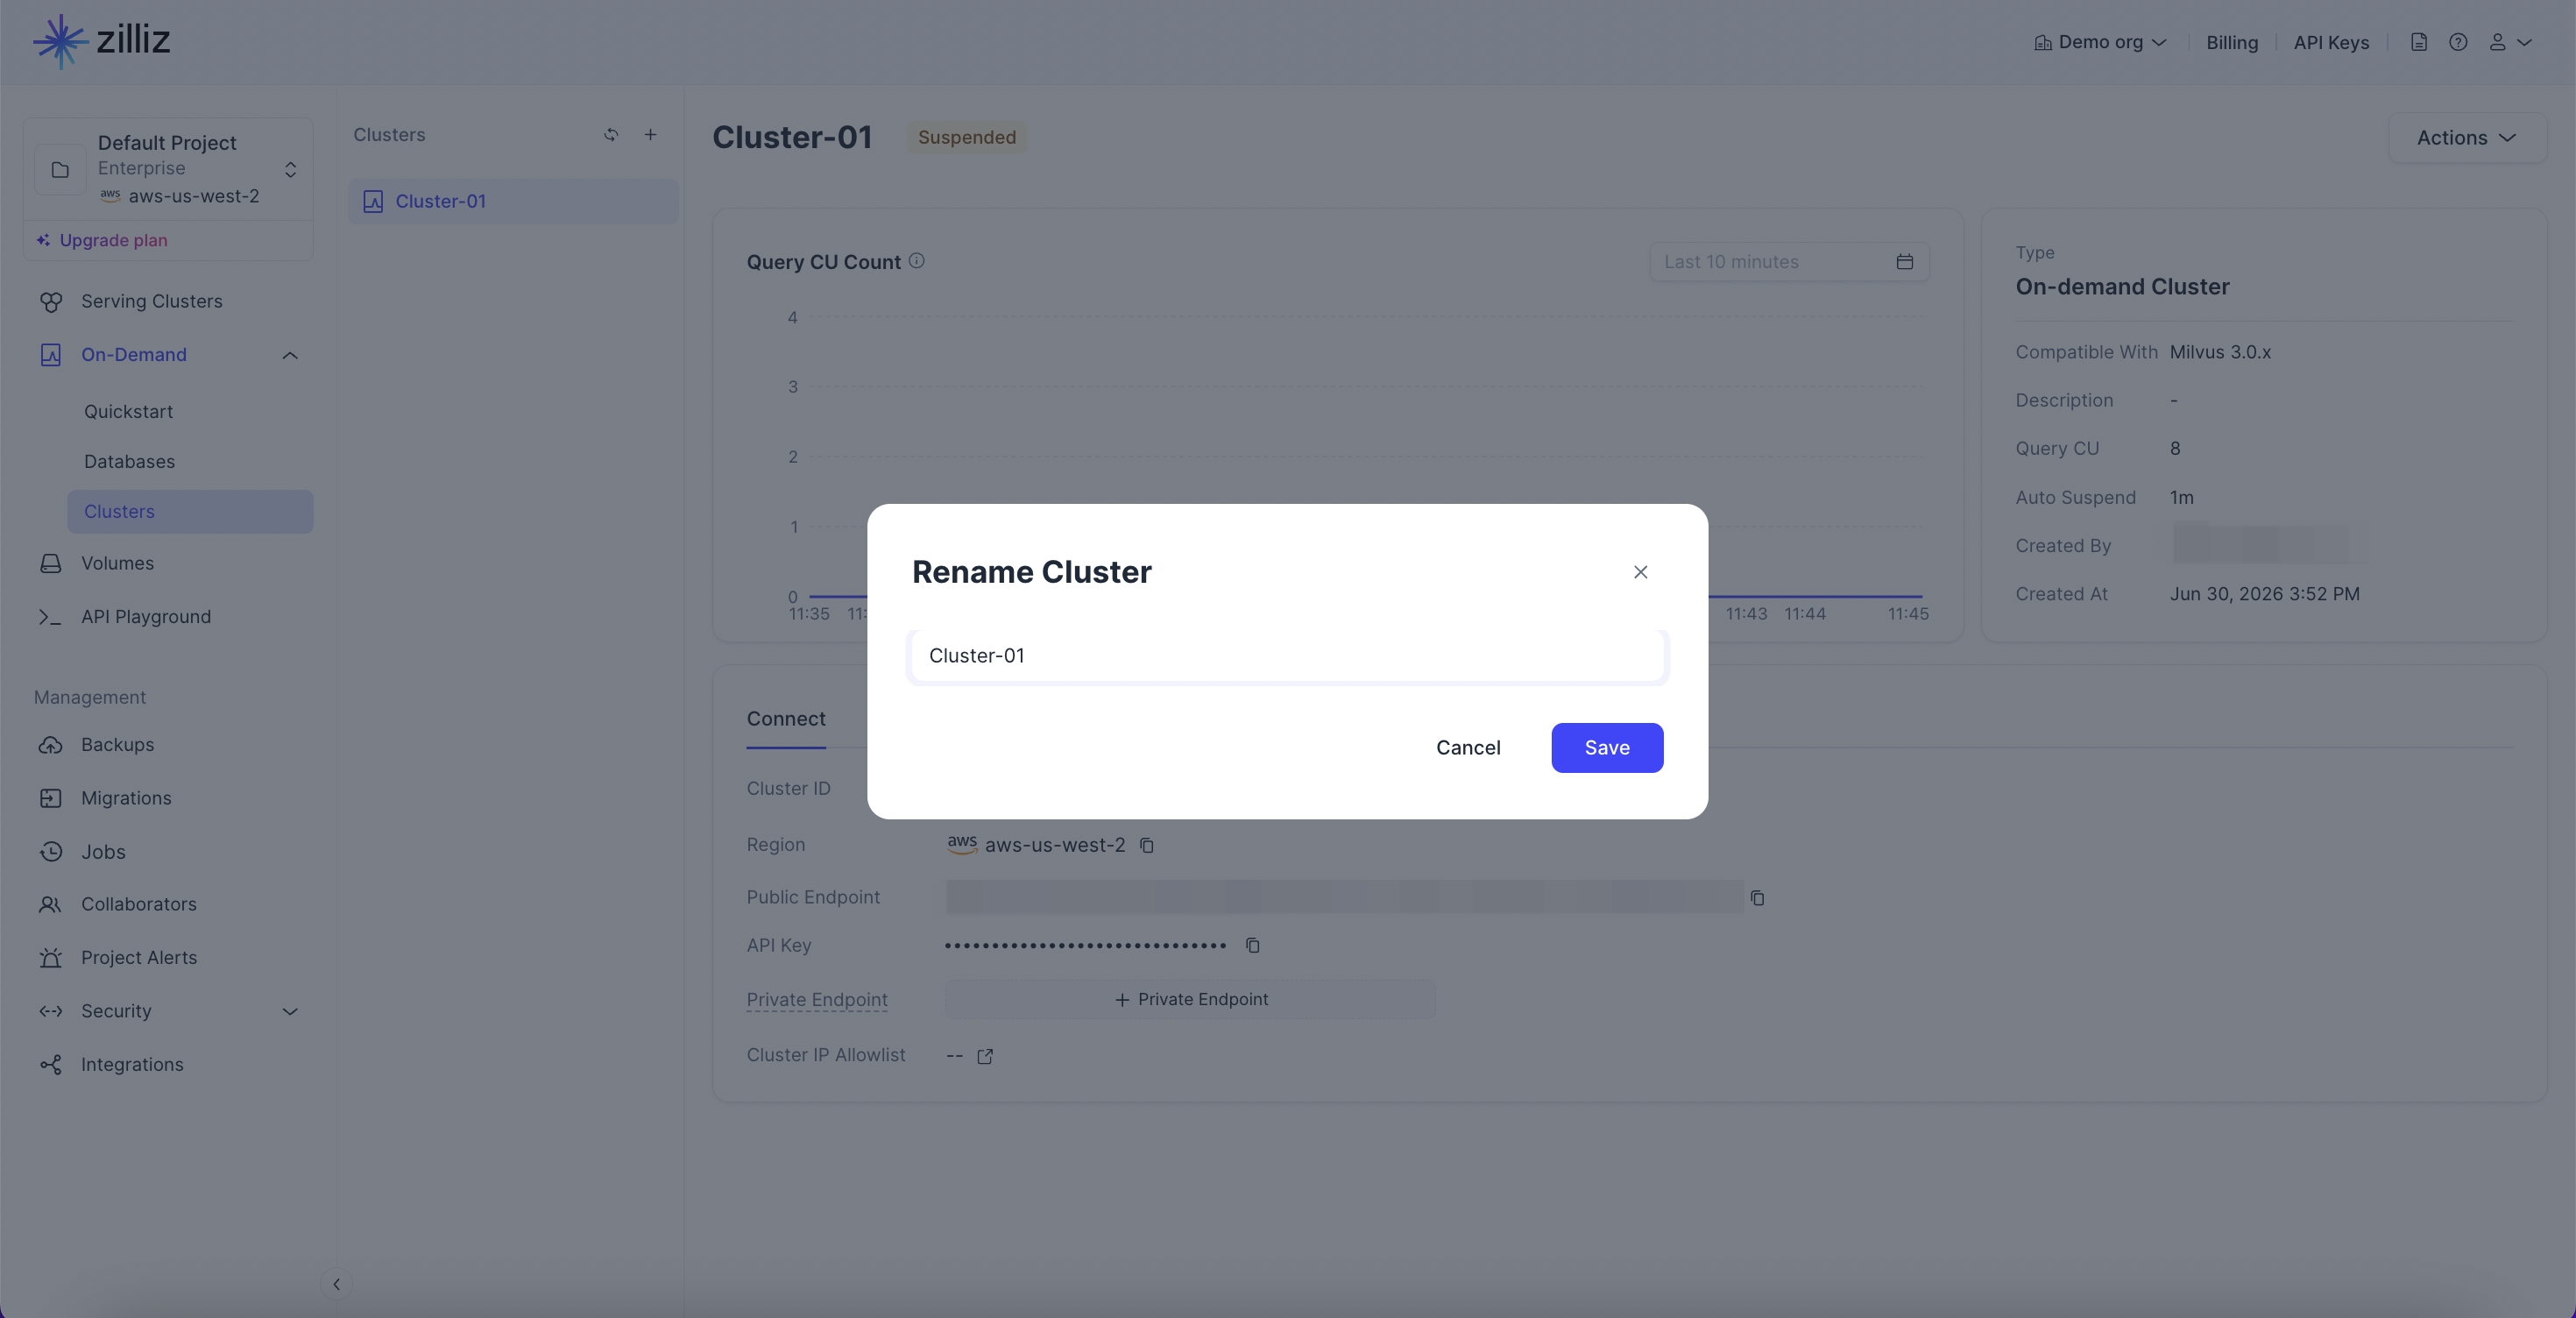
3クラスターの新しい名前を入力し、Save をクリックします。
オンデマンドクラスターの説明を編集する
-
RESTful API を使用する場合
以下の例では、クラスターの説明を変更します。詳細については、Update On-Demand クラスター を参照してください。
bashcurl --request PATCH \--url "${BASE_URL}/v2/clusters/onDemandClusters/${CLUSTER_ID}" \--header "Authorization: Bearer ${TOKEN}" \--header "OrgId: org-xxxxxxxxxxxxxxxxxxx" \--header "Content-Type: application/json" \-d '{"description": ""}'以下は出力例です。
json{"code": 0,"data": {"clusterId": "inxx-xxxxxxxxxxxxxxx","prompt": "successfully submitted. Cluster is being upgraded, which is expected to take several minutes. You can access data about the creation progress and status of your cluster by DescribeCluster API. Once the cluster status is RUNNING, you may access your vector database using the SDK."}} -
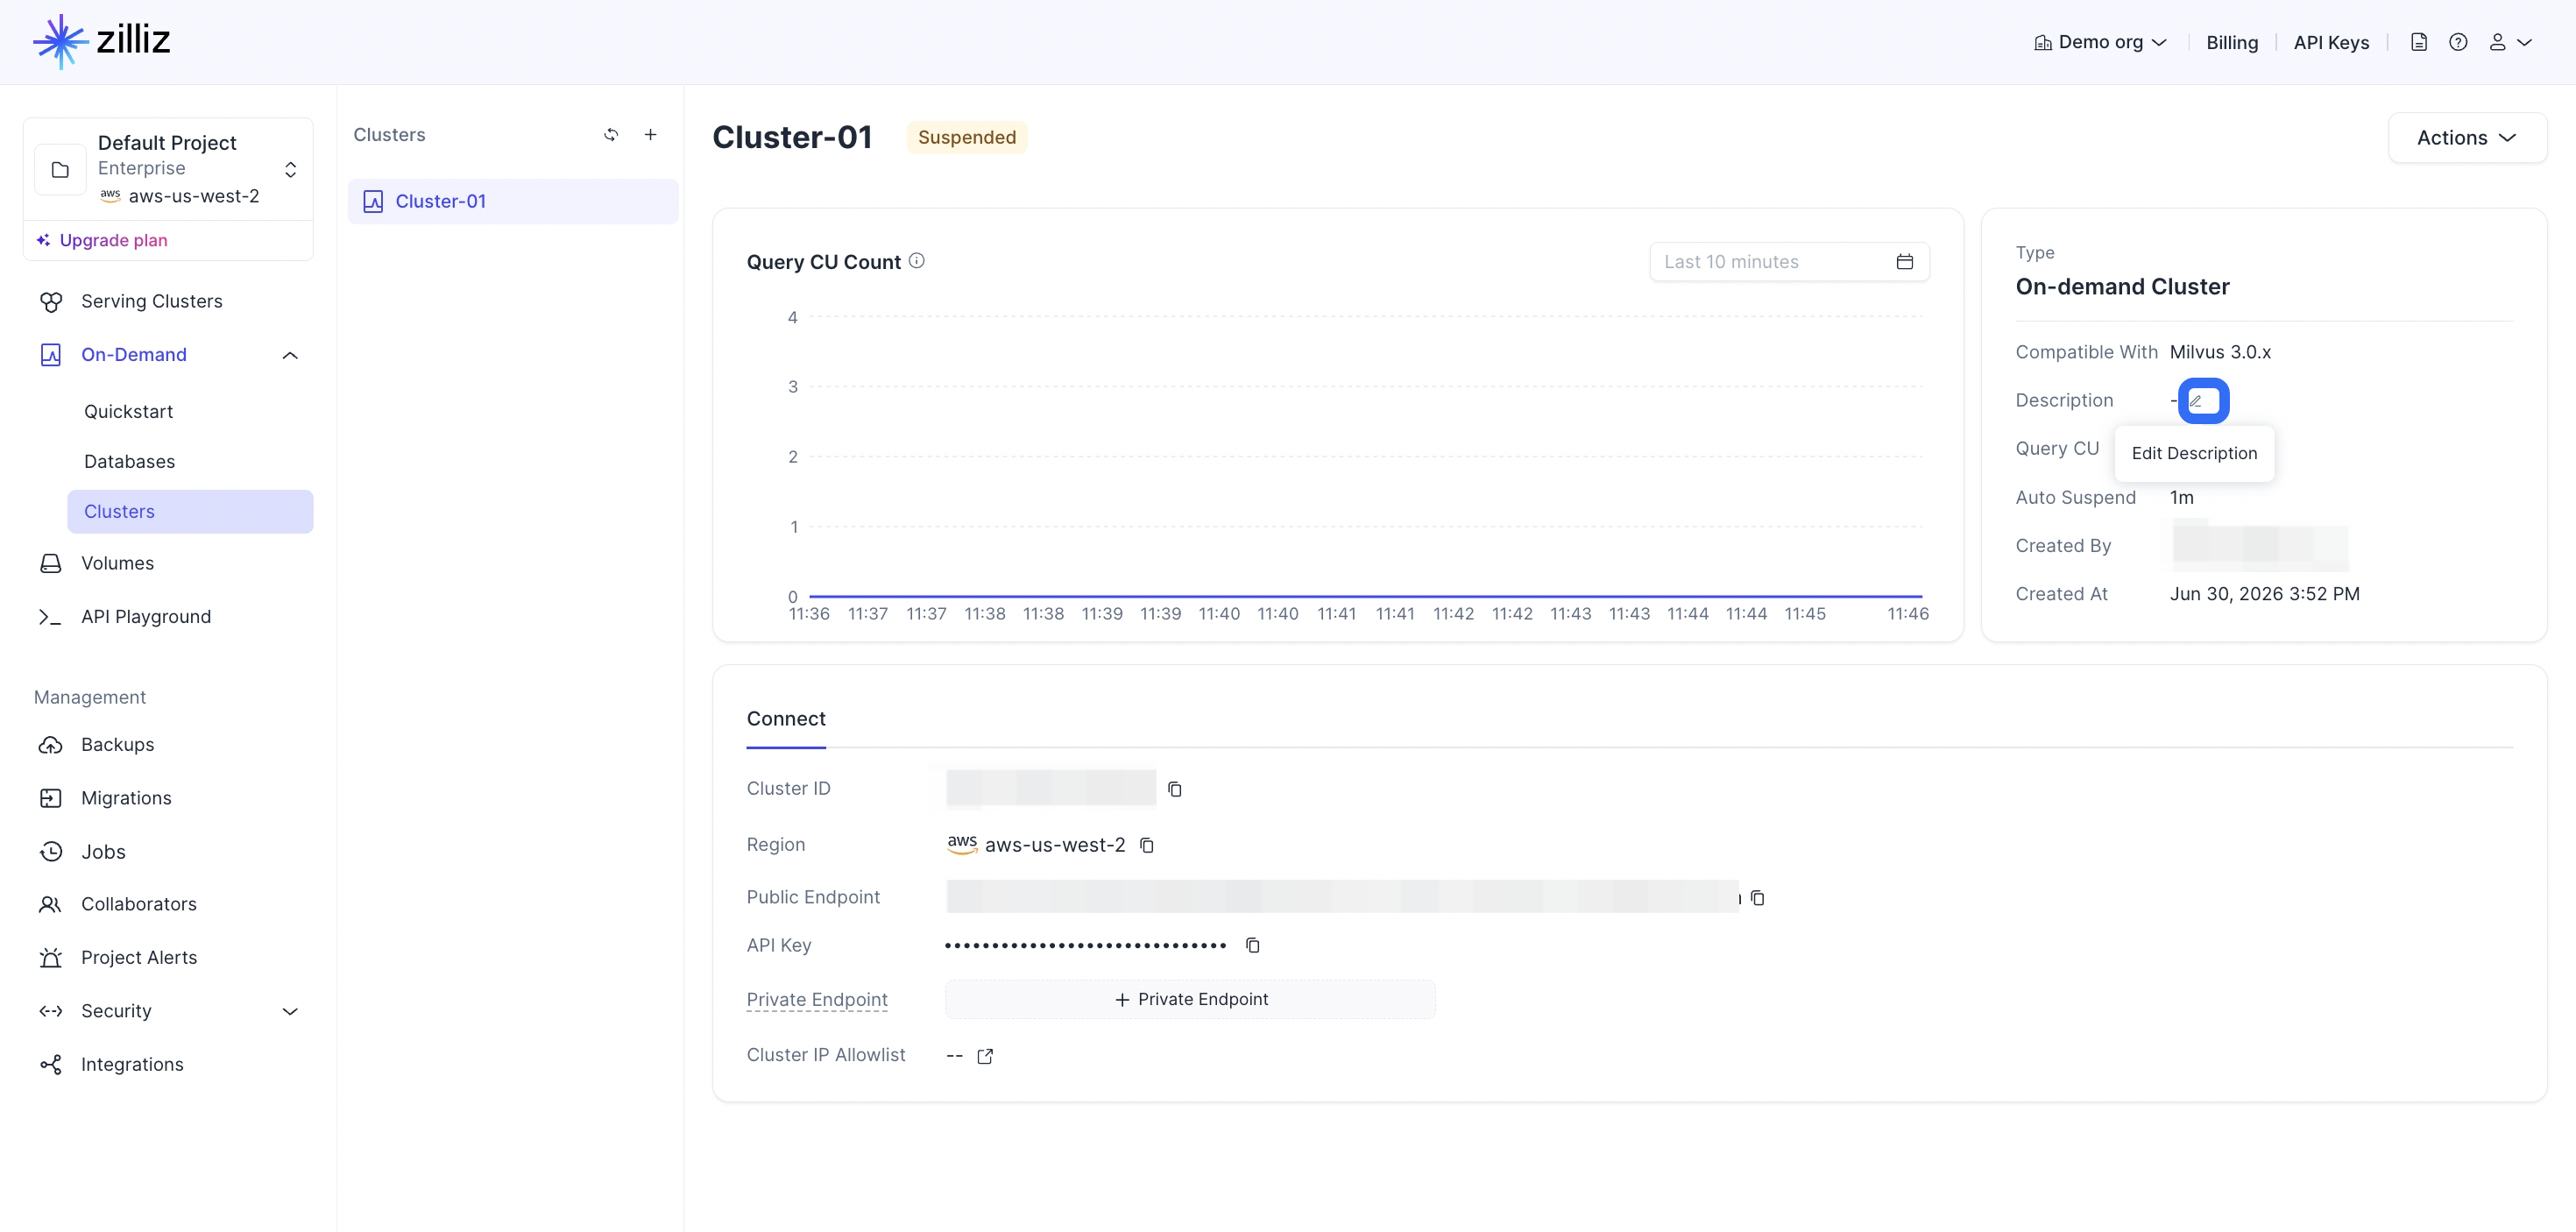
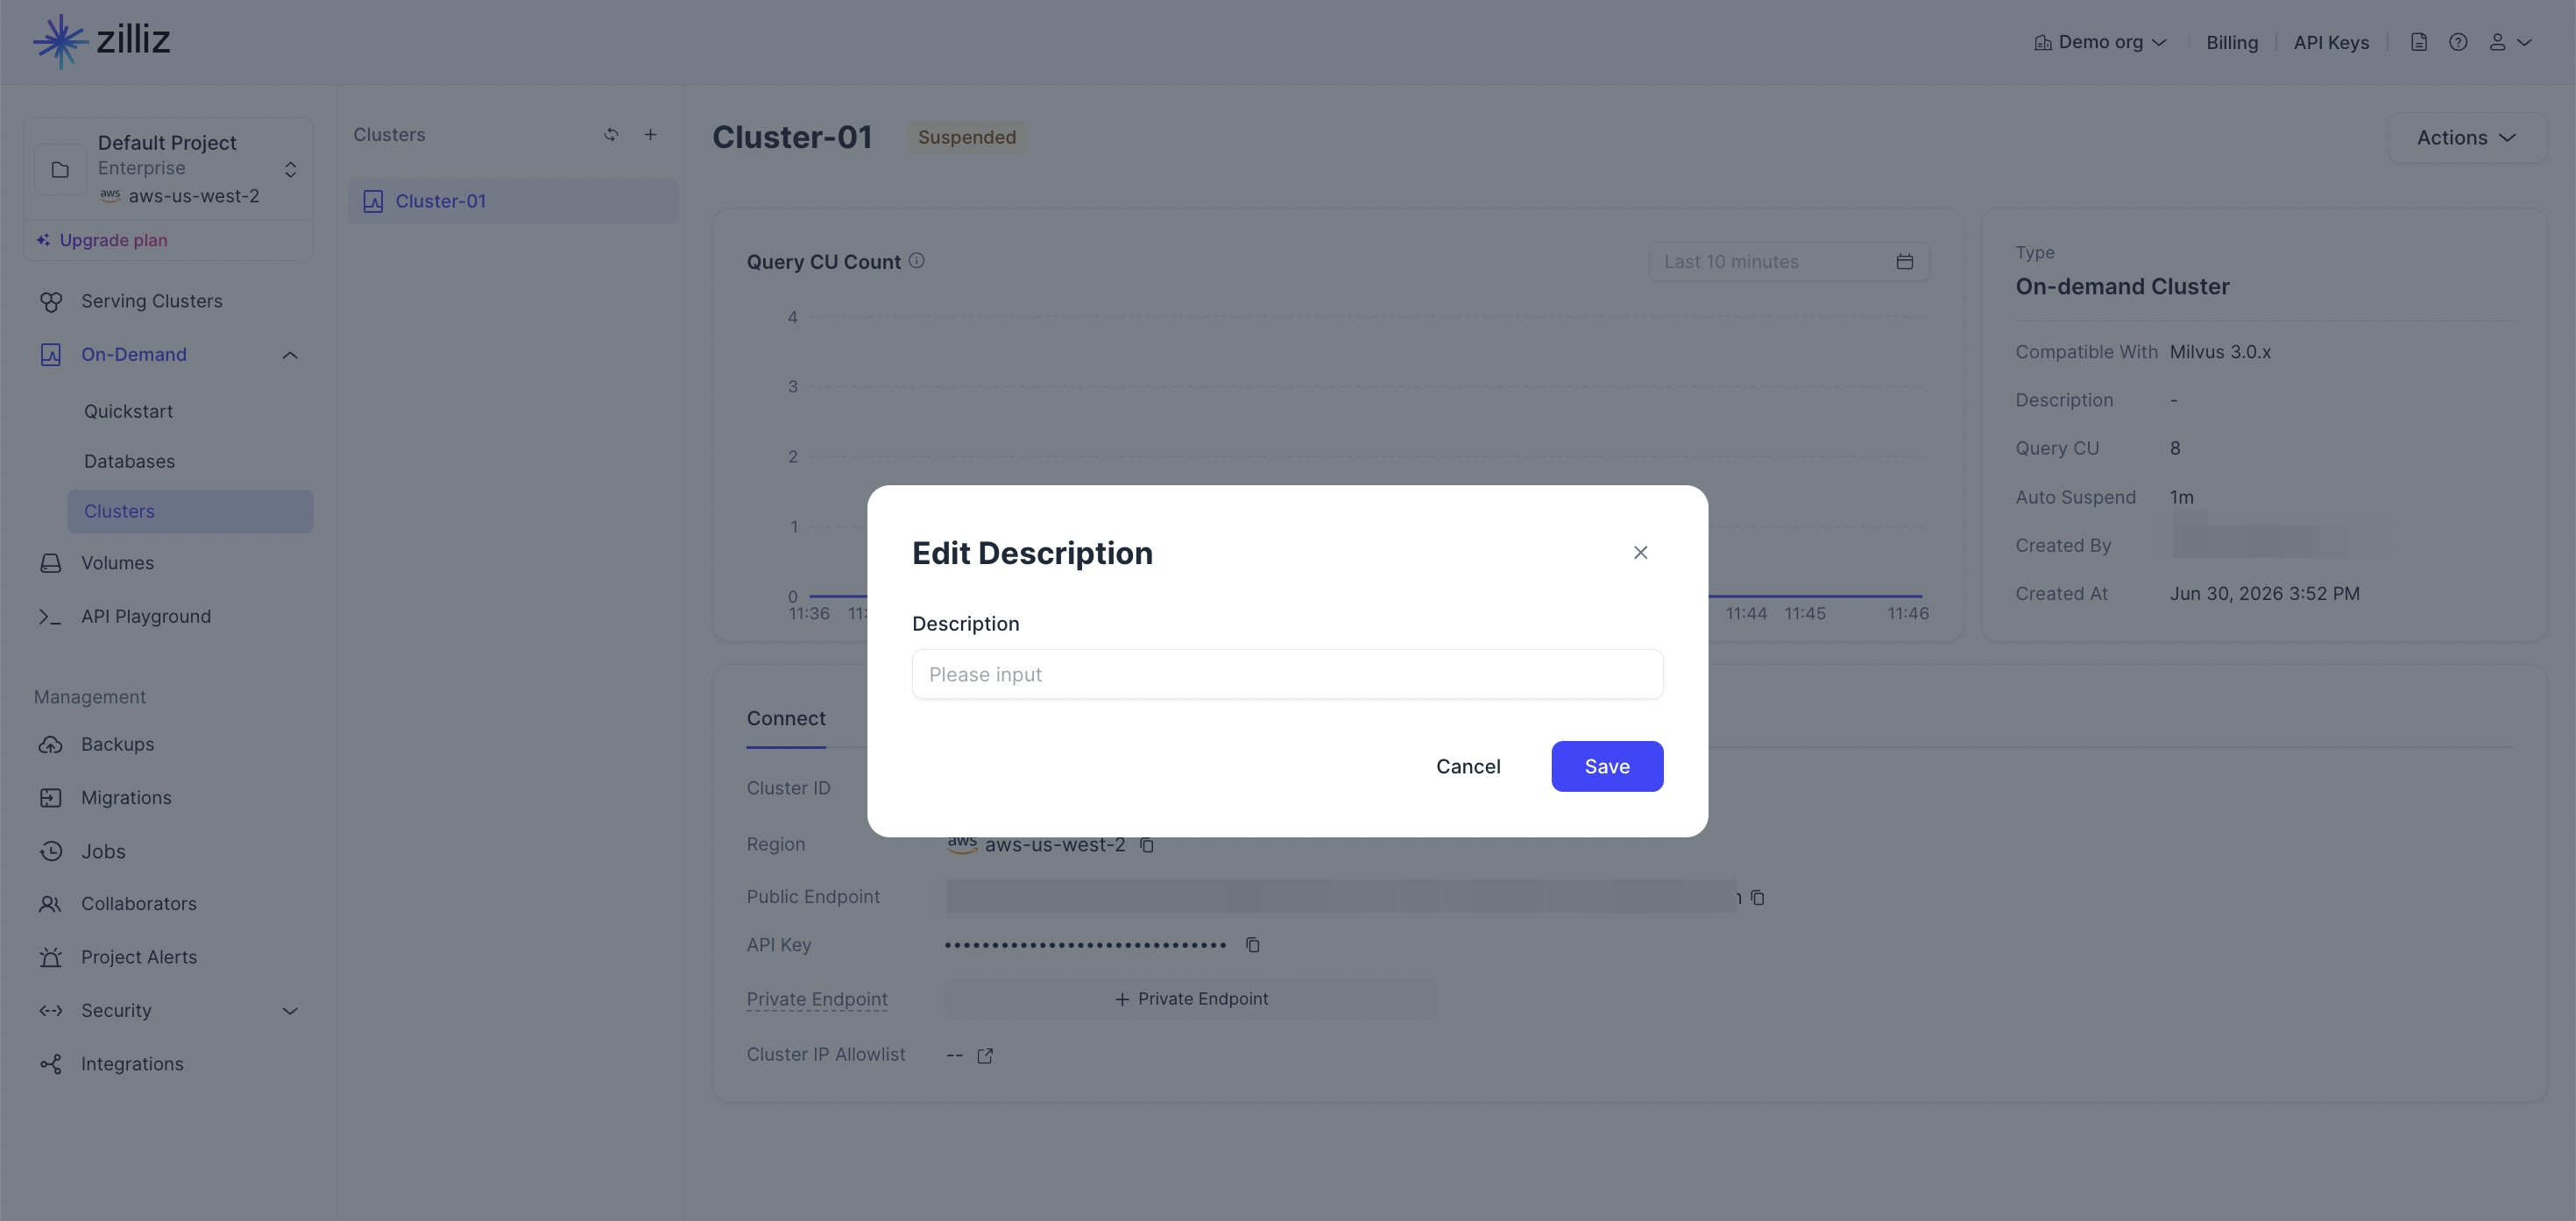
Web コンソールを使用する場合
1対象のオンデマンドクラスターに移動します。
2説明欄にカーソルを合わせ、Edit description アイコンをクリックします。
 3
3クラスターの新しい説明を入力し、Save をクリックします。
オンデマンドクラスターを変更する
オンデマンドクラスターの名前、説明、自動サスペンド設定などの設定を変更できます。
-
RESTful API を使用する場合
既存のオンデマンドクラスターの名前、説明、自動サスペンド時間、クエリ CU 数を変更できます。詳細については、Update On-Demand クラスター を参照してください。
bashexport TOKEN="YOUR_API_KEY"export CLUSTER_ID="inxx-xxxxxxxxxxxxxxx"curl --request PATCH \--url "https://${BASE_URL}/v2/clusters/onDemandClusters/in07-7d6ac8697204a6a" \--header "Authorization: Bearer ${API_KEY}" \--header "Accept: application/json" \--header "Content-Type: application/json" \--data-raw '{"autoSuspend": "5m","clusterName": "my-on-demand-updated","description": "Updated on-demand cluster description","cuSize": 32}'以下は出力例です。
bash{"code": 0,"data": {"clusterId": "inxx-xxxxxxxxxxxxxxx","prompt": "Successfully submitted."}} -
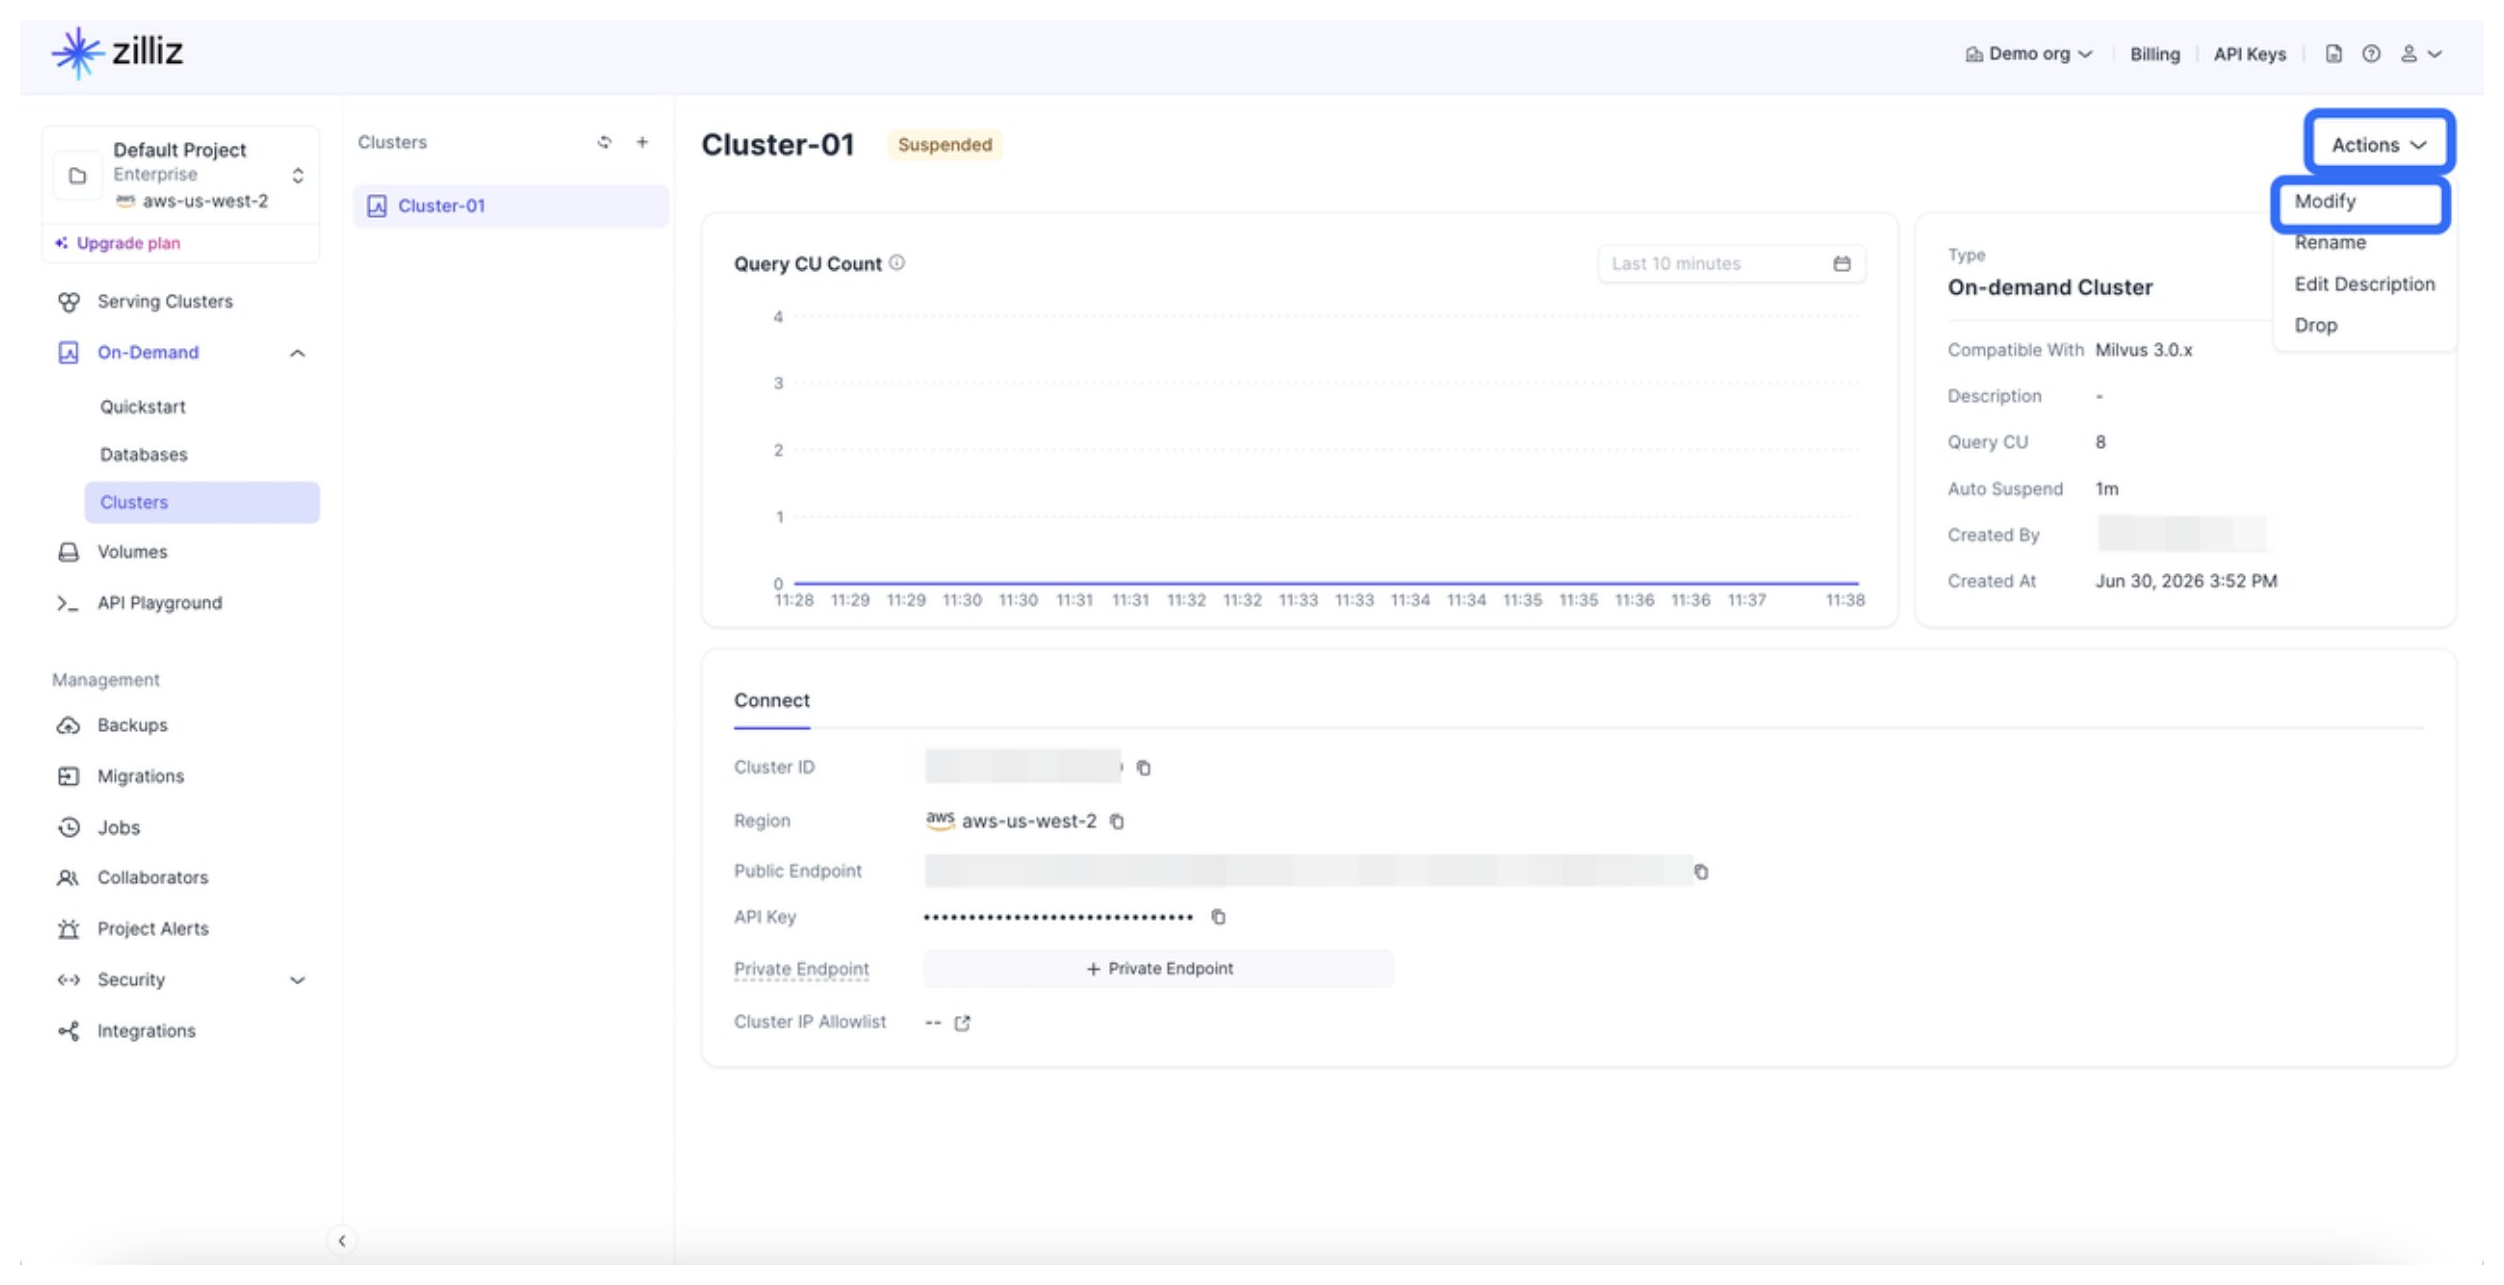
Web コンソールを使用する場合
Web コンソールから、既存のオンデマンドクラスターのクラスター名、説明、自動サスペンド時間、クエリ CU 数を変更できます。
keep-warm スケジュールを構成する
keep-warm スケジュールは、毎週繰り返される時間帯にオンデマンドクラスターを稼働させ続けます。keep-warm ウィンドウが開始されると、Zilliz Cloud はオンデマンドクラスターがサスペンド状態であれば再開します。ウィンドウ中は Auto Suspend が抑制されます。ウィンドウが終了すると、オンデマンドクラスターは再び既存の自動サスペンドポリシーに従います。
keep-warm スケジュールは、Auto Suspend を恒久的に無効化するものではなく、keep-warm ウィンドウの終了時にオンデマンドクラスターを能動的にサスペンドするものでもありません。
keep-warm ウィンドウ中にオンデマンドクラスターをサスペンドするには、先に keep-warm スケジュールを無効化または削除してください。
各オンデマンドクラスターは keep-warm スケジュールを 1 つ持つことができます。スケジュールには 1~5 件の週次ルールを含めることができます。各ルールは組織のシステムタイムゾーンを使用し、曜日、開始時刻、終了時刻を含みます。
RESTful API を使用する場合
オンデマンドクラスターの keep-warm スケジュールは、作成、更新、表示、有効化、無効化、削除できます。
keep-warm スケジュールを作成または更新する
keep-warm スケジュールを作成または更新する場合は、ルールの完全なリストを送信します。Zilliz Cloud は、既存のルールを送信されたルールで 1 回の操作で置き換えます。
以下の例では、平日の 09:00 から 18:00 までの keep-warm スケジュールを作成します。
レスポンス例:
keep-warm スケジュールを表示する
以下の例では、オンデマンドクラスターの keep-warm スケジュールを確認します。
レスポンス例:
スケジュールが構成されていない場合、リクエストは成功し、configured として false を返します。
keep-warm スケジュールを有効化または無効化する
keep-warm スケジュールを有効化または無効化するには、完全なルールセットと目的の enabled 値を指定して PUT リクエストを送信します。
スケジュールを無効化しても、構成済みのすべてのルールは保持されます。オンデマンドクラスターが keep-warm ウィンドウ内にある場合、Zilliz Cloud は即座に keep-warm モードを終了します。スケジュールによってオンデマンドクラスターがサスペンドされることはありません。
以下の例では、既存の keep-warm スケジュールを無効化します。
レスポンス例:
keep-warm スケジュールを削除する
keep-warm スケジュールを削除すると、スケジュールとすべてのルールが削除されます。オンデマンドクラスター、データ、イベント、監査レコードは削除されません。
レスポンス例:
Web コンソールを使用する場合

対象のオンデマンドクラスターに移動します。
Actions メニューを開き、Manage Keep-warm Schedule をクリックします。
Enable Keep-warm Schedule をオンにします。
Schedule Rules で、1 つ以上の週次ルールを追加します。
各ルールについて、繰り返し曜日、開始時刻、終了時刻を構成します。
次回の切り替え時刻を確認します。
Save をクリックします。
クラスターの詳細ページには、keep-warm スケジュールのステータスが On、Off、Not configured、または Schedule unavailable として表示されます。スケジュールが構成されている場合は、ルール数、システムタイムゾーン、次回の切り替え時刻も表示されます。
オンデマンドクラスターが現在 keep-warm ウィンドウ内にある場合、ページにはプライマリのクラスターステータスの横にセカンダリの Keep-warm タグが表示されます。

スケジュールを無効化しても、構成済みのすべてのルールは保持されます。オンデマンドクラスターが keep-warm ウィンドウ内にある場合、Zilliz Cloud は即座に keep-warm モードを終了します。スケジュールによってオンデマンドクラスターがサスペンドされることはありません。keep-warm スケジュールを無効化するには、以下に示すように Enable Keep-warm Schedule をオフにして Save をクリックします。

スケジュールを削除すると、すべてのルールが完全に削除されます。keep-warm スケジュールを削除するには、以下に示すように Delete Schedule をクリックして操作を確定します。

オンデマンドクラスターを削除する
オンデマンドクラスターを削除すると、即座に削除され、復元できません。この操作は元に戻せません。
RESTful API を使用する場合
curl --request DELETE \
     --url "${BASE_URL}/v2/clusters/onDemandClusters/inxx-xxxxxxxxxxxxxxx" \
     --header "Authorization: Bearer ${TOKEN}" \
     --header "Accept: application/json"
レスポンス例:
{
  "code": 0,
  "data": {
    "clusterId": "inxx-xxxxxxxxxxxxxxx",
    "status": "DELETING"
  }
}
Web コンソールを使用する場合
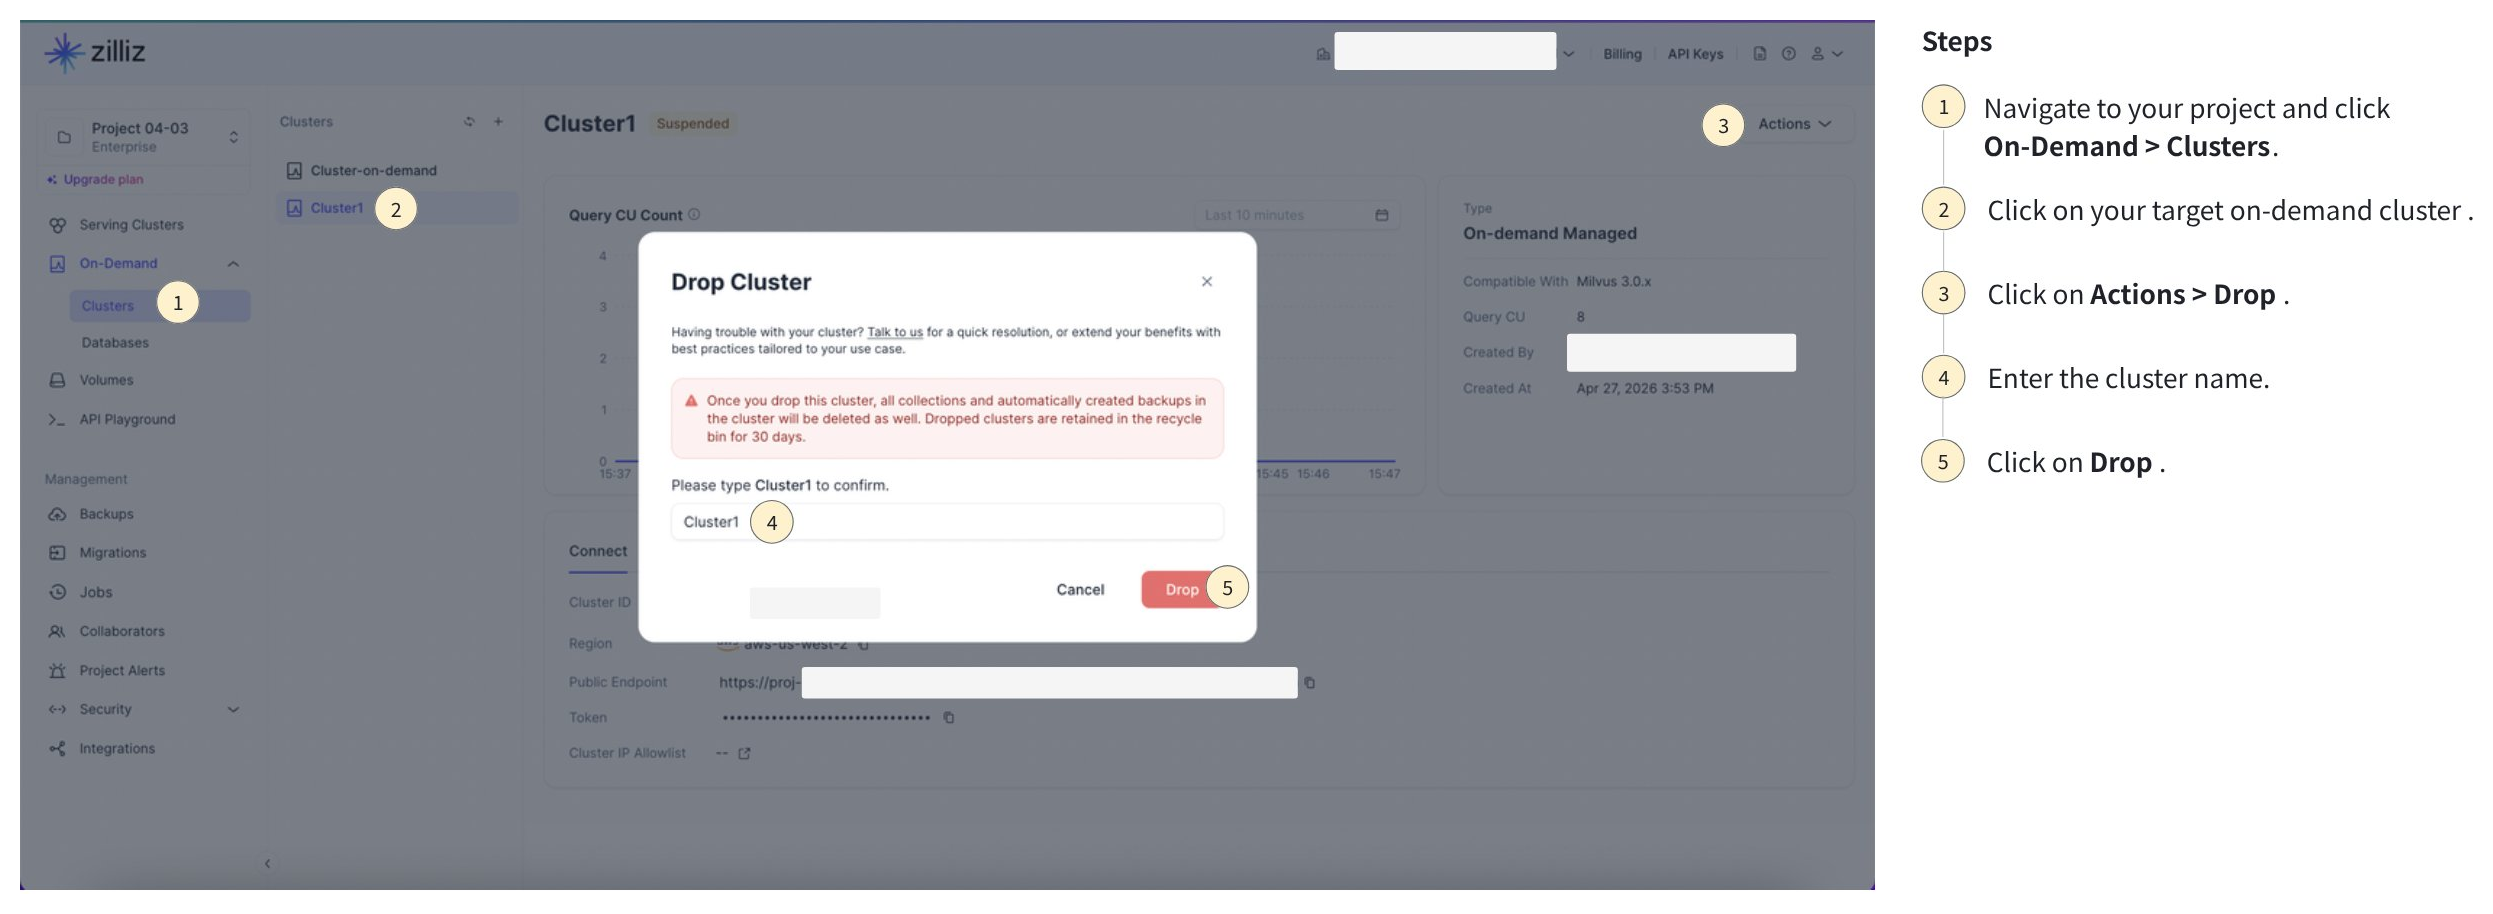
Zilliz Cloud コンソールで、対象プロジェクトを開きます。
On-Demand Compute > クラスター に移動します。
対象のオンデマンドクラスターを選択します。
クラスターを削除し、操作を確認します。
関連トピック
-
オンデマンドクラスターを作成するには、オンデマンドクラスターの作成 を参照してください。
-
プロジェクトエンドポイント経由で接続するには、オンデマンド検索のための接続 を参照してください。