Array of Structs を使用したデータモデル設計
モダンな AI アプリケーション、特にモノのインターネット(IoT)や自動運転では、通常、タイムスタンプとベクトル埋め込みを伴うセンサー読み取り値、エラーコードと音声スニペットを伴う診断ログ、位置・速度・シーンコンテキストを伴う走行区間など、豊富で構造化されたイベントを推論します。これには、データベースがネストされたデータの取り込みと検索をネイティブにサポートすることが必要です。
ユーザーに原子的な構造イベントをフラットなデータモデルへ変換させる代わりに、Zilliz Cloud は Array of Structs を導入します。配列内の各 Struct はスカラーとベクトルを保持でき、意味的な整合性を維持します。
Array of Structs を使用する理由
自動運転からマルチモーダル検索まで、モダンな AI アプリケーションはネストされた異種データにますます依存しています。従来のフラットなデータモデルでは、「多数の注釈付きチャンクを含む 1 つのドキュメント」や「複数の観測された操作を含む 1 つの運転シーン」のような複雑な関係を表現するのは困難です。ここで、Zilliz Cloud の Array of Structs データ型が威力を発揮します。
Array of Structs を使用すると、構造化要素の順序付きセットを保存できます。各 Struct はスカラーフィールドとベクトル埋め込みの独自の組み合わせを保持します。このため、次の用途に最適です。
-
階層データ: 多数の子レコードを持つ親エンティティです。たとえば、多数のテキストチャンクを含む書籍や、多数の注釈付きフレームを含む動画などがあります。
-
マルチモーダル埋め込み: 各 Struct は、メタデータとともに、テキスト埋め込みと画像埋め込みなどの複数のベクトルを保持できます。
-
時間的または順序データ: Array フィールド内の Struct は、時系列イベントや段階的なイベントを自然に表現します。
JSON ブロブを保存したり、データを複数のコレクションに分割したりする従来の回避策とは異なり、Array of Structs は Zilliz Cloud 内でネイティブなスキーマ適用、ベクトルインデックス作成、効率的なストレージを提供します。
スキーマ設計ガイドライン
検索用のデータモデル設計 で説明されているすべてのガイドラインに加えて、データモデル設計で Array of Structs の使用を開始する前に、次の点も考慮してください。
Struct スキーマを定義する
コレクションに Array フィールドを追加する前に、内部の Struct スキーマを定義します。Struct 内の各フィールドは、スカラー(VARCHAR、INT、BOOLEAN など)またはベクトル(FLOAT_VECTOR)として明示的に型指定する必要があります。
Struct スキーマは、取得や表示に使用するフィールドのみを含めて簡潔に保つことをお勧めします。未使用のメタデータで肥大化しないでください。
最大容量を慎重に設定する
各 Array フィールドには、エンティティごとに Array フィールドが保持できる要素の最大数を指定する属性があります。ユースケースの上限に基づいて設定してください。たとえば、ドキュメントごとに 1,000 個のテキストチャンク、運転シーンごとに 100 個の操作がある場合です。
値を過度に大きくするとメモリが浪費されるため、Array フィールド内の Struct の最大数を決めるには計算が必要です。
Struct 内のベクトルフィールドにインデックスを作成する
ベクトルフィールドには、コレクション内のベクトルフィールドと Struct 内で定義されたベクトルフィールドの両方を含め、インデックス作成が必須です。Struct 内のベクトルフィールドには、インデックスタイプとして AUTOINDEX を、メトリックタイプとして MAX_SIM シリーズを使用する必要があります。
適用されるすべての制限の詳細については、制限 を参照してください。
実例: 自動運転向け CoVLA データセットのモデリング
Turing Motors によって導入され、Winter Conference on Applications of Computer Vision(WACV)2025 で採択された Comprehensive Vision-Language-Action(CoVLA)データセットは、自動運転における Vision-Language-Action(VLA)モデルのトレーニングと評価のための豊富な基盤を提供します。通常はビデオクリップである各データポイントには、生の視覚入力だけでなく、次の内容を説明する構造化キャプションも含まれています。
-
自車両の行動(例:「対向車に道を譲りながら左車線に合流する」)、
-
存在する検出オブジェクト(例: 先行車両、歩行者、信号機)、および
-
シーンのフレームレベルのキャプション。
この階層的でマルチモーダルな性質により、Array of Structs 機能の理想的な対象となります。CoVLA データセットの詳細については、CoVLA Dataset Website を参照してください。
ステップ 1: データセットをコレクションスキーマにマッピングする
CoVLA データセットは、10,000 個のビデオクリップ、合計 80 時間以上の映像で構成される大規模なマルチモーダル運転データセットです。20Hz のレートでフレームをサンプリングし、各フレームに、詳細な自然言語キャプション、車両状態に関する情報、検出オブジェクトの座標を注釈付けします。
データセットの構造は以下の通りです。
├── video_1                                       (VIDEO) # video.mp4
│   ├── video_id                                  (INT)
│   ├── video_url                                 (STRING)
│   ├── frames                                    (ARRAY)
│   │   ├── frame_1                               (STRUCT)
│   │   │   ├── caption                           (STRUCT) # captions.jsonl
│   │   │   │   ├── plain_caption                 (STRING)
│   │   │   │   ├── rich_caption                  (STRING)
│   │   │   │   ├── risk                          (STRING)
│   │   │   │   ├── risk_correct                  (BOOL)
│   │   │   │   ├── risk_yes_rate                 (FLOAT)
│   │   │   │   ├── weather                       (STRING)
│   │   │   │   ├── weather_rate                  (FLOAT)
│   │   │   │   ├── road                          (STRING)
│   │   │   │   ├── road_rate                     (FLOAT)
│   │   │   │   ├── is_tunnel                     (BOOL)
│   │   │   │   ├── is_tunnel_yes_rate            (FLOAT)
│   │   │   │   ├── is_highway                    (BOOL)
│   │   │   │   ├── is_highway_yes_rate           (FLOAT)
│   │   │   │   ├── has_pedestrain                (BOOL)
│   │   │   │   ├── has_pedestrain_yes_rate       (FLOAT)
│   │   │   │   ├── has_carrier_car               (BOOL)
│   │   │   ├── traffic_light                     (STRUCT) # traffic_lights.jsonl
│   │   │   │   ├── index                         (INT)
│   │   │   │   ├── class                         (STRING)
│   │   │   │   ├── bbox                          (LIST<FLOAT>)
│   │   │   ├── front_car                         (STRUCT) # front_cars.jsonl
│   │   │   │   ├── has_lead                      (BOOL)
│   │   │   │   ├── lead_prob                     (FLOAT)
│   │   │   │   ├── lead_x                        (FLOAT)
│   │   │   │   ├── lead_y                        (FLOAT)
│   │   │   │   ├── lead_speed_kmh                (FLOAT)
│   │   │   │   ├── lead_a                        (FLOAT)
│   │   ├── frame_2                               (STRUCT)
│   │   ├── ...                                   (STRUCT)
│   │   ├── frame_n                               (STRUCT)
├── video_2
├── ...
├── video_n
CoVLA データセットの構造は高度に階層化されており、収集されたデータが複数の .jsonl ファイルに分割され、.mp4 形式のビデオクリップも含まれていることがわかります。
Zilliz Cloud では、JSON フィールドまたは Array-of-Structs フィールドのいずれかを使用して、コレクションスキーマ内にネスト構造を作成できます。ベクトル埋め込みがネスト形式の一部である場合、サポートされるのは Array-of-Structs フィールドのみです。ただし、Array 内の Struct 自体にさらにネストされた構造を含めることはできません。CoVLA データセットを重要な関係を維持したまま保存するには、不要な階層を削除し、Zilliz Cloud のコレクションスキーマに適合するようにデータをフラット化する必要があります。
次の図は、後述するスキーマを使用してこのデータセットをモデリングする方法を示しています。
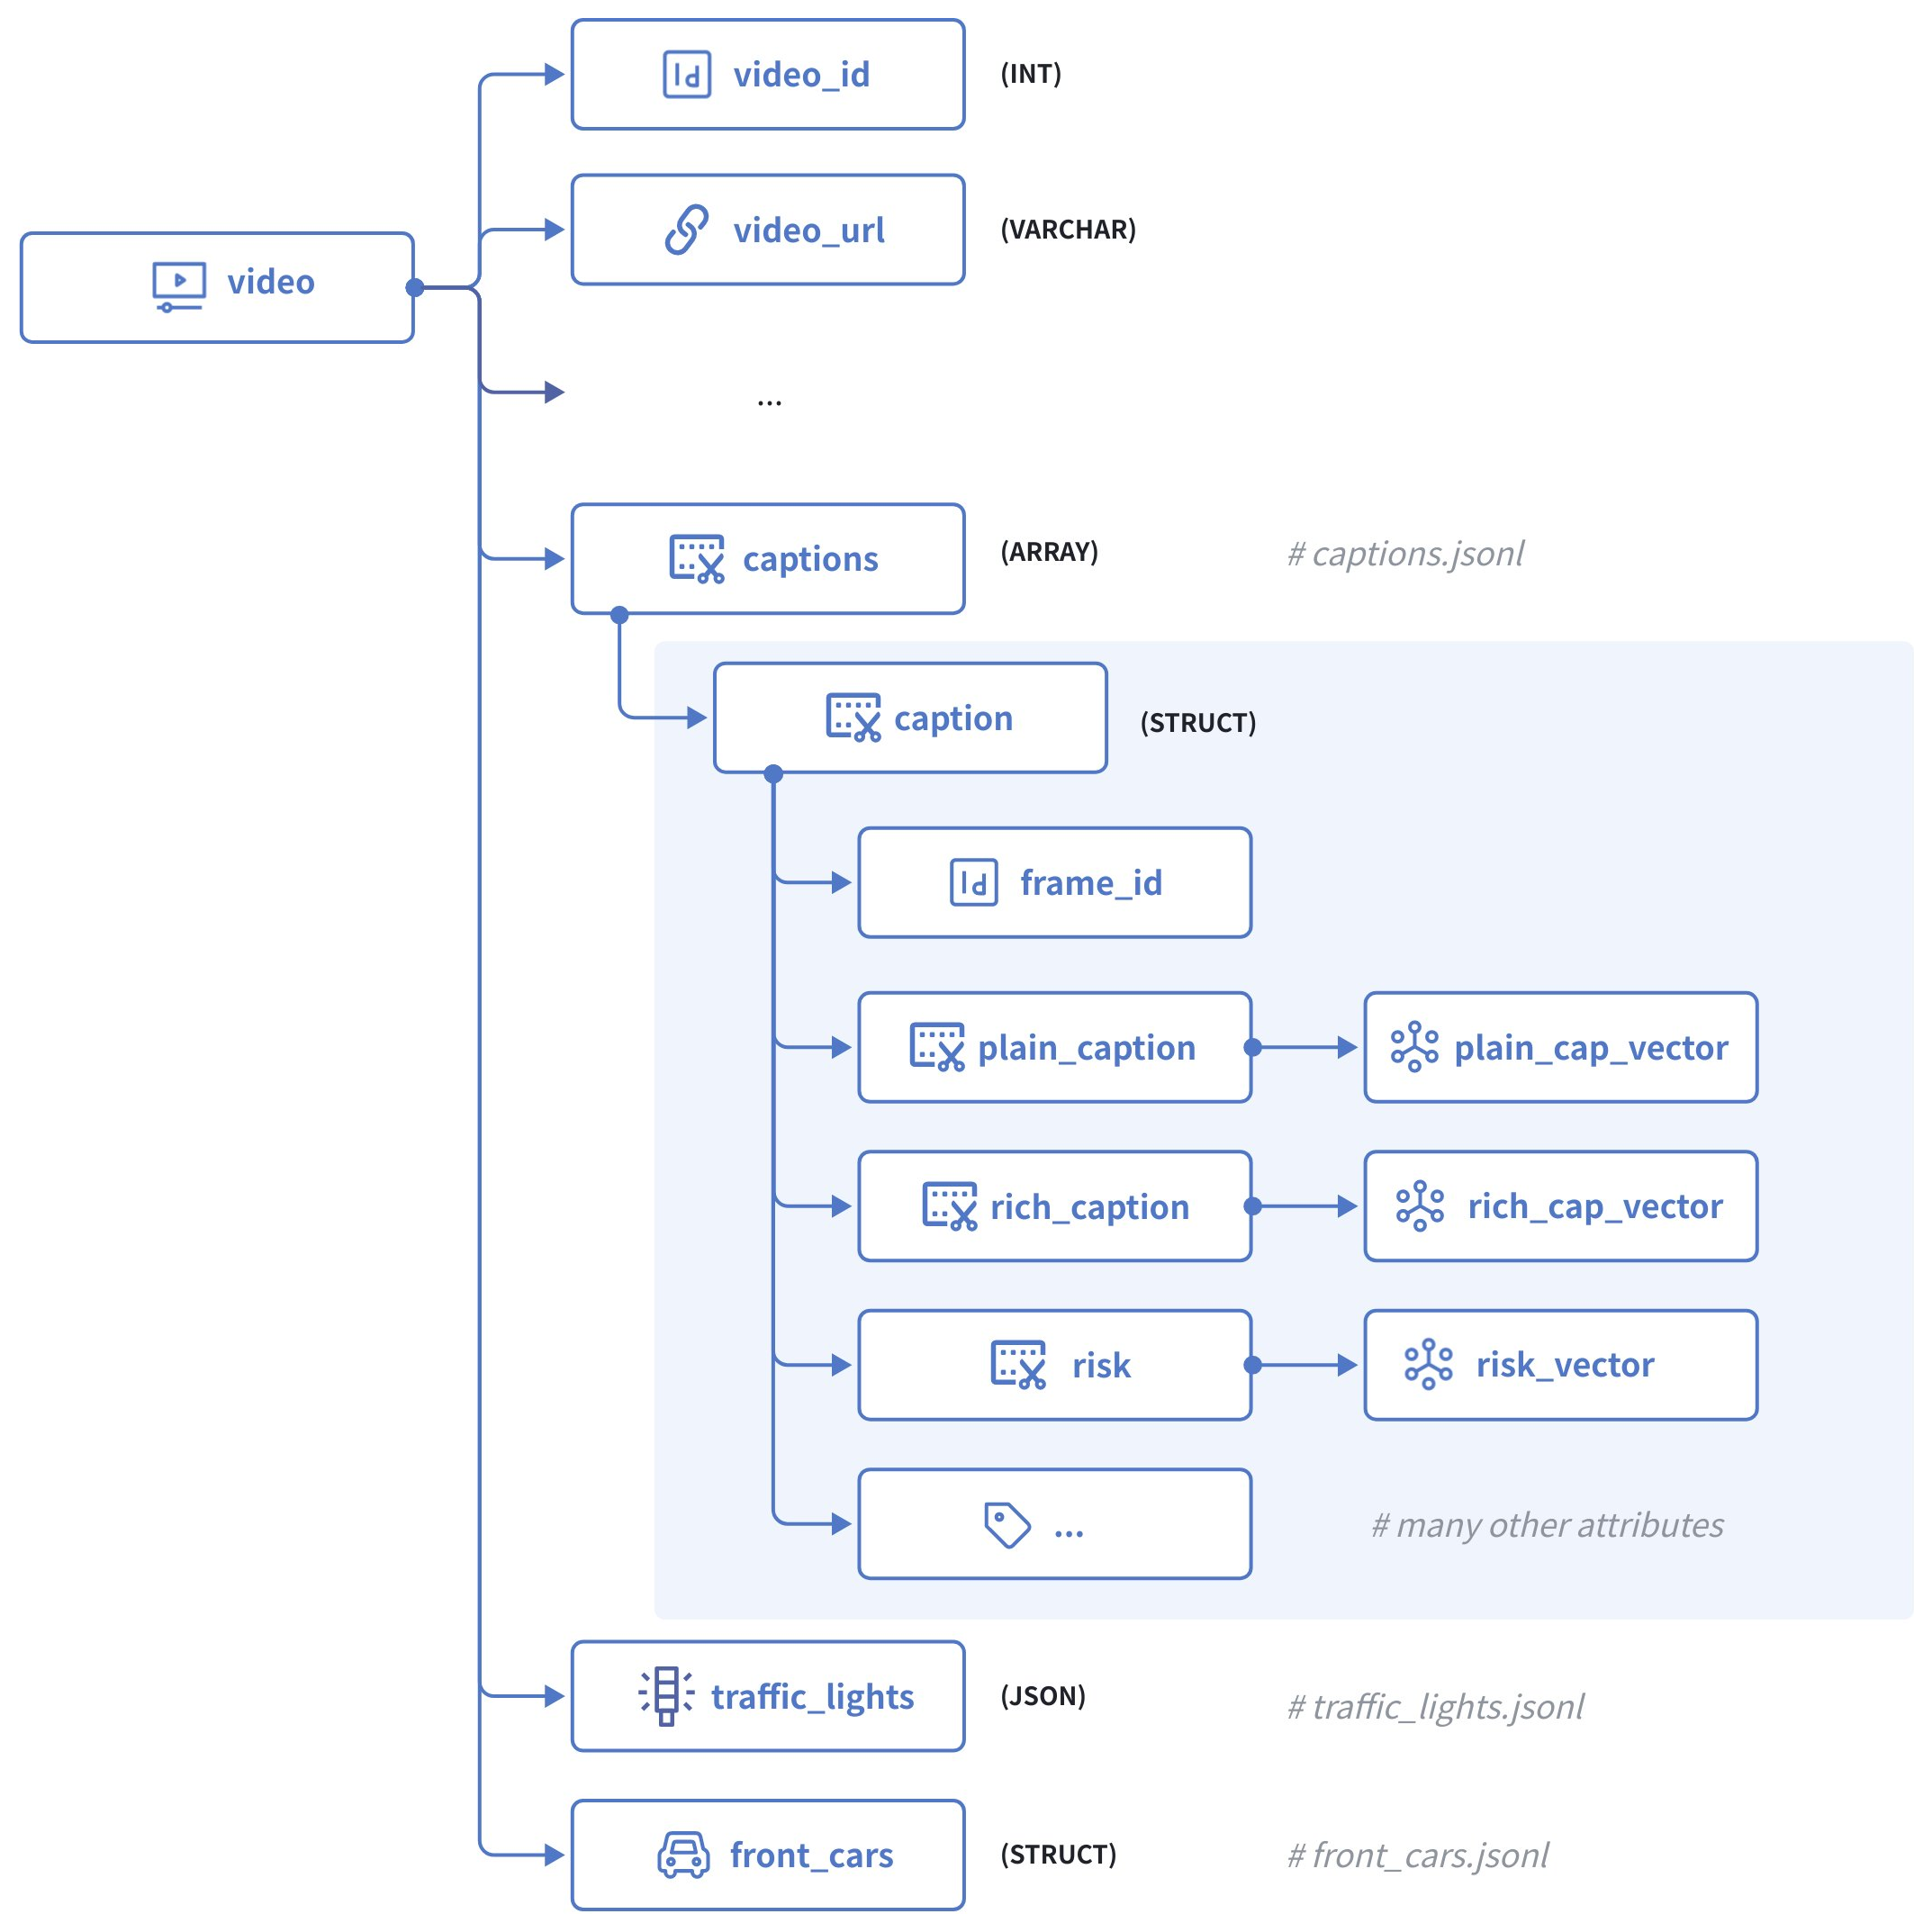
上の図はビデオクリップの構造を示しており、次のフィールドで構成されています。
-
video_idは主キーとして機能し、INT64 タイプの整数を受け入れます。 -
statesは、現在の動画の各フレームにおける自車両の状態を含む生の JSON ボディです。 -
captionsは Array of Structs であり、各 Struct は次のフィールドを持ちます。-
frame_idは、現在の動画内の特定のフレームを識別します。 -
plain_captionは、天候や道路状況などの周囲環境を含まない現在のフレームの説明であり、plain_cap_vectorはそれに対応するベクトル埋め込みです。 -
rich_captionは、周囲環境を含む現在のフレームの説明であり、rich_cap_vectorはそれに対応するベクトル埋め込みです。 -
riskは、現在のフレームで自車両が直面するリスクの説明であり、risk_vectorはそれに対応するベクトル埋め込みです。また、 -
road、weather、is_tunnel、has_pedestrainなど、フレームのその他すべての属性です。
-
-
traffic_lightsは、現在のフレームで識別されたすべての信号機を含む JSON ボディです。 -
front_carsも、現在のフレームで識別されたすべての先行車を含む Array of Structs です。
ステップ 2: スキーマを初期化する
まず、Caption Struct、front_cars Struct、およびコレクションのスキーマを初期化する必要があります。
-
Caption Struct のスキーマを初期化します。
- Python
- Java
- Go
- Rust
- C++
- NodeJS
- cURL
pythonfrom pymilvus import MilvusClient, DataTypeclient = MilvusClient("YOUR_CLUSTER_ENDPOINT")# create the schema for the caption structschema_for_caption = client.create_struct_field_schema()schema_for_caption.add_field(field_name="frame_id",datatype=DataType.INT64,description="ID of the frame to which the ego vehicle's behavior belongs")schema_for_caption.add_field(field_name="plain_caption",datatype=DataType.VARCHAR,max_length=1024,description="plain description of the ego vehicle's behaviors")schema_for_caption.add_field(field_name="plain_cap_vector",datatype=DataType.FLOAT_VECTOR,dim=768,description="vectors for the plain description of the ego vehicle's behaviors")schema_for_caption.add_field(field_name="rich_caption",datatype=DataType.VARCHAR,max_length=1024,description="rich description of the ego vehicle's behaviors")schema_for_caption.add_field(field_name="rich_cap_vector",datatype=DataType.FLOAT_VECTOR,dim=768,description="vectors for the rich description of the ego vehicle's behaviors")schema_for_caption.add_field(field_name="risk",datatype=DataType.VARCHAR,max_length=1024,description="description of the ego vehicle's risks")schema_for_caption.add_field(field_name="risk_vector",datatype=DataType.FLOAT_VECTOR,dim=768,description="vectors for the description of the ego vehicle's risks")schema_for_caption.add_field(field_name="risk_correct",datatype=DataType.BOOL,description="whether the risk assessment is correct")schema_for_caption.add_field(field_name="risk_yes_rate",datatype=DataType.FLOAT,description="probability/confidence of risk being present")schema_for_caption.add_field(field_name="weather",datatype=DataType.VARCHAR,max_length=50,description="weather condition")schema_for_caption.add_field(field_name="weather_rate",datatype=DataType.FLOAT,description="probability/confidence of the weather condition")schema_for_caption.add_field(field_name="road",datatype=DataType.VARCHAR,max_length=50,description="road type")schema_for_caption.add_field(field_name="road_rate",datatype=DataType.FLOAT,description="probability/confidence of the road type")schema_for_caption.add_field(field_name="is_tunnel",datatype=DataType.BOOL,description="whether the road is a tunnel")schema_for_caption.add_field(field_name="is_tunnel_yes_rate",datatype=DataType.FLOAT,description="probability/confidence of the road being a tunnel")schema_for_caption.add_field(field_name="is_highway",datatype=DataType.BOOL,description="whether the road is a highway")schema_for_caption.add_field(field_name="is_highway_yes_rate",datatype=DataType.FLOAT,description="probability/confidence of the road being a highway")schema_for_caption.add_field(field_name="has_pedestrian",datatype=DataType.BOOL,description="whether there is a pedestrian present")schema_for_caption.add_field(field_name="has_pedestrian_yes_rate",datatype=DataType.FLOAT,description="probability/confidence of pedestrian presence")schema_for_caption.add_field(field_name="has_carrier_car",datatype=DataType.BOOL,description="whether there is a carrier car present")javaimport io.milvus.v2.client.ConnectConfig;import io.milvus.v2.client.MilvusClientV2;import io.milvus.v2.common.DataType;import io.milvus.v2.service.collection.request.CreateCollectionReq;import java.util.Arrays;ConnectConfig connectConfig = ConnectConfig.builder().uri("YOUR_CLUSTER_ENDPOINT").token("YOUR_CLUSTER_TOKEN").build();MilvusClientV2 client = new MilvusClientV2(connectConfig);// create the schema for the caption structCreateCollectionReq.StructFieldSchema schemaForCaption = CreateCollectionReq.StructFieldSchema.builder().name("captions").description("captions for the current video").maxCapacity(600).fields(Arrays.asList(CreateCollectionReq.FieldSchema.builder().name("frame_id").dataType(DataType.Int64).description("ID of the frame to which the ego vehicle's behavior belongs").build(),CreateCollectionReq.FieldSchema.builder().name("plain_caption").dataType(DataType.VarChar).maxLength(1024).description("plain description of the ego vehicle's behaviors").build(),CreateCollectionReq.FieldSchema.builder().name("plain_cap_vector").dataType(DataType.FloatVector).dimension(768).description("vectors for the plain description of the ego vehicle's behaviors").build(),CreateCollectionReq.FieldSchema.builder().name("rich_caption").dataType(DataType.VarChar).maxLength(1024).description("rich description of the ego vehicle's behaviors").build(),CreateCollectionReq.FieldSchema.builder().name("rich_cap_vector").dataType(DataType.FloatVector).dimension(768).description("vectors for the rich description of the ego vehicle's behaviors").build(),CreateCollectionReq.FieldSchema.builder().name("risk").dataType(DataType.VarChar).maxLength(1024).description("description of the ego vehicle's risks").build(),CreateCollectionReq.FieldSchema.builder().name("risk_vector").dataType(DataType.FloatVector).dimension(768).description("vectors for the description of the ego vehicle's risks").build(),CreateCollectionReq.FieldSchema.builder().name("risk_correct").dataType(DataType.Bool).description("whether the risk assessment is correct").build(),CreateCollectionReq.FieldSchema.builder().name("risk_yes_rate").dataType(DataType.Float).description("probability/confidence of risk being present").build(),CreateCollectionReq.FieldSchema.builder().name("weather").dataType(DataType.VarChar).maxLength(50).description("weather condition").build(),CreateCollectionReq.FieldSchema.builder().name("weather_rate").dataType(DataType.Float).description("probability/confidence of the weather condition").build(),CreateCollectionReq.FieldSchema.builder().name("road").dataType(DataType.VarChar).maxLength(50).description("road type").build(),CreateCollectionReq.FieldSchema.builder().name("road_rate").dataType(DataType.Float).description("probability/confidence of the road type").build(),CreateCollectionReq.FieldSchema.builder().name("is_tunnel").dataType(DataType.Bool).description("whether the road is a tunnel").build(),CreateCollectionReq.FieldSchema.builder().name("is_tunnel_yes_rate").dataType(DataType.Float).description("probability/confidence of the road being a tunnel").build(),CreateCollectionReq.FieldSchema.builder().name("is_highway").dataType(DataType.Bool).description("whether the road is a highway").build(),CreateCollectionReq.FieldSchema.builder().name("is_highway_yes_rate").dataType(DataType.Float).description("probability/confidence of the road being a highway").build(),CreateCollectionReq.FieldSchema.builder().name("has_pedestrian").dataType(DataType.Bool).description("whether there is a pedestrian present").build(),CreateCollectionReq.FieldSchema.builder().name("has_pedestrian_yes_rate").dataType(DataType.Float).description("probability/confidence of pedestrian presence").build(),CreateCollectionReq.FieldSchema.builder().name("has_carrier_car").dataType(DataType.Bool).description("whether there is a carrier car present").build())).build();goimport ("context""log""github.com/milvus-io/milvus/client/v3/entity""github.com/milvus-io/milvus/client/v3/milvusclient")ctx := context.Background()cli, err := milvusclient.New(ctx, &milvusclient.ClientConfig{Address: "YOUR_CLUSTER_ENDPOINT",APIKey: "YOUR_CLUSTER_TOKEN",})if err != nil {log.Fatal(err)}// create the schema for the caption structcaptionSchema := entity.NewStructSchema().WithField(entity.NewField().WithName("frame_id").WithDataType(entity.FieldTypeInt64).WithDescription("ID of the frame to which the ego vehicle's behavior belongs")).WithField(entity.NewField().WithName("plain_caption").WithDataType(entity.FieldTypeVarChar).WithMaxLength(1024).WithDescription("plain description of the ego vehicle's behaviors")).WithField(entity.NewField().WithName("plain_cap_vector").WithDataType(entity.FieldTypeFloatVector).WithDim(768).WithDescription("vectors for the plain description of the ego vehicle's behaviors")).WithField(entity.NewField().WithName("rich_caption").WithDataType(entity.FieldTypeVarChar).WithMaxLength(1024).WithDescription("rich description of the ego vehicle's behaviors")).WithField(entity.NewField().WithName("rich_cap_vector").WithDataType(entity.FieldTypeFloatVector).WithDim(768).WithDescription("vectors for the rich description of the ego vehicle's behaviors")).WithField(entity.NewField().WithName("risk").WithDataType(entity.FieldTypeVarChar).WithMaxLength(1024).WithDescription("description of the ego vehicle's risks")).WithField(entity.NewField().WithName("risk_vector").WithDataType(entity.FieldTypeFloatVector).WithDim(768).WithDescription("vectors for the description of the ego vehicle's risks")).WithField(entity.NewField().WithName("risk_correct").WithDataType(entity.FieldTypeBool).WithDescription("whether the risk assessment is correct")).WithField(entity.NewField().WithName("risk_yes_rate").WithDataType(entity.FieldTypeFloat).WithDescription("probability/confidence of risk being present")).WithField(entity.NewField().WithName("weather").WithDataType(entity.FieldTypeVarChar).WithMaxLength(50).WithDescription("weather condition")).WithField(entity.NewField().WithName("weather_rate").WithDataType(entity.FieldTypeFloat).WithDescription("probability/confidence of the weather condition")).WithField(entity.NewField().WithName("road").WithDataType(entity.FieldTypeVarChar).WithMaxLength(50).WithDescription("road type")).WithField(entity.NewField().WithName("road_rate").WithDataType(entity.FieldTypeFloat).WithDescription("probability/confidence of the road type")).WithField(entity.NewField().WithName("is_tunnel").WithDataType(entity.FieldTypeBool).WithDescription("whether the road is a tunnel")).WithField(entity.NewField().WithName("is_tunnel_yes_rate").WithDataType(entity.FieldTypeFloat).WithDescription("probability/confidence of the road being a tunnel")).WithField(entity.NewField().WithName("is_highway").WithDataType(entity.FieldTypeBool).WithDescription("whether the road is a highway")).WithField(entity.NewField().WithName("is_highway_yes_rate").WithDataType(entity.FieldTypeFloat).WithDescription("probability/confidence of the road being a highway")).WithField(entity.NewField().WithName("has_pedestrian").WithDataType(entity.FieldTypeBool).WithDescription("whether there is a pedestrian present")).WithField(entity.NewField().WithName("has_pedestrian_yes_rate").WithDataType(entity.FieldTypeFloat).WithDescription("probability/confidence of pedestrian presence")).WithField(entity.NewField().WithName("has_carrier_car").WithDataType(entity.FieldTypeBool).WithDescription("whether there is a carrier car present"))rustuse milvus::v2::prelude::*;let config = ConnectConfig::new().uri("YOUR_CLUSTER_ENDPOINT").token("YOUR_CLUSTER_TOKEN");let client = ClientV2::new(&config).await?;// create the schema for the caption structlet caption_schema = StructFieldSchema::new().name("captions").description("captions for the current video").max_capacity(600).add_field(FieldSchema::new().name("frame_id").data_type(DataType::Int64).description("ID of the frame to which the ego vehicle's behavior belongs")).add_field(FieldSchema::new().name("plain_caption").data_type(DataType::VarChar).max_length(1024).description("plain description of the ego vehicle's behaviors")).add_field(FieldSchema::new().name("plain_cap_vector").data_type(DataType::FloatVector).dimension(768).description("vectors for the plain description of the ego vehicle's behaviors")).add_field(FieldSchema::new().name("rich_caption").data_type(DataType::VarChar).max_length(1024).description("rich description of the ego vehicle's behaviors")).add_field(FieldSchema::new().name("rich_cap_vector").data_type(DataType::FloatVector).dimension(768).description("vectors for the rich description of the ego vehicle's behaviors")).add_field(FieldSchema::new().name("risk").data_type(DataType::VarChar).max_length(1024).description("description of the ego vehicle's risks")).add_field(FieldSchema::new().name("risk_vector").data_type(DataType::FloatVector).dimension(768).description("vectors for the description of the ego vehicle's risks")).add_field(FieldSchema::new().name("risk_correct").data_type(DataType::Bool).description("whether the risk assessment is correct")).add_field(FieldSchema::new().name("risk_yes_rate").data_type(DataType::Float).description("probability/confidence of risk being present")).add_field(FieldSchema::new().name("weather").data_type(DataType::VarChar).max_length(50).description("weather condition")).add_field(FieldSchema::new().name("weather_rate").data_type(DataType::Float).description("probability/confidence of the weather condition")).add_field(FieldSchema::new().name("road").data_type(DataType::VarChar).max_length(50).description("road type")).add_field(FieldSchema::new().name("road_rate").data_type(DataType::Float).description("probability/confidence of the road type")).add_field(FieldSchema::new().name("is_tunnel").data_type(DataType::Bool).description("whether the road is a tunnel")).add_field(FieldSchema::new().name("is_tunnel_yes_rate").data_type(DataType::Float).description("probability/confidence of the road being a tunnel")).add_field(FieldSchema::new().name("is_highway").data_type(DataType::Bool).description("whether the road is a highway")).add_field(FieldSchema::new().name("is_highway_yes_rate").data_type(DataType::Float).description("probability/confidence of the road being a highway")).add_field(FieldSchema::new().name("has_pedestrian").data_type(DataType::Bool).description("whether there is a pedestrian present")).add_field(FieldSchema::new().name("has_pedestrian_yes_rate").data_type(DataType::Float).description("probability/confidence of pedestrian presence")).add_field(FieldSchema::new().name("has_carrier_car").data_type(DataType::Bool).description("whether there is a carrier car present"));c++#include "milvus/MilvusClientV2.h"#include <iostream>auto client = milvus::MilvusClientV2::Create();auto status = client->Connect(milvus::ConnectParam("YOUR_CLUSTER_ENDPOINT").WithToken("YOUR_CLUSTER_TOKEN"));if (!status.IsOk()) {std::cout << status.Message() << std::endl;}// create the schema for the caption structmilvus::StructFieldSchema schema_for_caption;schema_for_caption.SetName("captions");schema_for_caption.SetDescription("captions for the current video");schema_for_caption.SetMaxCapacity(600);schema_for_caption.AddField(milvus::FieldSchema("frame_id", milvus::DataType::INT64, "ID of the frame to which the ego vehicle's behavior belongs"));schema_for_caption.AddField(milvus::FieldSchema("plain_caption", milvus::DataType::VARCHAR, "plain description of the ego vehicle's behaviors").WithMaxLength(1024));schema_for_caption.AddField(milvus::FieldSchema("plain_cap_vector", milvus::DataType::FLOAT_VECTOR, "vectors for the plain description of the ego vehicle's behaviors").WithDimension(768));schema_for_caption.AddField(milvus::FieldSchema("rich_caption", milvus::DataType::VARCHAR, "rich description of the ego vehicle's behaviors").WithMaxLength(1024));schema_for_caption.AddField(milvus::FieldSchema("rich_cap_vector", milvus::DataType::FLOAT_VECTOR, "vectors for the rich description of the ego vehicle's behaviors").WithDimension(768));schema_for_caption.AddField(milvus::FieldSchema("risk", milvus::DataType::VARCHAR, "description of the ego vehicle's risks").WithMaxLength(1024));schema_for_caption.AddField(milvus::FieldSchema("risk_vector", milvus::DataType::FLOAT_VECTOR, "vectors for the description of the ego vehicle's risks").WithDimension(768));schema_for_caption.AddField(milvus::FieldSchema("risk_correct", milvus::DataType::BOOL, "whether the risk assessment is correct"));schema_for_caption.AddField(milvus::FieldSchema("risk_yes_rate", milvus::DataType::FLOAT, "probability/confidence of risk being present"));schema_for_caption.AddField(milvus::FieldSchema("weather", milvus::DataType::VARCHAR, "weather condition").WithMaxLength(50));schema_for_caption.AddField(milvus::FieldSchema("weather_rate", milvus::DataType::FLOAT, "probability/confidence of the weather condition"));schema_for_caption.AddField(milvus::FieldSchema("road", milvus::DataType::VARCHAR, "road type").WithMaxLength(50));schema_for_caption.AddField(milvus::FieldSchema("road_rate", milvus::DataType::FLOAT, "probability/confidence of the road type"));schema_for_caption.AddField(milvus::FieldSchema("is_tunnel", milvus::DataType::BOOL, "whether the road is a tunnel"));schema_for_caption.AddField(milvus::FieldSchema("is_tunnel_yes_rate", milvus::DataType::FLOAT, "probability/confidence of the road being a tunnel"));schema_for_caption.AddField(milvus::FieldSchema("is_highway", milvus::DataType::BOOL, "whether the road is a highway"));schema_for_caption.AddField(milvus::FieldSchema("is_highway_yes_rate", milvus::DataType::FLOAT, "probability/confidence of the road being a highway"));schema_for_caption.AddField(milvus::FieldSchema("has_pedestrian", milvus::DataType::BOOL, "whether there is a pedestrian present"));schema_for_caption.AddField(milvus::FieldSchema("has_pedestrian_yes_rate", milvus::DataType::FLOAT, "probability/confidence of pedestrian presence"));schema_for_caption.AddField(milvus::FieldSchema("has_carrier_car", milvus::DataType::BOOL, "whether there is a carrier car present"));javascriptimport { MilvusClient, DataType } from "@zilliz/milvus2-sdk-node";const client = new MilvusClient({ address: "YOUR_CLUSTER_ENDPOINT", token: "YOUR_CLUSTER_TOKEN" });// create the schema for the caption structconst captionStructFields = [{ name: "frame_id", data_type: DataType.Int64, description: "ID of the frame to which the ego vehicle's behavior belongs" },{ name: "plain_caption", data_type: DataType.VarChar, max_length: 1024, description: "plain description of the ego vehicle's behaviors" },{ name: "plain_cap_vector", data_type: DataType.FloatVector, dim: 768, description: "vectors for the plain description of the ego vehicle's behaviors" },{ name: "rich_caption", data_type: DataType.VarChar, max_length: 1024, description: "rich description of the ego vehicle's behaviors" },{ name: "rich_cap_vector", data_type: DataType.FloatVector, dim: 768, description: "vectors for the rich description of the ego vehicle's behaviors" },{ name: "risk", data_type: DataType.VarChar, max_length: 1024, description: "description of the ego vehicle's risks" },{ name: "risk_vector", data_type: DataType.FloatVector, dim: 768, description: "vectors for the description of the ego vehicle's risks" },{ name: "risk_correct", data_type: DataType.Bool, description: "whether the risk assessment is correct" },{ name: "risk_yes_rate", data_type: DataType.Float, description: "probability/confidence of risk being present" },{ name: "weather", data_type: DataType.VarChar, max_length: 50, description: "weather condition" },{ name: "weather_rate", data_type: DataType.Float, description: "probability/confidence of the weather condition" },{ name: "road", data_type: DataType.VarChar, max_length: 50, description: "road type" },{ name: "road_rate", data_type: DataType.Float, description: "probability/confidence of the road type" },{ name: "is_tunnel", data_type: DataType.Bool, description: "whether the road is a tunnel" },{ name: "is_tunnel_yes_rate", data_type: DataType.Float, description: "probability/confidence of the road being a tunnel" },{ name: "is_highway", data_type: DataType.Bool, description: "whether the road is a highway" },{ name: "is_highway_yes_rate", data_type: DataType.Float, description: "probability/confidence of the road being a highway" },{ name: "has_pedestrian", data_type: DataType.Bool, description: "whether there is a pedestrian present" },{ name: "has_pedestrian_yes_rate", data_type: DataType.Float, description: "probability/confidence of pedestrian presence" },{ name: "has_carrier_car", data_type: DataType.Bool, description: "whether there is a carrier car present" },];bash# Note: The RESTful API does not support Array-of-Struct fields as of Milvus v3.0.x. -
Front Car Struct のスキーマを初期化します。
Notes先行車にベクトル埋め込みは含まれませんが、データサイズが JSON フィールドの最大値を超えるため、Struct の配列として含める必要があります。
- Python
- Java
- Go
- Rust
- C++
- NodeJS
- cURL
pythonschema_for_front_car = client.create_struct_field_schema()schema_for_front_car.add_field(field_name="frame_id",datatype=DataType.INT64,description="ID of the frame to which the ego vehicle's behavior belongs")schema_for_front_car.add_field(field_name="has_lead",datatype=DataType.BOOL,description="whether there is a leading vehicle")schema_for_front_car.add_field(field_name="lead_prob",datatype=DataType.FLOAT,description="probability/confidence of the leading vehicle's presence")schema_for_front_car.add_field(field_name="lead_x",datatype=DataType.FLOAT,description="x position of the leading vehicle relative to the ego vehicle")schema_for_front_car.add_field(field_name="lead_y",datatype=DataType.FLOAT,description="y position of the leading vehicle relative to the ego vehicle")schema_for_front_car.add_field(field_name="lead_speed_kmh",datatype=DataType.FLOAT,description="speed of the leading vehicle in km/h")schema_for_front_car.add_field(field_name="lead_a",datatype=DataType.FLOAT,description="acceleration of the leading vehicle")javaimport io.milvus.v2.common.DataType;import io.milvus.v2.service.collection.request.CreateCollectionReq;import java.util.Arrays;// create the schema for the front car structCreateCollectionReq.StructFieldSchema schemaForFrontCar = CreateCollectionReq.StructFieldSchema.builder().name("front_cars").description("frame-specific leading cars identified in the current video").maxCapacity(600).fields(Arrays.asList(CreateCollectionReq.FieldSchema.builder().name("frame_id").dataType(DataType.Int64).description("ID of the frame to which the ego vehicle's behavior belongs").build(),CreateCollectionReq.FieldSchema.builder().name("has_lead").dataType(DataType.Bool).description("whether there is a leading vehicle").build(),CreateCollectionReq.FieldSchema.builder().name("lead_prob").dataType(DataType.Float).description("probability/confidence of the leading vehicle's presence").build(),CreateCollectionReq.FieldSchema.builder().name("lead_x").dataType(DataType.Float).description("x position of the leading vehicle relative to the ego vehicle").build(),CreateCollectionReq.FieldSchema.builder().name("lead_y").dataType(DataType.Float).description("y position of the leading vehicle relative to the ego vehicle").build(),CreateCollectionReq.FieldSchema.builder().name("lead_speed_kmh").dataType(DataType.Float).description("speed of the leading vehicle in km/h").build(),CreateCollectionReq.FieldSchema.builder().name("lead_a").dataType(DataType.Float).description("acceleration of the leading vehicle").build())).build();goimport "github.com/milvus-io/milvus/client/v3/entity"// create the schema for the front car structfrontCarSchema := entity.NewStructSchema().WithField(entity.NewField().WithName("frame_id").WithDataType(entity.FieldTypeInt64).WithDescription("ID of the frame to which the ego vehicle's behavior belongs")).WithField(entity.NewField().WithName("has_lead").WithDataType(entity.FieldTypeBool).WithDescription("whether there is a leading vehicle")).WithField(entity.NewField().WithName("lead_prob").WithDataType(entity.FieldTypeFloat).WithDescription("probability/confidence of the leading vehicle's presence")).WithField(entity.NewField().WithName("lead_x").WithDataType(entity.FieldTypeFloat).WithDescription("x position of the leading vehicle relative to the ego vehicle")).WithField(entity.NewField().WithName("lead_y").WithDataType(entity.FieldTypeFloat).WithDescription("y position of the leading vehicle relative to the ego vehicle")).WithField(entity.NewField().WithName("lead_speed_kmh").WithDataType(entity.FieldTypeFloat).WithDescription("speed of the leading vehicle in km/h")).WithField(entity.NewField().WithName("lead_a").WithDataType(entity.FieldTypeFloat).WithDescription("acceleration of the leading vehicle"))rustuse milvus::v2::prelude::*;// create the schema for the front car structlet front_car_schema = StructFieldSchema::new().name("front_cars").description("frame-specific leading cars identified in the current video").max_capacity(600).add_field(FieldSchema::new().name("frame_id").data_type(DataType::Int64).description("ID of the frame to which the ego vehicle's behavior belongs")).add_field(FieldSchema::new().name("has_lead").data_type(DataType::Bool).description("whether there is a leading vehicle")).add_field(FieldSchema::new().name("lead_prob").data_type(DataType::Float).description("probability/confidence of the leading vehicle's presence")).add_field(FieldSchema::new().name("lead_x").data_type(DataType::Float).description("x position of the leading vehicle relative to the ego vehicle")).add_field(FieldSchema::new().name("lead_y").data_type(DataType::Float).description("y position of the leading vehicle relative to the ego vehicle")).add_field(FieldSchema::new().name("lead_speed_kmh").data_type(DataType::Float).description("speed of the leading vehicle in km/h")).add_field(FieldSchema::new().name("lead_a").data_type(DataType::Float).description("acceleration of the leading vehicle"));c++// create the schema for the front car structmilvus::StructFieldSchema schema_for_front_car;schema_for_front_car.SetName("front_cars");schema_for_front_car.SetDescription("frame-specific leading cars identified in the current video");schema_for_front_car.SetMaxCapacity(600);schema_for_front_car.AddField(milvus::FieldSchema("frame_id", milvus::DataType::INT64, "ID of the frame to which the ego vehicle's behavior belongs"));schema_for_front_car.AddField(milvus::FieldSchema("has_lead", milvus::DataType::BOOL, "whether there is a leading vehicle"));schema_for_front_car.AddField(milvus::FieldSchema("lead_prob", milvus::DataType::FLOAT, "probability/confidence of the leading vehicle's presence"));schema_for_front_car.AddField(milvus::FieldSchema("lead_x", milvus::DataType::FLOAT, "x position of the leading vehicle relative to the ego vehicle"));schema_for_front_car.AddField(milvus::FieldSchema("lead_y", milvus::DataType::FLOAT, "y position of the leading vehicle relative to the ego vehicle"));schema_for_front_car.AddField(milvus::FieldSchema("lead_speed_kmh", milvus::DataType::FLOAT, "speed of the leading vehicle in km/h"));schema_for_front_car.AddField(milvus::FieldSchema("lead_a", milvus::DataType::FLOAT, "acceleration of the leading vehicle"));javascriptimport { DataType } from "@zilliz/milvus2-sdk-node";// create the schema for the front car structconst frontCarStructFields = [{ name: "frame_id", data_type: DataType.Int64, description: "ID of the frame to which the ego vehicle's behavior belongs" },{ name: "has_lead", data_type: DataType.Bool, description: "whether there is a leading vehicle" },{ name: "lead_prob", data_type: DataType.Float, description: "probability/confidence of the leading vehicle's presence" },{ name: "lead_x", data_type: DataType.Float, description: "x position of the leading vehicle relative to the ego vehicle" },{ name: "lead_y", data_type: DataType.Float, description: "y position of the leading vehicle relative to the ego vehicle" },{ name: "lead_speed_kmh", data_type: DataType.Float, description: "speed of the leading vehicle in km/h" },{ name: "lead_a", data_type: DataType.Float, description: "acceleration of the leading vehicle" },];bash# Note: The RESTful API does not support Array-of-Struct fields as of Milvus v3.0.x. -
コレクションのスキーマを初期化します。
- Python
- Java
- Go
- Rust
- C++
- NodeJS
- cURL
pythonschema = client.create_schema()schema.add_field(field_name="video_id",datatype=DataType.VARCHAR,description="primary key",max_length=16,is_primary=True,auto_id=False)schema.add_field(field_name="video_url",datatype=DataType.VARCHAR,max_length=512,description="URL of the video")schema.add_field(field_name="captions",datatype=DataType.ARRAY,element_type=DataType.STRUCT,struct_schema=schema_for_caption,max_capacity=600,description="captions for the current video")schema.add_field(field_name="traffic_lights",datatype=DataType.JSON,description="frame-specific traffic lights identified in the current video")schema.add_field(field_name="front_cars",datatype=DataType.ARRAY,element_type=DataType.STRUCT,struct_schema=schema_for_front_car,max_capacity=600,description="frame-specific leading cars identified in the current video")javaimport io.milvus.v2.common.DataType;import io.milvus.v2.service.collection.request.CreateCollectionReq;import java.util.Arrays;CreateCollectionReq.CollectionSchema schema = CreateCollectionReq.CollectionSchema.builder().fieldSchemaList(Arrays.asList(CreateCollectionReq.FieldSchema.builder().name("video_id").dataType(DataType.VarChar).description("primary key").maxLength(16).isPrimaryKey(true).autoID(false).build(),CreateCollectionReq.FieldSchema.builder().name("video_url").dataType(DataType.VarChar).description("URL of the video").maxLength(512).build(),CreateCollectionReq.FieldSchema.builder().name("traffic_lights").dataType(DataType.JSON).description("frame-specific traffic lights identified in the current video").build())).structFields(Arrays.asList(schemaForCaption, schemaForFrontCar)).build();goimport "github.com/milvus-io/milvus/client/v3/entity"schema := entity.NewSchema().WithField(entity.NewField().WithName("video_id").WithDataType(entity.FieldTypeVarChar).WithMaxLength(16).WithIsPrimaryKey(true).WithIsAutoID(false).WithDescription("primary key")).WithField(entity.NewField().WithName("video_url").WithDataType(entity.FieldTypeVarChar).WithMaxLength(512).WithDescription("URL of the video")).WithField(entity.NewField().WithName("captions").WithDataType(entity.FieldTypeArray).WithElementType(entity.FieldTypeStruct).WithMaxCapacity(600).WithStructSchema(captionSchema).WithDescription("captions for the current video")).WithField(entity.NewField().WithName("traffic_lights").WithDataType(entity.FieldTypeJSON).WithDescription("frame-specific traffic lights identified in the current video")).WithField(entity.NewField().WithName("front_cars").WithDataType(entity.FieldTypeArray).WithElementType(entity.FieldTypeStruct).WithMaxCapacity(600).WithStructSchema(frontCarSchema).WithDescription("frame-specific leading cars identified in the current video"))rustuse milvus::v2::prelude::*;let schema = CollectionSchema::new().add_field(FieldSchema::new().name("video_id").data_type(DataType::VarChar).max_length(16).primary_key(true).auto_id(false).description("primary key")).add_field(FieldSchema::new().name("video_url").data_type(DataType::VarChar).max_length(512).description("URL of the video")).add_struct_field(caption_schema).add_field(FieldSchema::new().name("traffic_lights").data_type(DataType::Json).description("frame-specific traffic lights identified in the current video")).add_struct_field(front_car_schema);c++milvus::CollectionSchema schema;schema.AddField(milvus::FieldSchema("video_id", milvus::DataType::VARCHAR,"primary key", true, false).WithMaxLength(16));schema.AddField(milvus::FieldSchema("video_url", milvus::DataType::VARCHAR,"URL of the video").WithMaxLength(512));schema.AddStructField(schema_for_caption);schema.AddField(milvus::FieldSchema("traffic_lights", milvus::DataType::JSON,"frame-specific traffic lights identified in the current video"));schema.AddStructField(schema_for_front_car);javascriptimport { DataType } from "@zilliz/milvus2-sdk-node";const schema = [{ name: "video_id", data_type: DataType.VarChar, is_primary_key: true, autoID: false,max_length: 16, description: "primary key" },{ name: "video_url", data_type: DataType.VarChar,max_length: 512, description: "URL of the video" },{ name: "captions", data_type: DataType.Array, element_type: DataType.Struct, max_capacity: 600,fields: captionStructFields, description: "captions for the current video" },{ name: "traffic_lights", data_type: DataType.JSON,description: "frame-specific traffic lights identified in the current video" },{ name: "front_cars", data_type: DataType.Array, element_type: DataType.Struct, max_capacity: 600,fields: frontCarStructFields, description: "frame-specific leading cars identified in the current video" },];bash# Note: The RESTful API does not support Array-of-Struct fields as of Milvus v3.0.x.
ステップ 3: インデックスパラメーターを設定する
すべてのベクトルフィールドにインデックスを作成する必要があります。要素 Struct 内のベクトルフィールドにインデックスを作成するには、インデックスタイプとして AUTOINDEX を、埋め込みリスト間の類似度を測定するメトリックタイプとして MAX_SIM シリーズを使用する必要があります。
- Python
- Java
- Go
- Rust
- C++
- NodeJS
- cURL
index_params = client.prepare_index_params()

index_params.add_index(
    field_name="captions[plain_cap_vector]",
    index_type="AUTOINDEX",
    metric_type="MAX_SIM_COSINE",
    index_name="captions_plain_cap_vector_idx"
)

index_params.add_index(
    field_name="captions[rich_cap_vector]",
    index_type="AUTOINDEX",
    metric_type="MAX_SIM_COSINE",
    index_name="captions_rich_cap_vector_idx"
)

index_params.add_index(
    field_name="captions[risk_vector]",
    index_type="AUTOINDEX",
    metric_type="MAX_SIM_COSINE",
    index_name="captions_risk_vector_idx"
)
import io.milvus.v2.common.IndexParam;
import java.util.Arrays;
import java.util.List;

List<IndexParam> indexParams = Arrays.asList(
        IndexParam.builder().fieldName("captions[plain_cap_vector]")
                .indexType(IndexParam.IndexType.AUTOINDEX)
                .metricType(IndexParam.MetricType.MAX_SIM_COSINE)
                .indexName("captions_plain_cap_vector_idx")
                .build(),
        IndexParam.builder().fieldName("captions[rich_cap_vector]")
                .indexType(IndexParam.IndexType.AUTOINDEX)
                .metricType(IndexParam.MetricType.MAX_SIM_COSINE)
                .indexName("captions_rich_cap_vector_idx")
                .build(),
        IndexParam.builder().fieldName("captions[risk_vector]")
                .indexType(IndexParam.IndexType.AUTOINDEX)
                .metricType(IndexParam.MetricType.MAX_SIM_COSINE)
                .indexName("captions_risk_vector_idx")
                .build());
import (
    "github.com/milvus-io/milvus/client/v3/entity"
    "github.com/milvus-io/milvus/client/v3/index"
    "github.com/milvus-io/milvus/client/v3/milvusclient"
)

indexes := []milvusclient.CreateIndexOption{
    milvusclient.NewCreateIndexOption("covla_dataset", "captions[plain_cap_vector]", index.NewAutoIndex(entity.MaxSimCosine)).
        WithIndexName("captions_plain_cap_vector_idx"),
    milvusclient.NewCreateIndexOption("covla_dataset", "captions[rich_cap_vector]", index.NewAutoIndex(entity.MaxSimCosine)).
        WithIndexName("captions_rich_cap_vector_idx"),
    milvusclient.NewCreateIndexOption("covla_dataset", "captions[risk_vector]", index.NewAutoIndex(entity.MaxSimCosine)).
        WithIndexName("captions_risk_vector_idx"),
}
use milvus::v2::prelude::*;

    let index_params = vec![
        IndexParam::new().field_name("captions[plain_cap_vector]")
            .index_name("captions_plain_cap_vector_idx")
            .index_type(IndexType::AutoIndex)
            .metric_type(MetricType::MaxSimCosine),
        IndexParam::new().field_name("captions[rich_cap_vector]")
            .index_name("captions_rich_cap_vector_idx")
            .index_type(IndexType::AutoIndex)
            .metric_type(MetricType::MaxSimCosine),
        IndexParam::new().field_name("captions[risk_vector]")
            .index_name("captions_risk_vector_idx")
            .index_type(IndexType::AutoIndex)
            .metric_type(MetricType::MaxSimCosine),
    ];
milvus::IndexDesc captions_plain_cap_vector_idx("captions[plain_cap_vector]",
    "captions_plain_cap_vector_idx", milvus::IndexType::AUTOINDEX, milvus::MetricType::MAX_SIM_COSINE);
milvus::IndexDesc captions_rich_cap_vector_idx("captions[rich_cap_vector]",
    "captions_rich_cap_vector_idx", milvus::IndexType::AUTOINDEX, milvus::MetricType::MAX_SIM_COSINE);
milvus::IndexDesc captions_risk_vector_idx("captions[risk_vector]",
    "captions_risk_vector_idx", milvus::IndexType::AUTOINDEX, milvus::MetricType::MAX_SIM_COSINE);
const indexParams = [
    { field_name: "captions[plain_cap_vector]", index_type: "AUTOINDEX",
      metric_type: "MAX_SIM_COSINE", index_name: "captions_plain_cap_vector_idx" },
    { field_name: "captions[rich_cap_vector]", index_type: "AUTOINDEX",
      metric_type: "MAX_SIM_COSINE", index_name: "captions_rich_cap_vector_idx" },
    { field_name: "captions[risk_vector]", index_type: "AUTOINDEX",
      metric_type: "MAX_SIM_COSINE", index_name: "captions_risk_vector_idx" },
];
# Note: The RESTful API does not support Array-of-Struct fields as of Milvus v3.0.x.
これらのフィールド内のフィルタリングを高速化するために、JSON フィールドで JSON シャーディングを有効にすることをお勧めします。
ステップ 4: コレクションを作成する
スキーマとインデックスの準備ができたら、次のようにしてターゲットコレクションを作成できます。
- Python
- Java
- Go
- Rust
- C++
- NodeJS
- cURL
client.create_collection(
    collection_name="covla_dataset",
    schema=schema,
    index_params=index_params
)
import io.milvus.v2.service.collection.request.CreateCollectionReq;

client.createCollection(CreateCollectionReq.builder()
        .collectionName("covla_dataset")
        .collectionSchema(schema)
        .indexParams(indexParams)
        .build());
import (
    "log"

    "github.com/milvus-io/milvus/client/v3/milvusclient"
)

err = cli.CreateCollection(ctx,
    milvusclient.NewCreateCollectionOption("covla_dataset", schema).
        WithIndexOptions(indexes...))
if err != nil {
    log.Fatal(err)
}
use milvus::v2::prelude::*;

    let request = CreateCollectionRequest::builder()
        .collection_name("covla_dataset")
        .schema(schema)
        .index_params(index_params)
        .build()?;
    client.create_collection(request).await?;
milvus::CreateCollectionRequest create_request;
create_request.WithCollectionName("covla_dataset");
create_request.WithCollectionSchema(std::make_shared<milvus::CollectionSchema>(schema));
create_request.WithIndexes({captions_plain_cap_vector_idx, captions_rich_cap_vector_idx, captions_risk_vector_idx});

status = client->CreateCollection(create_request);
if (!status.IsOk()) {
    std::cout << status.Message() << std::endl;
}
await client.createCollection({
    collection_name: "covla_dataset",
    schema,
    index_params: indexParams,
});
# Note: The RESTful API does not support Array-of-Struct fields as of Milvus v3.0.x.
ステップ 5: データを挿入する
Turing Motos は、CoVLA データセットを、生のビデオクリップ(.mp4)、状態(states.jsonl)、キャプション(captions.jsonl)、信号機(traffic_lights.jsonl)、先行車(front_cars.jsonl)など、複数のファイルに整理しています。
これらのファイルからビデオクリップごとのデータをマージして挿入する必要があります。以下は、特定のビデオクリップのデータをマージするスクリプトです。
import json
from openai import OpenAI

openai_client = OpenAI(
    api_key='YOUR_OPENAI_API_KEY',
)

video_id = "0a0fc7a5db365174" # represent a single video with 600 frames

# get all front car records in the specified video clip
entries = []
front_cars = []
with open('data/front_car/{}.jsonl'.format(video_id), 'r') as f:
    for line in f:
        entries.append(json.loads(line))

for entry in entries:
    for key, value in entry.items():
        value['frame_id'] = int(key)
        front_cars.append(value)

# get all traffic lights identified in the specified video clip
entries = []
traffic_lights = []
frame_id = 0
with open('data/traffic_lights/{}.jsonl'.format(video_id), 'r') as f:
    for line in f:
        entries.append(json.loads(line))

for entry in entries:
    for key, value in entry.items():
        if not value or (value['index'] == 1 and key != '0'):
            frame_id+=1

        if value:
            value['frame_id'] = frame_id
            traffic_lights.append(value)
        else:
            value_dict = {}
            value_dict['frame_id'] = frame_id
            traffic_lights.append(value_dict)

# get all captions generated in the video clip and convert them into vector embeddings
entries = []
captions = []
with open('data/captions/{}.jsonl'.format(video_id), 'r') as f:
    for line in f:
        entries.append(json.loads(line))

def get_embedding(text, model="embeddinggemma:latest"):
    response = openai_client.embeddings.create(input=text, model=model)
    return response.data[0].embedding

# Add embeddings to each entry
for entry in entries:
    # Each entry is a dict with a single key (e.g., '0', '1', ...)
    for key, value in entry.items():
        value['frame_id'] = int(key)  # Convert key to integer and assign to frame_id

        if "plain_caption" in value and value["plain_caption"]:
            value["plain_cap_vector"] = get_embedding(value["plain_caption"])
        if "rich_caption" in value and value["rich_caption"]:
            value["rich_cap_vector"] = get_embedding(value["rich_caption"])
        if "risk" in value and value["risk"]:
            value["risk_vector"] = get_embedding(value["risk"])

        captions.append(value)

data = {
    "video_id": video_id,
    "video_url": "https://your-storage.com/{}".format(video_id),
    "captions": captions,
    "traffic_lights": traffic_lights,
    "front_cars": front_cars
}
データを適切に処理したら、次のようにして挿入できます。
- Python
- Java
- Go
- Rust
- C++
- NodeJS
- cURL
client.insert(
    collection_name="covla_dataset",
    data=[data]
)

# {'insert_count': 1, 'ids': ['0a0fc7a5db365174']}
import com.google.gson.Gson;
import com.google.gson.JsonArray;
import com.google.gson.JsonObject;
import io.milvus.v2.service.vector.request.InsertReq;
import java.util.Arrays;
import java.util.Collections;
import java.util.List;

List<Float> vector = Collections.nCopies(768, 0.1f); // placeholder vectors

JsonObject data = new JsonObject();
data.addProperty("video_id", "0a0fc7a5db365174");
data.addProperty("video_url", "https://your-storage.com/0a0fc7a5db365174");

JsonArray captions = new JsonArray();
JsonObject caption = new JsonObject();
caption.addProperty("frame_id", 0);
caption.addProperty("plain_caption", "Merge left while yielding to oncoming traffic");
caption.add("plain_cap_vector", new Gson().toJsonTree(vector));
caption.addProperty("rich_caption", "Merge left while yielding to oncoming traffic on a sunny highway");
caption.add("rich_cap_vector", new Gson().toJsonTree(vector));
caption.addProperty("risk", "Potential collision with the leading vehicle");
caption.add("risk_vector", new Gson().toJsonTree(vector));
caption.addProperty("risk_correct", true);
caption.addProperty("risk_yes_rate", 0.8);
caption.addProperty("weather", "sunny");
caption.addProperty("weather_rate", 0.9);
caption.addProperty("road", "highway");
caption.addProperty("road_rate", 0.7);
caption.addProperty("is_tunnel", false);
caption.addProperty("is_tunnel_yes_rate", 0.1);
caption.addProperty("is_highway", true);
caption.addProperty("is_highway_yes_rate", 0.9);
caption.addProperty("has_pedestrian", true);
caption.addProperty("has_pedestrian_yes_rate", 0.6);
caption.addProperty("has_carrier_car", false);
captions.add(caption);

JsonArray trafficLights = new JsonArray();
JsonObject trafficLight = new JsonObject();
trafficLight.addProperty("index", 0);
trafficLight.addProperty("class", "red");
trafficLight.add("bbox", new Gson().toJsonTree(Arrays.asList(1, 2, 3, 4)));
trafficLights.add(trafficLight);

JsonArray frontCars = new JsonArray();
JsonObject frontCar = new JsonObject();
frontCar.addProperty("frame_id", 0);
frontCar.addProperty("has_lead", true);
frontCar.addProperty("lead_prob", 0.9);
frontCar.addProperty("lead_x", 1.5);
frontCar.addProperty("lead_y", 0.5);
frontCar.addProperty("lead_speed_kmh", 60.0);
frontCar.addProperty("lead_a", 0.2);
frontCars.add(frontCar);

data.add("captions", captions);
data.add("traffic_lights", trafficLights);
data.add("front_cars", frontCars);

client.insert(InsertReq.builder()
        .collectionName("covla_dataset")
        .data(Collections.singletonList(data))
        .build());
import (
    "encoding/json"
    "fmt"
    "log"

    "github.com/milvus-io/milvus/client/v3/column"
    "github.com/milvus-io/milvus/client/v3/milvusclient"
)
trafficLights, err := json.Marshal([]map[string]any{
    {"index": 0, "class": "red", "bbox": []float32{1, 2, 3, 4}},
    {"index": 1, "class": "green", "bbox": []float32{5, 6, 7, 8}},
})
if err != nil {
    log.Fatal(err)
}

// placeholder vectors
vector := func() []float32 {
    v := make([]float32, 768)
    for i := range v {
        v[i] = 0.1
    }
    return v
}

ins, err := cli.Insert(ctx, milvusclient.NewColumnBasedInsertOption("covla_dataset").
    WithColumns(
        column.NewColumnVarChar("video_id", []string{"0a0fc7a5db365174"}),
        column.NewColumnVarChar("video_url", []string{"https://your-storage.com/0a0fc7a5db365174"}),
        column.NewColumnJSONBytes("traffic_lights", [][]byte{trafficLights}),
    ).
    WithStructArrayColumn("captions", captionSchema, []map[string]any{
        {
            "frame_id":                []int64{0, 1},
            "plain_caption":           []string{"Merge left while yielding to oncoming traffic", "Continue straight on the highway"},
            "plain_cap_vector":        [][]float32{vector(), vector()},
            "rich_caption":            []string{"Merge left on a sunny highway", "Continue straight on a sunny highway"},
            "rich_cap_vector":         [][]float32{vector(), vector()},
            "risk":                    []string{"Potential collision with the leading vehicle", "No immediate risk"},
            "risk_vector":             [][]float32{vector(), vector()},
            "risk_correct":            []bool{true, true},
            "risk_yes_rate":           []float32{0.8, 0.1},
            "weather":                 []string{"sunny", "sunny"},
            "weather_rate":            []float32{0.9, 0.9},
            "road":                    []string{"highway", "highway"},
            "road_rate":               []float32{0.7, 0.8},
            "is_tunnel":               []bool{false, false},
            "is_tunnel_yes_rate":      []float32{0.1, 0.1},
            "is_highway":              []bool{true, true},
            "is_highway_yes_rate":     []float32{0.9, 0.9},
            "has_pedestrian":          []bool{true, false},
            "has_pedestrian_yes_rate": []float32{0.6, 0.2},
            "has_carrier_car":         []bool{false, false},
        },
    }).
    WithStructArrayColumn("front_cars", frontCarSchema, []map[string]any{
        {
            "frame_id":       []int64{0, 1},
            "has_lead":       []bool{true, false},
            "lead_prob":      []float32{0.9, 0.0},
            "lead_x":         []float32{1.5, 0.0},
            "lead_y":         []float32{0.5, 0.0},
            "lead_speed_kmh": []float32{60.0, 0.0},
            "lead_a":         []float32{0.2, 0.0},
        },
    }))
if err != nil {
    log.Fatal(err)
}
fmt.Println("insert OK, ids:", ins.IDs)
use milvus::v2::prelude::*;
use serde_json;

    let request = InsertRequest::builder()
        .collection_name("covla_dataset")
        .columns(vec![
            FieldData::VarChar {
                name: "video_id".into(),
                values: vec!["0a0fc7a5db365174".to_string()],
            },
            FieldData::VarChar {
                name: "video_url".into(),
                values: vec!["https://your-storage.com/0a0fc7a5db365174".to_string()],
            },
            FieldData::Json {
                name: "traffic_lights".into(),
                values: vec![serde_json::json!([
                    {"index": 0, "class": "red", "bbox": [1.0, 2.0, 3.0, 4.0]},
                    {"index": 1, "class": "green", "bbox": [5.0, 6.0, 7.0, 8.0]}
                ])],
            },
            FieldData::Struct {
                name: "captions".into(),
                values: vec![vec![
                    serde_json::json!({
                        "frame_id": 0,
                        "plain_caption": "Merge left while yielding to oncoming traffic",
                        "plain_cap_vector": vec![0.1f32; 768],
                        "rich_caption": "Merge left while yielding to oncoming traffic on a sunny highway",
                        "rich_cap_vector": vec![0.1f32; 768],
                        "risk": "Potential collision with the leading vehicle",
                        "risk_vector": vec![0.1f32; 768],
                        "risk_correct": true,
                        "risk_yes_rate": 0.8,
                        "weather": "sunny",
                        "weather_rate": 0.9,
                        "road": "highway",
                        "road_rate": 0.7,
                        "is_tunnel": false,
                        "is_tunnel_yes_rate": 0.1,
                        "is_highway": true,
                        "is_highway_yes_rate": 0.9,
                        "has_pedestrian": true,
                        "has_pedestrian_yes_rate": 0.6,
                        "has_carrier_car": false,
                    }).as_object().cloned().expect("caption object"),
                ]],
            },
            FieldData::Struct {
                name: "front_cars".into(),
                values: vec![vec![
                    serde_json::json!({
                        "frame_id": 0,
                        "has_lead": true,
                        "lead_prob": 0.9,
                        "lead_x": 1.5,
                        "lead_y": 0.5,
                        "lead_speed_kmh": 60.0,
                        "lead_a": 0.2,
                    }).as_object().cloned().expect("front car object"),
                ]],
            },
        ])
        .build()?;
    client.insert(request).await?;
milvus::EntityRows rows = {{
    {"video_id", "0a0fc7a5db365174"},
    {"video_url", "https://your-storage.com/0a0fc7a5db365174"},
    {"captions", nlohmann::json::array({{
            {"frame_id", 0},
            {"plain_caption", "Merge left while yielding to oncoming traffic"},
            {"plain_cap_vector", std::vector<float>(768, 0.1f)},
            {"rich_caption", "Merge left while yielding to oncoming traffic on a sunny highway"},
            {"rich_cap_vector", std::vector<float>(768, 0.1f)},
            {"risk", "Potential collision with the leading vehicle"},
            {"risk_vector", std::vector<float>(768, 0.1f)},
            {"risk_correct", true},
            {"risk_yes_rate", 0.8},
            {"weather", "sunny"},
            {"weather_rate", 0.9},
            {"road", "highway"},
            {"road_rate", 0.7},
            {"is_tunnel", false},
            {"is_tunnel_yes_rate", 0.1},
            {"is_highway", true},
            {"is_highway_yes_rate", 0.9},
            {"has_pedestrian", true},
            {"has_pedestrian_yes_rate", 0.6},
            {"has_carrier_car", false}
    }})},
    {"traffic_lights", nlohmann::json::array({{
        {"index", 0}, {"class", "red"}, {"bbox", std::vector<float>{1, 2, 3, 4}}
    }})},
    {"front_cars", nlohmann::json::array({{
            {"frame_id", 0},
            {"has_lead", true},
            {"lead_prob", 0.9},
            {"lead_x", 1.5},
            {"lead_y", 0.5},
            {"lead_speed_kmh", 60.0},
            {"lead_a", 0.2}
    }})}
}};

milvus::InsertRequest insert_request;
insert_request.WithCollectionName("covla_dataset");
insert_request.WithRowsData(std::move(rows));

milvus::InsertResponse insert_resp;
status = client->Insert(insert_request, insert_resp);
if (!status.IsOk()) {
    std::cout << status.Message() << std::endl;
}
const data = {
    video_id: "0a0fc7a5db365174",
    video_url: "https://your-storage.com/0a0fc7a5db365174",
    captions: [
        {
            frame_id: 0,
            plain_caption: "Merge left while yielding to oncoming traffic",
            plain_cap_vector: new Array(768).fill(0.1),
            rich_caption: "Merge left while yielding to oncoming traffic on a sunny highway",
            rich_cap_vector: new Array(768).fill(0.1),
            risk: "Potential collision with the leading vehicle",
            risk_vector: new Array(768).fill(0.1),
            risk_correct: true,
            risk_yes_rate: 0.8,
            weather: "sunny",
            weather_rate: 0.9,
            road: "highway",
            road_rate: 0.7,
            is_tunnel: false,
            is_tunnel_yes_rate: 0.1,
            is_highway: true,
            is_highway_yes_rate: 0.9,
            has_pedestrian: true,
            has_pedestrian_yes_rate: 0.6,
            has_carrier_car: false,
        },
    ],
    traffic_lights: [
        { index: 0, class: "red", bbox: [1, 2, 3, 4] },
        { index: 1, class: "green", bbox: [5, 6, 7, 8] },
    ],
    front_cars: [
        {
            frame_id: 0,
            has_lead: true,
            lead_prob: 0.9,
            lead_x: 1.5,
            lead_y: 0.5,
            lead_speed_kmh: 60,
            lead_a: 0.2,
        },
    ],
};

await client.insert({ collection_name: "covla_dataset", data: [data] });
# Note: The RESTful API does not support Array-of-Struct fields as of Milvus v3.0.x.