スキーマ進化
スキーマ進化を使用すると、コレクションを再構築したり本番トラフィックを停止したりすることなく、既存のコレクションにフィールドを追加できます。ただし、フィールドを追加しても変更されるのはコレクションスキーマのみです。既存のエンティティには新しいフィールドの値が自動的に設定されることはなく、移行中も新規エンティティや更新されたエンティティが引き続き到着する可能性があります。
本記事では、スキーマ進化の一般的な手順について説明します。
ワークフローを理解する
稼働中のコレクションのスキーマを安全に進化させるには、調整された順序で手順を実行します。
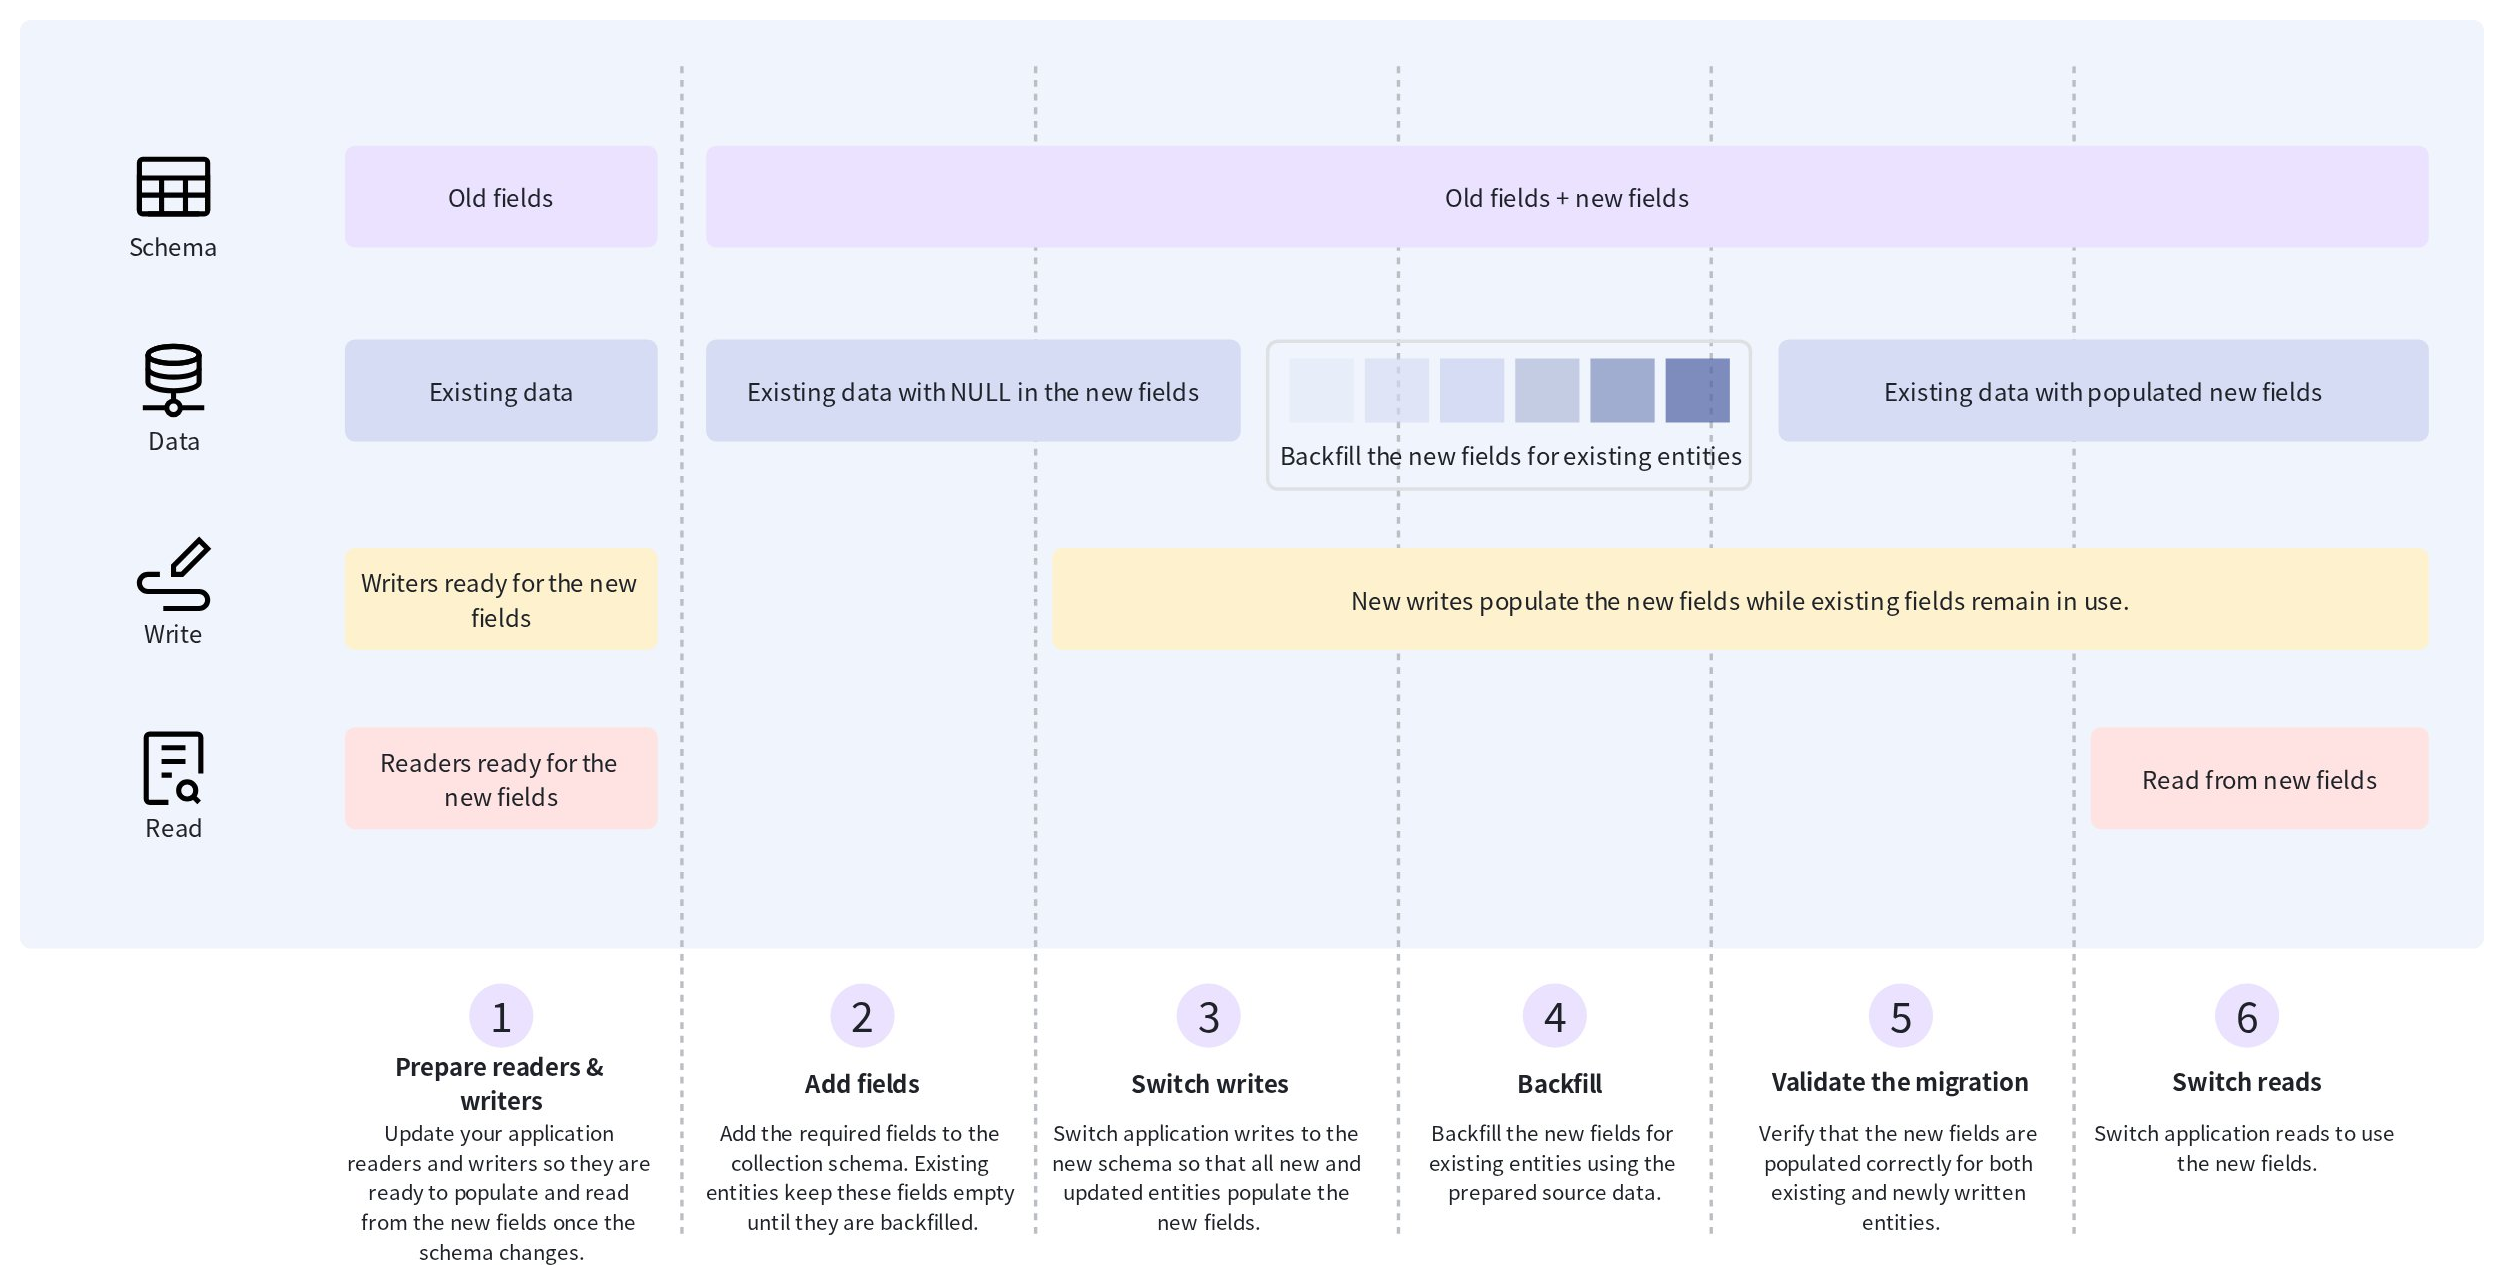
上記のシーケンス図に示すように、移行フロー全体は次のとおりです。
-
アプリケーションで新しいフィールドへの書き込みと読み取りを行えるように準備します。
-
必要なフィールドを追加してコレクションスキーマを拡張します。
-
新規作成および更新されるすべてのエンティティに新しいフィールドの値を設定します。
-
過去のデータについて新しいフィールドの値を設定します。
-
過去のエンティティと新しく書き込まれたエンティティの両方に、期待どおりの値が含まれていることを確認します。
-
本番の読み取りで新しいフィールドの使用を開始します。
順序が重要です。バックフィルを開始する前にアプリケーションの書き込みを切り替えることで、移行中に作成または更新されたエンティティにも新しいフィールドの値がすでに含まれるようになります。バックフィルの完了後、読み取りを新しいフィールドに切り替える前に、過去のデータと新しく書き込まれたデータの両方を検証してください。
事前準備
稼働中のコレクションのスキーマを進化させる前に、次の条件を満たしていることを確認してください。
-
アプリケーションを更新して、新しいフィールドの読み取りと書き込みを行えるようにできること。
-
既存のエンティティの新しいフィールドに値を設定するために必要なソースデータが利用可能であること。
-
各ソースレコードを主キーによって既存のエンティティと照合できること。
-
移行が検証されるまで、既存のフィールドが利用可能な状態に保たれること。
ステップ 1: 読み取り側と書き込み側を準備する
コレクションスキーマを変更する前に、アプリケーションで新しいフィールドの読み取りと書き込みを行えるように準備します。これらの変更は構成またはフィーチャーフラグの背後にデプロイしますが、新しいフィールドがコレクションに追加されるまでは無効のままにしておきます。
たとえば、category フィールドを追加する予定であるとします。新しいスキーマが有効になったときにそのフィールドを含めるよう、書き込み側を準備できます。
# Pseudocode
def build_entity(document, use_new_schema=False):
    entity = {
        "id": document["id"],
        "text": document["text"],
        "embedding": document["embedding"],
    }

    if use_new_schema:
        entity["category"] = document["category"]

    return entity
同様に読み取り側も準備しておくと、移行が検証された後に新しいフィールドを利用できます。
# Pseudocode
def get_output_fields(use_new_schema=False):
    fields = ["id", "text"]

    if use_new_schema:
        fields.append("category")

    return fields
この段階では、両方のスイッチを無効のままにしておきます。新しいフィールドが追加されるまでは、本番の読み取りと書き込みで引き続き既存のスキーマを使用します。
ステップ 2: 新しいフィールドを追加する
更新した読み取り側と書き込み側の準備ができたら、必要なフィールドを既存のコレクションスキーマに追加します。この時点では、アプリケーションの新しいパスは無効のままにしておきます。
たとえば、次のコードは nullable な category フィールドを追加します。
from pymilvus import DataType

client.add_collection_field(
    collection_name="documents",
    field_name="category",
    data_type=DataType.VARCHAR,
    max_length=64,
    nullable=True,
)
フィールドを追加しても変更されるのはコレクションスキーマのみです。既存のエンティティは書き換えられず、移行の後半でこのフィールドに値が設定されるまでは、新しいフィールドに NULL が入ります。
スキーマの変更が成功したら、アプリケーションの書き込みの切り替えに進み、新規に挿入または更新されるすべてのエンティティに新しいフィールドの値を設定します。
ステップ 3: 書き込みを切り替える
コレクションスキーマで新しいフィールドが利用可能になったら、更新した書き込み側を有効にして、すべての新規挿入と行全体の upsert でこれらのフィールドに値を設定するようにします。
たとえば、先ほど準備した書き込み側のパスを有効にします。
USE_NEW_SCHEMA = True

entity = build_entity(document, use_new_schema=USE_NEW_SCHEMA)

client.insert(
    collection_name="documents",
    data=[entity],
)
行全体の upsert では、ペイロードにも新しいフィールドを含めます。
client.upsert(
    collection_name="documents",
    data=[{
        "id": document["id"],
        "text": document["text"],
        "embedding": document["embedding"],
        "category": document["category"],
    }],
)
バックフィルを開始する前に、書き込み側の切り替えを完了します。以降は、新規に挿入または更新されたエンティティには新しいフィールドの値がすでに含まれ、既存のエンティティにはバックフィルによって値が設定されます。この順序により、移行中に行われた書き込みがどちらの経路からも漏れてしまうギャップを防ぐことができます。
バックフィルが完了し、移行が検証されるまでは、本番の読み取りでは既存のフィールドを使用し続けます。
ステップ 4: 既存のエンティティをバックフィルする
すべてのアプリケーションの書き込み側が新しいスキーマに切り替わったら、切り替え前に存在していたエンティティに対して新しいフィールドをバックフィルします。
主キーと、新しいフィールドに書き込む値を含むデータファイルを準備します。オンライン移行では、coalesce を使用して、過去のエンティティの欠損値を補完しつつ、アプリケーションによってすでに書き込まれた値を保持します。
Zilliz Cloud では、データバックフィルジョブを送信します。Zilliz Cloud は、ジョブの一部としてコレクションのスナップショット、Spark の実行、バックフィルのコミットを管理します。
バックフィルを送信する前に、オプションで事前チェックを実行し、入力データとフィールドマッピングを検証できます。
次のスニペットは、データバックフィルジョブを送信する方法を示しています。入力の準備、データに対する事前チェックの実行、バックフィルモードの選択、バックフィルジョブの送信、ジョブの監視の詳細については、データバックフィル を参照してください。
export API_KEY="xxxxxxxxxxxxxxxxxxxxxxxxxxxxxxxxxxxxxxxxxxx"

curl --request POST \
    --url "https://api.cloud.zilliz.com/v2/projects/{projectId}/jobs/backfill" \
    --header "Authorization: Bearer ${API_KEY}" \
    --header "Idempotency-Key: schema-evolution-backfill-001" \
    --header "Content-Type: application/json" \
    --data '{
      "description": "Backfill category for existing documents",
      "clusterId": "in-xxxxxxxx",
      "dbName": "default",
      "collectionName": "documents",
      "fields": ["category"],
      "input": {
        "type": "volume",
        "volumeName": "migration-data",
        "path": "schema-evolution/category-backfill.parquet",
        "format": "parquet"
      },
      "columnMapping": {
        "source_id": "id",
        "source_category": "category"
      },
      "mode": "coalesce",
      "resourceSize": "SMALL",
      "timeoutSeconds": 3600
    }'
ステップ 5: 移行を検証する
バックフィルが完了したら、本番の読み取りを新しいフィールドに切り替える前に、新しいフィールドに正しい値が設定されていることを確認します。
まず、バックフィルで処理された過去のエンティティと、書き込み側の切り替え後に挿入または更新されたエンティティの両方を含む、代表的なエンティティのセットをクエリします。
results = client.query(
    collection_name="documents",
    filter="id in [1001, 1002, 1003]",
    output_fields=["id", "category"],
)

for result in results:
    print(result)
次の点を確認します。
-
過去のエンティティの新しいフィールドに、期待どおりの値が含まれています。
-
書き込み側の切り替え後に書き込まれたエンティティにも、有効な値が含まれています。
-
提供する予定のデータに、予期しない
NULL値や不一致が残っていません。
大規模なコレクションでは、少数のサンプルエンティティだけに頼るのではなく、全体的なカバレッジと、代表的なデータセグメントまたはアプリケーションコホートの両方を検証します。
新しいフィールドがアプリケーションの要件を満たしていることを確認してから、本番の読み取りの切り替えに進みます。
ステップ 6: 読み取りを切り替える
移行が検証されたら、アプリケーションの読み取り側を更新して新しいフィールドを使用するようにします。
たとえば、先ほど準備した読み取り側のパスを有効にします。
USE_NEW_SCHEMA = True

results = client.query(
    collection_name="documents",
    filter="id in [1001, 1002, 1003]",
    output_fields=get_output_fields(use_new_schema=USE_NEW_SCHEMA),
)
新しいフィールドによって検索動作が変わる場合(たとえば、異なる埋め込みモデルで新しいベクトルフィールドを使用する場合)は、クエリモデル、対象フィールド、関連する検索構成など、読み取りパス全体をまとめて切り替えます。
可能であれば変更を段階的にロールアウトし、ロールバック期間が終了するまでは以前の読み取りパスを利用可能な状態に保ちます。
障害時の対応とロールバック
移行が検証され、ロールバック期間が終了するまでは、既存のフィールドと読み取りパスを利用可能な状態に保ちます。問題が発生した場合は、移行を先に進めるのを中止し、現在の段階から復旧します。
| 段階 | 推奨される対応 |
|---|---|
| 書き込み側の切り替えに失敗した場合 | 本番の読み取りは既存のフィールドのままにし、バックフィルを開始する前に書き込み側のロールアウトを完了します。 |
| 事前チェックに失敗した場合 | バックフィルを開始しないでください。ステージングされたデータまたは構成を修正してから、事前チェックを再度実行します。 |
| バックフィルに失敗した場合 | 本番の読み取りは既存のフィールドのままにし、問題を修正してバックフィルを再試行します。 |
| 検証に失敗した場合 | 読み取りを切り替えないでください。欠損している値、古い値、または不正確な値を修復してから、再度検証します。 |
| 新しい読み取りパスでリグレッションが発生した場合 | 新しいフィールドとバックフィル済みのデータを維持したまま、本番の読み取りを既存のフィールドに戻します。 |
| 移行が成功した場合 | 合意したロールバック期間の間は既存のフィールドを維持します。古いフィールド、インデックス、またはアプリケーションロジックを削除するのは、新しいパスが安定してからにします。 |
検索の動作が変わる移行(新しい埋め込みモデルや検索表現への移行など)では、可能であれば読み取りを段階的にロールアウトします。
バックフィルに失敗しても、本番の読み取りでは引き続き既存のフィールドが使用されるため、通常はデータのロールバックは必要ありません。主なロールバックポイントは読み取りの切り替え後であり、この場合の最も安全な復旧方法は、通常、新しいデータを削除するのではなく、トラフィックを古いフィールドに戻すことです。
次のステップ
このワークフローを、より具体的なスキーマ進化のシナリオの基盤として使用してください。次のランブックでは、ベクトル検索アプリケーションでよくある変更に対して、同じ移行手順を適用しています。
新しい埋め込みモデルへの移行
このランブックでは、コレクションを再構築せずに、既存のコレクションをある埋め込みモデルから別の埋め込みモデルへ移行する方法を説明します。新しい埋め込み表現用のベクトルフィールドを追加し、既存データと受信データをそのフィールドに移行して新しい表現を検証したうえで、本番検索を新しいフィールドに切り替えます。 | Cloud