Dense Vector
Dense vectors are numerical data representations widely used in machine learning and data analysis. They consist of arrays with real numbers, where most or all elements are non-zero. Compared to 疎ベクトル, dense vectors contain more information at the same dimensional level, as each dimension holds meaningful values. This representation can effectively capture complex patterns and relationships, making data easier to analyze and process in high-dimensional spaces. Dense vectors typically have a fixed number of dimensions, ranging from a few dozen to several hundred or even thousands, depending on the specific application and requirements.
Dense vectors are mainly used in scenarios that require understanding the semantics of data, such as セマンティック検索 and recommendation systems. In セマンティック検索, dense vectors help capture the underlying connections between queries and documents, improving the relevance of search results. In recommendation systems, they aid in identifying similarities between users and items, offering more personalized suggestions.
Overview
Dense vectors are typically represented as arrays of 浮動小数点数 with a fixed length, such as [0.2, 0.7, 0.1, 0.8, 0.3, ..., 0.5]. The dimensionality of these vectors usually ranges from hundreds to thousands, such as 128, 256, 768, or 1024. Each dimension captures specific semantic features of an object, making it applicable to various scenarios through similarity calculations.
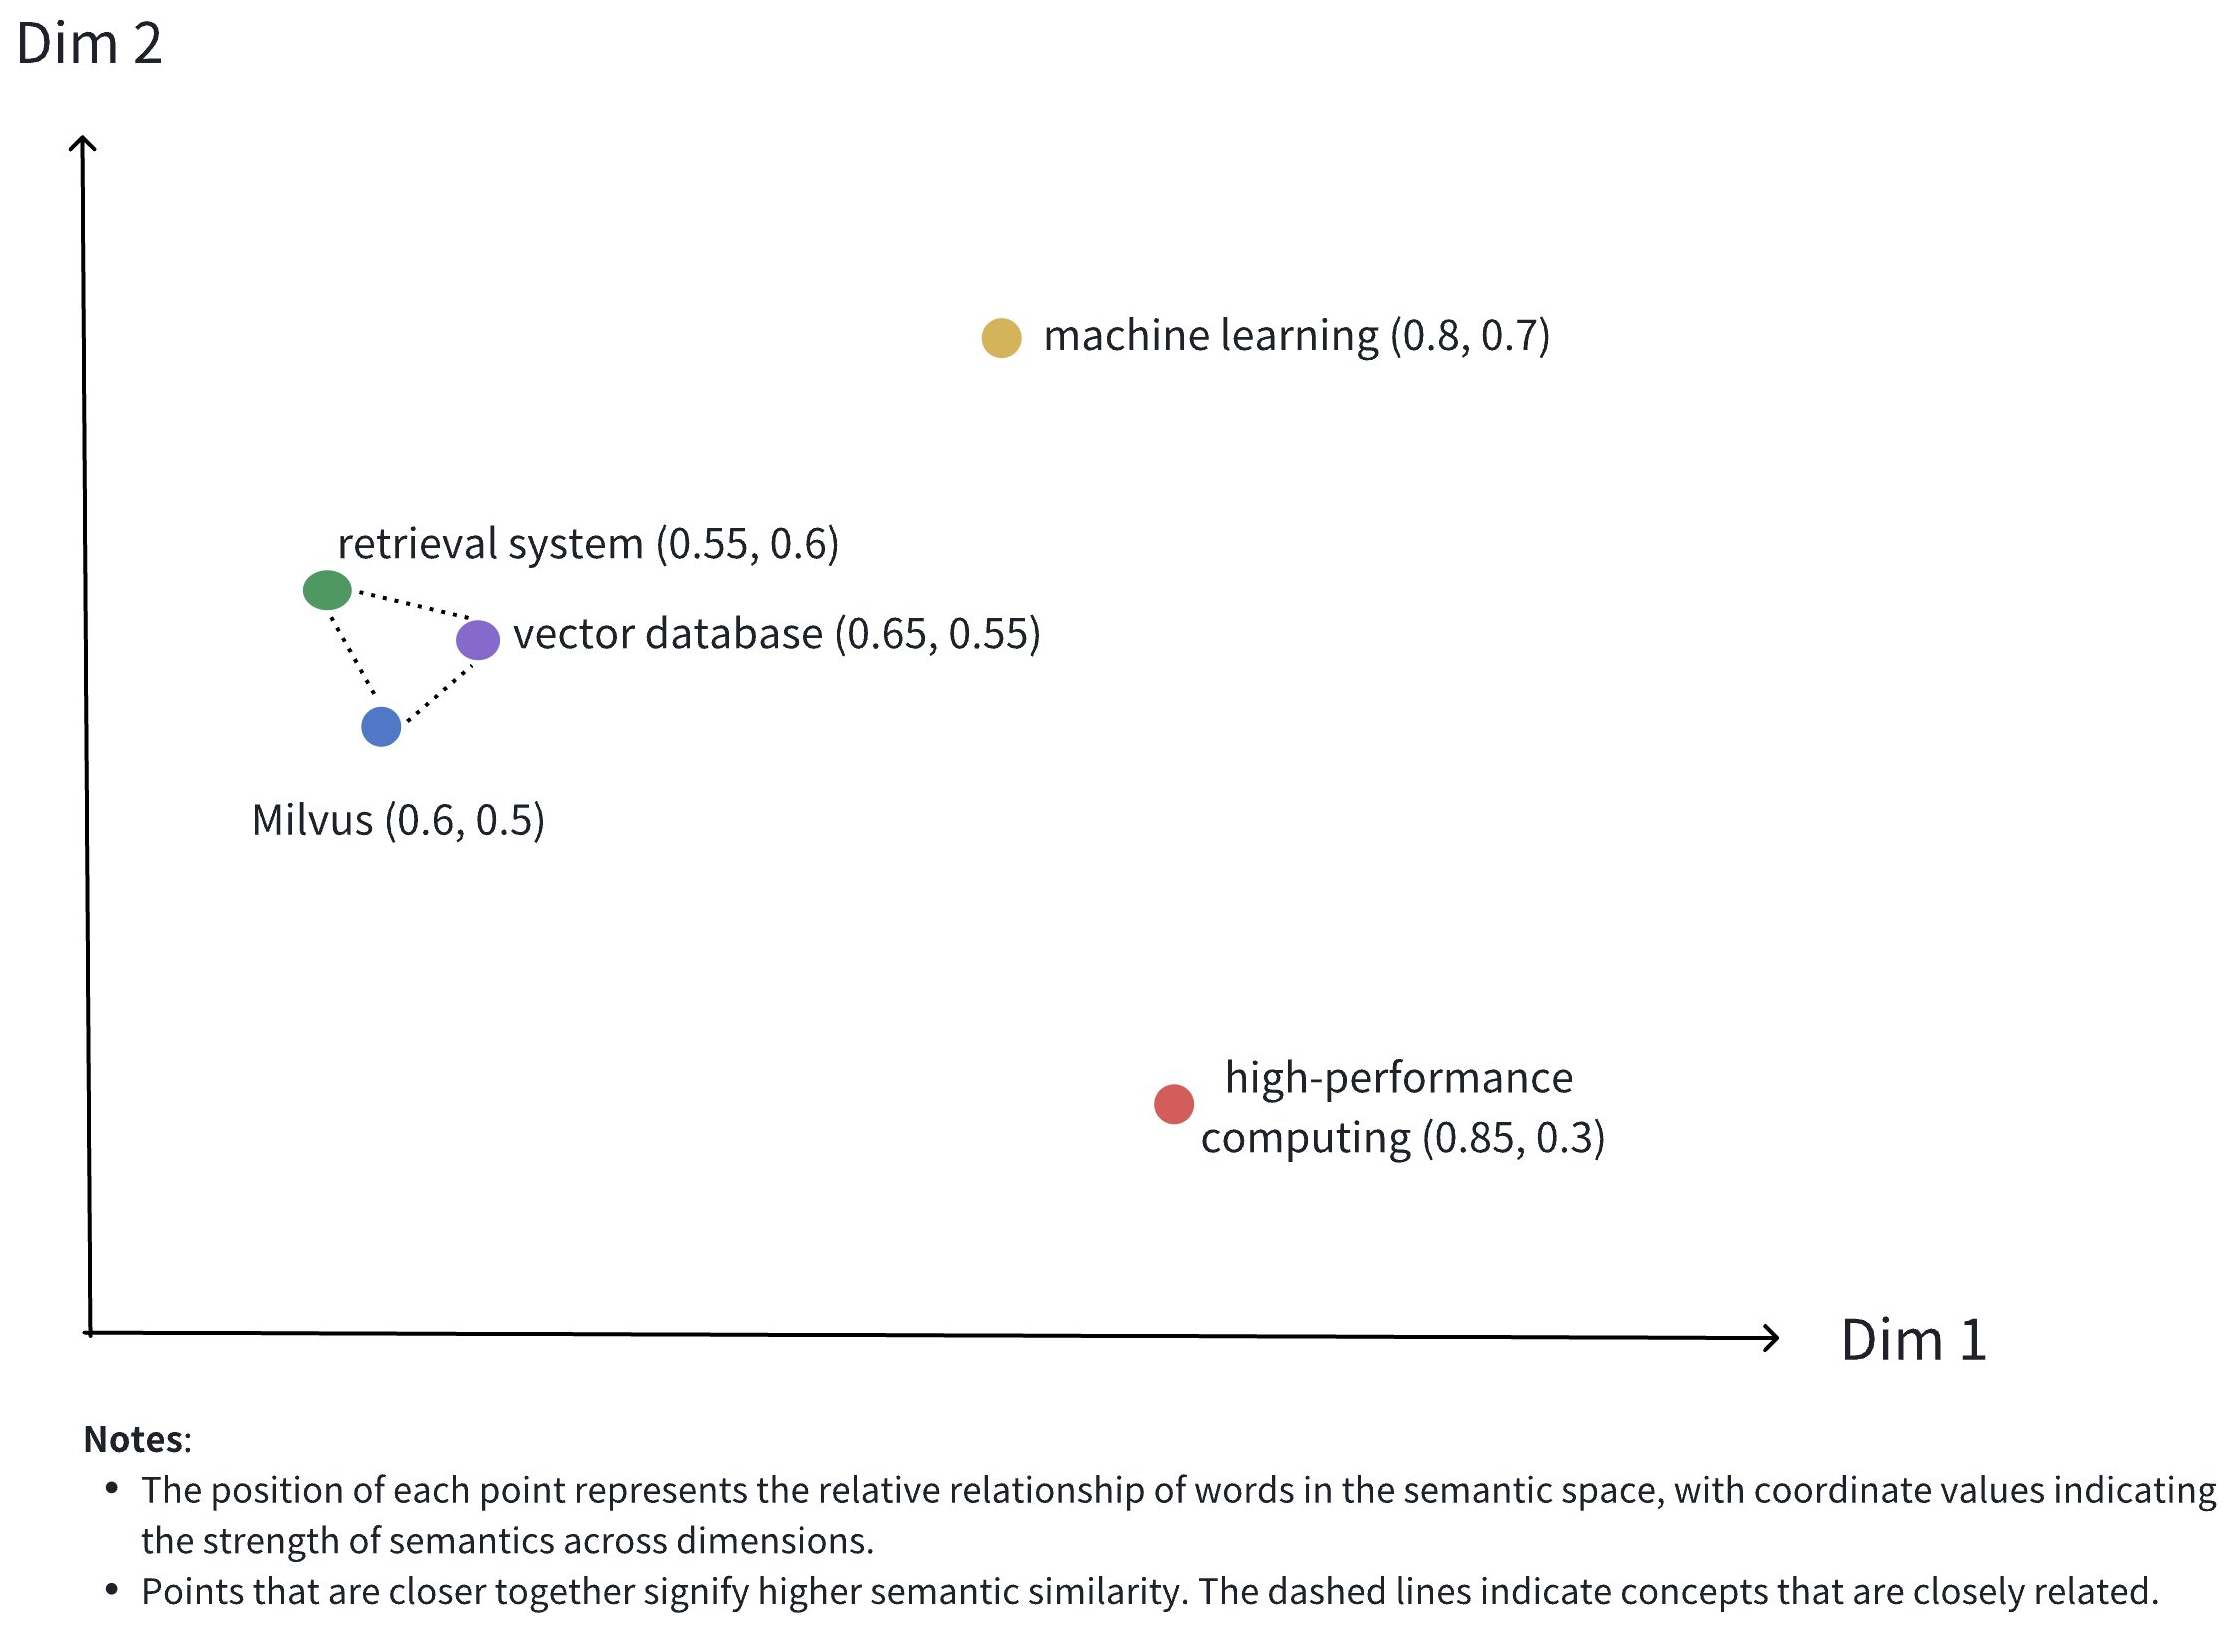
The image above illustrates the representation of dense vectors in a 2D space. Although dense vectors in real-world applications often have much higher dimensions, this 2D illustration effectively conveys several key concepts:
-
Multidimensional Representation: Each point represents a conceptual object (like Milvus, ベクトルデータベース, 検索システム, etc.), with its position determined by the values of its dimensions.
-
Semantic Relationships: The distances between points reflect the semantic similarity between concepts. Closer points indicate concepts that are more semantically related.
-
Clustering Effect: Related concepts (such as Milvus, ベクトルデータベース, and 検索システム) are positioned close to each other in space, forming a semantic cluster.
Below is an example of a real dense vector representing the text "Milvus is an efficient ベクトルデータベース":
[
    -0.013052909,
    0.020387933,
    -0.007869,
    -0.11111383,
    -0.030188112,
    -0.0053388323,
    0.0010654867,
    0.072027855,
    // ... more dimensions
]
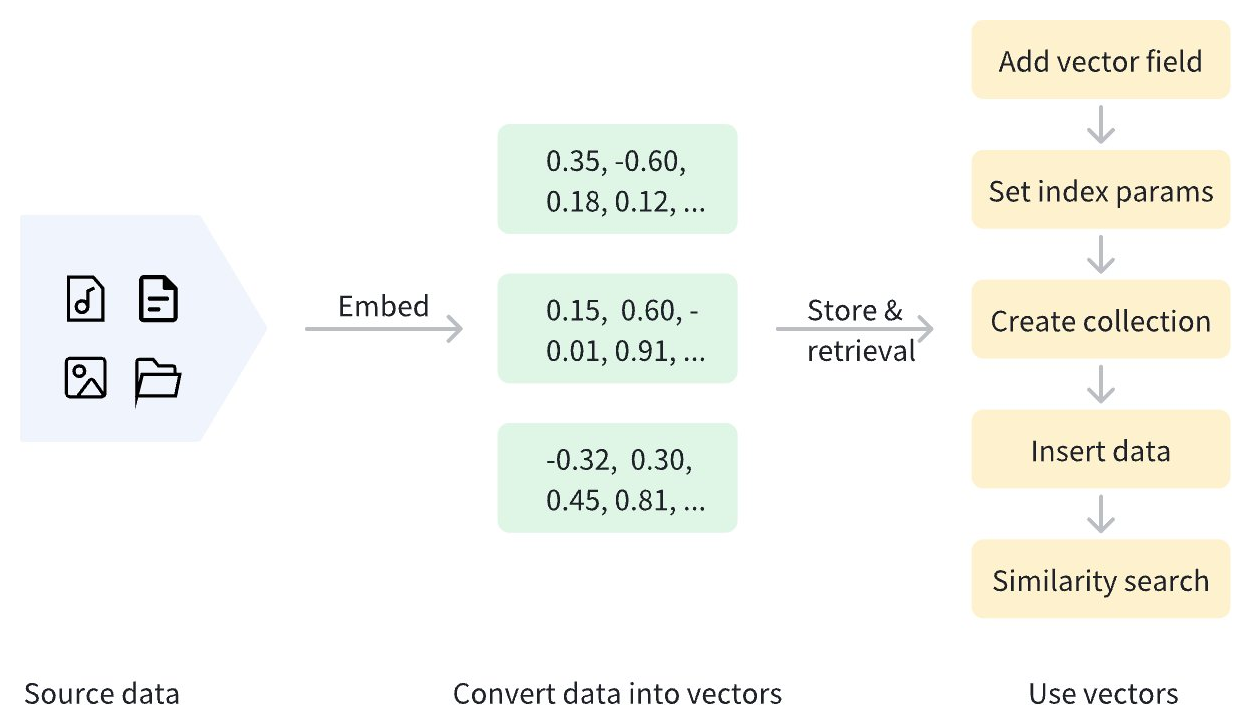
密ベクトルは、さまざまな 埋め込み モデルを使用して生成できます。例えば、画像用の CNN モデル(ResNet、VGG など)や、テキスト用の言語モデル([BERT](https://en.wikipedia.org/wiki/BERT_(language_model)、[Word2Vec](https://en.wikipedia.org/wiki/Word2vec) など)があります。これらのモデルは、生のデータを高次元空間の点に変換し、データのセマンティックな特徴を捉えます。さらに、Zilliz Cloud では、ユーザーが密ベクトルを生成および処理するための便利な方法を提供しており、詳細は Embeddings を参照してください。
データがベクトル化されると、Zilliz Cloud クラスタに保存して管理およびベクトル検索を行うことができます。以下の図は、基本的なプロセスを示しています。
密ベクトルに加えて、Zilliz Cloud は疎ベクトルとバイナリベクトルもサポートしています。疎ベクトルは、キーワード検索や用語マッチングなど、特定の用語に基づく正確な一致に適しており、バイナリベクトルは、画像パターンマッチングや特定のハッシュ処理など、バイナリ化されたデータを効率的に処理するために一般的に使用されます。詳細については、Binary Vector および Sparse Vector を参照してください。
密ベクトルを使用する
ベクトルフィールドを追加する
Zilliz Cloud クラスタで密ベクトルを使用するには、コレクションの作成時に密ベクトルを保存するためのベクトルフィールドを定義する必要があります。このプロセスには以下が含まれます。
-
datatypeをサポートされている密ベクトルのデータ型に設定します。サポートされている密ベクトルのデータ型については、データ型を参照してください。 -
dimパラメータを使用して、密ベクトルの次元を指定します。
以下の例では、dense_vector という名前のベクトルフィールドを追加して密ベクトルを保存します。このフィールドのデータ型は FLOAT_VECTOR で、次元は 4 です。
- Python
- Java
- NodeJS
- Go
- cURL
from pymilvus import MilvusClient, DataType

client = MilvusClient(uri="YOUR_CLUSTER_ENDPOINT")

schema = client.create_schema(
    auto_id=True,
    enable_dynamic_fields=True,
)

schema.add_field(field_name="pk", datatype=DataType.VARCHAR, is_primary=True, max_length=100)
schema.add_field(field_name="dense_vector", datatype=DataType.FLOAT_VECTOR, dim=4)
import io.milvus.v2.client.ConnectConfig;
import io.milvus.v2.client.MilvusClientV2;

import io.milvus.v2.common.DataType;
import io.milvus.v2.service.collection.request.AddFieldReq;
import io.milvus.v2.service.collection.request.CreateCollectionReq;

MilvusClientV2 client = new MilvusClientV2(ConnectConfig.builder()
        .uri("YOUR_CLUSTER_ENDPOINT")
        .build());

CreateCollectionReq.CollectionSchema schema = client.createSchema();
schema.setEnableDynamicField(true);
schema.addField(AddFieldReq.builder()
        .fieldName("pk")
        .dataType(DataType.VarChar)
        .isPrimaryKey(true)
        .autoID(true)
        .maxLength(100)
        .build());

schema.addField(AddFieldReq.builder()
        .fieldName("dense_vector")
        .dataType(DataType.FloatVector)
        .dimension(4)
        .build());
import { DataType } from "@zilliz/milvus2-sdk-node";

schema.push({
  name: "dense_vector",
  data_type: DataType.FloatVector,
  dim: 4,
});
import (
    "context"
    "fmt"

    "github.com/milvus-io/milvus/client/v2/column"
    "github.com/milvus-io/milvus/client/v2/entity"
    "github.com/milvus-io/milvus/client/v2/index"
    "github.com/milvus-io/milvus/client/v2/milvusclient"
)

ctx, cancel := context.WithCancel(context.Background())
defer cancel()

milvusAddr := "YOUR_CLUSTER_ENDPOINT"
client, err := milvusclient.New(ctx, &milvusclient.ClientConfig{
    Address: milvusAddr,
})
if err != nil {
    fmt.Println(err.Error())
    // handle error
}
defer client.Close(ctx)

schema := entity.NewSchema()
schema.WithField(entity.NewField().
    WithName("pk").
    WithDataType(entity.FieldTypeVarChar).
    WithIsPrimaryKey(true).
    WithIsAutoID(true).
    WithMaxLength(100),
).WithField(entity.NewField().
    WithName("dense_vector").
    WithDataType(entity.FieldTypeFloatVector).
    WithDim(4),
)
export primaryField='{
    "fieldName": "pk",
    "dataType": "VarChar",
    "isPrimary": true,
    "elementTypeParams": {
        "max_length": 100
    }
}'

export vectorField='{
    "fieldName": "dense_vector",
    "dataType": "FloatVector",
    "elementTypeParams": {
        "dim": 4
    }
}'

export schema="{
    \"autoID\": true,
    \"fields\": [
        $primaryField,
        $vectorField
    ]
}"
密ベクトルフィールドでサポートされるデータ型:
データ型 | 説明 |
|---|---|
| 32ビット浮動小数点数を格納します。科学計算や機械学習において実数を表現するのに一般的に使用されます。類似したベクトルを区別するなど、高い精度が求められるシナリオに最適です。 |
| 16ビット半精度浮動小数点数を格納します。ディープラーニングやGPU計算で使用されます。精度があまり重要でないシナリオ(例:レコメンデーションシステムの低精度リコールフェーズ)においてストレージ容量を節約できます。 |
| 16ビットBrain Floating Point (bfloat16) 数値を格納します。Float32と同じ指数範囲を持ちながら精度を犠牲にしています。大規模な画像検索など、大量のベクトルを高速に処理する必要があるシナリオに適しています。 |
| 各次元の要素が8ビット整数(int8)であるベクトルを格納します。各要素の範囲は–128から127です。量子化されたディープラーニングモデル(例:ResNet、EfficientNet)向けに設計されており、INT8_VECTORはモデルサイズを削減し、精度の損失を最小限に抑えながら推論を高速化します。 |
ベクトルフィールドのインデックスパラメータを設定する
セマンティック検索を高速化するには、ベクトルフィールドに対してインデックスを作成する必要があります。インデックス作成により、大規模なベクトルデータの検索効率を大幅に向上させることができます。
- Python
- Java
- NodeJS
- Go
- cURL
index_params = client.prepare_index_params()

index_params.add_index(
    field_name="dense_vector",
    index_name="dense_vector_index",
    index_type="AUTOINDEX",
    metric_type="IP"
)
import io.milvus.v2.common.IndexParam;
import java.util.*;

List<IndexParam> indexes = new ArrayList<>();

indexes.add(IndexParam.builder()
        .fieldName("dense_vector")
        .indexType(IndexParam.IndexType.AUTOINDEX)
        .metricType(IndexParam.MetricType.IP)
        .build());
import { MetricType, IndexType } from "@zilliz/milvus2-sdk-node";

const indexParams = {
    index_name: 'dense_vector_index',
    field_name: 'dense_vector',
    metric_type: MetricType.IP,
    index_type: IndexType.AUTOINDEX
};
idx := index.NewAutoIndex(index.MetricType(entity.IP))
indexOption := milvusclient.NewCreateIndexOption("my_collection", "dense_vector", idx)
export indexParams='[
        {
            "fieldName": "dense_vector",
            "metricType": "IP",
            "indexName": "dense_vector_index",
            "indexType": "AUTOINDEX"
        }
    ]'
上記の例では、AUTOINDEX インデックスタイプを使用して dense_vector フィールドに dense_vector_index という名前のインデックスが作成されています。metric_type は IP に設定されており、距離メトリックとして内積が使用されることを示しています。
Zilliz Cloud は他のメトリックタイプもサポートしています。詳細については、メトリックタイプ を参照してください。
Create collection
デンスベクトルとインデックスパラメータの設定が完了したら、デンスベクトルを含むコレクションを作成できます。以下の例では、create_collection メソッドを使用して my_collection という名前のコレクションを作成しています。
- Python
- Java
- NodeJS
- Go
- cURL
client.create_collection(
    collection_name="my_collection",
    schema=schema,
    index_params=index_params
)
import io.milvus.v2.service.collection.request.CreateCollectionReq;

CreateCollectionReq requestCreate = CreateCollectionReq.builder()
        .collectionName("my_collection")
        .collectionSchema(schema)
        .indexParams(indexes)
        .build();
client.createCollection(requestCreate);
import { MilvusClient } from "@zilliz/milvus2-sdk-node";

await client.createCollection({
    collection_name: 'my_collection',
    schema: schema,
    index_params: indexParams
});
err = client.CreateCollection(ctx,
    milvusclient.NewCreateCollectionOption("my_collection", schema).
        WithIndexOptions(indexOption))
if err != nil {
    fmt.Println(err.Error())
    // handle error
}
curl --request POST \
--url "${CLUSTER_ENDPOINT}/v2/vectordb/collections/create" \
--header "Authorization: Bearer ${TOKEN}" \
--header "Content-Type: application/json" \
-d "{
    \"collectionName\": \"my_collection\",
    \"schema\": $schema,
    \"indexParams\": $indexParams
}"
データの挿入
コレクションを作成した後、insert メソッドを使用して密ベクトルを含むデータを追加します。挿入する密ベクトルの次元数が、密ベクトルフィールドを追加する際に定義した dim 値と一致していることを確認してください。
- Python
- Java
- NodeJS
- Go
- cURL
data = [
    {"dense_vector": [0.1, 0.2, 0.3, 0.7]},
    {"dense_vector": [0.2, 0.3, 0.4, 0.8]},
]

client.insert(
    collection_name="my_collection",
    data=data
)
import com.google.gson.Gson;
import com.google.gson.JsonObject;
import io.milvus.v2.service.vector.request.InsertReq;
import io.milvus.v2.service.vector.response.InsertResp;

List<JsonObject> rows = new ArrayList<>();
Gson gson = new Gson();
rows.add(gson.fromJson("{\"dense_vector\": [0.1, 0.2, 0.3, 0.4]}", JsonObject.class));
rows.add(gson.fromJson("{\"dense_vector\": [0.2, 0.3, 0.4, 0.5]}", JsonObject.class));

InsertResp insertR = client.insert(InsertReq.builder()
        .collectionName("my_collection")
        .data(rows)
        .build());
const data = [
  { dense_vector: [0.1, 0.2, 0.3, 0.7] },
  { dense_vector: [0.2, 0.3, 0.4, 0.8] },
];

client.insert({
  collection_name: "my_collection",
  data: data,
});
_, err = client.Insert(ctx, milvusclient.NewColumnBasedInsertOption("my_collection").
    WithFloatVectorColumn("dense_vector", 4, [][]float32{
        {0.1, 0.2, 0.3, 0.7},
        {0.2, 0.3, 0.4, 0.8},
    }),
)
if err != nil {
    fmt.Println(err.Error())
    // handle err
}
curl --request POST \
--url "${CLUSTER_ENDPOINT}/v2/vectordb/entities/insert" \
--header "Authorization: Bearer ${TOKEN}" \
--header "Content-Type: application/json" \
-d '{
    "data": [
        {"dense_vector": [0.1, 0.2, 0.3, 0.4]},
        {"dense_vector": [0.2, 0.3, 0.4, 0.5]}
    ],
    "collectionName": "my_collection"
}'

## {"code":0,"cost":0,"data":{"insertCount":2,"insertIds":["453577185629572531","453577185629572532"]}}
類似性検索の実行
密ベクトルに基づくセマンティック検索は、Zilliz Cloud クラスターの中核機能の一つであり、ベクトル間の距離に基づいてクエリベクトルに最も類似したデータを高速に検索できます。類似性検索を実行するには、クエリベクトルと検索パラメータを準備し、search メソッドを呼び出します。
- Python
- Java
- NodeJS
- Go
- cURL
search_params = {
    "params": {"nprobe": 10}
}

query_vector = [0.1, 0.2, 0.3, 0.7]

res = client.search(
    collection_name="my_collection",
    data=[query_vector],
    anns_field="dense_vector",
    search_params=search_params,
    limit=5,
    output_fields=["pk"]
)

print(res)

# Output
# data: ["[{'id': '453718927992172271', 'distance': 0.7599999904632568, 'entity': {'pk': '453718927992172271'}}, {'id': '453718927992172270', 'distance': 0.6299999952316284, 'entity': {'pk': '453718927992172270'}}]"]
import io.milvus.v2.service.vector.request.data.FloatVec;

Map<String,Object> searchParams = new HashMap<>();
searchParams.put("nprobe",10);

FloatVec queryVector = new FloatVec(new float[]{0.1f, 0.3f, 0.3f, 0.4f});

SearchResp searchR = client.search(SearchReq.builder()
        .collectionName("my_collection")
        .data(Collections.singletonList(queryVector))
        .annsField("dense_vector")
        .searchParams(searchParams)
        .topK(5)
        .outputFields(Collections.singletonList("pk"))
        .build());

System.out.println(searchR.getSearchResults());

// Output
//
// [[SearchResp.SearchResult(entity={pk=453444327741536779}, score=0.65, id=453444327741536779), SearchResp.SearchResult(entity={pk=453444327741536778}, score=0.65, id=453444327741536778)]]
query_vector = [0.1, 0.2, 0.3, 0.7];

client.search({
    collection_name: 'my_collection',
    data: query_vector,
    limit: 5,
    output_fields: ['pk'],
    params: {
        nprobe: 10
    }
});
queryVector := []float32{0.1, 0.2, 0.3, 0.7}

annParam := index.NewCustomAnnParam()
annParam.WithExtraParam("nprobe", 10)
resultSets, err := client.Search(ctx, milvusclient.NewSearchOption(
    "my_collection", // collectionName
    5,                     // limit
    []entity.Vector{entity.FloatVector(queryVector)},
).WithANNSField("dense_vector").
    WithOutputFields("pk").
    WithAnnParam(annParam))
if err != nil {
    fmt.Println(err.Error())
    // handle error
}

for _, resultSet := range resultSets {
    fmt.Println("IDs: ", resultSet.IDs.FieldData().GetScalars())
    fmt.Println("Scores: ", resultSet.Scores)
    fmt.Println("Pks: ", resultSet.GetColumn("pk").FieldData().GetScalars())
}
curl --request POST \
--url "${CLUSTER_ENDPOINT}/v2/vectordb/entities/search" \
--header "Authorization: Bearer ${TOKEN}" \
--header "Content-Type: application/json" \
-d '{
    "collectionName": "my_collection",
    "data": [
        [0.1, 0.2, 0.3, 0.7]
    ],
    "annsField": "dense_vector",
    "limit": 5,
    "searchParams":{
        "params":{"nprobe":10}
    },
    "outputFields": ["pk"]
}'

## {"code":0,"cost":0,"data":[{"distance":0.55,"id":"453577185629572532","pk":"453577185629572532"},{"distance":0.42,"id":"453577185629572531","pk":"453577185629572531"}]}
類似性検索パラメータの詳細については、基本的な ANN 検索 を参照してください。